Page 10 - GUIDE D’UTILISATION; FOUR
Page 11 - CHER CLIENT; L’attrait est immédiat dès le premier regard. La qualité du design
CHÈRE CLIENTE, CHER CLIENT FR Découvrir les produits De Dietrich, c’est éprouver des émotions uniques. L’attrait est immédiat dès le premier regard. La qualité du design s’illustre par l’esthétique intemporelle et les finitions soignées rendant chaque objet élégant et raffiné en parfaite harmonie le...
Page 12 - TABLE DES MATIERES; Modification de l’heure
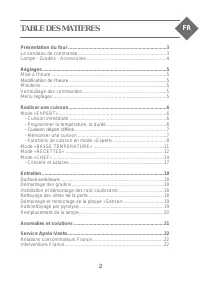
2 TABLE DES MATIERES FR Présentation du four ..........................................................................3 Le bandeau de commande ...................................................................3 Lampe - Gradins - Accessoires ............................................................
Page 13 - PRESENTATION DU FOUR
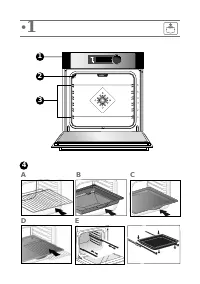
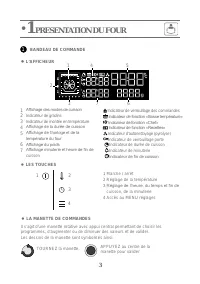
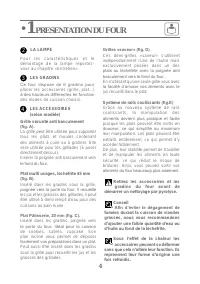
3 • 1 PRESENTATION DU FOUR Affichage des modes de cuisson Indicateur de gradins Indicateur de montée en température Affichage de la durée de cuisson Affichage de l’horloge et de la température du four Affichage du poids Affichage minuterie et heure de fin de cuisson BANDEAU DE COMMANDE L’AFFICHEUR •...
Page 15 - REGLAGES
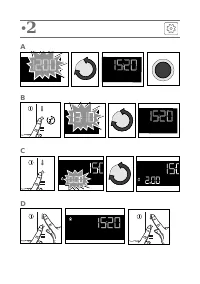
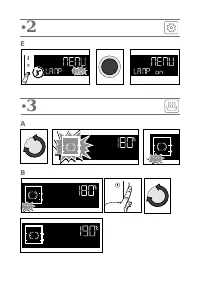
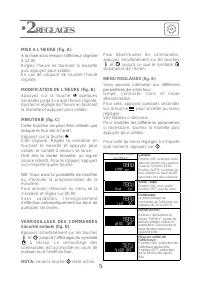
5 • 2 REGLAGES MISE A L’HEURE (fig. A) A la mise sous tension l’afficheur clignote à 12:00. Réglez l’heure en tournant la manette puis appuyez pour valider. En cas de coupure de courant l’heure clignote. MODIFICATION DE L’HEURE (fig. B) Appuyez sur la touche quelques secondes jusqu’à ce que l’heure ...
Page 16 - CUISSON
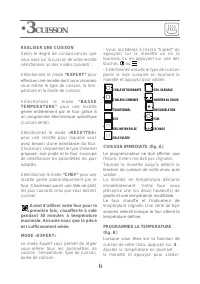
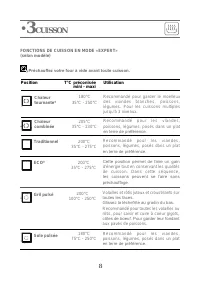
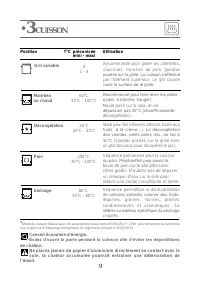
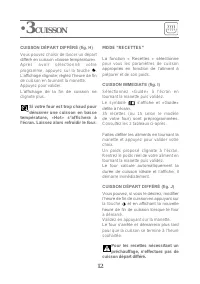
- Vous accéderez à l’écran “Expert” en appuyant sur la manette ou en la tournant, ou en appuyant sur une des touches ou .- Sélectionnez ensuite le type de cuisson parmi la liste suivante en tournant la manette et appuyez pour valider. CHALEUR TOURNANTE GRIL VARIABLE CHALEUR COMBINEE MAINTIEN AU CHAU...
Page 20 - Tableau indicatif pour déshydrater vos aliments
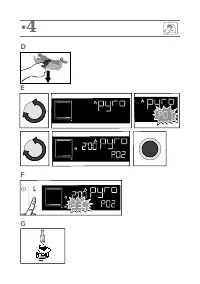
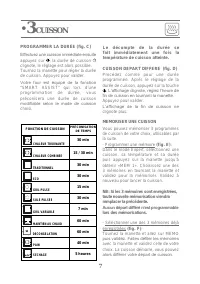
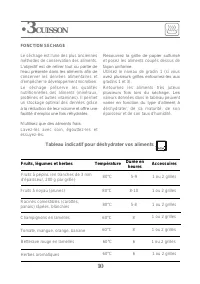
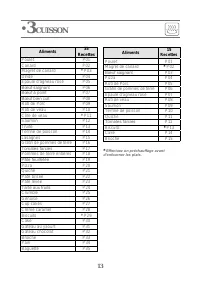
10 Le séchage est l’une des plus anciennes méthodes de conservation des aliments. L’objectif est de retirer tout ou partie de l’eau présente dans les aliments afin de conserver les denrées alimentaires et d’empêcher le développement microbien. Le séchage préserve les qualités nutritionnelles des ali...
Page 28 - ENTRETIEN
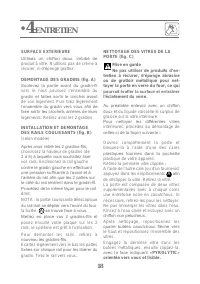
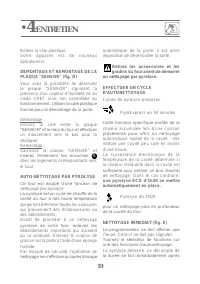
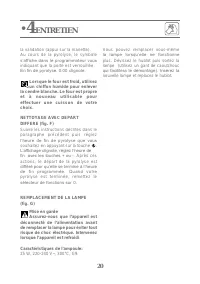
18 SURFACE EXTERIEURE Utilisez un chiffon doux, imbibé de produit à vitre. N’utilisez pas de crème à récurer, ni d’éponge grattoir. DEMONTAGE DES GRADINS (fig. A) Soulevez la partie avant du gradin-fil vers le haut poussez l’ensemble du gradin et faites sortir le crochet avant de son logement. Puis ...
Page 31 - ANOMALIES ET SOLUTIONS
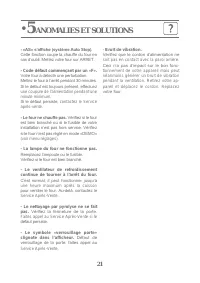
21 • 5 ANOMALIES ET SOLUTIONS - «AS» s’affiche (système Auto Stop). Cette fonction coupe la chauffe du four en cas d’oubli. Mettez votre four sur ARRET. - Code défaut commençant par un «F». Votre four a détecté une perturbation. Mettez le four à l’arrêt pendant 30 minutes. Si le défaut est toujours ...
Page 33 - OVEN; EN; USER GUIDE
Page 34 - DEAR; Discovering a De Dietrich product means experiencing
DEAR CUSTOMER, EN Discovering a De Dietrich product means experiencing the range of unique emotions. The attraction is immediate, from the moment you set eyes on the product. The sheer quality of the design shines through, thanks to the timeless style and outstanding finishes which make each compone...
Page 35 - CONTENTS; «LOW TEMPERATURE» mode
2 CONTENTS EN Description of the oven ......................................................................3 The control panel ..................................................................................3 Light - Shelf runners - Accessories........................................................
Page 36 - DESCRIPTION OF THE OVEN
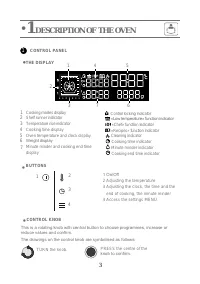
3 • 1 DESCRIPTION OF THE OVEN Cooking modes display Shelf runner indicator Temperature rise indicator Cooking time display Oven temperature and clock display Weight display Minute minder and cooking end time display CONTROL PANEL THE DISPLAY • 1 On/Off 2 Adjusting the temperature3 Adjusting the cloc...
Page 38 - SETTINGS
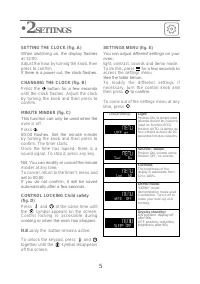
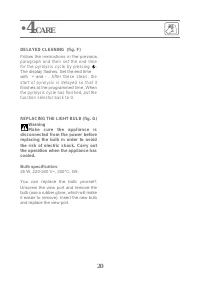
5 • 2 SETTINGS SETTING THE CLOCK (fig. A) When switching on, the display flashes at 12:00. Adjust the hour by turning the knob, then press to confirm. If there is a power cut, the clock flashes. CHANGING THE CLOCK (fig. B) Press the button for a few seconds until the clock flashes. Adjust the clock ...
Page 39 - COOKING
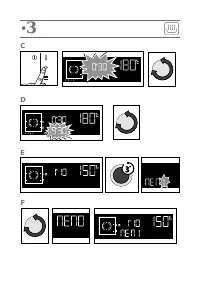
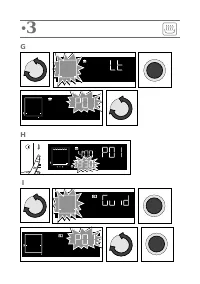
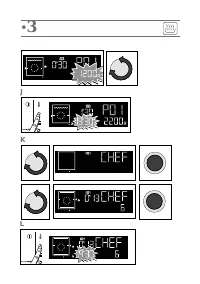
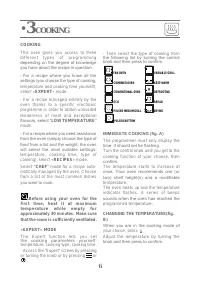
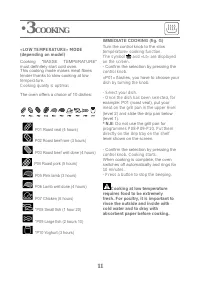
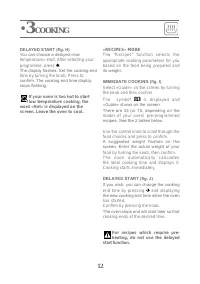
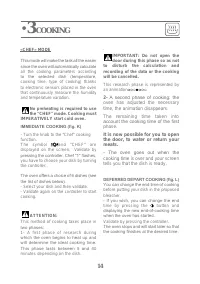
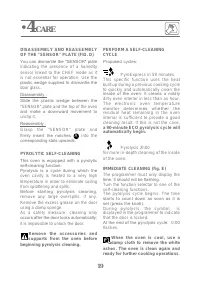
6 • 3 COOKING - Then select the type of cooking from the following list by turning the control knob and then press to confirm. FAN OVEN VARIABLE GRILL COMBINED OVEN KEEP WARM CONVENTIONAL OVEN DEFROSTING ECO BREAD PULSED MEDIUM GRILL DRYING PULSED BOTTOM IMMEDIATE COOKING (fig. A) The programmer mus...
Page 43 - Guide table to dehydrate your food
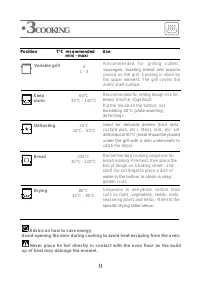
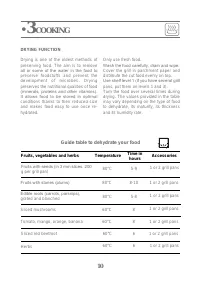
10 Drying is one of the oldest methods of preserving food. The aim is to remove all or some of the water in the food to preserve foodstuffs and prevent the development of microbes. Drying preserves the nutritional qualities of food (minerals, proteins and other vitamins). It allows food to be stored...
Page 47 - It is now possible for you to open; - The oven goes out when the
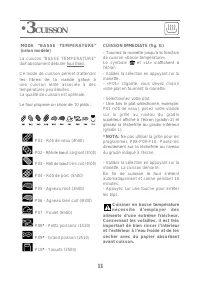
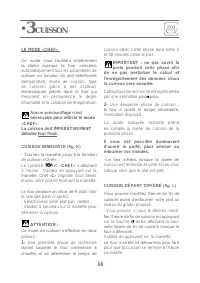
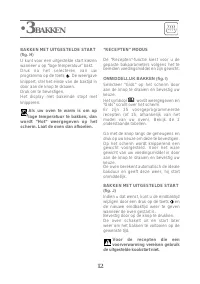
14 This mode will make the task all the easier since the oven will automatically calculate all the cooking parameters according to the selected dish (temperature, cooking time, type of cooking) thanks to electronic sensors placed in the oven that continuously measure the humidity and temperature var...
Page 51 - CARE
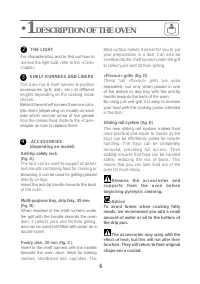
18 EXTERNAL SURFACE Use a window washing product applied to a soft cloth. Do not use abrasive creams or scouring sponges. REMOVING THE SHELF RUNNERS (fig. A) Lift the front part of the shelf runner upwards. Press the entire shelf runner and release the front hook from its housing. Then, gently pull ...
Page 54 - ANOMALIES AND SOLUTIONS
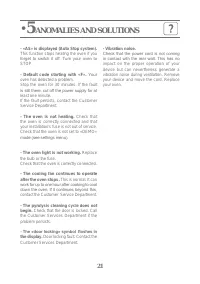
21 • 5 ANOMALIES AND SOLUTIONS - «AS» is displayed (Auto Stop system). This function stops heating the oven if you forget to switch it off. Turn your oven to STOP. - Default code starting with «F». Your oven has detected a problem. Stop the oven for 30 minutes. If the fault is still there, cut off t...
Page 55 - AFTER-SALES SERVICE
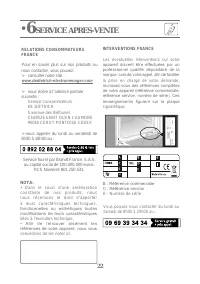
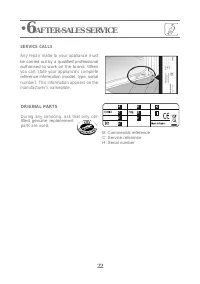
22 • 6 AFTER-SALES SERVICE SERVICE CALLS Any repair made to your appliance must be carried out by a qualified professional authorised to work on the brand. When you call, state your appliance’s complete reference information (model, type, serial number). This information appears on the manufacturer’...
Page 56 - HORNO; GUÍA DE UTILIZACIÓN
Page 57 - ESTIMADO CLIENTE; siente es un irresistible deseo de tocarlos.
ESTIMADA CLIENTA, ESTIMADO CLIENTE ES Descubrir los productos De Dietrich supone disfrutar de emociones únicas. Un flechazo a primera vista. La calidad del diseño se plasma en la estética intemporal y en los cuidados acabados, para crear objetos elegantes y refinados en perfecta armonía unos con otr...
Page 58 - ÍNDICE
2 ÍNDICE ES Presentación del horno......................................................................3 El panel de control ................................................................................3 Lámpara - Niveles - Accesorios ............................................................4...
Page 59 - PRESENTACIÓN DEL HORNO
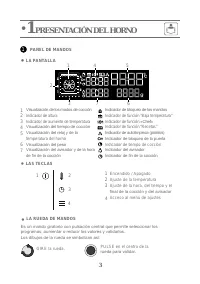
3 • 1 PRESENTACIÓN DEL HORNO PANEL DE MANDOS LA PANTALLA • 1 Encendido / ApagadoAjuste de la temperaturaAjuste de la hora, del tiempo y el final de la cocción y del avisador Acceso al menú de ajustes Es un mando giratorio con pulsación central que permite seleccionar los programas, aumentar o reduci...
Page 61 - AJUSTES
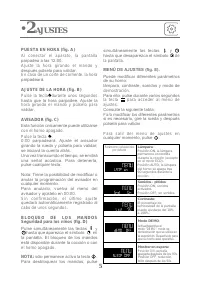
5 • 2 AJUSTES PUESTA EN HORA (fig. A) Al conectar el aparato, la pantalla parpadea a las 12:00. Ajuste la hora girando el mando y después púlselo para validar. En caso de un corte de corriente, la hora parpadeará. AJUSTE DE LA HORA (fig. B) Pulse la tecla durante unos segundos hasta que la hora parp...
Page 62 - COCCIÓN
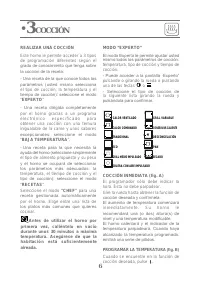
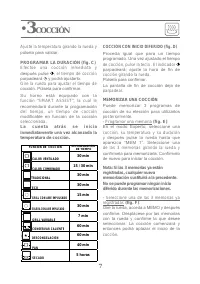
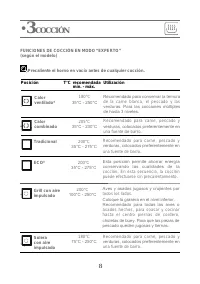
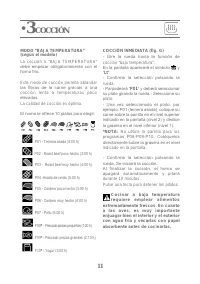
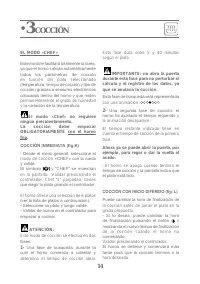
MODO “EXPERTO” El modo Experto le permite ajustar usted mismo todos los parámetros de cocción: temperatura, tipo de cocción y tiempo de cocción. - Puede acceder a la pantalla ·Experto” pulsando o girando la rueda o pulsando una de las teclas o . - Seleccione el tipo de cocción de la siguiente lista ...
Page 66 - Tabla indicativa para deshidratar sus alimentos
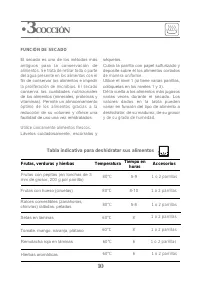
10 El secado es uno de los métodos más antiguos para la conservación de alimentos. Se trata de retirar toda o parte del agua presente en los alimentos con el fin de conservar los alimentos e impedir la proliferación de microbios. El secado conserva las cualidades nutricionales de los alimentos (mine...
Page 74 - MANTENIMIENTO
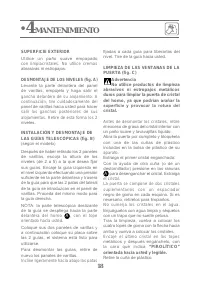
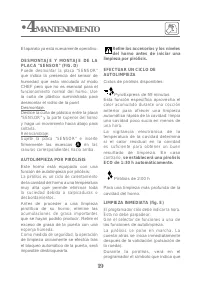
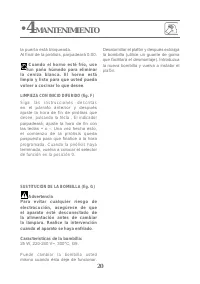
18 SUPERFICIE EXTERIOR Utilice un paño suave empapado con limpiacristales. No utilice cremas abrasivas ni estropajos. DESMONTAJE DE LOS NIVELES (fig. A) Levante la parte delantera del panel de varillas, empújelo y haga salir el gancho delantero de su alojamiento. A continuación, tire cuidadosamente ...
Page 77 - ANOMALÍAS Y SOLUCIONES
21 • 5 ANOMALÍAS Y SOLUCIONES - La pantalla indica “AS” (parada automática) Esta función corta el calentamiento del horno en caso de olvido. Ponga su horno en PARADA. - El código de fallo comienza por “F”. Su horno ha detectado una perturbación. Apague su horno durante 30 minutos. Si el fallo sigue ...
Page 78 - SERVICIO TECNICO
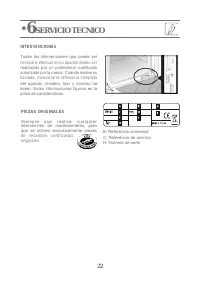
22 • 6 SERVICIO TECNICO INTERVENCIONES Todas las intervenciones que pueda ser necesario efectuar en su aparato deben ser realizadas por un profesional cualificado autorizado por la marca. Cuando realice su llamada, mencione la referencia completa del aparato (modelo, tipo y número de serie). Estas i...
Page 79 - GEBRUIKSGIDS
Page 80 - en de verzorgde afwerkingen die elk voorwerp elegant en verfijnd
GEACHTE CLIËNTE, GEACHTE CLIËNT, NL Ontdek de De Dietrich producten en ervaar unieke emoties. U wordt er onmiddellijk, vanaf de eerste oogopslag, door aangetrokken. De kwaliteit van het design uit zich in de tijdloze vormgeving en de verzorgde afwerkingen die elk voorwerp elegant en verfijnd maken i...
Page 81 - INHOUDSOPGAVE
2 INHOUDSOPGAVE NL Voorstelling van de oven ...................................................................3 Het bedieningspaneel ...........................................................................3 Lamp - Niveaus - Accessoires ...............................................................
Page 82 - VOORSTELLING VAN DE OVEN
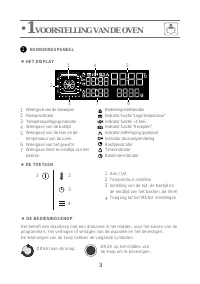
3 • 1 VOORSTELLING VAN DE OVEN Weergave van de bakwijzen Niveau-indicator Temperatuurstijgingsindicator Weergave van de baktijd Weergave van de klok en de temperatuur van de oven Weergave van het gewicht Weergave timer en eindtijd van het bakken BEDIENINGSPANEEL HET DISPLAY • 1 Aan / UitTemperatuur ...
Page 84 - INSTELLINGEN
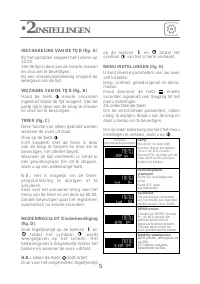
5 • 2 INSTELLINGEN INSCHAKELING VAN DE TIJD (fig. A) Bij het opstarten knippert het scherm op 12:00. Stel de tijd in door aan de knop te draaien en druk om te bevestigen. Bij een stroomonderbreking knippert de weergave van de tijd. WIJZIGING VAN DE TIJD (fig. B) Houd de toets enkele seconden ingedru...
Page 85 - BAKKEN
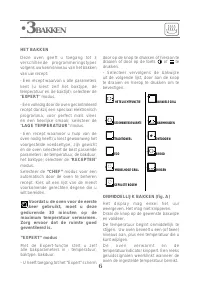
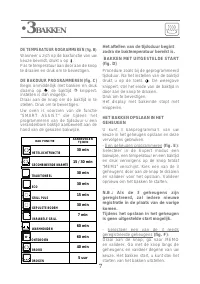
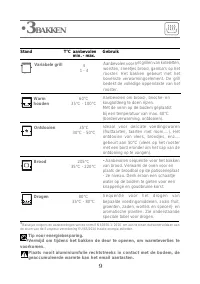
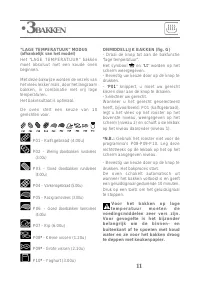
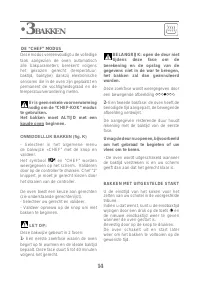
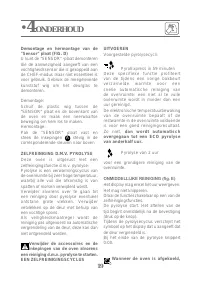
door op de knop te drukken of hieraan te draaien of door op de toets of te drukken.- Selecteer vervolgens de bakwijze uit de volgende lijst, door aan de knop te draaien en hierop te drukken om te bevestigen. ONMIDDELLIJK BAKKEN (fig. A) Het display mag enkel het uur weergeven. Het mag niet knipperen...
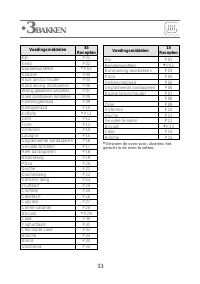
Page 89 - Tabel ter indicatie voor het drogen van uw voedingsmiddelen
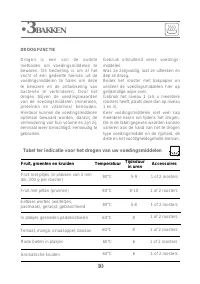
10 Drogen is een van de oudste methodes om voedingsmiddelen te bewaren. De bedoeling is om al het vocht of een gedeelte hiervan uit de voedingsmiddelen te halen om deze te bewaren en de ontwikkeling van bacteriën te verhinderen. Door het drogen blijven de voedingswaarden van de voedingsmiddelen (min...
Page 97 - ONDERHOUD
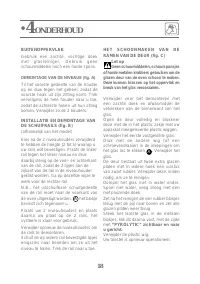
18 BUITENOPPERVLAK Gebruik een zachte, vochtige doek met glasreiniger. Gebruik geen schuurmiddelen noch een harde spons. DEMONTAGE VAN DE NIVEAUS (fig. A) Til het voorste gedeelte van de houder op en duw tegen het geheel, zodat de voorste haak uit zijn zitting komt. Trek vervolgens de hele houder na...
Page 100 - STORINGEN EN OPLOSSINGEN
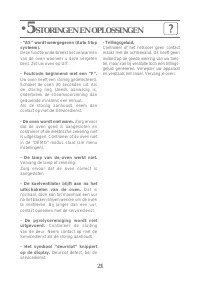
21 • 5 STORINGEN EN OPLOSSINGEN - “AS” wordt weergegeven (Auto Stop systeem). Deze functie onderbreekt het verwarmen van de oven wanneer u deze vergeten bent. Zet uw oven op UIT. - Foutcode beginnend met een “F”. Uw oven heeft een storing gedetecteerd. Schakel de oven 30 seconden uit. Als de storing...
Page 101 - SERVICEDIENST
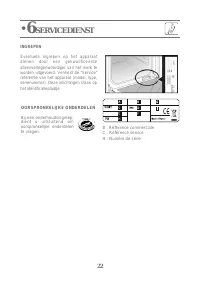
22 • 6 SERVICEDIENST INGREPEN Eventuele ingrepen op het apparaat dienen door een gekwalificeerde alleenvertegenwoordiger van het merk te worden uitgevoerd. Vermeld de “Service” referentie van het apparaat (model, type, serienummer). Deze inlichtingen staan op het identificatieplaatje. OORSPRONKELIJK...
Page 102 - FORNO; GUIA DE UTILIZAÇÃO
Page 104 - Menu de configurações
2 ÍNDICE PT Apresentação do forno ......................................................................3 Módulo de comandos ...........................................................................3 Lâmpada - Encaixes - Acessórios ........................................................4 Configur...
Page 105 - APRESENTAÇÃO DO FORNO
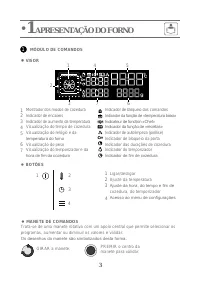
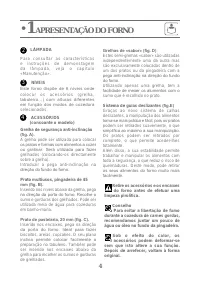
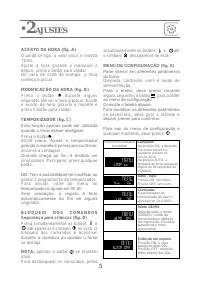
3 • 1 APRESENTAÇÃO DO FORNO MÓDULO DE COMANDOS VISOR • 1 Ligar/desligarAjuste da temperatura Ajuste da hora, do tempo e fim de cozedura, do temporizador Acesso ao menu de configurações Trata-se de uma manete rotativa com um apoio central que permite selecionar os programas, aumentar ou diminuir os v...
Page 108 - COZEDURA
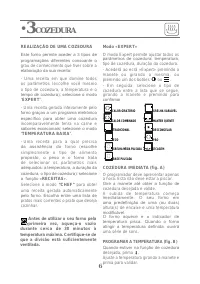
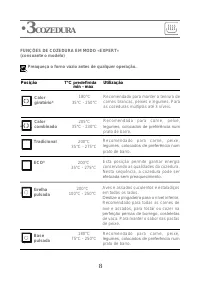
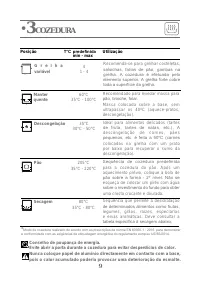
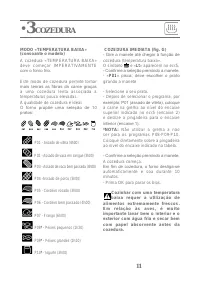
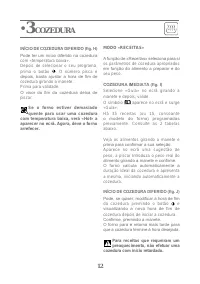
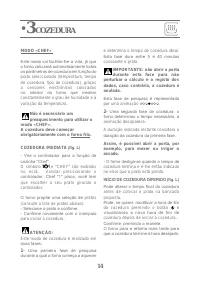
Modo «EXPERT» O modo Expert permite ajustar todos os parâmetros de cozedura: temperatura, tipo de cozedura, duração da cozedura.- Acederá ao ecrã «Expert» premindo a manete ou girando a mesma, ou premindo um dos botões ou .- Em seguida, selecione o tipo de cozedura entre a lista que se segue, girand...
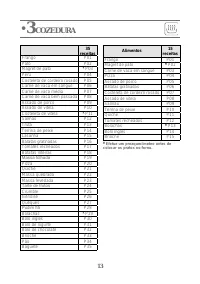
Page 112 - Tabela indicativa para desidratar os seus alimentos.
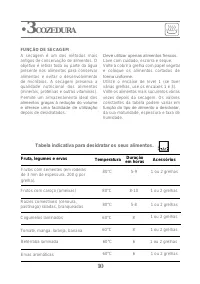
10 A secagem é um dos métodos mais antigos de conservação de alimentos. O objetivo é retirar toda ou parte da água presente nos alimentos para conservar alimentos e evitar o desenvolvimento de micróbios. A secagem preserva a qualidade nutricional dos alimentos (minerais, proteínas e outras vitaminas...
Page 120 - MANUTENÇÃO
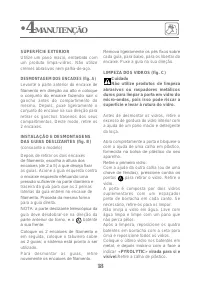
18 SUPERFÍCIE EXTERIOR Utilize um pano macio, embebido com um produto limpa-vidros. Não utilize cremes abrasivos nem palha-de-aço. DESMONTAGEM DOS ENCAIXES (fig. A) Levante a parte anterior do encaixe de filamento em direção ao alto e coloque o conjunto do encaixe fazendo sair o gancho antes do comp...
Page 123 - RESOLUÇÃO DE AVARIAS
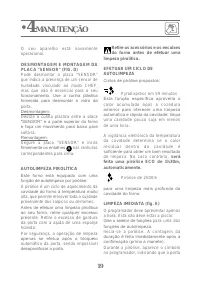
21 • 5 RESOLUÇÃO DE AVARIAS - «AS» aparece no visor (sistema Auto Stop). Esta função desliga o aquecimento do forno no caso de esquecimento. Coloque o forno em PARAGEM. - Código de avaria que começa por «F». O forno detetou uma perturbação. Desligue o forno durante 30 minutos. Se a avaria persistir,...