Page 3 - TABLE OF CONTENTS
97 TABLE OF CONTENTS EN 1 / INFORMATION FOR THE USER • • Safety instructions _________________________________________ 98 • • Care for the environment ____________________________________ 99 2 / INSTALLING YOUR APPLIANCE • • Choice of location __________________________________________ 100 • • Fitti...
Page 4 - / INFORMATION FOR THE USER; SAFETY INSTRUCTIONS; Warning
98 1 / INFORMATION FOR THE USER EN SAFETY INSTRUCTIONS • Your appliance is designed for standardhousehold use for cooking, reheating anddefrosting foods. The manufacturer declinesany responsibility in the case of inappropriateuse.• Before each use, ensure that anyreceptacles and accessories are suit...
Page 5 - CARE FOR THE ENVIRONMENT
99 1 / INFORMATION FOR THE USER EN CARE FOR THE ENVIRONMENT • • — This appliance’s packing materials are recyclable. Recycle them and play a role in protectingthe environment by depositing them in municipal containers provided for this purpose. — Your appliance also contains many recyclable material...
Page 6 - / INSTALLING YOUR APPLIANCE; FITTING; Tip; CHOICE OF LOCATION
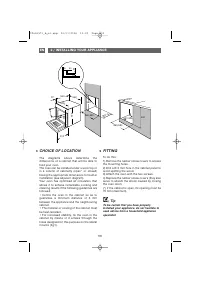
100 2 / INSTALLING YOUR APPLIANCE EN FITTING To do this:1) Remove the rubber screw covers to accessthe mounting holes.2) Drill a Ø 2 mm hole in the cabinet panel toavoid splitting the wood.3) Attach the oven with the two screws.4) Replace the rubber screw covers (they alsoserve to absorb the shock c...
Page 7 - ELECTRIC CONNECTION
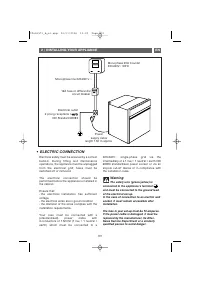
101 2 / INSTALLING YOUR APPLIANCE EN • • ELECTRIC CONNECTION Monophase 20A Counter220-240V~ 50Hz Electrical outlet 2 prong receptacle +e ea arrtth h CEI Standard 60083 Monophase line 220-240 V ~ Power supply cable length 1.50 m approx. 16A fuse or differential circuit breaker Electrical safety must ...
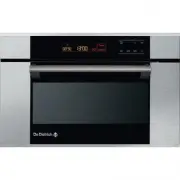
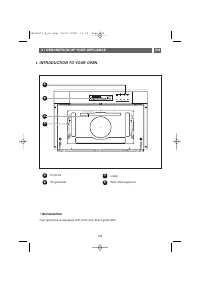
Page 9 - / DESCRIPTION OF YOUR APPLIANCE; INTRODUCTION TO YOUR OVEN; Controls; •Accessories; Your appliance is equipped with a flat rack and a glass dish.
103 3 / DESCRIPTION OF YOUR APPLIANCE EN INTRODUCTION TO YOUR OVEN • • A B Controls Programmer C D Lamp Wire shelf supports D C B A •Accessories Your appliance is equipped with a flat rack and a glass dish. 99643571_b_ml.qxp 03/01/2008 10:39 Page 103
Page 10 - ACCESSORIES
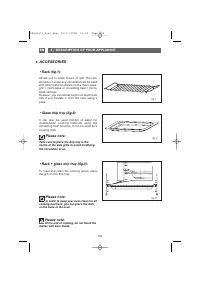
Please note: At the end of cooking, do not touch the dishes with bare hands. Please note: In order to keep your oven clean for all cooking functions, you can place the dishon the base of the oven. Please note: Take care to place the drip tray in thecentre of the side grills to avoid modifyingthe cir...
Page 11 - INTRODUCTION TO THE PROGRAMMER
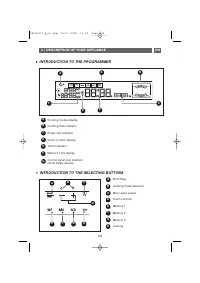
105 3 / DESCRIPTION OF YOUR APPLIANCE EN • • INTRODUCTION TO THE PROGRAMMER A B C D G E F A B Cooking modes display Cooking time indicator Power rise indicator Clock or timer display Timer indicator Memory 1,2,3 display Control panel lock indicator (Child safety device). C D E F G INTRODUCTION TO TH...
Page 12 - / USING YOUR APPLIANCE; •How to set the time
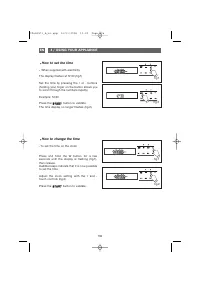
106 4 / USING YOUR APPLIANCE EN W W W W •How to set the time -- When supplied with electricity The display flashes at 12:00 (fig.1) Set the time by pressing the + or - buttons(holding your finger on the button allows youto scroll through the numbers rapidly). Example: 12:30 Press the S ST TA AR RT T...
Page 13 - The
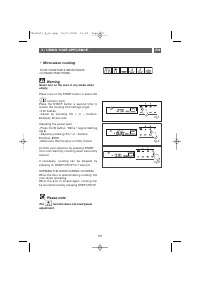
107 4 / USING YOUR APPLIANCE EN W • Micro-wave cooking YOUR OVEN HAS 6 MICRO-WAVECOOKING FUNCTIONS fig.2 Warning Never turn on the oven in any mode whenempty. Please note: The function does not need power adjustment. W fig.1 W fig.3 Press once on the START button to select the function (fig.1). Pres...
Page 14 - • AUTOMATIC MICRO-WAVE DEFROSTING
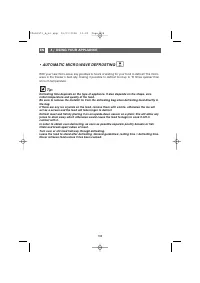
108 4 / USING YOUR APPLIANCE EN • AUTOMATIC MICRO-WAVE DEFROSTING With your new micro-wave, say goodbye to hours of waiting for your food to defrost! The micro-wave is the freezer’s best ally, making it possible to defrost food up to 10 times quicker thanat room temperature. Tip: Defrosting time dep...
Page 15 - • DEFROSTING GUIDE
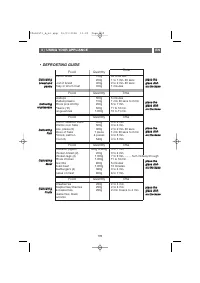
109 4 / USING YOUR APPLIANCE EN D De effrro os sttiin ng g b brre ea ad d a an nd d p pa as sttrryy D De effrro os sttiin ng g c crru us stta ac ce ea an ns s D De effrro os sttiin ng g F Fiis sh h D De effrro os sttiin ng g M Me ea att D De effrro os sttiin ng g F Frru uiitts s p plla ac ce e tth h...
Page 16 - CUSTOMISING THE COOKING POWER; po
110 EN 4 / USING YOUR APPLIANCE CUSTOMISING THE COOKING POWER • • • Micro-wave cooking When selecting the cooking mode or during acooking programme, you can customise thep po ow we err for micro-wave cooking: Press once on the START button to select the function. Press the START button a second time...
Page 17 - Example of use in the
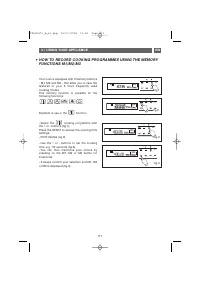
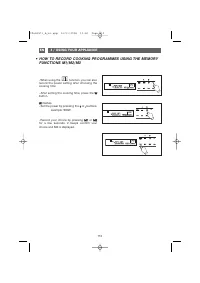
111 4 / USING YOUR APPLIANCE EN • • HOW TO RECORD COOKING PROGRAMMES USING THE MEMORYFUNCTIONS M1/M2/M3 Your oven is equipped with 3 memory buttons- M1, M2 and M3 - that allow you to save thefeatures of your 3 most frequently usedcooking modes.This memory function is possible for thefollowing functi...
Page 18 - function, you can also
112 4 / USING YOUR APPLIANCE EN • • HOW TO RECORD COOKING PROGRAMMES USING THE MEMORYFUNCTIONS M1/M2/M3 - When using the function, you can also record the power setting after choosing thecooking time. - After setting the cooking time, press the W W button. W W flashes.- Set the power by pressing the...
Page 19 - HOW TO START A COOKING PROGRAMME USING THE MEMORY
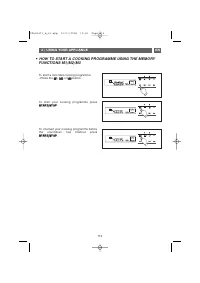
113 4 / USING YOUR APPLIANCE EN HOW TO START A COOKING PROGRAMME USING THE MEMORY FUNCTIONS M1/M2/M3 • • To start a recorded cooking programme:- Press the M M1 1, M M2 2 or M M3 3 button. To start your cooking programme pressS ST TA AR RT T//S ST TO OP P. To interrupt your cooking programme beforeth...
Page 20 - When the oven is off, hold down the; You cannot lock the oven if you have programmed a cooking cycle.
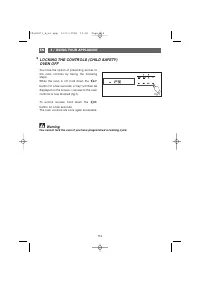
114 EN 4 / USING YOUR APPLIANCE LOCKING THE CONTROLS (CHILD SAFETY)OVEN OFF You have the option of preventing access tothe oven controls by taking the followingsteps: When the oven is off, hold down the button for a few seconds; a “key” will then be displayed on the screen -> access to the oven c...
Page 21 - DISPLAY STAND-BY MODE
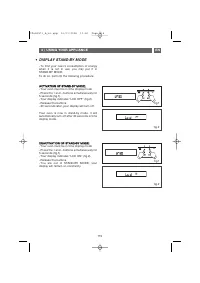
115 EN 4 / USING YOUR APPLIANCE - To limit your oven’s consumption of energywhen it is not in use, you may put it inSTAND-BY MODE.To do so, perform the following procedure: A AC CT TIIV VA AT TIIO ON N O OF F S ST TA AN ND D--B BY Y M MO OD DE E:: - Your oven must be in time display mode.- Press the...
Page 22 - / OVEN COOKING MODES
116 EN 5 / OVEN COOKING MODES M MIIC CR RO O--W WA AV VE E (recommended positions 1 10 00 00 0 W W min 100 max 1000) •The energy source is supplied by the micro-waves.•Energy is distributed by a combination of - 1 upper element - 1 lower element. A AU UT TO OM MA AT TIIC C D DE EF FR RO OS ST TIIN N...
Page 23 - / CARING FOR AND CLEANING YOUR APPLIANCE; CLEANING THE OUTER SURFACES
117 6 / CARING FOR AND CLEANING YOUR APPLIANCE EN Before manually cleaning your oven, allow the appliance to cool down.In general a ab brra as siiv ve e p po ow wd de errs s a an nd d s sc co ou urriin ng g p pa ad ds s a as s w we ellll a as s s sh ha arrp p o ob bjje ec ctts s s sh ho ou ulld d b ...
Page 24 - Department without delay.; repairs may be a source of danger for the user.
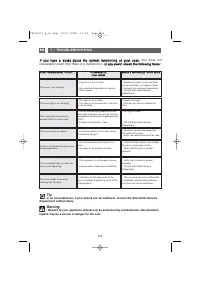
118 7 / TROUBLESHOOTING EN Tip In all circumstances, if your efforts are not sufficient, contact the After-Sales Service Department without delay. W WH HA AT T S SH HO OU UL LD D Y YO OU U D DO O? ? P PO OS SS SIIB BL LE E C CA AU US SE ES S Y YO OU U O OB BS SE ER RV VE E T TH HA AT T… … IIff y yo ...
Page 25 - • SERVICE CALLS
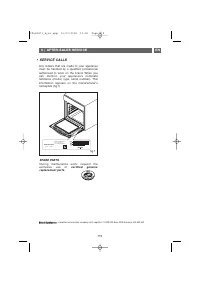
119 EN 8 / AFTER -SALES SERVICE Any repairs that are made to your appliancemust be handled by a qualified professionalauthorised to work on the brand. When youcall, mention your appliance’s completereference (model, type, serial number). Thisinformation appears on the manufacturer’snameplate (fig.1)...