Page 3 - Model • Modèle
CONTENTS CAUTION: Read and follow all safety rules and operating instructions before fi rst use of this product. AVERTISSEMENT : Veuillez lire attentivement les consignes de sécurité et les instructions d’utilisation avant l’utilisation initiale de ce produit. TABLE DES MATIÈRES Owner’s Use and Care...
Page 4 - Thank you for choosing Silhouette
1 Thank you for choosing Silhouette We know you’re excited. We are too! However, the more familiar you are with your new appliance, the better experience you willhave. We therefore strongly suggest that you read this Owner’s Manual before plugging in your new appliance . It contains important operat...
Page 5 - READ AND FOLLOW ALL SAFETY INSTRUCTIONS; ELECTRICAL REQUIREMENTS; WARNING; IMPORTANT WARNING
Important Safety Information READ AND FOLLOW ALL SAFETY INSTRUCTIONS This appliance must be grounded. In the event of an electrical short circuit, grounding reduces the risk of electrical shock by providing an escape wire for the electrical current. ELECTRICAL REQUIREMENTS WARNING ELECTRICAL RATING:...
Page 6 - GROUNDING INSTRUCTIONS; SAVE THESE INSTRUCTIONS!; FOR YOUR SAFETY
GROUNDING INSTRUCTIONS This appliance is equipped with a cord having a grounding wire with a grounding plug. The plug must be plugged into an outlet that is properly installed and grounded. This appliance must be grounded. In the event of an electrical short circuit, grounding reduces the risk of el...
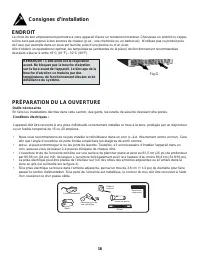
Page 7 - LOCATION; PREPARING THE ENCLOSURE
LOCATION Selecting the proper location will ensure peak performance levels for your appliance. Choose a location where the unit will not be exposed to heat emitting sources (e.g. a fi replace or a barbeque). The cooler should not be exposed to direct sunlight. Do not use product near water, for exam...
Page 8 - FEATURES; Fig F
Operating Instructions FEATURES 5 Installation Instructions PREPARING THE ENCLOSURE (continued) Important: The listed depth requirement for the installation is assuming that the electrical outlet is located in the adjacent cabinetry or is fl ush mounted in the rear wall, not surface mounted in the e...
Page 9 - CONTROL PANEL
CONTROL PANEL 6 Operating Instructions Indicator light illuminates to signify the cooling mode is currently in operation. Control the interior light ON/OFF. (If you press this button, the inner light is not controlled by the Mechanical Switch, it is continuously lit). To turn appliance on/off (press...
Page 10 - FUNCTION INSTRUCTION
Operating Instructions 7 SSWC056D1B STORAGE In order to achieve the maximum storage capacity of forty-eight (48) bottles, it will be necessary to position 7 bottles each on the 6 shelves and 6 bottles on the bottom of the unit. IMPORTANT • The maximum* capacity of the unit is 48 (750ml) wine bottles...
Page 12 - DOOR REVERSAL
Operating Instructions 9 DOOR REVERSAL 1. Bottom Hinge (Right)2. Screws3. Door Axis 4. Screws5. Mechanical Switch 6. Top Hinge (Right)7. Screws8. Top Hinge (Left)9. Plug10. Bottom Hinge (Left) 1. Open the door to a 90° angle, take out 2 screws from the lower door axis (3), remove the door (refer to ...
Page 13 - ENERGY SAVING TIP
Care and Maintenance CLEANING YOUR APPLIANCE POWER FAILURE • Most power failures are corrected within a few hours and should not affect the temperature of your appliance if you minimize the number of times the door is opened. If the power is going to be off for a longer period of time, you need to t...
Page 15 - LIMITED IN-HOME APPLIANCE WARRANTY
LIMITED IN-HOME APPLIANCE WARRANTY This quality product is warranted to be free from manufacturer’s defects in material and workmanship, provided that the unit is used under the normal operating conditions intended by the manufacturer.This warranty is available only to the person to whom the unit wa...
Page 16 - Merci d’avoir choisi Silhouette
13 Merci d’avoir choisi Silhouette Nous savons que vous êtes excité. Nous sommes aussi! Cependant, le plus que vous vous familiarisez avec votre nouvel appareil, le mieux va être votre expérience. Nous suggérons donc de lire ces instructions avant connecter votre nouvel appareil . Ce manuel contient...
Page 17 - CONDITIONS ÉLECTRIQUES; PRENDRE CONNAISSANCE DE TOUTES LES INFORMATIONS
CONDITIONS ÉLECTRIQUES Pour éviter les diffi cultés d’installation / du fonctionnement, veuillez lire ces instructions soigneusement. • Cet appareil doit être mis à la terre. Branchez le seulement dans une prise correctement mise à la terre. Référez-vous au chapitre “Instructions de mise à la terre”...
Page 18 - MISE À LA TERRE; SAUVEGARDE CES INSTRUCTIONS!
MISE À LA TERRE Cet appareil doit être mis à la terre. Dans l’éventualité d’un court-circuit, la mise à la terre procure un chemin direct con-tournement du courant pour prévenir l’électrocution des manipulateurs de l’appareil. L’appareil est muni d’un cordon électrique comprenant un fi l de mise à l...
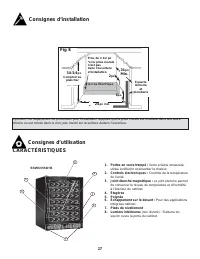
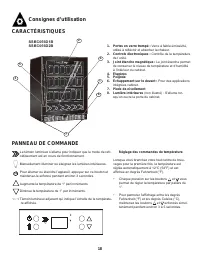
Page 20 - CARACTÉRISTIQUES; Fig E
Consignes d’utilisation CARACTÉRISTIQUES Consignes d’installation 17 Important : Le requirement de profondeur pour l’installation suppose que la prise murale est localisée dans une autre armoire ou est monté dans le mur, pas monté sur la surface dedans l’ouverture. 1. Portes en verre trempé : Verre ...
Page 21 - PANNEAU DE COMMANDE
PANNEAU DE COMMANDE 18 Consignes d’utilisation Le témoin lumineux s’allume pour indiquer que le mode de refr- oidissement est en cours de fonctionnement. Manuellement illuminer ou éteignez les lumières intérieures. Pour allumer ou éteindre l’appareil, appuyez sur ce bouton et maintenez-le enfoncé pe...
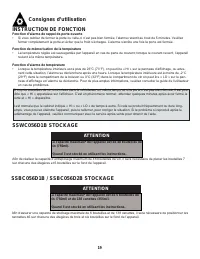
Page 22 - INSTRUCTION DE FONCTION; ATTENTION
Consignes d’utilisation 19 SSWC056D1B STOCKAGE ATTENTION La capacité maximale* de l’appareil est de 48 bouteilles de vin (750ml). *Quand il est stocké en utilisant les instructions. A fi n de réaliser la capacité d’entreposage maximum de 48 bouteilles de vin, il sera nécessaire de placer les bouteil...
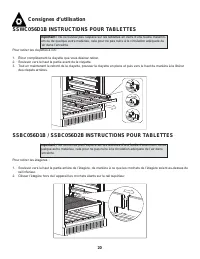
Page 23 - SSWC056D1B INSTRUCTIONS POUR TABLETTES
Important : Ne recouvrez pas l’espace sur les tablettes en verre d’une feuille d’alumin- ium ou de quelque autre matériau, cela pour ne pas nuire à la circulation adéquate de l’air dans l’enceinte. Pour retirer les clayettes à vin : 1. Étirer complètement la clayette que vous désirez retirer.2. Soul...
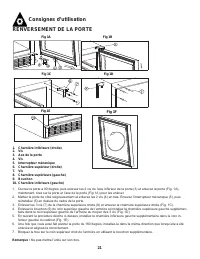
Page 24 - RENVERSEMENT DE LA PORTE
Consignes d’utilisation RENVERSEMENT DE LA PORTE 21 1. Charnière inférieure (droite)2. Vis3. Axe de la porte4. Vis5. Interrupteur mécanique 6. Charnière supérieur (droite)7. Vis8. Charnière supérieure (gauche)9. Bouchon10. Charnière inférieure (gauche) 1. Ouvrez la porte à 90 degrés, puis enlevez le...
Page 26 - PROBLÈME
Dépannage De temps en temps, un problème est mineur et un appel de service peut ne pas être nécessaire. Utilisez ce guide de dépannage pour trouver une solution possible. Si l’unité continue de fonctionner incorrectement, appelez un dépôt de service autorisé ou le numéro sans frais pour obtenir de l...
Page 27 - GARANTIE LIMITÉE SUR
LIMITED IN-HOME APPLIANCE WARRANTY This quality product is warranted to be free from manufacturer’s defects in material and workmanship, provided that the unit is used under the normal operating conditions intended by the manufacturer.This warranty is available only to the person to whom the unit wa...