Page 2 - Welcome to the Danby family.; You must keep the original proof
1 Welcome to the Danby family. We are proud of our quality products and we believe in dependable service. We suggest that you read this owner’s manual before plugging in your new appliance as it contains important operation information, safety information, troubleshooting, and maintenance tips to en...
Page 3 - WARNING; SAVE THESE INSTRUCTIONS!
IMPORTANT SAFETY INSTRUCTIONSREAD AND FOLLOW ALL SAFETY INSTRUCTIONS Basic safety precautions should be followed when using electrical appliances, including the following: WARNING - To reduce the risk of burns, electric shock, fi re, injury to persons or exposure to excessive microwave energy: 1. Rea...
Page 4 - Do not immerse the power cord or plug in water.
IMPORTANT SAFETY INSTRUCTIONSREAD AND FOLLOW ALL SAFETY INSTRUCTIONS SAVE THESE INSTRUCTIONS! 3 11. Do not store this microwave outdoors. Do not use this microwave near water, for example, near a kitchen sink, in a wet basement, near a swimming pool or similar location. 12. Do not immerse the power ...
Page 6 - GROUNDING INSTRUCTIONS; DANGER; shock. Do not plug the microwave in if the grounded plug is damaged.
GROUNDING INSTRUCTIONS This microwave must be grounded. In the event of an electrical short circuit, grounding reduces the risk of electrical shock by providing an escape wire for the electrical current. This microwave is equipped with a cord that has a grounding wire with a grounding plug. The powe...
Page 7 - SAFETY - SUPERHEATED LIQUID
SAFETY - SUPERHEATED LIQUID Liquids are able to be overheated beyond the boiling point without appearing to be boiling due to the surface tension of the liquid. Visible bubbling will not always be present when the liquid is removed from the microwave. This could result in very hot liquids suddenly b...
Page 8 - INSTALLATION INSTRUCTIONS; INSTALLATION; OPERATING INSTRUCTIONS; COOKING TECHNIQUES; STIRRING
7 INSTALLATION INSTRUCTIONS INSTALLATION • Remove all packing materials from the inside and outside of the microwave. Do not remove the cardboard mica sheet covering the magnetron. • Check the microwave for damage before using, such as a misaligned or bent door, damaged door seals, broken or loose d...
Page 9 - COOKING UTENSILS GUIDE
8 RECOMMENDED Microwave Browning Dish: Used to brown the exterior of small food items. Follow the directions provided with the browning dish. Microwavable Plastic Wrap: Used to retain steam. Leave a small opening to avoid a build up of steam. Do not place directly on food. Glass and Ceramic Bowls an...
Page 10 - FEATURES; Do Not Remove; CONTROL PANEL
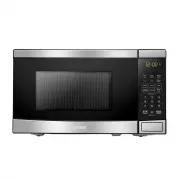
9 OPERATING INSTRUCTIONS FEATURES 1. Door Lock System 2. Glass Tray 3. Roller Ring 4. Mica Sheet ( Do Not Remove ) 5. Control Panel 1 2 3 4 5 CONTROL PANEL 1. Display: Shows cooking time, power level and clock time. 2. Time Cook: Used to set the desired cook time. 3. Time Defrost: Used to set the de...
Page 11 - MICROWAVE COOKING
10 FIRST TIME USE When the appliance is plugged in for the fi rst time, the display will show “0:00”. Use the number pad to enter the current time and then press the clock button to confi rm When setting the cook timer, the appliance will return to standby mode if there is no input within 60 seconds. ...
Page 12 - EXPRESS COOK
11 OPERATING INSTRUCTIONS EXPRESS COOK When the appliance is not in operation, press the number pad from 1 to 6 and the appliance will run between 1 and 6 minutes at 100% cooking power. ADD 30 SECONDS When the appliance is not in operation, pressing the +30SEC button will run the appliance for 30 se...
Page 13 - MEMORY FUNCTION; Time Cook; SETTING THE CHILD LOCK; Stop; CLEANING; CARE AND MAINTENANCE
12 MEMORY FUNCTION The memory function allows the programming of cooking times and powers that can be recalled and used again and again with minimal input. Three memory programs can be set at one time, they are labeled 1, 2 and 3. To set Memory 1: 1. Press the 0/Memor y button once. The number 1 wil...
Page 14 - TROUBLESHOOTING; DISPOSAL
MICA SHEET Inside the appliance there is a cardboard mica sheet protecting the magnetron. Do not remove this from the appliance as exposing the magnetron to food splatters can cause arcing or fi re. If it becomes dirty, the mica sheet can be cleaned with a warm cloth. PROBLEM POSSIBLE CAUSE No power ...
Page 15 - LIMITED IN-HOME APPLIANCE WARRANTY; LIMITED “CARRY IN” WARRANTY
LIMITED IN-HOME APPLIANCE WARRANTY This quality product is warranted to be free from manufacturer’s defects in material and workmanship, provided that the unit is used under the normal operating conditions intended by the manufacturer.This warranty is available only to the person to whom the unit wa...
Page 16 - Bienvenue dans la famille Danby.; Vous devez
15 Bienvenue dans la famille Danby. Nous sommes fi ers de nos produits de qualité et nous croyons en un service fi able. Nous vous suggérons de lire ce manuel du propriétaire avant de brancher votre nouvel appareil car il contient des informations de fonctionnement importantes, des informations de séc...
Page 17 - ATTENTION; corporelles ou d’exposition à une énergie micro-ondes excessive :; CONSERVEZ CES INSTRUCTIONS !
Des précautions de sécurité de base doivent être suivies lors de l’utilisation d’appareils électriques, notamment les suivantes : ATTENTION - Pour réduire le risque de brûlures, d’électrocution, d’incendie, de blessures corporelles ou d’exposition à une énergie micro-ondes excessive : 1. Lisez toute...
Page 18 - Ne plongez pas le cordon d’alimentation ou la fi che dans l’eau.
CONSIGNES DE SÉCURITÉ IMPORTANTESLIRE ET SUIVRE TOUTES LES CONSIGNES DE SÉCURITÉ CONSERVEZ CES INSTRUCTIONS ! 11. Ne rangez pas ce micro-ondes à l’extérieur. N’utilisez pas ce micro-ondes près de l’eau, par exemple près d’un évier de cuisine, dans un sous-sol humide, près d’une piscine ou d’un endro...
Page 20 - INSTRUCTIONS DE MISE À LA TERRE; des blessures graves ou mortelles. Ne démontez pas ce micro-ondes.
INSTRUCTIONS DE MISE À LA TERRE Ce micro-ondes doit être mis à la terre. En cas de court-circuit électrique, la mise à la terre réduit le risque de choc électrique en fournissant un fi l d’évacuation pour le courant électrique. Ce four à micro-ondes est équipé d’un cordon doté d’un fi l de mise à la t...
Page 21 - SÉCURITÉ - LIQUIDE SURCHAUFFÉ; INTERFÉRENCES RADIO
SÉCURITÉ - LIQUIDE SURCHAUFFÉ Les liquides peuvent être surchauffés au-delà du point d’ébullition sans sembler bouillir en raison de la tension superfi cielle du liquide. Des bulles visibles ne seront pas toujours présentes lorsque le liquide est retiré du micro-ondes. Cela pourrait entraîner une ébu...
Page 22 - MÉLANGER
21 INSTRUCTIONS D’INSTALLATION CONSIGNES D’UTILISATION INSTALLATION • Retirez tous les matériaux d’emballage de l’intérieur et de l’extérieur de l’appareil. Ne retirez pas la feuille de mica en carton couvrant le magnétron. • Vérifi ez si l’appareil est endommagé avant de l’utiliser, comme une porte ...
Page 23 - Récipients en plastique et pots de nourriture; GUIDE DES USTENSILES DE CUISINE; CONSIGNES D’UTILISATION
22 RECOMMANDÉ Plat de brunissement à micro-ondes: Utilisé pour brunir l’extérieur des petits produits alimentaires. Suivez les instructions fournies avec le plat brunissant. Enveloppement en plastique à micro-ondes: Utilisé pour retenir la vapeur. Laissez une petite ouverture pour éviter une accumul...
Page 24 - CARACTÉRISTIQUES
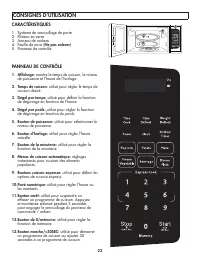
CONSIGNES D’UTILISATION 23 CARACTÉRISTIQUES 1. Système de verrouillage de porte 2. Plateau en verre 3. Anneau de rouleau 4. Feuille de mica (Ne pas enlever) 5. Panneau de contrôle PANNEAU DE CONTRÔLE 1. Affi chage: montre le temps de cuisson, le niveau de puissance et l’heure de l’horloge. 2. Temps d...
Page 25 - PREMIÈRE UTILISATION
CONSIGNES D’UTILISATION 24 PREMIÈRE UTILISATION Lorsque l’appareil est branché pour la première fois, l’affi chage indique “0:00”. Utilisez le pavé numérique pour entrer l’heure actuelle, puis appuyez sur le bouton d’horloge pour confi rmer Lorsque vous réglez la minuterie de cuisson, l’appareil revie...
Page 26 - CUISSON EXPRESSE
25 CONSIGNES D’UTILISATION CUISSON EXPRESSE Lorsque l’appareil n’est pas en service, appuyez sur le pavé numérique de 1 à 6 et l’appareil fonctionnera entre 1 et 6 minutes à 100% de la puissance de cuisson. AJOUTER 30 SECONDES Lorsque l’appareil ne fonctionne pas, appuyez sur la touche marche/+30SEC...
Page 27 - FONCTION MÉMOIRE; temps de cuisson; RÉGLAGE DE LA VERROUILLAGE DES ENFANTS; arrêt; NETTOYAGE; SOINS ET ENTRETIEN
CONSIGNES D’UTILISATION 26 FONCTION MÉMOIRE La fonction mémoire permet de programmer les temps de cuisson et les pouvoirs qui peuvent être rappelés et utilisés encore et encore avec une entrée minimale. Trois programmes de mémoire peuvent être défi nis à la fois, ils sont étiquetés 1, 2 et 3. Pour co...
Page 28 - DÉPANNAGE
27 PROBLEM POSSIBLE CAUSE Aucune puissance • Un fusible peut être souffl é ou le disjoncteur a déclenché • Branchement pas complètement inséré dans la prise murale Arracher ou étinceler pendant l’opération • Les articles métalliques ont été laissés dans l’appareil pendant l’opération • L’appareil fon...
Page 29 - GARANTIE LIMITÉE « EN ATELIER »
LIMITED IN-HOME APPLIANCE WARRANTY This quality product is warranted to be free from manufacturer’s defects in material and workmanship, provided that the unit is used under the normal operating conditions intended by the manufacturer.This warranty is available only to the person to whom the unit wa...
Page 30 - Bienvenido a la familia Danby.; Debe conser var el comprobante
29 Bienvenido a la familia Danby. Estamos orgullosos de nuestros productos de calidad y creemos en un servicio confi able. Le sugerimos que lea este manual del propietario antes de enchufar su nuevo electrodoméstico, ya que contiene información importante de funcionamiento, información de seguridad, ...
Page 31 - ADVERTENCIA; Lea todas las instrucciones antes de usar el microondas.; ¡GUARDA ESTAS INSTRUCCIONES!
Se deben seguir las precauciones básicas de seguridad al usar aparatos eléctricos, incluidas las siguientes: ADVERTENCIA - Para reducir el riesgo de quemaduras, descargas eléctricas, incendios, lesiones a personas o exposición a energía de microondas excesiva: 1. Lea todas las instrucciones antes de...
Page 32 - No sumerja el cable de alimentación ni el enchufe en agua.
¡GUARDA ESTAS INSTRUCCIONES! INSTRUCCIONES DE SEGURIDAD IMPORTANTESLEA Y SIGA TODAS LAS INSTRUCCIONES DE SEGURIDAD 11. No guarde este microondas al aire libre. No use este microondas cerca del agua, por ejemplo, cerca de un fregadero de la cocina, en un sótano húmedo, cerca de una piscina o en un lu...
Page 34 - INSTRUCCIONES DE PUESTA A TIERRA; PELIGRO
INSTRUCCIONES DE PUESTA A TIERRA Este microondas debe estar conectado a tierra. En caso de un cortocircuito eléctrico, la conexión a tierra reduce el riesgo de descarga eléctrica al proporcionar un cable de escape para la corriente eléctrica. Este microondas está equipado con un cable que tiene un c...
Page 36 - INSTRUCCIONES DE INSTALACIÓN; INSTALACIÓN; INSTRUCCIONES DE OPERACIÓN; TÉCNICAS DE COCCIÓN; REVOLVIENDO
35 INSTRUCCIONES DE INSTALACIÓN INSTALACIÓN • Retire todos los materiales de embalaje del interior y del exterior del aparato. No retire la hoja de mica de cartón que cubre el magnetrón. • Compruebe si el aparato está dañado antes de usarlo, como una puerta desalineada o doblada, sellos dañados de l...
Page 37 - GUÍA DE UTENSILIOS DE COCINA
36 RECOMENDADO Plato para dorar en el microondas: Se utiliza para dorar el exterior de los alimentos pequeños. Siga las instrucciones proporcionadas con el plato de dorado. Envoltura de plástico para microondas: Se utiliza para retener el vapor. Deje una pequeña abertura para evitar una acumulación ...
Page 38 - CARACTERISTICAS
37 INSTRUCCIONES DE OPERACIÓN CARACTERISTICAS 1. Sistema de cierre de puerta 2. Bandeja de vidrio 3. Anillo de rodillos 4. Hoja de mica (No quitar) 5. Panel de control PANEL DE CONTROL 1. Pantalla de visualización: Muestra el tiempo de cocción, el nivel de potencia y la hora del reloj. 2. Botón de c...
Page 39 - USO PRIMERO
38 INSTRUCCIONES DE OPERACIÓN USO PRIMERO Cuando el aparato esté enchufado por primera vez, la pantalla mostrará “0:00”. Utilice el teclado numérico para introducir la hora actual y luego pulse el botón de reloj para confi rmar Al confi gurar el temporizador de cocción, el aparato volverá al modo de e...
Page 40 - COCCIÓN EXPRESA
39 INSTRUCCIONES DE OPERACIÓN COCCIÓN EXPRESA Cuando el aparato no esté en funcionamiento, presione el botón numérico de 1 a 6 y el aparato funcionará entre 1 y 6 minutos con una potencia de cocción del 100%. AÑADIR 30 SEGUNDOS Cuando el aparato no esté en funcionamiento, al presionar el botón inici...
Page 41 - FUNCIÓN DE MEMORIA; cocción programada; CONFIGURACIÓN DEL BLOQUEO PARA NIÑOS; LIMPIEZA; CUIDADO Y MANTENIMIENTO
FUNCIÓN DE MEMORIA La función de memoria permite programar tiempos de cocción y potencias que se pueden recuperar y utilizar una y otra vez con una entrada mínima. Tres programas de memoria se pueden confi gurar al mismo tiempo, están etiquetados como 1, 2 y 3. Para confi gurar la memoria 1: 1. Pulse ...
Page 42 - SOLUCIÓN SUGERIDA; PROBLEM; HOJA DE MICA
41 SOLUCIÓN SUGERIDA PROBLEM POSSIBLE CAUSE Ninguna energía • Se puede quemar un fusible o disparar el disyuntor • El enchufe no está completamente insertado en la toma de corriente Arco o chispas durante la operación • Se dejaron artículos metálicos en el aparato durante el funcionamiento • El apar...
Page 43 - GARANTÍA LIMITADA “ACARREADO SOLAMENTE”
LIMITED IN-HOME APPLIANCE WARRANTY This quality product is warranted to be free from manufacturer’s defects in material and workmanship, provided that the unit is used under the normal operating conditions intended by the manufacturer.This warranty is available only to the person to whom the unit wa...