Page 2 - Welcome to the Danby family.; You must keep the original proof
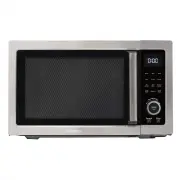
1 Welcome to the Danby family. We are proud of our quality products and we believe in dependable service. We suggest that you read this owner’s manual before plugging in your new appliance as it contains important operation information, safety information, troubleshooting, and maintenance tips to en...
Page 3 - EXCESSIVE MICROWAVE ENERGY” found on page 3.; SAVE THESE INSTRUCTIONS!
IMPORTANT SAFETY INSTRUCTIONS READ AND FOLLOW ALL SAFETY INSTRUCTIONS When using electrical appliances basic safety precautions should be followed, including the following: WARNING - To reduce the risk of burns, electric shock, fi re, injury to persons or exposure to excessive microwave energy: 1. Re...
Page 4 - the appliance is designed for.
IMPORTANT SAFETY INSTRUCTIONS READ AND FOLLOW ALL SAFETY INSTRUCTIONS PRECAUTIONS TO AVOID POSSIBLE EXPOSURE TO EXCESSIVE MICROWAVE ENERGY (a) Do not attempt to operate this oven with the door open since open- door operation can result in harmful exposure to microwave energy. It is important not to ...
Page 5 - SAFETY - SUPERHEATED LIQUID; IMPORTANT SAFETY INSTRUCTIONS; RADIO FREQUENCY INTERFERENCE
4 SAFETY - SUPERHEATED LIQUID Liquids are able to be overheated beyond the boiling point without appearing to be boiling due to the surface tension of the liquid. Visible bubbling will not always be present when the liquid is removed from the appliance. This could result in very hot liquids suddenly...
Page 6 - INSTALLATION INSTRUCTIONS; INSTALLATION; OPERATING INSTRUCTIONS; COOKING TECHNIQUES
5 INSTALLATION INSTRUCTIONS INSTALLATION • Remove all packing materials from the inside and outside of the appliance. Do not remove the cardboard mica sheet covering the magnetron. • Check the appliance for damage before using, such as a misaligned or bent door, damaged door seals, broken or loose d...
Page 7 - COOKING UTENSILS GUIDE
6 COOKING UTENSILS GUIDE Certain utensils are inappropriate for use in a microwave. See below for more information on which utensils are recommended, which should only have limited use and which are not recommended. RECOMMENDED Microwave Browning Dish: Used to brown the exterior of small food items....
Page 8 - FEATURES; Sound; Start
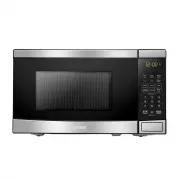
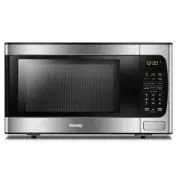
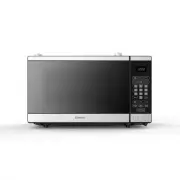
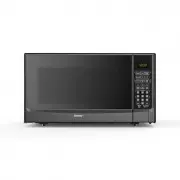
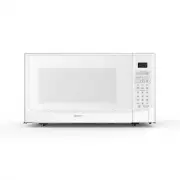
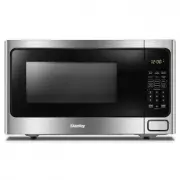
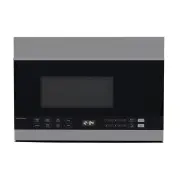
7 OPERATING INSTRUCTIONS FEATURES 1. Control panel 2. Turntable shaft3. Turntable ring assembly4. Glass tray5. Observation window6. Door assembly7. Safety interlock system8. Grill rack9. Baking tray Note: The grill rack is made of metal and should not be used when running the microwave. 1 2 3 4 5 6 ...
Page 9 - MICROWAVE COOKING; Level; FAST MICROWAVE COOKING
8 CLOCK The clock can be only be set as a 12 hour clock. To set the current time: 1. Press the clock/timer button once. The display will show “00:00”. 2. Turn the control knob to set the current hour. Press the clock/timer button to confi rm selection. 3. Turn the control knob to set the current minu...
Page 10 - Press
9 OPERATING INSTRUCTIONS BROIL / GRILL COOKING 1. Press the broil button once. The display will show “G-1”. 2. Press the start/+30sec button to confi rm and then set the desired time by turning the knob. 3. Press the start/+30Sec button to begin the program. 4. The display will show the time remainin...
Page 11 - KEEP WARM; DEFROST BY WEIGHT; Program; DEFROST BY TIME
10 KEEP WARM 1. Press the keep warm button to keep food in the oven warm. The display will show “L1” and the grill icon. Press repeatedly for other programs as per the below chart. Press the start/+30sec button to confi rm. 2. Set the desired temperature by turning the knob, then press the start/+30s...
Page 12 - AUTOMENU; AIR FRY
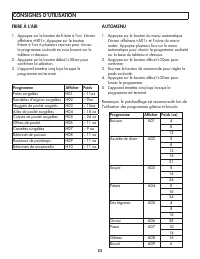
AUTOMENU 1. Press the automenu button. The display will show “A01” and the microwave icon. Press the automenu repeatedly to choose the desired program based on the below chart. 2. Press the start/+30sec button to confi rm.3. Turn the control knob to set the desired weight.4. Press the start/+30sec bu...
Page 13 - DEODORIZATION
OPERATING INSTRUCTIONS DEODORIZATION Press the deodorization button to begin the program. The fan will run for 5 minutes without engaging the heating function to remove odors from the oven. The oven will beep fi ve times when the program is complete. ECO Press the eco button to turn off the display. ...
Page 14 - TROUBLESHOOTING
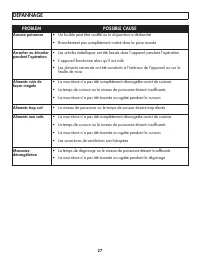
PROBLEM POSSIBLE CAUSE No power • A fuse may be blown or the circuit breaker tripped • Plug not fully inserted into the wall outlet • Door is open Arcing or sparking during operation • Metallic items were left in the appliance during operation • The appliance is being operated while empty • Spilled ...
Page 15 - LIMITED IN-HOME APPLIANCE WARRANTY; LIMITED “CARRY IN” WARRANTY
LIMITED IN-HOME APPLIANCE WARRANTY This quality product is warranted to be free from manufacturer’s defects in material and workmanship, provided that the unit is used under the normal operating conditions intended by the manufacturer.This warranty is available only to the person to whom the unit wa...
Page 16 - Bienvenue dans la famille Danby.; PROLONGATION DE GARANTIE
15 Bienvenue dans la famille Danby. Nous sommes fi ers de nos produits de qualité et nous croyons en un service fi able. Nous vous suggérons de lire ce manuel du propriétaire avant de brancher votre nouvel appareil car il contient des informations de fonctionnement importantes, des informations de séc...
Page 17 - ATTENTION; GARDEZ CES INSTRUCTIONS!
CONSIGNES DE SÉCURITÉ IMPORTANTES LIRE ET SUIVRE TOUTES LES INSTRUCTIONS DE SÉCURITÉ Lors de l’utilisation d’appareils électriques, les précautions de sécurité de base doivent être suivies, y compris les suivantes: ATTENTION - Pour réduire les risques de brûlures, de chocs électriques, d’incendie, d...
Page 18 - les surfaces d’étanchéité.; AVERTISSEMENT; aucun cas la troisième broche de masse du cordon d’alimentation.
CONSIGNES DE SÉCURITÉ IMPORTANTES LIRE ET SUIVRE TOUTES LES INSTRUCTIONS DE SÉCURITÉ PRÉCAUTIONS POUR ÉVITER L’EXPOSITION POSSIBLE À L’ÉNERGIE MICRO-ONDES EXCESSIVE (a) N’essayez pas d’utiliser ce four avec la porte ouverte car le fonctionnement à porte ouverte peut entraîner une exposition dangereu...
Page 19 - SÉCURITÉ - LIQUIDE SURCHAUFFÉ
CONSIGNES DE SÉCURITÉ IMPORTANTES LIRE ET SUIVRE TOUTES LES INSTRUCTIONS DE SÉCURITÉ SÉCURITÉ - LIQUIDE SURCHAUFFÉ Les liquides peuvent être surchauffés au-delà du point d’ébullition sans que cela soit apparent, en raison de la tension superfi cielle du liquide. Le bouillonnement visible occasionné p...
Page 20 - INSTRUCTIONS D’INSTALLATION; CONSIGNES D’UTILISATION; TECHNIQUES DE CUISSON
19 INSTRUCTIONS D’INSTALLATION INSTALLATION • Retirez tous les matériaux d’emballage de l’intérieur et de l’extérieur de l’appareil. Ne retirez pas la feuille de mica en carton couvrant le magnétron. • Vérifi ez si l’appareil est endommagé avant de l’utiliser, comme une porte mal alignée ou pliée, de...
Page 21 - GUIDE DES USTENSILES DE CUISINE; Va au four à micro-ondes; Récipients en plastique et pots de nourriture
20 CONSIGNES D’UTILISATION GUIDE DES USTENSILES DE CUISINE Certains ustensiles sont inappropriés pour une utilisation dans un micro-ondes. Voir ci-dessous pour plus d’informations sur les ustensiles recommandés, qui ne devraient avoir qu’une utilisation limitée et qui ne sont pas recommandés. RECOMM...
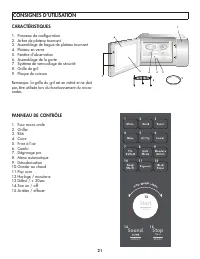
Page 22 - CARACTÉRISTIQUES
CONSIGNES D’UTILISATION 21 CARACTÉRISTIQUES 1. Panneau de confi guration2. Arbre de plateau tournant3. Assemblage de bague de plateau tournant4. Plateau en verre5. Fenêtre d’observation6. Assemblage de la porte7. Système de verrouillage de sécurité8. Grille de gril9. Plaque de cuisson Remarque: la gr...
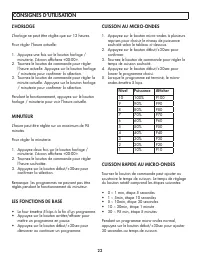
Page 23 - L’HORLOGE; Nivel; CUISSON RAPIDE AU MICRO-ONDES
CONSIGNES D’UTILISATION 22 L’HORLOGE L’horloge ne peut être réglée que sur 12 heures. Pour régler l’heure actuelle: 1. Appuyez une fois sur le bouton horloge / minuterie. L’écran affi chera «00:00». 2. Tournez le bouton de commande pour régler l’heure actuelle. Appuyez sur le bouton horloge / minuter...
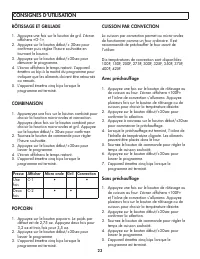
Page 24 - Presse Affi cher Micro onde Gril Convection
23 CONSIGNES D’UTILISATION RÔTISSAGE ET GRILLADE 1. Appuyez une fois sur le bouton de gril. L’écran affi chera «G-1». 2. Appuyez sur le bouton début/+ 30sec pour confi rmer puis réglez l’heure souhaitée en tournant le bouton. 3. Appuyez sur le bouton début/+30sec pour démarrer le programme. 4. L’écran...
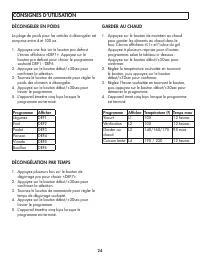
Page 25 - GARDER AU CHAUD; DÉCONGELER EN POIDS; Programme; DÉCONGÉLATION PAR TEMPS
GARDER AU CHAUD 1. Appuyez sur le bouton de maintien au chaud pour garder les aliments au chaud dans le four. L’écran affi chera «L1» et l’icône du gril. Appuyez à plusieurs reprises pour d’autres programmes selon le tableau ci-dessous. Appuyez sur le bouton début/+30sec pour confi rmer. 2. Réglez la ...
Page 26 - FRIRE À L’AIR
AUTOMENU 1. Appuyez sur le bouton du menu automatique. L’écran affi chera «A01» et l’icône du micro-ondes. Appuyez plusieurs fois sur le menu automatique pour choisir le programme souhaité sur la base du tableau ci-dessous. 2. Appuyez sur le bouton début/+30sec pour confi rmer. 3. Tournez le bouton de...
Page 27 - VERROUILLAGE ENFANT / MUET
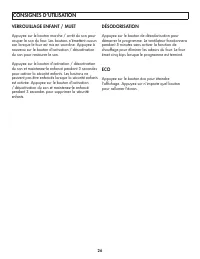
DÉSODORISATION Appuyez sur le bouton de désodorisation pour démarrer le programme. Le ventilateur fonctionnera pendant 5 minutes sans activer la fonction de chauffage pour éliminer les odeurs du four. Le four émet cinq bips lorsque le programme est terminé. ECO Appuyez sur le bouton éco pour éteindr...
Page 28 - DÉPANNAGE
PROBLEM POSSIBLE CAUSE Aucune puissance • Un fusible peut être souffl é ou le disjoncteur a déclenché • Branchement pas complètement inséré dans la prise murale Arracher ou étinceler pendant l’opération • Les articles métalliques ont été laissés dans l’appareil pendant l’opération • L’appareil foncti...
Page 29 - GARANTIE LIMITÉE « EN ATELIER »
LIMITED IN-HOME APPLIANCE WARRANTY This quality product is warranted to be free from manufacturer’s defects in material and workmanship, provided that the unit is used under the normal operating conditions intended by the manufacturer.This warranty is available only to the person to whom the unit wa...
Page 30 - Bienvenido a la familia Danby.; Debe conser var el comprobante
29 Bienvenido a la familia Danby. Estamos orgullosos de nuestros productos de calidad y creemos en un servicio confi able. Le sugerimos que lea este manual del propietario antes de enchufar su nuevo electrodoméstico, ya que contiene información importante de funcionamiento, información de seguridad, ...
Page 31 - ADVERTENCIA; ¡GUARDE ESTAS INSTRUCCIONES!
INSTRUCCIONES DE SEGURIDAD IMPORTANTES LEA Y SIGA TODAS LAS INSTRUCCIONES DE SEGURIDAD Al usar aparatos eléctricos, se deben seguir las precauciones básicas de seguridad, que incluyen lo siguiente: ADVERTENCIA : para reducir el riesgo de quemaduras, descargas eléctricas, incendios, lesiones a las pe...
Page 33 - INSTRUCCIONES DE SEGURIDAD IMPORTANTES; INTERFERENCIA DE RADIO FRECUENCIA
SEGURIDAD – LIQUIDOS SUPER-CALENTADOS Los líquidos pueden ser sobre-calentados mas allá de su punto de ebullición si que asi parezca debido la tensión de la superfi cie del liquido en cuestión. Burbujas visibles no siempre estarán presentes cuando el recipiente con liquido es retirado del aparato mic...
Page 34 - INSTRUCCIONES DE INSTALACIÓN; INSTALACIÓN; INSTRUCCIONES DE OPERACIÓN; TÉCNICAS DE COCCIÓN
33 INSTRUCCIONES DE INSTALACIÓN INSTALACIÓN • Retire todos los materiales de embalaje del interior y del exterior del aparato. No retire la hoja de mica de cartón que cubre el magnetrón. • Compruebe si el aparato está dañado antes de usarlo, como una puerta desalineada o doblada, sellos dañados de l...
Page 35 - GUÍA DE UTENSILIOS DE COCINA
34 GUÍA DE UTENSILIOS DE COCINA Ciertos utensilios son inadecuados para su uso en un microondas. Vea a continuación para más información sobre qué utensilios se recomiendan, que sólo deben tener un uso limitado y que no se recomiendan. RECOMENDADO Plato para dorar en el microondas: Se utiliza para d...
Page 36 - CARACTERISTICAS
35 INSTRUCCIONES DE OPERACIÓN CARACTERISTICAS 1. Panel de control2. Eje del plato giratorio3. Conjunto de anillo de plato giratorio4. Bandeja de cristal5. Ventana de observación6. Montaje de puerta7. Sistema de bloqueo de seguridad8. Parrilla9. Bandeja de hornear Nota: La rejilla de la parrilla está...
Page 37 - RELOJ; COCCIÓN RÁPIDA EN MICROONDAS
36 INSTRUCCIONES DE OPERACIÓN RELOJ El reloj solo se puede confi gurar como un reloj de 12 horas. Para confi gurar la hora actual: 1. Presione el botón de reloj / temporizador una vez. La pantalla mostrará “00:00”. 2. Gire la perilla de control para confi gurar la hora actual. Presione el botón de relo...
Page 38 - Prensa Visualización Microondas Parrilla Convección
37 INSTRUCCIONES DE OPERACIÓN ASAR A LA PARRILLA Y LA PARRILLA 1. Presione el botón de asar una vez. La pantalla mostrará “G-1”. 2. Presione el botón de inicio / + 30 segundos para confi rmar y luego confi gure el tiempo deseado girando la perilla. 3. Presione el botón de inicio / + 30 segundos para c...
Page 39 - MANTENER CALIENTE; DESCONGELAR POR PESO; Programa; DESCONGELAR POR TIEMPO
MANTENER CALIENTE 1. Presione el botón de mantener caliente para mantener calientes los alimentos en el horno. La pantalla mostrará “L1” y el icono de parrilla. Presione repetidamente para otros programas según la tabla siguiente. Presione el botón de inicio / + 30 segundos para confi rmar. 2. Confi g...
Page 40 - FRITURA AL AIRE
AUTOMENU 1. Presione el botón de menú automático. La pantalla mostrará “A01” y el icono de microondas. Presione el menú automático repetidamente para elegir el programa deseado según la tabla siguiente. 2. Presione el botón de inicio / + 30 segundos para confi rmar. 3. Gire la perilla de control para...
Page 41 - BLOQUEO INFANTIL / SILENCIO
DESODORIZACIÓN Presione el botón de desodorización para comenzar el programa. El ventilador funcionará durante 5 minutos sin activar la función de calentamiento para eliminar los olores del horno. El horno emitirá cinco pitidos cuando se complete el programa. ECO Presione el botón eco para apagar la...
Page 42 - SOLUCIÓN SUGERIDA; PROBLEM
41 SOLUCIÓN SUGERIDA PROBLEM POSSIBLE CAUSE Ninguna energía • Se puede quemar un fusible o disparar el disyuntor • El enchufe no está completamente insertado en la toma de corriente Arco o chispas durante la operación • Se dejaron artículos metálicos en el aparato durante el funcionamiento • El apar...
Page 43 - GARANTÍA LIMITADA “ACARREADO SOLAMENTE”
LIMITED IN-HOME APPLIANCE WARRANTY This quality product is warranted to be free from manufacturer’s defects in material and workmanship, provided that the unit is used under the normal operating conditions intended by the manufacturer.This warranty is available only to the person to whom the unit wa...