Page 2 - DANGER
2 SPLIT SYSTEM Air Conditioners Installation manual English CONTENTS 1. SAFETY CONSIDERATIONS …………………………… 2 2. BEFORE INSTALLATION ………………………………… 3 3. SELECTING INSTALLATION SITE ……………………… 4 4. PREPARATIONS BEFORE INSTALLATION …………… 5 5. INDOOR UNIT INSTALLATION …………………………… 6 6. REFRIGERANT PIPING WO...
Page 3 - BEFORE INSTALLATION; WARNING
3 English Before touching electrical parts, turn off the unit. • Do not touch the switch with wet fi ngers. • Touching a switch with wet fi ngers can cause electric shock. Be sure to install an earth leakage breaker. • Failure to install an earth leakage breaker may result in electric shocks, or fi ...
Page 4 - ACCESSORIES; Check the following accessories are included with your unit.; OPTIONAL ACCESSORIES; NOTE; NOTE TO THE INSTALLER; SELECTING INSTALLATION SITE; Select an installation site where the following conditions
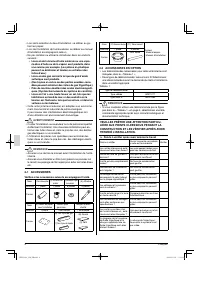
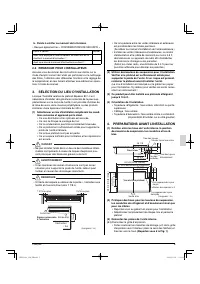
4 English ACCESSORIES 2-1 Check the following accessories are included with your unit. Name (1) Drain pipe (2) Metal clamp (3) Washer for hanger bracket (4) Clamp Quantity 1 pc. 1 pc. 8 pcs. 9 pcs. Shape Name (5) Paper pattern for installation Insulation pipe cover Sealing pad Quantity 1 pc. 1 each ...
Page 5 - PREPARATIONS BEFORE INSTALLATION; Front view
5 English 12 or more Air inlet Air outlet Obstruction Floor Required service space (Length : in.) 1 3/16 or more 1 3/16 or more ∗ ∗ Where pipe between indoor and outdoor units is possible • within the allowable limit.(Refer to the installation manual for the outdoor unit.)Install the indoor and outd...
Page 6 - INDOOR UNIT INSTALLATION; Secure the hanger brackets to the suspension bolts.
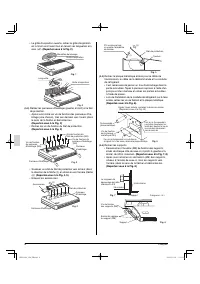
6 English Fig. 5 (ii) (i) Hook Protection net If it raises too much,a hook stops catchingand falling out. Remove the rear metal plate for transmission wire, remote (3-3) controller wire and refrigerant pipe. It is necessary to drill the knock out hole in the removable • part. Knock down several time...
Page 7 - REFRIGERANT PIPING WORK; GENERAL INSTRUCTIONS
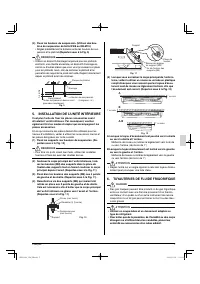
7 English When hanging the indoor unit main body, be sure to (5) use a level or a plastic tube with water in it to make sure the drain piping is set either level or slightly tilted, in order to ensure proper drainage. (Refer to Fig. 12) 1˚ or less 1˚ or less 1˚ or less A A.B B Fig. 12 A.When the dra...
Page 8 - BRAZING REFRIGERANT PIPING; PIPING INSULATION; For piping facing back.
8 English Table 3 Pipe size (in.) Further tightening angle Recommended arm length of tool (in.) φ 3/8 60 to 90 degrees Approx. 7 7/8 φ 5/8 30 to 60 degrees Approx. 11 13/16 After the work is fi nished, make sure to check that there is no gas leak. BRAZING REFRIGERANT PIPING 6-3 DANGER CAUTION TO BE ...
Page 9 - DRAIN PIPING WORK; Carry out the drain piping.; Good; CAUTION
9 English Top plate Top penetration lid Cut out Fig. 18 (A figure from an inside bottom) This hole not using it. Fig. 19 Upward-facing refrigerant pipe L-shaped branch pipe kit (Optional accessories) Top penetration lid clamp section Thermistor lead line Swing motor lead line Fig. 20 (A figure from ...
Page 10 - ELECTRIC WIRING WORK; ELECTRICAL CHARACTERISTICS; WIRING EXAMPLE AND HOW TO SET; HOW TO CONNECT WIRES
10 English Keep in mind that it will become the cause of getting drain • pipe blocked if water collects on drain pipe. ELECTRIC WIRING WORK 8. GENERAL INSTRUCTIONS 8-1 All fi eld supplied parts and materials and electric works must • conform to local codes.Use copper wire only. • For electric wiring...
Page 11 - WIRING EXAMPLE; COMPLETE SYSTEM EXAMPLE
11 English L 1 POWER SUPPLY L 2 power supply How to connect power supplyterminal block (2P) Control box Transmissionterminal block (6P) Power supplyteminal block (2P) Remote controller wireand transmission wire Refer to Fig. 27 Ground terminal Power supply wire Gas pipe Liquid pipe Drain pipe Condui...
Page 12 - When using 1 remote controller for 1 indoor unit.; When using 2 remote controllers for 1 indoor unit.; ATTACHING THE SUCTION GRILLE,; FIELD SETTING; Setting air fi lter sign
12 English 1. When using 1 remote controller for 1 indoor unit. (Normal operation) L 1 L 2 IN/D OUT/D F 1 F 2 F 1 F 2 Control box L 1 L 2 P 1 P 2 P 1 P 2 F 1 F 2 T 1 T 2 Outdoor unit Indoor unit Power supply 208-230V 60Hz Remote controller 2. When using 2 remote controllers for 1 indoor unit. IN/D O...
Page 13 - Wiring Method; COMPUTERISED CONTROL; CENTRALIZED CONTROL; TEST OPERATION; HOW TO DIAGNOSE FOR MALFUNCTION
13 English 2 remote controllers control 11-2 (Controlling 1 indoor unit by 2 remote controllers) When using 2 remote controllers, one must be set to “MAIN” • and the other to “SUB”. MAIN/SUB CHANGEOVER (1) Insert a screw driver into the recess between the up- per and lower part of remote controller ...
Page 14 - MALFUNCTION CODE
14 English If nothing is displayed in the remote controller, check the follow-ing items before attempting a diagnosis based on the malfunc-tion code, as they might be a cause. Disconnected or incorrect wiring (between power supply and • the outdoor unit, between the outdoor and indoor units, and bet...
Page 15 - English
15 English L5 Instantaneous overcurrent (outdoor) Possible earth fault or short circuit in the compressor motor. L8 Electric thermal (outdoor) Possible electrical overload in the compressor or cut line in the compressor motor. L9 Stall prevention (outdoor) Compressor possibly locked. LC Transmission...
Page 17 - ATTENTION; AVANT L’INSTALLATION; Veillez à vérifi er le type de réfrigérant à utiliser avant d’ins-
3 Français Exécuter les travaux d’installation spécifi és en tenant • compte de vents forts, de typhons et de tremblements de terre. Une mauvaise installation peut entraîner la chute du matériel et provoquer des blessures. S’assurer qu’un circuit d’alimentation séparé soit fourni • pour cette unité ...
Page 18 - ACCESSOIRES; Vérifi ez si les accessoires suivants accompagnent l’unité.; ACCESSOIRES EN OPTION; REMARQUE
4 Français Lors de la sélection du lieu d’installation, se référer au ga- • barit en papier.Lors de l'installation de l'unité externe, se référer au manuel • d'installation accompagnant celle-ci.Ne pas installer ou utiliser le climatiseur dans les endroits • suivants : Lieux où de la brume d’huile m...
Page 19 - REMARQUE POUR L’INSTALLATEUR; SÉLECTION DU LIEU D’INSTALLATION; PREPARATIONS AVANT L’INSTALLATION; Vue du faux plafond
5 Français b. Points à vérifi er au moment de la livraison ∗ Revoyez également les « CONSIDÉRATIONS DE SÉCURITÉ » Points à vérifi er Vérifi er Avez-vous expliqué le fonctionnement au client tout en lui montrant le manuel d’instruction ? Avez-vous donné le manuel d’instructions au client ? REMARQUE P...
Page 21 - INSTALLATION DE L’UNITÉ INTÉRIEURE; TUYAUTERIES DE FLUIDE FRIGORIFIQUE
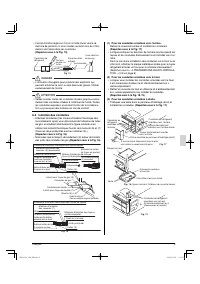
7 Français Fixez les boulons de suspension. (Utilisez des bou- (4) lons de suspension de taille W3/8 ou M8-M10.) Réglez préalablement la distance entre les boulons de sus- • pension et le plafond. (Reportez-vous à la Fig. 9) REMARQUE Utilisez un dispositif d’ancrage tamponné pour les plafonds • exis...
Page 22 - Soudage du tuyau de réfrigérant
8 Français Ne permettez à rien d’autre que le réfrigérant désigné • de se mélanger au circuit du réfrigérant, tel que l’air, etc. En cas de fuite de réfrigérant lorsque vous travaillez sur l’unité, aérez immédiatement la pièce. Instruction générales 6-1 Pour les tuyauteries de fl uide frigorifi que ...
Page 23 - Isolation des conduites; Pour les conduites orientées vers l’arrière.
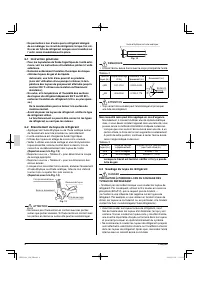
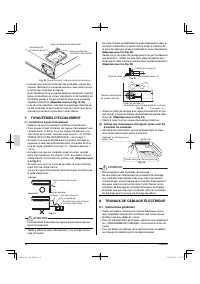
9 Français L’azote doit être réglé sur 2.9 psi à l’aide d’une vanne ré- • ductrice de pression si vous soudez au laiton lors de l’intro-duction de l’azote dans les conduites. (Reportez-vous à la Fig. 15) Conduites de réfrigérant Partie à souder au laiton Pose de ruban adhésif Vanne réductrice de pre...
Page 24 - TUYAUTERIES D’ÉCOULEMENT; Installez les tuyaux d’écoulement.; Correct; TRAVAUX DE CÂBLAGE ÉLECTRIQUE; Instructions générales
10 Français Zone du serre-fils du couvercle du haut Ligne conductrice du thermistor Ligne conductrice du moteur d'oscillation Fig. 20 (figure montrant l'intérieur de la partie basse) Lorsque vous avez fi ni d’installer les conduites, prenez des • ciseaux, découpez le couvercle que vous avez retiré s...
Page 25 - Ne mettez pas l’appareil à la terre sur une canalisation d’eau,; Caractéristiques électriques; EXEMPLE DE CÂBLAGE et INSTALLA-; Branchement des câbles; Même en cas de démontage du couvercle supérieur d’inser-; Cordon de l'alimentation
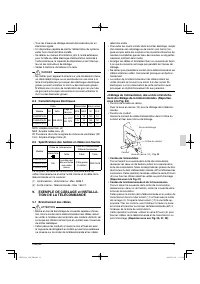
11 Français Tous les travaux de câblage doivent être exécutés par un • électricien agréé. Un disjoncteur capable de mettre l’alimentation du système • entier hors circuit doit être installé. Se référer au manuel d’installation joint à l’unité extérieure • pour la taille du câble électrique d’aliment...
Page 26 - AVERTISSEMENT; EXEMPLE DE CÂBLAGE; EXEMPLE DE SYSTÈME COMPLET
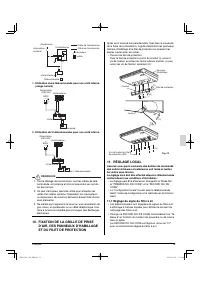
12 Français L 1 POWER SUPPLY L 2 Alimentation Mode de raccordement au bornier d'alimentation (2P) Boîte de commutation Bornier de transmission (6P) Plaque à bornes d'alimentation (2P) Cordon de télécommande et cordon de transmission Reportez-vous à la Fig. 27 Borne de terre Cordon d'alimentation Tuy...
Page 27 - Utilisation de 2 télécommandes pour une unité interne.; FIXATION DE LA GRILLE DE PRISE; Réglage du signe du fi ltre à air
13 Français Câble de l'alimentation Câble de transmission Interrupteur Fusible Alimentation Interrupteur principal Télécommande Unité interne Unité externe 1. Utilisation d'une télécommande pour une unité interne. (usage normal) L 1 L 2 IN/D OUT/D F 1 F 2 F 1 F 2 Control box L 1 L 2 P 1 P 2 P 1 P 2 ...
Page 28 - ; Commande via plusieurs 2 télécommandes; Changement de PRINCIPALE/SECONDAIRE; CONTRÔLE INFORMATIQUE; CONTRÔLE CENTRALISÉ; ESSAI DE FONCTIONNEMENT
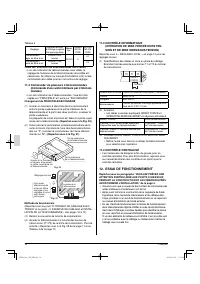
14 Français Tableau 5 Réglage Espacement du temps de l'affi chage du signe du fi ltre (type longue durée) Mode No. PREMIER NO. DE CODE SECOND NO. DE CODE Encrassement léger du fi ltre à air Environ 2500 heures 10 (20) 0 01 Encrassement lourd du fi ltre à air Environ 1250 heures 02 <Lors de l’util...
Page 29 - Code de dysfonctionnement
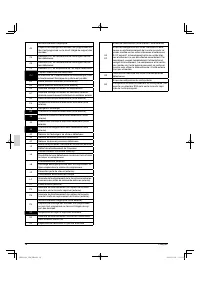
15 Français Tableau 6 Affi chage de la télécommande Contenu “ ” (contrôle centralisé en cours) est affi ché Court circuit à la borne ARRÊT • FORCÉ (T1, T2) “U4” est affiché“UF” est affiché L'unité externe est hors tension. • L'unité externe n'a pas été câblée • pour l'alimentationLe câblage de la tr...
Page 30 - Français
16 Français AJ Jeu de caractères inapproprié. Capacité de stockage des données mal programmée ou rien n’est programmé sur le circuit intégré de support des données. C4 Détecteur R2T de température de l’échangeur de cha-leur défectueux. C5 Détecteur R3T de température de l’échangeur de cha-leur défec...
Page 31 - ALIMENTATION; BOITIÉ DE COMMUTATION; FICHE TECHNIQUE DU CÂBLAGE
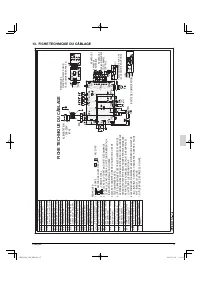
17 Français FICHE TECHNIQUE DU CÂBLAGE 13. A1P C1 F1U HAP KAR KPR M1F M1S Q1M R1T R2T R3T S1Q T1R V1TR X1M X2M Y1E R1T SS1 A2P A3P BS1 H1P H2P H3P H4P SS1 SS2 X18A X23A PLAQUETTE DE CIRCUITS IMPRIMÉS CONDENSATEUR (M1F) FUSIBLE (B 5A, 250V) DIODE ÉMETTRICE DE LUMIÈRE (ÉCRAN DE CONTRÔLE ENTRETIENT-VER...
Page 32 - PELIGRO
2 SPLIT SYSTEM Air Conditioners Installation manual Español CONTENIDO 1. PRECAUCIONES PARA SU SEGURIDAD ……………… 2 2. ANTES DE LA INSTALACIÓN …………………………… 3 3. SELECCIÓN DEL LUGAR DE LA INSTALACIÓN ……… 5 4. PREPARATIVOS ANTES DE LA INSTALACIÓN ……… 6 5. INSTALACIÓN DE LA UNIDAD INTERIOR …………… 7 6. TRABA...
Page 33 - PRECAUCIÓN; ANTES DE LA INSTALACIÓN; Asegúrese de comprobar el tipo de refrigerante que se uti-
3 Español Lleve a cabo las tareas de instalación especifi cadas • teniendo en cuenta la posible presencia de vientos fuer-tes, tifones o terremotos. Si la instalación no se realizara correctamente, la unidad puede caerse y provocar accidentes. Asegúrese de que haya un circuito de alimentación eléc- ...
Page 34 - ACCESORIO; NOTA
4 Español Para la instalación de la unidad exterior, consulte el manual • de instalación que viene junto con la unidad exterior.No instale ni haga funcionar la unidad en los cuartos men- • cionados abajo. Cuartos llenos de aceite mineral, o llenos de vapor o • rocío de aceite como en cocinas. (Las p...
Page 35 - b. Puntos a ser verifi cados en el momento de la entrega; NOTA PARA EL INSTALADOR; SELECCIÓN DEL LUGAR DE LA INSTA-; Seleccione un lugar de instalación que satisfaga las
5 Español b. Puntos a ser verifi cados en el momento de la entrega ∗ También revise las “PRECAUCIONES PARA SU SEGURIDAD” Puntos a ser verifi cados Verifi cado ¿Usted explicó a su cliente sobre las operaciones mientras le mostraba el manual de operación? ¿Usted entregó a su cliente el manual de opera...
Page 36 - Relación de los agujeros para la unidad interior, la posición; Haga los agujeros para los pernos de suspensión, las
6 Español PREPARATIVOS ANTES DE LA INSTA- 4. LACIÓN Relación de los agujeros para la unidad interior, la posición (1) de los pernos de suspensión, las tuberías y el cableado. 3 3/4 6 1/4 26 1/8 Agujero delconducto Vista frontal 62 5/8 (unidad interior) 61 (Longitud de paso del perno de suspensión) 7...
Page 37 - Figura 9; INSTALACIÓN DE LA UNIDAD INTERIOR
7 Español Retire los soportes de la suspensión. (3-4) Afl oje un máximo de 3/8 pulgadas los 2 pernos (M8) • usados para asegurar los soportes de la suspensión los mismos que están a cada lado (4 lugares a la izquierda y derecha) (Vea las Figuras 7, 8) Luego de retirar los tornillo de sujeción (M5) p...
Page 38 - INSTRUCCIONES GENERALES
8 Español B.Cuando la tubería de drenaje esté inclinada hacia la iz- quierda, o hacia la izquiera y atrás. Colóquela a nivel , o con una ligera inclinación hacia la iz-quierda o hacia atrás (1” o menos.) PRECAUCIÓN El colocar la unidad en un ángulo opuesto a la tubería de • drenaje puede ocasionar f...
Page 39 - SOLDADO DE TUBERÍAS DE REFRIGERANTE; AISLAMIENTO DE LA TUBERÍA; Para tuberías orientadas hacia atrás.
9 Español SOLDADO DE TUBERÍAS DE REFRIGERANTE 6-3 PELIGRO PRECAUCIÓN QUE SE DEBE TOMAR CUANDO SE SUEL-DEN TUBERÍAS DE REFRIGERANTE “No utilice fundición (fl ux) cuando suelde tuberías de refrige-rante. En esos casos, utilice fi ltro de metal de fósforo de cobre (BCuP) que suelda sin necesidad de fun...
Page 40 - Lleve a cabo las tuberías de drenaje.; Correcto
10 Español Placa superior Tapa superior de penetración Recortar Figura 18 (Una figura desde el inferior interior) No utilice este agujero Figura 19 Tubería de refrigerante orientada hacia arribaJuego de tubería de bifurcación en forma de "L" (Accesorios opcionales) Sección de la abrazadera d...
Page 41 - TRABAJO DE CABLEADO ELÉCTRICO; CARACTERÍSTICAS ELÉCTRICAS; EJEMPLO DE CABLEADO Y DE CÓMO; CÓMO CONECTAR LOS CABLES
11 Español PRECAUCIÓN Conexiones de tubería de drenaje • No conecte la tubería de drenaje directamente a tuberías de desagüe que huelan a amoníaco. El amoníaco del desagüe puede entrar a la unidad interior a través de las tuberías de drenaje y corroer el intercambiador de calor.Tenga en mente que el...
Page 42 - Vea la Figura 27; ADVERTENCIA
12 Español Anillo de resina (10) Tuerca de fijación Conducto Agujero del conducto Figura 25 Cable de la fuente de alimentación • Desajuste los 2 tornillos de fi jación mientras agarra la tapa de la caja de control, retire la tapa de la caja de control, coteje las fases dentro del bloque de terminale...
Page 43 - EJEMPLO DE CABLEADO; EJEMPLO DEL SISTEMA COMPLETO; Cuando use 2 controladores a distancia para 1 unidad; COLOCACIÓN DE LA PARRILLA DE
13 Español 2. Torque de ajuste para los tornillos del terminal. Use el desarmador correcto para ajustar los tornillos del • terminal. Si el ancho de la hoja de la punta del desar-mador fuera muy pequeña, podría dañarse la cabeza del tornillo y no podría realizarse el ajuste apropiado.Los tornillos d...
Page 44 - CONFIGURACIONES DE CAMPO; CAMBIO DE PRINCIPAL/AUXILIAR
14 Español Panel de decoración Malla de protección (ii) (ii) (i) (i) Gancho Gancho (ii) Figura 29 Tornillos de fijación de la malla de protección (M4) (iii) CONFIGURACIONES DE CAMPO 11. Asegúrese de que las tapas de servicio estén cerradas en las unidades interior y exterior.Las confi guraciones de ...
Page 45 - CONTROL COMPUTARIZADO; CONTROL CENTRALIZADO; OPERACIÓN DE PRUEBA; CÓMO DIAGNOSTICAR UNA FALLA
15 Español CONTROL COMPUTARIZADO 11-3 (OPERACIONES DE APAGADO FORZADO Y ENCENDIDO/APAGADO) Vea “CONFIGURACIONES DE CAMPO” en la págna 12 para las confi guraciones locales. (1) Especifi caciones de los cables y de cómo realizar el ca- bleadoConectar el ingreso desde el exterior a los terminales T1 y ...
Page 46 - CÓDIGO DE FALLA
16 Español (1) Presione el botón de INSPECCIÓN/OPERACIÓN DE PRUEBA (“INSPECTION/TEST OPERATION” en Inglés) y se visualizará el símbolo “ ” y destellará el “0”. (2) Presione el botón de TIEMPO DE PROGRAMACIÓN (“PROGRAMMING TIME” en Inglés) y encuentrará el número de la unidad que se detuvo debido al ...
Page 47 - Español
17 Español P4 Mal función en el sensor de temperatura de la aleta de calor radiante (exterior) PJ Tipo incorrecto de confi guración (unidad exterior) Preselección equivocada de la capacidad de dato. O no hay nada programado en el circuito integrado de mantención de datos U0 Temperatura anormal en la...
Page 48 - FUENTE DE ALIMENTACIÓN; CAJA DE CONTROL; ESQUEMA ELÉCTRICO
18 Español ESQUEMA ELÉCTRICO 13. A1P C1 F1U HAP KAR KPR M1F M1S Q1M R1T R2T R3T S1Q T1R V1TR X1M X2M Y1E R1T SS1 A2P A3P BS1 H1P H2P H3P H4P SS1 SS2 X18A X23A TARJETA DE CIRCUITOS IMPRESOS CAPACITADOR (M1F) FUSIBLE (B 5A, 250V) DIODO ELECTROLUMINOSO (MONITOREO DEL SERVICIO-VERDE) RELÉ MAGNÉTICO (M1S...