Page 2 - Table of Contents
2 Table of Contents Safety Information � � � � � � � � � � � � � � � � � � � � � � � � � � � � � � � � � � � � � � � � � � � � � � � � � � � � � � � � � � � � � � � � � � � 3 Intended Use � � � � � � � � � � � � � � � � � � � � � � � � � � � � � � � � � � � � � � � � � � � � � � � � � � � � � � � � ...
Page 3 - Safety Information
3 Safety Information WARNING: To reduce risk of injury and property damage, you must read this entire guide before assembling, installing and operating the dispenser. WARNING: This product dispenses water at very high temperatures. Failure to use properly can cause personal injury. When operating th...
Page 5 - Indicator Panel Description; Product Dimensions; Package Contents
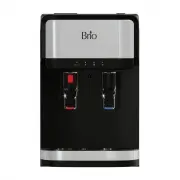
5 Indicator Panel Description 1� Power/self-cleaning UV indicator light – When illuminated, indicates the dispenser is on. When blinking, indicates the self-cleaning UV process is on. 2� Hot water indicator light – When illuminated, indicates that the dispenser is heating water. 3� Cold water indica...
Page 6 - Materials Needed; Determine Installation Location
6 Part Description Quantity Part Description Quantity A Filter connecting tube 2 H Mounting bracket 3 B Shut off valve tube (7 ft.) 1 I Filter clip 10 C Elbow joint tube 1 J Grounding bracket 1 D Filter flushing tube (4 ft.) 1 K Plumber’s tape 1 E Feed water adapter (with extra nut) 1 L Pressure-red...
Page 7 - Install the Filters and Tubing
7 A� Loosen and remove the screw on the bottom left or right of the dispenser. B� Use this screw to attach the grounding bracket (J) on the left or right bottom corner of the water dispenser. J C� Make a hole on the surface where the water dispenser will be installed. D� Attach the grounding bracket...
Page 9 - Connect to the Cold Water Supply
9 G� Connect the filters (G) into the filter housings (F). The sediment filter goes on the left, the pre carbon filter in the middle, and the carbon block filter on the right. H� Add filter clips (I) to each connection where indicated. G F I 4� Connect to the Cold Water Supply CAUTION: DO NOT CONNEC...
Page 10 - Flush the Filters and Complete the Installation
10 G� Gently tug on the tube (B) to ensure a secure connection with the feed water adapter (E). E B 5� Flush the Filters and Complete the Installation IMPORTANT: Follow this procedure every time you replace your filters. IMPORTANT: Ensure the water supply is off before you begin. A� Connect the red ...
Page 11 - Operation; Turn the Dispenser On/Off
11 Operation IMPORTANT: This unit has been tested and sanitized prior to packing and shipping. During transit, dust and odors can accumulate in the tank and lines. Dispense and dispose at least one quart of water prior to drinking any water. Turn the Dispenser On/Off IMPORTANT: Before you activate t...
Page 12 - Troubleshooting; Cleaning and Maintenance
12 Troubleshooting Problem Solution The cold water is not cold. • It takes up to one hour after setup to dispense cold water. • Make sure the power cord is properly connected to a working outlet. • Make sure the back of the dispenser is at least 20 cm from a wall and there is free airflow on all 20 ...
Page 13 - Clean the Dispenser
13 Clean the Dispenser CAUTION: Before cleaning, make sure the power switch is in the O (off) position and unplug the water dispenser. IMPORTANT: This dispenser contains UV technology that will help keep your dispenser clean. However, if you do need to clean your dispenser for any reason, follow the...
Page 15 - Care and Maintenance
15 Care and Maintenance • Keep this dispenser in a dry and cool place and avoid direct sunshine. • Ensure the back of the dispenser is at least 20 cm (8 in.) away from the wall. • Never put the dispenser on paper or foam, which may store water and then cause creepage. Never put anything flammable be...
Page 16 - Warranty
16 Warranty Brio (“Vendor”) warrants to the original purchaser of the Brio Water Coolers (the “Product”), and to no other person, that if the Product is assembled and operated in accordance with the printed instructions accompanying it, then for a period of one (1) year from the date of purchase, al...
Page 18 - Contact Us
©2023 Brio Water Technology, Inc. Contact Us Call: +1 844-257-4103