Page 2 - Contents
2 BREVILLE RECOMMENDS SAFETY FIRST At Breville we are very safety conscious. We design and manufacture consumer products with the safety of you, our valued customer, foremost in mind. In addition we ask that you exercise a degree of care when using any electrical appliance and adhere to the followin...
Page 8 - SUPERHEATED LIQUIDS
8 • Always ensure the temperature of food or drink which has been heated or cooked in the microwave oven has been tested before eating, drinking or serving. PRECAUTIONS TO AVOID POSSIBLE EXPOSURE TO EXCESSIVE MICROWAVE ENERGY • Do not attempt to operate this oven with the door open since open-door o...
Page 9 - RADIO INTERFERENCE
9 pop popcorn longer than the manufacturer's instructions (popping time should not exceed 3 minutes). Longer cooking could cause scorching or fire. • Do not cook any food surrounded by a membrane (such as potatoes, chicken liver, egg yolks, oysters, etc) without first piercing the membrane several tim...
Page 10 - • Connect the equipment into
10 conditions: (1) This device may not cause harmful interference, and (2) this device must accept any interference received, including interference that may cause undesired operation. CAUTION Changes or modifications not expressly approved by the party responsible for compliance could void the user'...
Page 11 - SPECIFICATIONS; Output
11 FOR HOUSEHOLD USE ONLYSAVE THESE INSTRUCTIONS • Consult a qualified electrician if the grounding instructions are not completely understood, or if doubt exists as to whether the appliance is properly grounded. • We do not recommend using an extension cord with this appliance. SPECIFICATIONS Power ...
Page 12 - Components; buttons
12 Components D F H G E A B C A. Viewing windowB. Door handle Pull handle to open. C. LCD screenD. SMART COOK, DEFROST AND REHEAT buttons Automatically cook at the correct power for the correct time. See pages 18-23 for more details on the SMART COOK food types. SMART REHEAT and SMART DEFROST are bo...
Page 13 - Assembly; BEFORE FIRST USE; WARNING
13 Assembly BEFORE FIRST USE Before first use remove all promotional stickers and packaging material. Carefully unpack the microwave oven and keep all the packing material until all the parts of the microwave oven have been found and the appliance has been assembled. It is recommended to keep all the...
Page 15 - Cooking Functions; Press SET CLOCK on shortcuts panel; NOTE; NOTE
15 Cooking Functions SETTING THE CLOCK - 12 OR 24-HOUR CLOCK DISPLAY Press SET CLOCK on shortcuts panel . The clock can be set as 12- or 24-hour clock display. When entering the SET CLOCK setting, ‘12’ will flash. To select a 12-hour clock display, press START to confirm the selection. START Instant +...
Page 16 - Press UNITS on shortcuts panel.; SETTING CHILD LOCK; STANDBY; Stand by mode when the time is not set.
16 SETTING THE UNIT WEIGHT CONVERSION MEASURE Press UNITS on shortcuts panel. You can change from grams (g) to ounces (oz.) The default UNITS is ounces (oz) . The highlighted ounces (oz) will flash to show it can be adjusted. Turn START/TIME or POWER/AMOUNT dials to toggle between grams (g) and ounce...
Page 17 - TURNTABLE OFF; Turntable; TIME & POWER LEVEL ADJUSTMENT; There are 10 power levels available.; Turning the TIME Dial; Turn TIME dial to adjust the time.; The default time will be 30 seconds.; Turning The POWER Dial
17 TURNTABLE OFF The TURNTABLE OFF button allows you to stop the turntable rotation while cooking in the microwave. This setting is useful if using a square dish that will constrain the rotation. In order to activate the TURNTABLE OFF setting, press once on the button. ‘Turntable off’ will be displa...
Page 18 - DYNAMIC POWER ADJUSTMENT; Press START to begin cooking.
18 DYNAMIC POWER ADJUSTMENT To suit your personal preference, adjustment of both time and power is available when using the microwave in manual setting. An example of dynamic power adjustment can be seen below in the SMART COOK mode. Please note that the dynamic power adjustment can only be used wit...
Page 19 - A BIT MORETM BUTTON; Press the SMART COOK button.; After selecting the desired quantity with
19 STOP/CLEAR Press STOP/CLEAR once to pause the current function. Press twice to clear and return to default screen. For Smart Reheat and Smart Cook functions that use Sensor IQ, pressing stop clear ONCE will cancel the current function and return to the default screen. STOP CLEAR R nt x2 When in t...
Page 20 - At the end of the cooking process, if you; Press START to begin your favorite setting.
20 3. At the end of the cooking process, if you think the food requires additional cooking time, you can select the ‘A BIT MORE™’ setting. Close the microwave door and press the A BIT MORE™ button to add A BIT MORE™ cooking time. The timer will start to count down. A Bit More NOTE As soon as A BIT M...
Page 21 - SMART SETTINGS; SMART COOK; Functions
21 SMART SETTINGS Choose from SMART COOK, SMART DEFROST and SMART REHEAT . SMART REHEAT SMART COOK SMART DEFROST Then select from a list of most commonly used food types and press START. The microwave will automatically set the time and power level for the selected food types so no need to program t...
Page 22 - FOR BEST RESULTS; Popcorn
22 FOR BEST RESULTS • Foods should be cooked in a microwave safe container, either plastic, pyrex or ceramic. • Moist foods will cook more evenly because microwave energy heats water molecules very efficiently. Add approximately 1 tablespoon of water per 4oz/115g of food. • For optimal results, arran...
Page 23 - Frozen Vegetables; No water needs to be added.; Chicken
23 Frozen Vegetables The SMART COOK FROZEN VEGETABLES setting is suitable for a selection of frozen vegetables such as carrots, broccoli, cauliflower and peas. Cook times are based on vegetables from the freezer (approx. 0°F/–18°C). Minimum amount of frozen vegetables cooked is 1 cup (125g) and maxim...
Page 24 - SMART REHEAT; Press START to begin reheating.
24 Rice The SMART COOK RICE setting is suitable for white rice such as long grain rice, jasmine and basmati. The Sensor IQ technology will automatically calculate the cooking time for the optimal food result, and for the rice grains to remain separate and tender. Always use a deep microwave-safe bow...
Page 25 - SMART DEFROST
25 SMART DEFROST SMART REHEAT SMART COOK SMART DEFROST The SMART DEFROST setting is designed to gently defrost food without overheating and drying out of edges. Press SMART DEFROST button to enter SMART DEFROST setting. Turn TIME/ FOOD TYPE dial to select the food type. As the TIME/FOOD TYPE dial is...
Page 27 - Soup; SHORTCUTS; Melt chocolate; Soften butter; Open door and press SOFTEN BUTTER
27 Soup The SMART DEFROST SOUP is suitable for defrosting frozen prepared soups directly from the freezer (approx. 0°F/–18°C). Minimum amount of soup to defrost is 8 fl. oz (250mL) and maximum is 64 fl. oz (2L). Remove soup from any packaging and place into a microwave-safe bowl. Cover with a vented m...
Page 28 - Beverage
28 Turn POWER/AMOUNT dial to select weight and press START button to commence softening. Minimum amount of butter is 4oz (115g) and maximum is 1lb (450g). NOTE The butter should be soft enough to push your finger easily into the center. The butter should not be melted. Beverage The shortcut BEVERAGE ...
Page 29 - MICROWAVE USTENSILS
29 Hints & Tips SOME IMPORTANT TIPS FOR MICROWAVE COOKING To help equalize energy in the food so that it cooks evenly follow these helpful tips. • Arrange foods with varying size ends, such as chicken drumsticks and broccoli with the thicker or tougher part positioned to the outside of the dish....
Page 31 - Troubleshooting; PROBLEM
31 Troubleshooting PROBLEM EASY SOLUTION Microwave oven interfering with radio, TV or similar equipment. • Clean door and sealing surface of the oven. • Reorient the receiving antenna of radio or television. • Relocate the microwave oven with respect to the receiver. • Move the microwave oven away f...
Page 32 - the; Smooth Wave
Page 40 - LIQUIDES SURCHAUFFÉS
40 • Ne placez aucun objet entre la porte et le montant de la porte du four. • Le four ne doit être ajusté ou réparé que par du personnel qualifié. LIQUIDES SURCHAUFFÉS • Pour réduire le risque de blessures :i) Ne surchauffez pas les liquides. ii) Remuez le liquide avant de le chauffer et à mi-temps ...
Page 42 - • Augmenter la distance; Poids net; Ces spécifications peuvent changer sans préavis.
42 USAGE DOMESTIQUE SEULEMENT SAUVEGARDEZ CES INSTRUCTIONS INTERFÉRENCE AVEC LES APPAREILS RADIO/TÉLÉ Cet équipement a été testé et déclaré conforme à la Section 18 des règles de la FCC. Son utilisation est soumise aux deux conditions suivantes :(1) il ne doit pas provoquer d'interférence nuisible, ...
Page 43 - Composants; DÉCONGÉLATION et RÉCHAUFFAGE
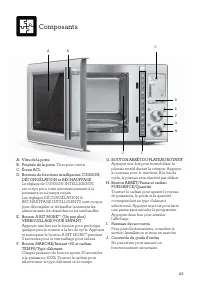
43 Composants D F H G E A B C A. Vitre de la porteB. Poignée de la porte. Tirer pour ouvrir. C. Écran ACLD. Boutons de fonctions intelligentes CUISSON, DÉCONGÉLATION et RÉCHAUFFAGE Le réglage de CUISSON INTELLIGENTE est conçu pour cuire automatiquement à la puissance et au temps requis. Les réglages...
Page 44 - Assemblage; AVANT LA PREMIÈRE UTILISATION
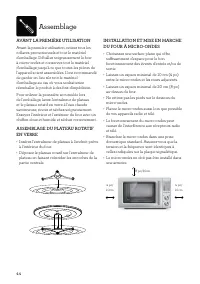
44 Assemblage AVANT LA PREMIÈRE UTILISATION Avant la première utilisation, retirez tous les collants promotionnels et tout le matériel d'emballage. Déballez soigneusement le four à micro-ondes et conservez tout le matériel d'emballage jusqu'à ce que toutes les pièces de l'appareil soient assemblées....
Page 45 - AVERTISSEMENT
45 AVERTISSEMENT • Pour éviter une surcharge du circuit électrique, il est recommandé de ne brancher aucun autre appareil sur le même circuit que le four à micro-ondes (ou autres appareils) lorsqu'il est en marche. • N'installez pas le four à micro-ondes sur le dessus d'une cuisinière ou autres appa...
Page 46 - Fonctions du four à micro-ondes; réglé sur 12 heures ou 24 heures.; . Le volume du signal par
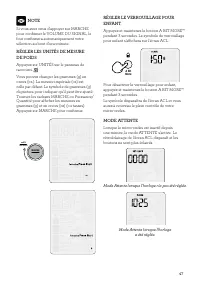
46 Fonctions du four à micro-ondes RÉGLER L'HORLOGE – AFFICHAGE SUR 12 OU 24 HEURES Appuyez sur RÉGLER HORLOGE sur le panneau de raccourcis . L'affichage peut être réglé sur 12 heures ou 24 heures. En activant ce réglage, le nombre '12' clignotera. Pour sélectionner l'affichage sur 12 heures, appuyez ...
Page 47 - MODE ATTENTE; Mode Attente lorsque l'horloge
47 NOTE Si vous avez omis d'appuyer sur MARCHE pour confirmer le VOLUME DU SIGNAL, le four confirmera automatiquement votre sélection au bout d'une minute. RÉGLER LES UNITÉS DE MESURE DE POIDS Appuyez sur UNITÉS sur le panneau de raccourci. Vous pouvez changer les grammes (g) en onces (oz.). La mesure...
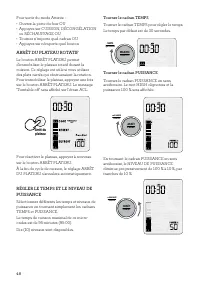
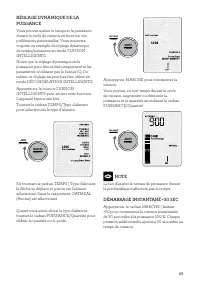
Page 48 - ARRÊT DU PLATEAU ROTATIF; Tourner le cadran TEMPS; Tourner le cadran PUISSANCE
48 Pour sortir du mode Attente : • Ouvrez la porte du four OU • Appuyez sur CUISSON, DÉCONGÉLATION ou RÉCHAUFFAGE OU • Tournez n'importe quel cadran OU • Appuyez sur n'importe quel bouton ARRÊT DU PLATEAU ROTATIF Le bouton ARRÊT PLATEAU permet d'immobiliser le plateau rotatif durant la cuisson. Ce r...
Page 50 - À LA FIN DE LA CUISSON; Après avoir sélectionné la quantité désirée,
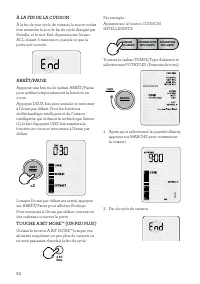
50 À LA FIN DE LA CUISSON À la fin de tout cycle de cuisson, le micro-ondes fera entendre le son de fin de cycle désigné par Breville, et le mot End clignotera sur l'écran ACL durant 5 minutes ou jusqu'à ce que la porte soit ouverte. ARRÊT/PAUSE Appuyez une fois sur le cadran ARRÊT/Pause pour arrêter ...
Page 51 - Appuyez sur MARCHE pour activer ce réglage.
51 À la fin du cycle, si vos aliments requièrent un peu plus de cuisson, fermez la porte et appuyez sur le bouton A BIT MORE™. Le compte à rebours débutera. A Bit More NOTE Dès que le bouton A BIT MORE™ aura été enfoncé, la cuisson commencera immédiatement. Si le bouton A BIT MORE™ est enfoncé et que...
Page 53 - POUR DES RÉSULTATS OPTIMAUX
53 POUR DES RÉSULTATS OPTIMAUX • Les aliments doivent être cuits dans un récipient allant au micro-ondes, soit en plastique, en pyrex ou en céramique. • Les aliments humides cuisent plus uniformément, car l'énergie des micro-ondes chauffe efficacement les molécules d'eau. Ajoutez environ 1 c. à soupe...
Page 57 - Poulet
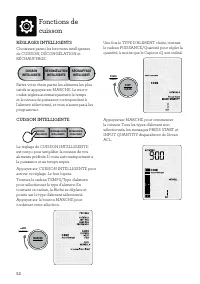
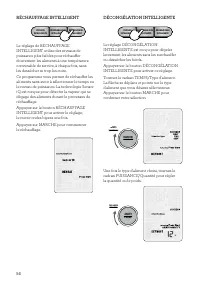
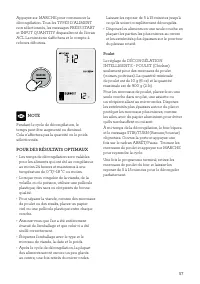
57 Appuyez sur MARCHE pour commencer la décongélation. Tous les TYPES D'ALIMENT non sélectionnés, les messages PRESS START et INPUT QUANTITY disparaîtront de l'écran ACL La minuterie s'affichera et le compte à rebours débutera. MARCHE Instant +30 PS ment NOTE Pendant le cycle de décongélation, le tem...
Page 58 - RACCOURCIS; Chocolat fondu
58 Viande Le réglage de DÉCONGÉLATION INTELLIGENTE – VIANDE (Meat) convient à tout type de viande hachée ou en dés, comme le bœuf, l'agneau et le porc. La quantité minimale de viande à dégeler est de 6 oz (170 g) et la quantité maximale est de 2 lb (900 g). Retirez de la viande l'emballage et le des...
Page 59 - Beurre ramolli; Boisson
59 À mi-temps du cycle, le four bipera et le message STIR/TURN (Remuer/tourner) clignotera. Ouvrez la porte ou appuyez une fois sur ARRÊT/Pause. Remuez le chocolat, refermez la porte et appuyez sur MARCHE pour reprendre le cycle. NOTE À la fin du cycle, il se peut que certains morceaux de chocolat ga...
Page 60 - Trucs et astuces; USTENSILES POUR MICRO-ONDES
60 Trucs et astuces QUELQUES TRUCS IMPORTANTS SUR LA CUISSON AU MICRO-ONDES Pour d'équilibrer le transfert d'énergie et favoriser une cuisson uniforme des aliments, voici quelques conseils utiles. • Disposez les aliments de forme variée, comme les pilons de poulet et le brocoli, de sorte que la part...
Page 62 - Guide de Dépannage; PROBLÈME; PROBLÈME POSSIBLE
62 Guide de Dépannage PROBLÈME SOLUTION FACILE Le micro-ondes crée de l'interférence avec la radio, la télé ou autre équipement similaire. • Nettoyez la porte et la surface d'étanchéité du four. • Réorientez l'antenne réceptrice de la radio ou du téléviseur. • Replacez le micro-ondes en tenant compt...
Page 63 - Notes
Page 64 - Breville Consumer Support
Breville, the Breville Logo, Master Every Moment, Smooth Wave, A Bit More, Power Smoothing and Sensor iQ are trademarks of Breville Pty Ltd (“Breville”) and Breville's products are distributed in the USA and Canada under license. Breville, la Breville Logo, Master Every Moment, Smooth Wave, A Bit Mo...