ZALMAN Z9 - Manuals
ZALMAN Z9 PC Case – User Manual in PDF format online.
Manuals:
User Manual ZALMAN Z9


Summary
2 3 Z9 ICEBERG Precautions Precauciones ■ Read this manual carefully before installing. ■ Check the product and components before installing. If you find any abnormality, contact the location where you purchased the product for a replacement or refund. ■ Wear gloves to prevent accidents when install...
4 5 Z9 ICEBERG 预防措施 Środki ostrożności ■ 在安装前请仔细阅读本手册。 ■ 在安装前请检查产品和组件。如果您发现任何异常情况,请联系您购买本产品的地方,进行更换或是退款。 ■ 在安装本产品时,请佩戴手套,以防止发生事故。 ■ 在安装系统时,可能会发生严重伤害,所以请不要过度用力。 ■ 错误的接线可能导致因短路而造成的火灾。接线时请确保参考本手册。 ■ 在使用该系统时,请小心不要遮挡本产品的通风口。 ■ 避免放置在阳光直晒、有水、潮湿、有油或是尘土过多的地方。请在通风良好的场合保存并使用本产品。 ■ 请不要用化学品擦拭本产品的表面。(例如酒精或丙酮等有机溶剂...
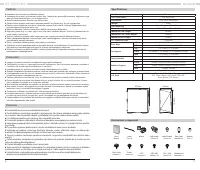
6 7 Z9 ICEBERG Tedbirler Specifications ■ Kurmadan önce bu kılavuzu dikkatlice okuyun. ■ Kurmadan önce ürünü ve bileşenleri kontrol edin. Herhangi bir anormallik bulursanız, değiştirme veya iade için ürünü satın aldığınız yer ile iletişim kurun. ■ Ürünü kurarken kazaları önlemek için eldiven takın. ...