Page 3 - Contents
Important instructions – retain for future use. Contents Sunbeam's Safety Precautions 2 Features of your Torino 4 Torino LCD Display 9 Quick Guide to Using Your Torino 10 Tips to Coffee Making 15 Tips to Milk Texturing 19 Advanced Programming 21 Espresso Recipes 24 Care and Cleaning 26 Coffee Thermo...
Page 4 - Sunbeam’s Safety Precautions
2 Sunbeam’s Safety Precautions SAFETY PRECAUTIONS FOR YOUR SUNBEAM ESPRESSO MACHINE • Always place the unit on a flat, level surface.• Do not operate without water in reservoir. Fill reservoir with only clean and cold water. Observe the maximum filling volume is 2.5L. • Do not remove the filter hand...
Page 6 - Features of your Torino
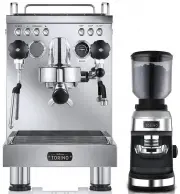
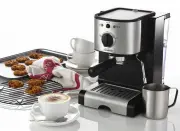
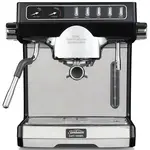
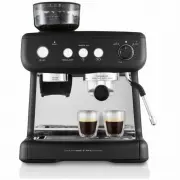
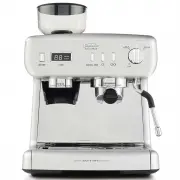
4 Warming rackPreheats cups and glasses, which helps retain the essential characteristics of true espresso - aroma and a rich, sweet taste. Programmable control panelShows the Coffee Temperature, Steam flow rate, Pre-infusion profile and cleaning reminder. Steam control dialTo open and close the ste...
Page 8 - Features of your Torino continued
6 Twin Pump and Triple Thermoblock SystemTrue to commercial use, the Torino has twin pumps, and a unique triple thermoblock heating system, to deliver fast water heat up and delivery at the correct pressure. There is a dedicated pump and 2 dedicated thermoblocks for the espresso, and a dedicated pum...
Page 11 - Torino LCD display
9 Torino LCD display Display modes1. Pre-heat mode: display nothing (the power button flashing) See figure 22. 2. Ready mode: display "READY". See figure 23. 3. Coffee mode: Counting the brewing time. See figure 24. 4.Fill tank: remind user to fill tank by flashing "NO WATER" when lo...
Page 12 - Quick Guide To Using Your Torino
10 Quick Guide To Using Your Torino For greater detail on the coffee making process, use this Quick Guide together with the Tips to Coffee Making and Tips to Milk Texturing sections.WARNING: Before turning on the Torino, ensure the steam and hot water control dials, and the manual pour arm are in th...
Page 13 - Quick Guide To Using Your Torino continued
11 Quick Guide To Using Your Torino continued Making the Espresso Scalding hazard! Warning: Do these steps very carefully. 1. Plug into 230-240V AC powerpoint and turn on. Press POWER button. The unit will beep and button will flash. 2. When it has heated up, READY will appear in the LCD display. 3....
Page 15 - Using your espresso machine continued
13 Texturing the Milk1. Move steam wand over the drip tray, and purge by turning the steam on for a few seconds. 2. Pour about 250-300ml of cold milk into the jug. 3. Place steam wand into the milk, approx. 1cm below surface, and gradually turn steam dial fully on. 4. Ensure steam tip is just off ce...
Page 17 - Tips to Coffee Making
15 Tips to Coffee Making This section gives greater detail about the coffee making process, and should be used together with the Quick Guide to Using your Torino. 1. Pre-heating Glasses• Pre-heating glasses helps to preserve the crema of the espresso and also helps to maintain the temperature of you...
Page 18 - Tips to Coffee Making continued
16 Tips to Coffee Making continued • To ensure a level tamp, use the Sunbeam tamper as a handy guide. Line up the black & silver dividing line on the base of the tamp, and ensure it is level with the rim of the filter basket. • TIP. The coffee dosage and the degree of tamping should remain the s...
Page 21 - Tips to Milk Texturing
19 Tips to Milk Texturing This section gives greater detail about the milk texturing process, and should be used together with the Quick Guide to Using your Torino.Milk texturing is the steaming of milk. The steam coming out of the machine will only heat the milk. You will also need to aerate (add a...
Page 22 - Tips to Milk Texturing continued
20 Tips to Milk Texturing continued • Tip: The amount of foam required depends on the type of coffee being made, and how you like your coffee. Cappuccinos traditionally have more foam than a flat white. • When the milk reaches the desired temperature, turn the steam off. We recommend around 65°C for...
Page 23 - Advanced Programming
21 Advanced Programming The Torino has preset programming on many of its features. You can also vary the programs to suit your beans and how you like your coffee. Press PROGRAM button to access the program mode. Keep pressing PROGRAM to scroll through the programs available. Press - or +, to change ...
Page 24 - Advanced Programming continued
22 3. Pre-infusion profile. Pre-infusion warms and wets the coffee grounds under low pressure to bring the particles together to form one cake/ puck, before full water pressure is applied. Baristas often change the pre-infusion profile according to the type of bean. Adjusting the timing of the pre-i...
Page 26 - Espresso recipes
24 Espresso recipes ESPRESSO (SHORT BLACK)Espresso is a concentrated, full bodied coffee with a stable layer of cream on top – known as ‘crema’. An espresso is the foundation of all café coffee. Variations are achieved by adding different amounts of milk and froth.• 90mL espresso glass or demitasse ...
Page 27 - Espresso recipes continued
25 Espresso recipes continued LATTEAn espresso with steamed milk, typically served in a glass. The smaller mouth of the glass naturally increases the height of the froth layer. The layer of frothed milk on top is about 10mm.• 220mL glass or cup• single or double espresso• steamed milk CAPPUCCINOCapp...
Page 28 - Care and cleaning
26 Care and cleaning The coffee making process involves extracting oils out of coffee grinds to make espresso coffee. Deposits of these oils build up over time and affect the taste of the coffee and operation of the espresso machine. Regular cleaning to remove these oils is essential and will mainta...
Page 29 - Care and cleaning continued
27 Care and cleaning continued Cup warming plate, hot water tap and exteriorWipe over the unit with a damp cloth and wipe dry. Do not use abrasives or metal scourers as these will scratch the exterior surface. Steam wand Keeping the steam wand clean is essential to ensure maximum efficiency of the s...
Page 30 - Coffee Thermoblock Cleaning
28 Deposits of coffee oils build up over time and affect the taste of the coffee and operation of the espresso machine. Therefore the group head will require regular cleaning. It is recommended that the group head is cleaned at a minimum every 3 months, however this will vary depending on the freque...
Page 31 - Coffee Thermoblock Cleaning continued
29 5. Place group handle onto the group head. 6. Place a sufficiently large container or bowl under both pouring spouts. Starting the coffee cleaning cycleIf CLEAN appears on the LCD display, go to Step 3 below. 1. Insert the power cord into a 230-240V AC power outlet and switch the power ‘ON’. 2. P...
Page 33 - Steam Thermoblock Descaling
31 Steam Thermoblock Descaling Scale is a surface build-up of minerals that naturally occur over time in all appliances that are involved with the heating of water. Therefore the espresso machine will require occasional descaling. It is recommended that the espresso machine is descaled every 4-6 mon...
Page 34 - Steam Thermoblock Descaling continued
32 4. Immediately press PROGRAM button (whilst St Clean is still on the LCD display) to start the steam clean cycle. 5. Purge the machine with clean water. Turn the steam dial on and allow water to run for 30-60 seconds, then turn off. 6. Pull out the water reservoir. 7. Place one (1) Sunbeam Espres...
Page 35 - Troubleshooting Guide
33 Troubleshooting Guide Problem Possible Cause Solution Machine has switched off • Machine may be in power saving (sleep) mode. The machine switches off after 1 hour of inactivity. • Simply press any of the buttons on the control panel. Water is not being pulled in from water reservoir • Water rese...
Page 36 - Troubleshooting Guide continued
34 Troubleshooting Guide continued Problem Possible Cause Solution Coffee pours too quickly. Under Extraction • Coffee grind is too coarse.• Too little coffee in the filter basket. • Coffee not tamped firmly enough. • Use a finer grind.• Fill filter basket with more coffee, and/or use a dual filter ...
Page 38 - User Guide; Need help with your appliance?
SUNBEAM TORINO ESPRESSO MACHINE User Guide Need help with your appliance? Contact our customer service team or visit our website for information and tips on getting the most from your appliance. Australia | visit www.sunbeam.com.au phone 1300 881 861 mail Units 5 & 6, 13 Lord Street, Botany NSW ...
Page 42 - Heading
Page 45 - Congratulations
3 Congratulations on the purchase of your Sunbeam Torino Precision Grinder, designed and engineered in Australia. Sunbeam Torino delivers quality, style and superior performance capturing the essence of the commercial kitchen. Inspired by heavy-duty equipment found in restaurants, cafes and bars, th...
Page 49 - Functions of your Torino Precision Grinder (continued)
7 Functions of your Torino Precision Grinder (continued) LED Lit Grind AreaSeamless grind delivery is assisted by LED illumination that engages when grinding begins. An auto dimming feature then dims the light when grinding is complete. Easy clean without recalibrationThe patent pending grind cartri...
Page 51 - Operating your Torino Precision Grinder (continued)
9 Operating your Torino Precision Grinder (continued) For grinding into the group handle7. Insert the group handle into the group handle cradle at an inclined angle placing the front edge under the lip of the group handle cradle. See figure 3. Note: The group handle cradle accepts 58mm group handles...
Page 53 - Adjusting the Grind Setting
11 The range of 30 grind settings allows for precision adjustment. The coffee maker has control of the particle size and ultimately the quality of the resulting brew.Some things to remember when using the coffee grinder;• The smaller the particle size the longer it will take to grind. • After long p...
Page 54 - Care and Cleaning
12 Important Notes:• Spots and marks on the surface of the burrs are part of the hardening process. These marks do not affect the performance of the grinder or the taste of the coffee. • Ensure the coffee grinder is switched off and unplugged from the power outlet prior to cleaning. • Do not immerse...