Page 7 - Frozen Food Calendar; HINTS AND TIPS; Normal operating sounds
Ice-cube production This appliance is equipped with one or more trays for the production of ice-cubes. Do not use metallic instruments to remove the trays from the freezer. 1. Fill these trays with water 2. Put the ice trays in the freezer compartment. Frozen Food Calendar The symbols show different...
Page 8 - CARE AND CLEANING; General warnings
Hints for freezing To help you make the most of the freezing process, here are some important hints:• the maximum quantity of food which can be frozen in 24 hours is shown on the rating plate; • the freezing process takes 24 hours no further food to be frozen should be added during this period; • fr...
Page 10 - TROUBLESHOOTING
TROUBLESHOOTING WARNING! Refer to Safety chapters. What to do if... Problem Possible cause Solution The appliance does not oper-ate. The appliance is switched off. Switch on the appliance. The mains plug is not con-nected to the mains socketcorrectly. Connect the mains plug tothe mains socket correc...
Page 11 - Replacing the lamp
Problem Possible cause Solution Temperature is set incorrect-ly. Refer to "Operation" chapter. Water flows on the rear plateof the refrigerator. During the automatic defrost-ing process, frost melts onthe rear plate. This is correct. Water flows into the refrigera-tor. The water outlet is cl...
Page 12 - Closing the door; INSTALLATION; Location; Electrical Connection
1 2 1 2. Replace the lamp with one of the same power and shape, specifically designed for household appliances. The maximum power is shown on the light bulb cover. 3. Install the lamp cover. 4. Connect the plug to the mains socket. 5. Open the door. Make sure that the light switches on. Closing the ...
Page 14 - Installing the appliance
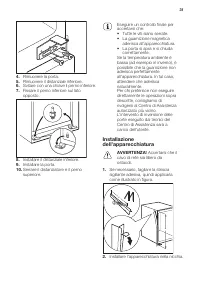
5. Remove the lower spacer. 6. Loosen the lower pin with a key. 7. Tighten the lower pin on the opposite side. 8. Install the lower spacer. 9. Install the door. 10. Tighten the spacer and the upper pin. Do a final check to make sure that: • All screws are tightened. • The magnetic seal adheres to th...
Page 17 - TECHNICAL INFORMATION; Technical data; ENVIRONMENTAL CONCERNS
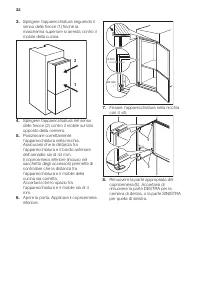
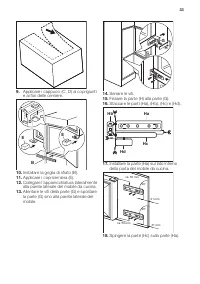
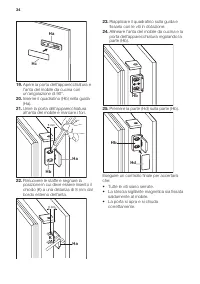
23. Place the small square on the guide again and fix it with the screws supplied. 24. Align the kitchen furniture door and the appliance door by adjusting the part (Hb). Hb 25. Press the part (Hd) on the part (Hb). Hb Hd Do a final check to make sure that:• All screws are tightened. • The sealing s...
Page 19 - Installazione
• Verificare che le aperture di ventilazione, sia sull'apparecchiatura che nella struttura da incasso, non siano ostruite. • Non usare dispositivi elettrici o altri mezzi artificiali non raccomandati dal produttore allo scopo di accelerare il processo di sbrinamento. • Non danneggiare il circuito re...
Page 21 - Smaltimento; USO DELL'APPARECCHIATURA; Accensione; UTILIZZO QUOTIDIANO
Smaltimento ATTENZIONE! Rischio di lesioni o soffocamento. • Staccare la spina dall'alimentazione elettrica. • Tagliare il cavo di rete e smaltirlo. • Rimuovere la porta per evitare che bambini e animali domestici rimangano chiusi all’interno dell’apparecchiatura. • Il circuito refrigerante e i mate...
Page 23 - CONSIGLI E SUGGERIMENTI UTILI
Congelamento di alimenti freschi Lo scomparto congelatore è adatto al congelamento di alimenti freschi e alla conservazione a lungo termine di alimenti congelati e surgelati.Per congelare i cibi freschi è possibile mantenere la regolazione media.Tuttavia, per ottenere un congelamento più rapido, è p...
Page 25 - PULIZIA E CURA; Avvertenze generali
• una volta scongelati, gli alimenti si deteriorano rapidamente e non possono essere ricongelati; • non superare la durata di conservazione indicata sulla confezione. PULIZIA E CURA ATTENZIONE! Fare riferimento ai capitoli sulla sicurezza. Avvertenze generali AVVERTENZA! Prima di qualsiasi intervent...
Page 26 - RISOLUZIONE DEI PROBLEMI
Sbrinamento del congelatore AVVERTENZA! Per rimuovere la brina dall'evaporatore, non usare utensili metallici appuntiti che possano danneggiarlo. Non usare dispositivi meccanici o altri mezzi artificiali non raccomandati dal produttore allo scopo di accelerare il processo di sbrinamento. Un aumento ...
Page 28 - Sostituzione della lampadina
Problema Causa possibile Soluzione La temperatura impostatanon è corretta. Fare riferimento al capitolo"Uso dell'apparecchiatura". Scorre dell'acqua sul pannel-lo posteriore del frigorifero. Durante lo sbrinamento auto-matico, la brina che si formasul pannello posteriore siscioglie. Non si t...
Page 29 - Chiusura della porta; INSTALLAZIONE; Ubicazione; Collegamento elettrico
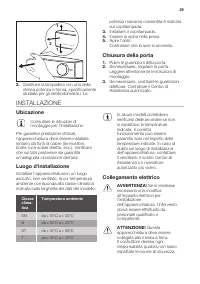
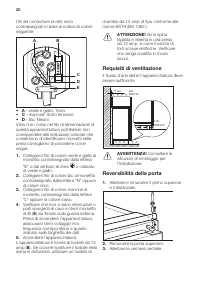
1 2 1 2. Sostituire la lampadina con una della stessa potenza e forma, specificamente studiata per gli elettrodomestici. La potenza massima consentita è indicata sul coprilampada. 3. Installare il coprilampada. 4. Inserire la spina nella presa. 5. Apire l'oblò. Controllare che la luce si accenda. Ch...
Page 35 - DATI TECNICI; Dati tecnici; CONSIDERAZIONI SULL'AMBIENTE
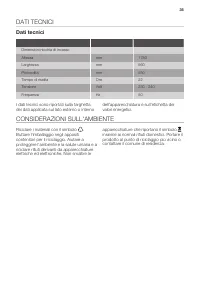
DATI TECNICI Dati tecnici Dimensioni nicchia di incasso Altezza mm 1780 Larghezza mm 560 Profondità mm 550 Tempo di risalita Ore 22 Tensione Volt 230 - 240 Frequenza Hz 50 I dati tecnici sono riportati sulla targhetta dei dati applicata sul lato esterno o interno dell'apparecchiatura e sull'etichett...