Page 2 - SAFETY INFORMATION; Children and vulnerable people safety
CONTENTS Safety information 2 Safety instructions 4 Installation 6 Product description 9 Daily use 11 Hints and tips 14 Care and cleaning 15 Troubleshooting 16 Technical data 18 Energy efficiency 18 Subject to change without notice. SAFETY INFORMATION Before the installation and use of the appliance...
Page 3 - General Safety
General Safety • WARNING: The appliance and its accessible parts become hot during use. Care should be taken to avoid touching heating elements. • Do not operate the appliance by means of an external timer or separate remote-control system. • WARNING: Unattended cooking on a hob with fat or oil can ...
Page 4 - SAFETY INSTRUCTIONS; Installation; WARNING! Only a qualified; Electrical Connection; WARNING! Risk of fire and
SAFETY INSTRUCTIONS Installation WARNING! Only a qualified person must install this appliance. WARNING! Risk of injury or damage to the appliance. • Remove all the packaging. • Do not install or use a damaged appliance. • Follow the installation instructions supplied with the appliance. • Keep the m...
Page 5 - Use; Care and cleaning
disconnect the appliance from the mains at all poles. The isolation device must have a contact opening width of minimum 3 mm. Use WARNING! Risk of injury, burns and electric shock. • Remove all the packaging, labelling and protective film (if applicable) before first use. • Use this appliance in a h...
Page 6 - INSTALLATION; Before the installation
Service • To repair the appliance contact an Authorised Service Centre. • Use original spare parts only. Disposal WARNING! Risk of injury or suffocation. • Contact your municipal authority for information on how to discard the appliance correctly. • Disconnect the appliance from the mains supply. • ...
Page 7 - installation
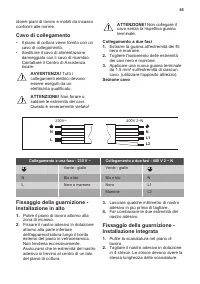
One-phase connection - 230 V~ Two-phase connection - 400 V 2 ~ N N Blue and blue Blue and blue N L Black and brown Black L1 Brown L2 Attaching the seal - On-top installation 1. Clean the worktop around the cut out area. 2. Attach the supplied seal stripe to the lower edge of the hob along the outer ...
Page 8 - Integrated installation
On-top installation 1. R 5mm min. 55mm 560 +1 mm 490 +1 mm 2. 3. min.28 mm 4. min.12 mm Integrated installation 1. 514 +1 mm 560 +1 mm 490 +1 mm 604 +1 mm R5 mm R5 mm 7 mm min.55mm 2. min.38 mm 8
Page 9 - PRODUCT DESCRIPTION; Cooking surface layout; Control panel layout
3. min.12 mm PRODUCT DESCRIPTION Cooking surface layout 1 1 1 2 1 Induction cooking zone 2 Control panel Control panel layout 1 2 3 4 6 7 10 8 9 5 Use the sensor fields to operate the appliance. The displays, indicators and sounds tell which functions operate. 9
Page 10 - Heat setting displays
Sensor field Function Comment 1 ON / OFF To activate and deactivate the hob. 2 Lock / Child Safety De‐ vice To lock / unlock the control panel. 3 Pause To activate and deactivate the function. 4 - Heat setting display To show the heat setting. 5 - Timer indicators of cooking zones To show for which ...
Page 11 - DAILY USE; WARNING! Refer to Safety; Activating and deactivating; The function deactivates the hob; The heat setting
Eco-Heat (3 step Residual heat indicator) WARNING! / / There is a risk of burns from residual heat. The indicators show the level of the residual heat for the cooking zones you are currently using. The indicators may also come on for the neighbouring cooking zones even if you are not using them. The...
Page 12 - Count Down Timer; Pause
Immediately touch until the correct heatsetting comes on. After 3 seconds comes on.To deactivate the function: touch . Power function This function makes more power available to the induction cooking zones. The function can be activated for the induction cooking zone only for a limited period of tim...
Page 13 - To activate the function: touch; Child Safety Device; Set the heat setting in 10 seconds. You; Power limitation; CAUTION! Make sure that the
To activate the function: touch . comes on for 4 seconds. The Timer stays on.To deactivate the function: touch . The previous heat setting comes on. When you deactivate the hob, you also deactivate this function. Child Safety Device This function prevents an accidental operation of the hob.To activa...
Page 14 - HINTS AND TIPS; Cookware; Cookware is suitable for an induction; The noises during operation
When you set the Power limitation function to more than 6.0 kW, power of the hob is divided between two cooking zones in a pair. HINTS AND TIPS WARNING! Refer to Safety chapters. Cookware For induction cooking zones a strong electro-magnetic field creates the heat in the cookware very quickly. Use t...
Page 15 - The noises are normal and do not refer; Examples of cooking; CARE AND CLEANING; General information
• clicking: electric switching occurs. • hissing, buzzing: the fan operates. The noises are normal and do not refer to hob malfunction. Examples of cooking applications The correlation between the heat setting of a zone and its consumption of power is not linear. When you increase the heat setting, ...
Page 16 - Cleaning the hob; discoloration: use a solution of water; TROUBLESHOOTING
• Always use cookware with a clean base. • Scratches or dark stains on the surface have no effect on how the hob operates. • Use a special cleaner suitable for the surface of the hob. • Use a special scraper for the glass. Cleaning the hob • Remove immediately: melted plastic, plastic foil, sugar an...
Page 18 - TECHNICAL DATA; Rating plate; ENERGY EFFICIENCY; Product information according to EU 66/2014
If you cannot find a solution... If you cannot find a solution to the problem yourself, contact your dealer or an Authorised Service Centre. Give the data from the rating plate. Give also three digit letter code for the glass ceramic (it is in the corner of the glass surface) and an error message th...
Page 19 - Energy saving; ENVIRONMENTAL CONCERNS
Energy consumption per cooking zone (EC electric cooking) Left front Left rear Right front 179.3 Wh / kg 183.2 Wh / kg 178.9 Wh / kg Energy consumption of the hob (EC electric hob) 180.5 Wh / kg EN 60350-2 - Household electric cooking appliances - Part 2: Hobs - Methods for measuring performance Ene...
Page 20 - INFORMATIONS DE SÉCURITÉ; Sécurité des enfants et des personnes vulnérables
TABLE DES MATIÈRES Informations de sécurité 20 Consignes de sécurité 22 Installation 24 Description de l'appareil 28 Utilisation quotidienne 30 Conseils 33 Entretien et nettoyage 35 Dépannage 35 Caractéristiques techniques 38 Rendement énergétique 38 Sous réserve de modifications. INFORMATIONS DE SÉ...
Page 21 - Sécurité générale
• Les enfants ne doivent pas nettoyer ni entreprendre une opération de maintenance sur l'appareil sans surveillance. Sécurité générale • AVERTISSEMENT : L'appareil et ses parties accessibles deviennent chauds pendant son fonctionnement. Veillez à ne pas toucher les éléments chauffants. • Ne faites p...
Page 22 - AVERTISSEMENT! Risque de; Branchement électrique; AVERTISSEMENT! Risque
• AVERTISSEMENT : Utilisez uniquement les dispositifs de protection pour table de cuisson conçus ou indiqués comme adaptés par le fabricant de l'appareil de cuisson dans les instructions d'utilisation, ou les dispositifs de protection pour table de cuisson intégrés à l'appareil. L'utilisation de dis...
Page 23 - Utilisation
• Assurez-vous que le câble d'alimentation ou la fiche (si présente) n'entrent pas en contact avec les surfaces brûlantes de l'appareil ou les récipients brûlants lorsque vous branchez l'appareil à des prises électriques situées à proximité. • N'utilisez pas d'adaptateurs multiprises ni de rallonges...
Page 24 - Entretien et nettoyage; Tables de cuisson intégrées
produits inflammables à l'intérieur ou à proximité de l'appareil, ni sur celui-ci. AVERTISSEMENT! Risque d'endommagement de l'appareil. • Ne laissez pas de récipients chauds sur le bandeau de commande. • Ne posez pas de couvercle de casserole chaud sur la surface en verre de la table de cuisson. • N...
Page 25 - Installation du joint - Installation
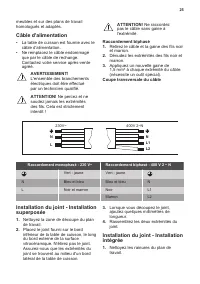
meubles et sur des plans de travail homologués et adaptés. Câble d'alimentation • La table de cuisson est fournie avec le câble d'alimentation. • Ne remplacez le câble endommagé que par le câble de rechange. Contactez votre service après-vente agréé. AVERTISSEMENT! L'ensemble des branchements électr...
Page 26 - Montage; Installation superposée
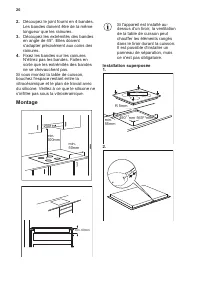
2. Découpez le joint fourni en 4 bandes. Les bandes doivent être de la même longueur que les rainures. 3. Découpez les extrémités des bandes en angle de 45°. Elles doivent s'adapter précisément aux coins des rainures. 4. Fixez les bandes sur les rainures N’étirez pas les bandes. Faites en sorte que ...
Page 27 - Installation intégrée
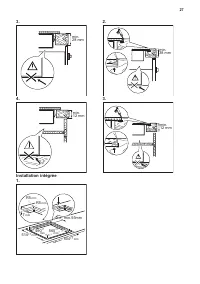
3. min.28 mm 4. min.12 mm Installation intégrée 1. 514 +1 mm 560 +1 mm 490 +1 mm 604 +1 mm R5 mm R5 mm 7 mm min.55mm 2. min.38 mm 3. min.12 mm 27
Page 28 - DESCRIPTION DE L'APPAREIL; Description de la table de cuisson; Description du bandeau de commande
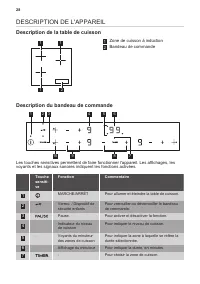
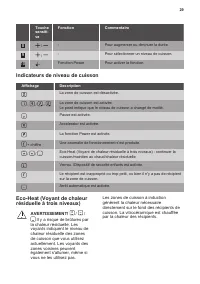
DESCRIPTION DE L'APPAREIL Description de la table de cuisson 1 1 1 2 1 Zone de cuisson à induction 2 Bandeau de commande Description du bandeau de commande 1 2 3 4 6 7 10 8 9 5 Les touches sensitives permettent de faire fonctionner l'appareil. Les affichages, les voyants et les signaux sonores indiq...
Page 30 - UTILISATION QUOTIDIENNE; Activation et désactivation; Cette fonction arrête la table de; Niveau de cuisson
UTILISATION QUOTIDIENNE AVERTISSEMENT! Reportez- vous aux chapitres concernant la sécurité. Activation et désactivation Appuyez sur pendant 1 seconde pour activer ou désactiver la table de cuisson. Arrêt automatique Cette fonction arrête la table de cuisson automatiquement si :• toutes les zones de ...
Page 31 - Minuteur; Minuteur dégressif
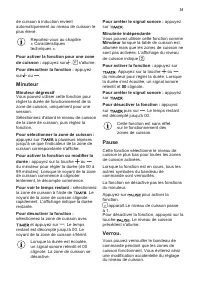
de cuisson à induction revient automatiquement au niveau de cuisson le plus élevé. Reportez-vous au chapitre « Caractéristiques techniques ». Pour activer la fonction pour une zonede cuisson : appuyez sur . s'allume.Pour désactiver la fonction : appuyezsur ou . Minuteur Minuteur dégressif Vous pouve...
Page 32 - Dispositif de sécurité enfants; Réglez le niveau de cuisson dans les; Limitation de puissance
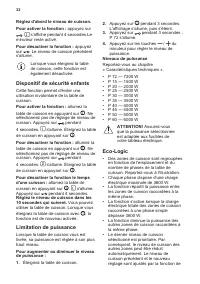
Réglez d'abord le niveau de cuisson.Pour activer la fonction : appuyez sur . s'affiche pendant 4 secondes.Le minuteur reste activé.Pour désactiver la fonction : appuyez sur . Le niveau de cuisson précédent s'allume. Lorsque vous éteignez la table de cuisson, cette fonction est également désactivée. ...
Page 33 - CONSEILS; Récipients; Les plats de cuisson conviennent pour; Bruits pendant le
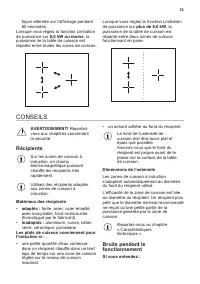
façon alternée sur l'affichage pendant 60 secondes. Lorsque vous réglez la fonction Limitation de puissance sur 6,0 kW ou moins, la puissance de la table de cuisson est répartie entre toutes les zones de cuisson. Lorsque vous réglez la fonction Limitation de puissance sur plus de 6,0 kW, la puissanc...
Page 34 - Exemples de cuisson
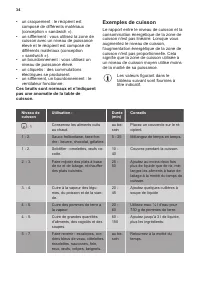
• un craquement : le récipient est composé de différents matériaux (conception « sandwich »). • un sifflement : vous utilisez la zone de cuisson avec un niveau de puissance élevé et le récipient est composé de différents matériaux (conception « sandwich »). • un bourdonnement : vous utilisez un nive...
Page 35 - ENTRETIEN ET NETTOYAGE; Informations générales; métalliques brillantes : utilisez une; DÉPANNAGE
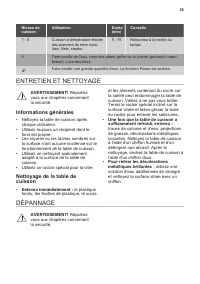
Niveau de cuisson Utilisation : Durée (min) Conseils 7 - 8 Cuisson à température élevée des pommes de terre risso‐ lées, filets, steaks. 5 - 15 Retournez à la moitié du temps. 9 Faire bouillir de l'eau, cuire des pâtes, griller de la viande (goulasch, bœuf braisé), cuire des fritesFaire bouillir une...
Page 36 - En cas d'anomalie de fonctionnement
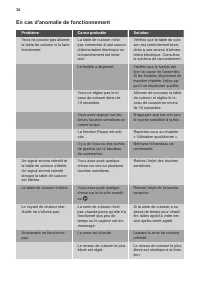
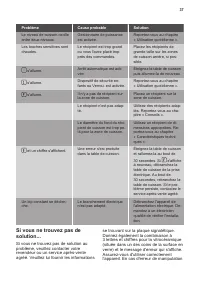
En cas d'anomalie de fonctionnement Problème Cause probable Solution Vous ne pouvez pas allumer la table de cuisson ni la faire fonctionner. La table de cuisson n'est pas connectée à une source d'alimentation électrique ou le branchement est incor‐ rect. Vérifiez que la table de cuis‐ son est correc...
Page 37 - Si vous ne trouvez pas de
Problème Cause probable Solution Le niveau de cuisson oscille entre deux niveaux. Gestionnaire de puissance est activée. Reportez-vous au chapitre « Utilisation quotidienne ». Les touches sensitives sont chaudes. Le récipient est trop grand ou vous l'avez placé trop près des commandes. Placez les ré...
Page 38 - CARACTÉRISTIQUES TECHNIQUES; Plaque signalétique; RENDEMENT ÉNERGÉTIQUE; Informations sur le produit selon la norme EU 66/2014
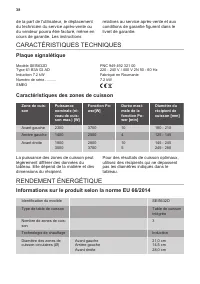
de la part de l'utilisateur, le déplacement du technicien du service après-vente ou du vendeur pourra être facturé, même en cours de garantie. Les instructions relatives au service après-vente et aux conditions de garantie figurent dans le livret de garantie. CARACTÉRISTIQUES TECHNIQUES Plaque signa...
Page 39 - EN MATIÈRE DE PROTECTION DE L'ENVIRONNEMENT
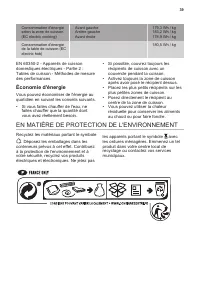
Consommation d'énergie selon la zone de cuisson (EC electric cooking) Avant gauche Arrière gauche Avant droite 179,3 Wh / kg 183,2 Wh / kg 178,9 Wh / kg Consommation d'énergie de la table de cuisson (EC electric hob) 180,5 Wh / kg EN 60350-2 - Appareils de cuisson domestiques électriques - Partie 2 ...
Page 40 - SICHERHEITSHINWEISE; Sicherheit von Kindern und schutzbedürftigen
INHALTSVERZEICHNIS Sicherheitshinweise 40 Sicherheitsanweisungen 42 Montage 45 Gerätebeschreibung 48 Täglicher Gebrauch 50 Tipps und Hinweise 53 Reinigung und Pflege 55 Fehlersuche 55 Technische Daten 58 Energieeffizienz 58 Änderungen vorbehalten. SICHERHEITSHINWEISE Lesen Sie vor der Montage und de...
Page 41 - Allgemeine Sicherheit
• Halten Sie Kinder und Haustiere während des Betriebs oder der Abkühlphase vom Gerät fern. Berührbare Teile sind heiß. • Falls Ihr Gerät mit einer Kindersicherung ausgestattet ist, empfehlen wir, diese einzuschalten. • Kinder dürfen keine Reinigung und Wartung ohne Beaufsichtigung durchführen. Allg...
Page 42 - WARNUNG! Die Montage des; Elektrischer Anschluss
Stromversorgung zu unterbrechen. Verständigen Sie in jedem Fall den autorisierten Kundendienst. • Wenn das Netzkabel beschädigt ist, muss es vom Hersteller, einem autorisierten Kundendienst oder einer gleichermaßen qualifizierten Person ausgetauscht werden, um Gefahrenquellen zu vermeiden. • WARNUNG...
Page 43 - Verwendung
elektrischen Stromversorgung getrennt werden. • Stellen Sie sicher, dass die Daten auf dem Typenschild mit den elektrischen Nennwerten der Netzspannung übereinstimmen. • Vergewissern Sie sich, dass das Gerät ordnungsgemäß installiert ist. Lockere und unsachgemäße Kabel oder Stecker (falls vorhanden)...
Page 45 - MONTAGE; Vor der Montage; Anbringen der Dichtung -
MONTAGE WARNUNG! Siehe Kapitel Sicherheitshinweise. Vor der Montage Notieren Sie vor der Montage des Kochfelds folgende Daten, die Sie auf dem Typenschild finden. Das Typenschild ist auf dem Boden des Kochfelds angebracht. Seriennummer ............ Einbau-Kochfelder Einbau-Kochfelder dürfen nur nach...
Page 47 - Integrierte Montage
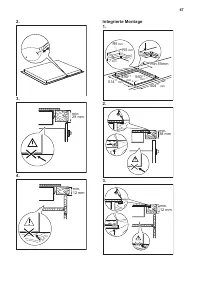
2. 3. min.28 mm 4. min.12 mm Integrierte Montage 1. 514 +1 mm 560 +1 mm 490 +1 mm 604 +1 mm R5 mm R5 mm 7 mm min.55mm 2. min.38 mm 3. min.12 mm 47
Page 48 - GERÄTEBESCHREIBUNG; Kochfeldanordnung; Bedienfeldanordnung
GERÄTEBESCHREIBUNG Kochfeldanordnung 1 1 1 2 1 Induktionskochzone 2 Bedienfeld Bedienfeldanordnung 1 2 3 4 6 7 10 8 9 5 Bedienen Sie das Gerät über die Sensorfelder. Die Anzeigen, Kontrolllampen und akustischen Signale informieren Sie über die aktiven Funktionen. Sensor‐ feld Funktion Kommentar 1 EI...
Page 49 - Anzeigen der Kochstufen
Sensor‐ feld Funktion Kommentar 9 / - Einstellen der Kochstufe. 10 Power -Funktion Einschalten der Funktion. Anzeigen der Kochstufen Anzeigen Beschreibung Die Kochzone ist ausgeschaltet. - / - Die Kochzone ist eingeschaltet. Der Punkt zeigt eine Änderung um eine halbe Kochstufe an.Pause ist eingesch...
Page 50 - TÄGLICHER GEBRAUCH; WARNUNG! Siehe Kapitel; Abschaltautomatik; Mit dieser Funktion wird das Kochfeld; Einstellen der Kochstufe
TÄGLICHER GEBRAUCH WARNUNG! Siehe Kapitel Sicherheitshinweise. Ein- und Ausschalten Berühren Sie 1 Sekunde lang, um das Kochfeld ein- oder auszuschalten. Abschaltautomatik Mit dieser Funktion wird das Kochfeld in folgenden Fällen automatisch ausgeschaltet:• Alle Kochzonen sind ausgeschaltet. • Nach ...
Page 51 - Timer; Kurzzeitmesser
Induktionskochzone kann diese Funktion nur für einen begrenzten Zeitraum eingeschaltet werden. Danach schaltet die Induktionskochzone automatisch wieder auf die höchste Kochstufe um. Siehe Kapitel „Technische Daten“. Einschalten der Funktion für eineKochzone: Berühren Sie . leuchtet auf.Ausschalten ...
Page 52 - Einschalten der Funktion:Berühren Sie; Kindersicherung; Funktion für einen einzelnen; Leistungsbegrenzung
Einschalten der Funktion:Berühren Sie . leuchtet 4 Sekunden auf.Der Timer bleibt eingeschaltet.Ausschalten der Funktion: Berühren Sie . Die vorherige Kochstufe wird angezeigt. Diese Funktion wird auch ausgeschaltet, sobald das Kochfeld ausgeschaltet wird. Kindersicherung Diese Funktion verhindert ei...
Page 53 - weniger einstellen, wird die Leistung des; TIPPS UND HINWEISE; Kochgeschirr; Kochgeschirr eignet sich für; Betriebsgeräusche; Es gibt verschiedene
weniger einstellen, wird die Leistung des Kochfelds auf alle Kochzonen verteilt. Wenn Sie die Funktion Leistungsbegrenzung auf mehr als 6,0 kW, einstellen, wird die Leistung des Kochfelds zwischen zwei Kochzonen eines Paars verteilt. TIPPS UND HINWEISE WARNUNG! Siehe Kapitel Sicherheitshinweise. Koc...
Page 54 - Anwendungsbeispiele für das
Kochgeschirr besteht aus unterschiedlichen Materialien (Sandwichkonstruktion). • Summen: Sie haben die Kochzone auf eine hohe Stufe geschaltet. • Klicken: Bei elektronischen Schaltvorgängen. • Zischen, Surren: Der Ventilator läuft. Die Geräusche sind normal und weisen nicht auf eine Störung des Koch...
Page 55 - REINIGUNG UND PFLEGE; Allgemeine Informationen; Abkühlung des Kochfelds entfernt; FEHLERSUCHE
Kochstufe Verwendung: Dauer (Min.) Hinweise 7 - 8 Braten bei starker Hitze: Rösti, Lendenstücke, Steaks. 5 - 15 Nach der Hälfte der Zeit wen‐ den. 9 Aufkochen von Wasser, Nudeln kochen, Anbraten von Fleisch (Gulasch, Schmorbraten), Frittieren von Pommes frites.Aufkochen großer Mengen Wasser. Die Fun...
Page 58 - Wenn Sie das Problem nicht; TECHNISCHE DATEN; Typenschild; ENERGIEEFFIZIENZ
Wenn Sie das Problem nicht lösen können... Wenn Sie das Problem nicht selbst lösen können, wenden Sie sich an Ihren Händler oder einen autorisierten Kundendienst. Geben Sie die Daten, die Sie auf dem Typenschild finden, an. Geben Sie dabei den dreistelligen Buchstaben-Code für die Glaskeramik (befin...
Page 59 - Energie sparen; UMWELTTIPPS
Heiztechnologie Induktion Durchmesser der kreisför‐ migen Kochzonen (Ø) Vorne links Hinten links Vorne rechts 21,0 cm 14,5 cm 28,0 cm Energieverbrauch pro Kochzone (EC electric coo‐ king) Vorne links Hinten links Vorne rechts 179,3 Wh/kg 183,2 Wh/kg 178,9 Wh/kg Energieverbrauch des Kochfelds (EC ele...
Page 60 - INFORMAZIONI DI SICUREZZA; Sicurezza dei bambini e delle persone vulnerabili
INDICE Informazioni di sicurezza 60 Istruzioni di sicurezza 62 Installazione 64 Descrizione del prodotto 68 Utilizzo quotidiano 70 Consigli e suggerimenti utili 73 Pulizia e cura 75 Risoluzione dei problemi 75 Dati tecnici 78 Efficienza energetica 78 Con riserva di modifiche. INFORMAZIONI DI SICUREZ...
Page 61 - Avvertenze di sicurezza generali
• I bambini non devono eseguire interventi di pulizia e manutenzione sull'apparecchiatura senza essere supervisionati. Avvertenze di sicurezza generali • AVVERTENZA: L'apparecchiatura e le parti accessibili si riscaldano molto durante l'uso. Abbiate cura di non toccare gli elementi riscaldanti. • No...
Page 62 - Installazione; AVVERTENZA! L’installazione; Collegamento elettrico; AVVERTENZA! Rischio di
• Se il cavo di alimentazione è danneggiato, deve essere sostituito dal produttore, da un tecnico autorizzato o da una persona qualificata per evitare situazioni di pericolo. • AVVERTENZA: Servirsi unicamente di protezioni per il piano cottura progettate dal produttore dell'apparecchiatura o indicat...
Page 63 - Utilizzo
• Utilizzare il cavo di alimentazione appropriato. • Evitare che i collegamenti elettrici si aggroviglino. • Assicurarsi che la protezione da scosse elettriche sia installata. • Utilizzare il morsetto fermacavo sul cavo. • Assicurarsi che il cavo di alimentazione o la spina (ove prevista) non sfiori...
Page 64 - AVVERTENZA! Vi è il rischio; Manutenzione e pulizia; INSTALLAZIONE; Prima dell'installazione
• L'olio usato, che può contenere residui di cibo, può liberare delle fiamme ad una temperatura inferiore rispetto ad un olio utilizzato per la prima volta. • Non appoggiare o tenere liquidi o materiali infiammabili, né oggetti facilmente incendiabili sull'apparecchiatura, al suo interno o nelle imm...
Page 65 - Cavo di collegamento; Fissaggio della guarnizione -
idonei piani di lavoro e mobili da incasso conformi alle norme. Cavo di collegamento • Il piano di cottura viene fornito con un cavo di collegamento. • Sostituire il cavo di alimentazione danneggiato con il cavo di ricambio. Contattare il Centro di Assistenza locale. AVVERTENZA! Tutti i collegamenti...
Page 66 - Montaggio; Installazione in alto
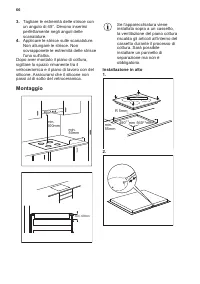
3. Tagliare le estremità delle strisce con un angolo di 45°. Devono inserirsi perfettamente negli angoli delle scanalature. 4. Applicare le strisce sulle scanalature. Non allungare le strisce. Non sovrapponete le estremità delle strisce l'una sull'altra. Dopo aver montato il piano di cottura, sigill...
Page 67 - Installazione integrata
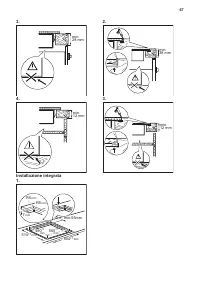
3. min.28 mm 4. min.12 mm Installazione integrata 1. 514 +1 mm 560 +1 mm 490 +1 mm 604 +1 mm R5 mm R5 mm 7 mm min.55mm 2. min.38 mm 3. min.12 mm 67
Page 68 - DESCRIZIONE DEL PRODOTTO; Disposizione della superficie di cottura; Disposizione del pannello dei comandi
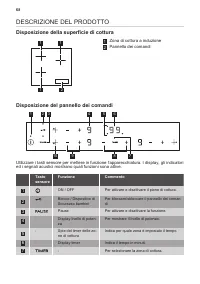
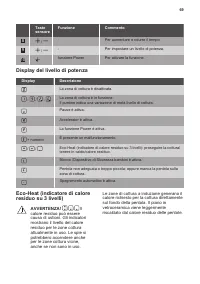
DESCRIZIONE DEL PRODOTTO Disposizione della superficie di cottura 1 1 1 2 1 Zona di cottura a induzione 2 Pannello dei comandi Disposizione del pannello dei comandi 1 2 3 4 6 7 10 8 9 5 Utilizzare i tasti sensore per mettere in funzione l'apparecchiatura. I display, gli indicatori ed i segnali acust...
Page 70 - UTILIZZO QUOTIDIANO; Attivazione e disattivazione; La funzione spegne automaticamente il; Livello di potenza
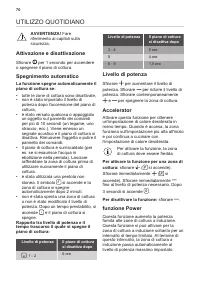
UTILIZZO QUOTIDIANO AVVERTENZA! Fare riferimento ai capitoli sulla sicurezza. Attivazione e disattivazione Sfiorare per 1 secondo per accendere o spegnere il piano di cottura. Spegnimento automatico La funzione spegne automaticamente il piano di cottura se:• tutte le zone di cottura sono disattivate...
Page 71 - Timer del conto alla rovescia
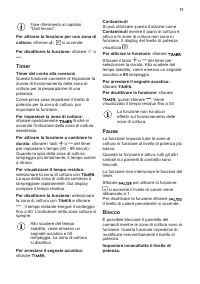
Fare riferimento al capitolo "Dati tecnici". Per attivare la funzione per una zona dicottura: sfiorare . si accende.Per disattivare la funzione: sfiorare o . Timer Timer del conto alla rovescia Questa funzione consente di impostare la durata di funzionamento della zona di cottura per la prep...
Page 72 - Per attivare la funzione: sfiorare; Dispositivo di Sicurezza; livello di potenza entro 10 secondi. È; Limitazione di potenza; ATTENZIONE! Assicurarsi che
Per attivare la funzione: sfiorare . si accende per 4 secondi.Il Timer rimane acceso.Per disattivare la funzione: sfiorare . Il livello di potenza precedente si accende. Quando si spegne il piano di cottura, si interrompe anche questa funzione. Dispositivo di Sicurezza bambini Questa funzione impedi...
Page 73 - CONSIGLI E SUGGERIMENTI UTILI; Pentole; Una pentola è adatta per un piano di; I rumori durante l'uso
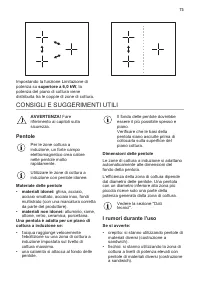
Impostando la funzione Limitazione di potenza su superiore a 6,0 kW, la potenza del piano di cottura viene distribuita tra le coppie di zone di cottura. CONSIGLI E SUGGERIMENTI UTILI AVVERTENZA! Fare riferimento ai capitoli sulla sicurezza. Pentole Per le zone cottura a induzione, un forte campo ele...
Page 74 - Esempi di impiego per la cottura
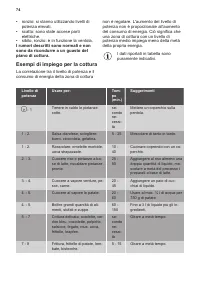
• ronzio: si stanno utilizzando livelli di potenza elevati. • scatto: sono state accese parti elettriche. • sibilo, ronzio: è in funzione la ventola. I rumori descritti sono normali e non sono da ricondurre a un guasto del piano di cottura. Esempi di impiego per la cottura La correlazione tra il liv...
Page 75 - PULIZIA E CURA; Informazioni generali; sufficientemente raffreddato, è; RISOLUZIONE DEI PROBLEMI
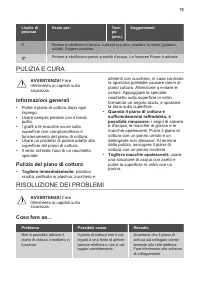
Livello di potenza Usare per: Tem‐ po (min.) Suggerimenti 9 Portare a ebollizione l'acqua, cuocere la pasta, rosolare la carne (gulasch, stufati), friggere patatine.Portare a ebollizione grandi quantità d'acqua. La funzione Power è attivata. PULIZIA E CURA AVVERTENZA! Fare riferimento ai capitoli su...
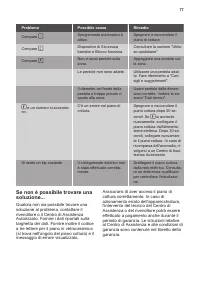
Page 77 - Se non è possibile trovare una
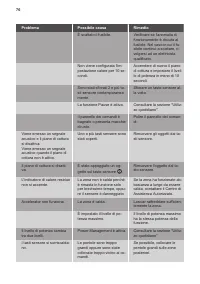
Problema Possibile causa Rimedio Compare . Spegnimento automatico è attiva. Spegnere e riaccendere il piano di cottura. Compare . Dispositivo di Sicurezza bambini o Blocco funziona. Consultare la sezione "Utiliz‐ zo quotidiano". Compare . Non vi sono pentole sulla zona. Appoggiare una pentol...
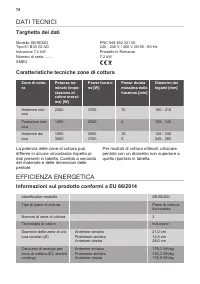
Page 78 - DATI TECNICI; Targhetta dei dati; EFFICIENZA ENERGETICA; Informazioni sul prodotto conformi a EU 66/2014
DATI TECNICI Targhetta dei dati Modello SEI5632D PNC 949 492 321 00 Tipo 61 B3A 02 AD 220 - 240 V / 400 V 2N 50 - 60 Hz Induzione 7.2 kW Prodotto in Romania Numero di serie.......... 7.2 kW SMEG Caratteristiche tecniche zone di cottura Zona di cottu‐ ra Potenza no‐ minale (impo‐ stazione di calore m...
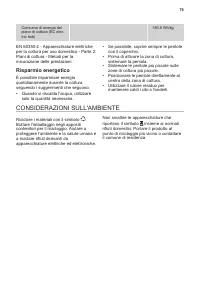
Page 79 - Risparmio energetico; CONSIDERAZIONI SULL'AMBIENTE
Consumo di energia del piano di cottura (EC elec‐ tric hob) 180,5 Wh/kg EN 60350-2 - Apparecchiature elettriche per la cottura per uso domestico - Parte 2: Piani di cottura - Metodi per la misurazione delle prestazioni Risparmio energetico È possibile risparmiare energia quotidianamente durante la c...









 Smeg SI1F7645B
User Manual
Smeg SI1F7645B
User Manual
 Smeg CBE66MF
Manual
Smeg CBE66MF
Manual
 Smeg Campana decorativa Smeg KCVR9NE, cristal-negro, 7l
User Manual
Smeg Campana decorativa Smeg KCVR9NE, cristal-negro, 7l
User Manual
 Smeg CO200
Manual
Smeg CO200
Manual
 Smeg SUK61PX8
User Manual
Smeg SUK61PX8
User Manual
 Smeg BQ6030
Manual
Smeg BQ6030
Manual
 Smeg VA91XVG
Manual
Smeg VA91XVG
Manual
 Smeg SE2641CX
Manual
Smeg SE2641CX
Manual
 Smeg SUK81MFX
Installation Manual
Smeg SUK81MFX
Installation Manual
 Smeg SCA301X
Manual
Smeg SCA301X
Manual
 Smeg CR305AP
Manual
Smeg CR305AP
Manual
 Smeg NCT 335 E
Manual
Smeg NCT 335 E
Manual
 Smeg ST337
User Manual
Smeg ST337
User Manual
 Smeg SCA130P
Manual
Smeg SCA130P
Manual
 Smeg SA702X-5
Manual
Smeg SA702X-5
Manual
 Smeg S 34 STRP
Manual
Smeg S 34 STRP
Manual
 Smeg WDI147
User Manual
Smeg WDI147
User Manual
 Smeg SNZ61MFA1
Manual
Smeg SNZ61MFA1
Manual
 Smeg ST4108
Manual
Smeg ST4108
Manual