Page 2 - IMPORTANT SAFEGUARDS; FOR HOUSEHOLD USE ONLY; always be observed, including the following:; WARNING; GENERAL USE; SAVE THESE INSTRUCTIONS; POLARIZED PLUG; TECHNICAL SPECIFICATIONS:; Contents; Table des matières; Índice de contenidos; Rocket; Thank you for purchasing the; Gracias por haber comprado la
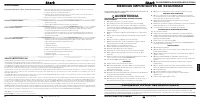
w w w . s h a r k r o c k e t . c o m 1 . 8 0 0 . 7 9 8 . 7 3 9 8 2 3 IMPORTANT SAFEGUARDS FOR HOUSEHOLD USE ONLY READ ALL INSTRUCTIONS BEFORE USE When using an electrical appliance, basic safety precautions should always be observed, including the following: WARNING TO REDUCE THE RISK OF FIRE, ELEC...
Page 3 - CLICK
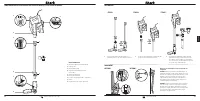
Storage Hook STEP 1 STEP 2 STEP 3 ASSEMBLY STORAGE 1 Insert the wand into the floor nozzle connector until you hear a “click”. 2 Insert the handheld portion into the top of the wand until you hear a “click”. 3 This vacuum comes with a detachable clip to store up to 2 accessories on board. Snap clip ...
Page 4 - NOTE: Both power settings provide the same suction; USING THE MOTORIZED FLOOR NOZZLE
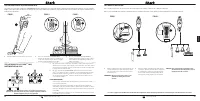
Wand Release STEP 1 STEP 1 STEP 2 STEP 2 STEP 3 w w w . s h a r k r o c k e t . c o m 1 . 8 0 0 . 7 9 8 . 7 3 9 8 6 7 1 Stand the vacuum upright. Step on the foot pedal and pull the wand up to disconnect from the floor nozzle. Attach desired cleaning accessory. NOTE: Both power settings provide the ...
Page 5 - OR; ACCESSORIES
Empty Empty Monthly DO NOT SCALE DRAWING 650_motorized_5_asm SHEET 1 OF 1 UNLESS OTHERWISE SPECIFIED: SCALE: 1:5 WEIGHT: REV DWG. NO. A SIZE TITLE: NAME DATE COMMENTS: Q.A. MFG APPR. ENG APPR. CHECKED DRAWN FINISH MATERIAL INTERPRET GEOMETRIC TOLERANCING PER: DIMENSIONS ARE IN INCHES TOLERANCES: FRA...
Page 6 - CONSIGNES DE SÉCURITÉ IMPORTANTES; POUR USAGE DOMESTIQUE SEULEMENT; AVERTISSEMENT; TROUBLE-SHOOTING GUIDE
w w w . s h a r k r o c k e t . c o m 1 . 8 0 0 . 7 9 8 . 7 3 9 8 1 0 1 1 Vacuum is not picking up dirt. No suction or light suction • Check filters to see if they need cleaning. Follow instructions for rinsing and drying the filters before re- inserting back into the vacuum. • Dust cup may be full;...
Page 7 - Nous vous recommandons l’un des deux modes de; CLIC
Storage Hook ÉTAPE 1 ÉTAPE 2 ÉTAPE 3 ASSEMBLAGE RANGEMENT 1 Insérez le tube dans le raccord de la brosse à planchers jusqu’à ce que vous entendiez un «clic». 2 Insérez la section portative à l’extrémité du tube jusqu’à ce que vous entendiez un «clic». 3 Cet aspirateur comprend un support amovible pe...
Page 8 - mode ou l’autre de vitesse.
Wand Release ÉTAPE 1 ÉTAPE 1 ÉTAPE 2 w w w . s h a r k r o c k e t . c o m 1 . 8 0 0 . 7 9 8 . 7 3 9 8 1 4 1 5 1 Mettez l’aspirateur en position verticale. Marchez sur la pédale pour pied sur la buse de plancher et tirez le tube vers le haut pour le sortir. Fixez l’accessoire de nettoyage désiré. RE...
Page 9 - ÉTAPE 1; ACCESSOIRES
Empty Empty Monthly Dust Cup Release ÉTAPE 1 ÉTAPE 2 w w w . s h a r k r o c k e t . c o m 1 . 8 0 0 . 7 9 8 . 7 3 9 8 1 6 1 7 Certains accessoires sont inclus. Pour obtenir la liste des accessoires inclus avec ce modèle, consultez le Guide de démarrage rapide. Pour assurer la puissance d’aspiration...
Page 10 - MEDIDAS IMPORTANTES DE SEGURIDAD; PARA USO DOMÉSTICO SOLAMENTE; ADVERTENCIA; GUIDE DE DÉPANNAGE
w w w . s h a r k r o c k e t . c o m 1 . 8 0 0 . 7 9 8 . 7 3 9 8 1 8 1 9 L’aspirateur n’aspire pas les saletés. Succion faible ou inexistante • Inspectez les filtres pour vérifier s’il faut les nettoyer. Nettoyez et séchez les filtres en respectant les instructions avant de réinsérer ceux-ci dans l...
Page 12 - NOTA: Ambas velocidades tienen el mismo poder de
Wand Release ETAPA 1 ETAPA 1 ETAPA 2 ETAPA 2 ETAPA 3 w w w . s h a r k r o c k e t . c o m 1 . 8 0 0 . 7 9 8 . 7 3 9 8 2 2 2 3 1 Coloque la aspiradora en posición vertical. Pise el pedal de color de la boquilla para pisos y tire del tubo hacia arriba para desconectarlo de la boquilla. Coloque el acc...
Page 13 - ETAPA 1; ACCESORIOS
Empty Empty Monthly Dust Cup Release ETAPA 1 ETAPA 2 w w w . s h a r k r o c k e t . c o m 1 . 8 0 0 . 7 9 8 . 7 3 9 8 2 4 2 5 Algunos accesorios de limpieza están incluidos. Para obtener una lista de los elementos que se incluyen con este modelo, consulte el Inicio rápido. Para mantener la succión ...
Page 14 - GUÍA DE DIAGNÓSTICO DE PROBLEMAS
w w w . s h a r k r o c k e t . c o m 1 . 8 0 0 . 7 9 8 . 7 3 9 8 2 6 2 7 La aspiradora no levanta la tierra. No hay succión o es muy baja • Revise si hay que limpiar los filtros. Siga las instrucciones para enjuagar y secar los filtros antes de volver a instalarlos en la aspiradora. • El recipiente...