Shark WD101 - User Manual

Shark WD101 – User Manual, read for free online in PDF format. We hope this helps you resolve any issues you may have. If you have further questions, please contact us through the contact form.


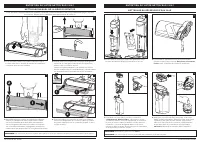


Table of Contents:
- Page 2 – IMPORTANT SAFETY INSTRUCTIONS; FOR HOUSEHOLD USE ONLY.; SAVE THESE INSTRUCTIONS; s h a r k c l e a n . c o m
- Page 3 – ASSEMBLY; Align the; Pole; with the opening in the; Main Body; and insert firmly until it clicks; Storage Tray; on the floor near; Press the release button and lift off the; FILLING THE CLEAN SOLUTION TANK; REMOVE THE CLEAN SOLUTION TANK
- Page 4 – POWE R ON; HARD FLOOR MODE; CONTROL S; Recommended after every use; Power; POWE R OFF; Dirty Water Tank
- Page 5 – CLEANING THE DIRT Y WATER TANK; MANUALLY CLEANING THE BRUSHROLL
- Page 7 – SharkNinja; What is covered by this warranty?; registeryourshark.com; How state law applies
- Page 8 – NOTES; PLEASE READ CAREFULLY AND KEEP FOR FUTURE REFERENCE.; TECHNICAL SPECIFICATIONS; You can find the model and serial numbers on; RECORD THIS INFORMATION; Model Number: �����������������������������; REGISTER YOUR PURCHASE
- Page 9 – AVERTISSEMENT; CONSIGNES DE SÉCURITÉ IMPORTANTES; POUR UN USAGE DOMESTIQUE UNIQUEMENT.; CONSERVEZ CES INSTRUCTIONS
- Page 10 – ASSEMBLAGE; tige; UTILISATION DE VOTRE NETTOYEUR 3 EN 1; réservoir de solution nettoyante; REMPLISSAGE DU RÉSERVOIR DE SOLUTION NET TOYANTE; RETRAIT DU RÉSERVOIR DE SOLUTION NETTOYANTE.
- Page 11 – COMMANDES; Recommandé après chaque utilisation; MISE E N MARCHE; MODES DE NET TOYAGE; réservoir d’eau sale
- Page 12 – Easy Pour (versement; NET TOYAGE DU RÉSERVOIR D’ EAU SALE; ENTRETIEN DE VOTRE NETTOYEUR 3 EN 1; NET TOYAGE MANUEL DE L A BROSSE ROTATIVE; enlever les débris ou les cheveux enroulés autour de celle-ci.
- Page 13 – involontaire, éteignez l’appareil avant toute réparation.; VOYANT À DEL
- Page 14 – SharkNinja Operating LLC.; Qu’est-ce qui est couvert par cette garantie?; Comment s’applique la loi de l’État
- Page 15 – CARACTÉRISTIQUES TECHNIQUES; Le numéro de modèle et le numéro de; CONSIGNEZ LES RENSEIGNEMENTS CI-DESSOUS; Numéro de modèle : �������������������������; ENREGISTREZ VOTRE ACHAT; REMARQUES
- Page 16 – SOLO PARA USO DOMÉSTICO.
- Page 17 – ENSAMBLADO; Alinea el; palo; con la abertura de la; estructura principal; e insértalo hasta que; bandeja de almacenamiento; en el piso cerca de una toma de corriente.; Presiona el botón de liberación y levanta; LLENADO DEL TANQUE DE SOLUCIÓN LIMPIA; RETIRAR EL TANQUE DE SOLUCIÓN LIMPIA
- Page 18 – APAGADIDO; CONTROLES; E NCE NDIDO; encendido; MODO DE PISO DURO; MODOS DE LIMPIEZA; MODO DE ALFOMBR A; CICLO DE AUTOLIMPIEZA; Recomendado después de cada uso; tanque de agua sucia
- Page 19 – LIMPIEZA DEL TANQUE DE AGUA SUCIA; LIMPIEZA MANUAL DEL CEPILLO GIR ATORIO; durante
- Page 20 – desconecta la corriente antes de realizar el mantenimiento.; INDICADOR LED
- Page 21 – ¿Qué cubre esta garantía?; registeryourninja.com; Cómo se aplica la ley estatal
- Page 22 – ESPECIFICACIONES TÉCNICAS; Puedes encontrar el modelo y los; REGISTRA ESTA INFORMACIÓN; Número de modelo: ��������������������������; REGISTRA TU COMPRA; NOTAS
Corded 3-in-1 Cleaner
Nettoyeur filaire 3 en 1
Limpiador 3-en-1 con cable
WD100 Series
Série WD100
Serie WD100
OWNER’S GUIDE
GUIDE DE L’UTILISATEUR
GUÍA DEL USUARIO
"Loading the manual" means you need to wait until the file loads and becomes available for online reading. Some manuals are very large, and the time they take to appear depends on your internet speed.
Summary
b) Hard or sharp objects (glass, nails, screws, or coins). c) Large quantities of dust (e.g., drywall dust). d) Smoking or burning objects (hot coals, cigarette butts, or matches). e) Flammable or combustible materials (lighter fluid, gasoline, or kerosene). f) Toxic materials (chlorine bleach, ammo...
NOTE: To remove the handle, press the release button located on the back of the unit with a thin tool while pulling up on the handle. NOTE: When assembling your HydroVac, there may be a little water in or around the water tanks. This is because we test all our HydroVacs before you buy them to ensure...
USING YOUR 3 - IN -1 CLEANER POWE R ON HARD FLOOR MODE AREA RUG MODE MAINTAINING YOUR 3 - IN -1 CLEANER Press and release the Power button on the handle to turn on power. Use Hard Floor mode for powerful cleaning on bare floors. To activate Hard Floor mode, turn on the unit and tilt the handle back....