Page 2 - IMPORTANT SAFETY INSTRUCTIONS; For Household Use Only; TO REDUCE THE
2 1.800.798.7398 1 Read all label, operational and marking instructions before using the appliance. 2 Use ONLY as described in this manual. Use only manufacturer’s recommended attachments. 3 To reduce the risk of injury, DO NOT allow to be used as a toy. Close attention is necessary when used by or ...
Page 3 - SAVE THESE INSTRUCTIONS
3 w w w.sharkclean.com TO MAXIMIZE THE LIFE OF YOUR NI-MH BATTERIES: 1 Charge for 7 hours before initial use. Failure to do so will reduce the product’s battery life significantly. 2 For best battery performance, remove the charging adapter fom the unit after the charging period has completed. 3 Do ...
Page 4 - MESURES DE SÉCURITÉ IMPORTANTES; Pour usage domestique seulement
4 1.800.798.7398 1 Avant d’utiliser l’appareil, lisez les consignes d’utilisation figurant sur toute étiquette ou inscription. 2 Utilisez l’appareil UNIQUEMENT de la façon décrite dans ce manuel. N’utilisez que les accessoires recommandés par le fabricant. 3 Pour réduire le risque de blessures, cet ...
Page 5 - VEUILLEZ CONSERVER CES DIRECTIVES
5 w w w.sharkclean.com 23 Cet appareil comprend des piles rechargeables au nickel-métal-hydrure (NiMH). Les piles doivent être recyclées ou éliminées correctement. N’incinérez pas les piles et ne les exposez pas à des températures élevées, car elles pourraient exploser. 24 L’aspirateur sans fil pour...
Page 6 - PARA; INSTRUCCIONES IMPORTANTES DE; Para uso doméstico solamente
6 1.800.798.7398 1 Lea todas las etiquetas, instrucciones de operación y advertencias antes de usar el artefacto. 2 Utilícela SOLAMENTE como se indica en este manual. Use únicamente los accesorios recomendados por el fabricante. 3 Para reducir el riesgo de heridas, NO permita que se use como si fuer...
Page 7 - CONSERVE ESTAS INSTRUCCIONES
7 w w w.sharkclean.com 23 Este producto incluye baterías recargables de hidruro metálico de níquel. Las baterías deben descartarse o reciclarse de forma apropiada. No arroje las baterías al fuego o las exponga a altas temperaturas, pueden explotar. 24 La barredora inalámbrica de pisos y alfombras de...
Page 8 - QUICK START; CLEAN
8 1.800.798.7398 IMPORTANT: Before you can start using your new cordless floor and carpet sweeper, you’ll need to charge it for 7 hours. ASSEMBLE 1 Assemble the upper and lower handle into the elbow joint to form the Shark ® Backsaver ™ folding handle. Then insert it into the base of your cordless f...
Page 9 - EMPTY
9 w w w.sharkclean.com Eng lis h 5 The Shark ® Backsaver ™ folding handle makes cleaning under furniture a breeze. Just press the button on the handle with your thumb to engage the Shark ® Backsaver ™ function. ( fig. 4 ) EMPTY 6 When you’re finished cleaning, empty the No-Touch dust cup. Simply pre...
Page 10 - ASSEMBLY OF YOUR FLOOR; ASSEMBLY
10 1.800.798.7398 ASSEMBLY OF YOUR FLOOR AND CARPET SWEEPER: 1 Slide the upper pole (the tube with the handle) into the end of the Shark ® Backsaver ™ joint that has a small notch in it ( a ). Then slide the lower pole into the other end of the joint ( b ). Push it in until it clicks into place. ( f...
Page 11 - USING YOUR CORDLESS FLOOR AND CARPET SWEEPER
11 w w w.sharkclean.com Eng lis h 1 Press the On/Off button to start the floor and carpet sweeper. When finished cleaning, press the On/Off button again to turn the unit off. ( fig. 3 ) 2 You can adjust the speed of the brush roll to suit the floors that you are cleaning. Press the Fig. 3 Fig. 4 FLO...
Page 12 - OFF; CHARGING YOUR CORDLESS FLOOR AND CARPET SWEEPER
12 1.800.798.7398 3 To re-insert the dust cup, position it over the floor and carpet sweeper base and press down gently until it snaps into place. ( fig. 12 ) For easy insertion into the base, tip the dust cup slightly forward. from the unit after the charging period has completed. Storing the unit ...
Page 13 - MAINTENANCE
13 w w w.sharkclean.com Eng lis h Fig. 14 1 Once a month, wipe down your unit with a dry cloth, including the area under the dust cup. Wipe away any hair, fiber or other dirt that may have built up in the chamber and on the rotating brush. Do not use any harsh sweeper or chemicals. 2 Do not immerse ...
Page 14 - TROUBLESHOOTING GUIDE & REPLACEMENT PARTS; PROBLEM; REPLACEMENT PARTS; ORDERING REPLACEMENT PARTS
14 1.800.798.7398 TROUBLESHOOTING GUIDE & REPLACEMENT PARTS PROBLEM The cordless floor and carpet sweeper will not operate The cordless floor and carpet sweeper will not pick up Dust is escaping from the cordless floor and carpet sweeper Rotating brush will not pick up The cordless floor and car...
Page 15 - WARRANTY & PRODUCT REGISTRATION; PRODUCT REGISTRATION
15 w w w.sharkclean.com Eng lis h WARRANTY & PRODUCT REGISTRATION EURO-PRO ONE-YEAR (1) LIMITED WARRANTY EURO-PRO Operating LLC warrants this product to be free from defects in material and workmanship for a period of one (1) year from the date of the original purchase, when utilized for normal ...
Page 16 - DÉMARRAGE RAPIDE; NETTOYAGE
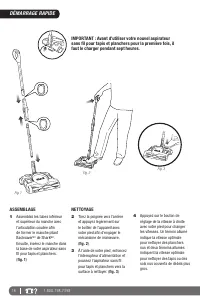
16 1.800.798.7398 IMPORTANT : Avant d’utiliser votre nouvel aspirateur sans fil pour tapis et planchers pour la première fois, il faut le charger pendant sept heures. ASSEMBLAGE 1 Assemblez les tubes inférieur et supérieur du manche avec l’articulation coudée afin de former le manche pliant Backsave...
Page 17 - VIDANGE
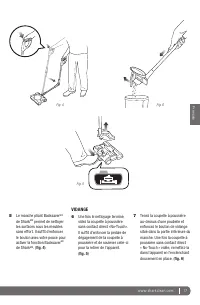
17 w w w.sharkclean.com F ra nça is 5 Le manche pliant Backsaver MC de Shark MD permet de nettoyer les surfaces sous les meubles sans effort. Il suffit d’enfoncer le bouton avec votre pouce pour activer la fonction Backsaver MC de Shark MD . ( fig. 4 ) VIDANGE 6 Une fois le nettoyage terminé, videz ...
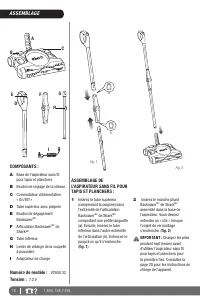
Page 18 - ASSEMBLAGE
18 1.800.798.7398 ASSEMBLAGE DE L’ASPIRATEUR SANS FIL POUR TAPIS ET PLANCHERS : 1 Insérez le tube supérieur (comprenant la poignée) dans l’extrémité de l’articulation Backsaver MC de Shark MD comportant une petite languette (a). Ensuite, insérez le tube inférieur dans l’autre extrémité de l’articula...
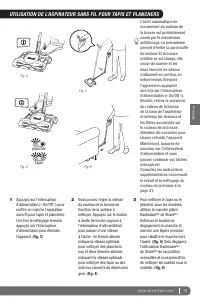
Page 19 - UTILISATION DE L’ASPIRATEUR SANS FIL POUR TAPIS ET PLANCHERS
19 w w w.sharkclean.com F ra nça is 1 Appuyez sur l’interrupteur d’alimentation (« On/Off ») pour mettre en marche l’aspirateur sans fil pour tapis et planchers. Une fois le nettoyage terminé, appuyez sur l’interrupteur d’alimentation pour éteindre l’appareil. ( fig. 3 ) Fig. 3 Fig. 4 Fig. 5 Fig. 6 ...
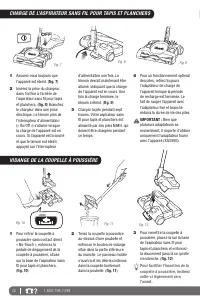
Page 20 - CHARGE DE L’ASPIRATEUR SANS FIL POUR TAPIS ET PLANCHERS
20 1.800.798.7398 3 Pour remettre la coupelle à poussière, placez-la sur la base de l’aspirateur sans fil pour tapis et planchers et enfoncez-la doucement jusqu’à ce qu’elle s’enclenche. ( fig. 12 ) Pour faciliter l’insertion de la coupelle à poussière, inclinez celle-ci légèrement vers l’avant. 4 P...
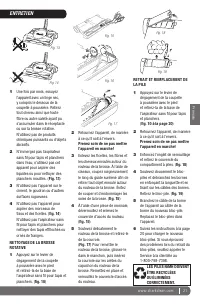
Page 21 - ENTRETIEN
21 w w w.sharkclean.com F ra nça is Fig. 14 1 Une fois par mois, essuyez l’appareil avec un linge sec, y compris le dessous de la coupelle à poussière. Retirez tout cheveu ainsi que toute fibre ou autre saleté ayant pu s’accumuler dans le réceptacle ou sur la brosse rotative. N’utilisez pas de produ...
Page 22 - GUIDE DE DÉPANNAGE ET PIÈCES DE RECHANGE; PROBLÈME; COMMANDE DE PIÈCES DE RECHANGE
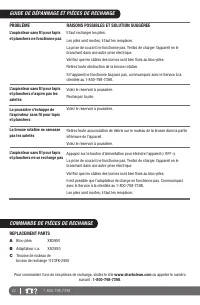
22 1.800.798.7398 GUIDE DE DÉPANNAGE ET PIÈCES DE RECHANGE PROBLÈME L’aspirateur sans fil pour tapis et planchers ne fonctionne pas L’aspirateur sans fil pour tapis et planchers n’aspire pas les saletés La poussière s’échappe de l’aspirateur sans fil pour tapis et planchers La brosse rotative ne ram...
Page 23 - GARANTIE ET ENREGISTREMENT DU PRODUIT; ENREGISTREMENT DU PRODUIT
23 w w w.sharkclean.com F ra nça is GARANTIE ET ENREGISTREMENT DU PRODUIT GARANTIE LIMITÉE D’UN (1) AN EURO-PRO EURO-PRO Operating LLC garantit ce produit contre toute défectuosité matérielle ou de main-d’œuvre pour une période d’un (1) an à compter de la date d’achat, dans le cadre d’une utilisatio...
Page 24 - GUÍA RÁPIDA; LIMPIEZA
24 1.800.798.7398 IMPORTANTE: Antes de utilizar su nueva barredora inalámbrica de pisos y alfombras, cárguela durante 7 horas. ARMADO 1 Acople el mango superior e inferior al codo de unión para formar el mango plegable Backsaver MR de Shark ® . Luego insértelo en la base de su barredora inalámbrica ...
Page 25 - VACIADO
25 w w w.sharkclean.com E spañol 5 El mango Backsaver MR de Shark ® facilita la limpieza debajo de los muebles. Simplemente presione el botón del mango con su pulgar para activar la función Backsaver MR de Shark ® . ( fig. 4 ) VACIADO 6 Cuando termine de limpiar, vacíe el recipiente para la tierra d...
Page 26 - ARMADO
26 1.800.798.7398 ARMADO DE SU BARREDORA INALÁMBRICA DE PISOS Y ALFOMBRAS 1 Deslice el tubo superior (el que tiene el mango) dentro del extremo de la unión Backsaver MR de Shark ® que tiene una pequeña ranura (a). Luego deslice el tubo inferior dentro del otro extremo de la unión (b). Empújelo hasta...
Page 27 - USO DE SU BARREDORA INALÁMBRICA DE PISOS Y ALFOMBRAS
27 w w w.sharkclean.com E spañol 1 Presione el botón de encendido para encender la barredora de pisos y alfombras. Al terminar de limpiar, presione nuevamente el botón de encendido para apagar la unidad. ( fig. 3 ) Fig. 3 Fig. 4 Fig. 5 Fig. 6 Si el cepillo giratorio deja de moverse es probablemente ...
Page 28 - CARGA DE SU BARREDORA INALÁMBRICA DE PISOS Y ALFOMBRAS
28 1.800.798.7398 3 Para volver a instalar el recipiente de la tierra, colóquelo sobre la base de la barredora de pisos y alfombras y presione suavemente hacia abajo hasta que se trabe en su lugar. ( fig. 12 ) Para facilitar la inserción en la base, inclínelo levemente hacia adelante. 4 Para obtener...
Page 29 - MANTENIMIENTO
29 w w w.sharkclean.com E spañol Fig. 14 1 Limpie la unidad con un trapo seco una vez por mes, incluyendo debajo del recipiente de la tierra. Quite los cabellos, fibras o cualquier otra suciedad que se haya acumulado en el compartimiento o en el cepillo giratorio. No use ningún limpiador ni producto...
Page 30 - GUÍA DE SOLUCIÓN DE PROBLEMAS Y PARTES DE REPUESTO; PROBLEMA; COMPRA DE PARTES DE REPUESTO
30 1.800.798.7398 GUÍA DE SOLUCIÓN DE PROBLEMAS Y PARTES DE REPUESTO PROBLEMA La barredora inalámbrica de pisos y alfombras no funciona La barredora inalámbrica de pisos y alfombras no levanta la tierra Sale polvo de la barredora inalámbrica de pisos y alfombras El cepillo giratorio no levanta la ba...
Page 31 - GARANTÍA Y REGISTRO DEL PRODUCTO; REGISTRO DEL PRODUCTO
31 w w w.sharkclean.com E spañol GARANTÍA Y REGISTRO DEL PRODUCTO GARANTÍA LIMITADA DE UN (1) AÑO DE EURO-PRO EURO-PRO Operating LLC garantiza este producto contra defectos de materiales y mano de obra por un término de un (1) año a partir de la fecha de compra original, siempre que sea utilizado pa...