Page 2 - AFTER THE RANGE HAS; WARNING; Do not step, lean, or sit on the doors of the range
2 English WARNING To reduce the risk of tipping the range, the range must be secured by a properly installed Anti-Tip device. AFTER THE RANGE HAS BEEN INSTALLED, CONFIRM THAT THE ANTI-TIP DEVICE HAS BEEN PROPERLY INSTALLED AND VERIFY THAT THE ANTI-TIP DEVICE IS PROPERLY ENGAGED . Refer to the instal...
Page 3 - Regulatory Notice; Reorienting or relocating the receiving antenna; CAUTION; FCC CAUTION
English 3 Regulatory Notice FCC STATEMENT: This equipment has been tested and found to comply within the limits for a Class B digital device, pursuant to part 15 of the FCC Rules. These limits are designed to provide reasonable protection against harmful interference in a residential installation. T...
Page 4 - IC RADIATION EXPOSURE STATEMENT:
4 English Regulatory Notice IC RADIATION EXPOSURE STATEMENT: This equipment complies with IC RSS-102 radiation exposure limits set forth for an uncontrolled environment. This equipment should be installed and operated so there is at least 8 inches (20 cm) between the radiator and your body. This dev...
Page 5 - Contents
English 5 C ontents Contents Important safety instructions 6 Introducing your new range 21 Overview 21What’s included with your range 21 Before you begin 22 Energy saving tips 22 Surface cooking 22 About surface cooking 22 How to set the appliance for surface cooking 24 Using the proper cookware 26 ...
Page 6 - SAVE THESE INSTRUCTIONS; CALIFORNIA PROPOSITION 65 WARNING; Important safety instructions; severe personal injury; minor personal injury
6 English Important safety instructions Impor tant saf ety ins truc tions SAVE THESE INSTRUCTIONS CAUTION To reduce the risk of fire, explosion, electric shock, or personal injury when using your range, follow these basic safety precautions. Do NOT attempt. Do NOT disassemble. Do NOT touch. Follow d...
Page 7 - User servicing
English 7 Impor tant saf ety ins truc tions SAVE THESE INSTRUCTIONS FOR YOUR SAFETY When using electrical appliances, you should follow basic safety precautions, including the following: CAUTION • Use this appliance only for its intended purpose as described in this Owner’s Manual. • Potentially hot...
Page 8 - Use only dry potholders.
8 English Important safety instructions Impor tant saf ety ins truc tions SAVE THESE INSTRUCTIONS • Use only dry potholders. Placing moist or damp potholders on hot surfaces may result in burns from steam. Do not let the potholder touch hot heating elements. Do not use a towel or other bulky cloth. ...
Page 9 - Use proper pan sizes.; SURFACE COOKING UNITS; Never leave surface units unattended at high heat settings.
English 9 Impor tant saf ety ins truc tions SAVE THESE INSTRUCTIONS • Be careful when placing spoons or other stirring utensils on the glass cooktop surface when it is in use. They may become hot and could cause burns. • Use proper pan sizes. This appliance is equipped with surface units of differen...
Page 10 - Do not use decorative surface element covers; ELECTRICAL SAFETY; Proper Installation
10 English Important safety instructions Impor tant saf ety ins truc tions SAVE THESE INSTRUCTIONS • Flush-mounted appliances may be operated only after they have been installed in cabinets and workplaces that conform to the relevant standards. This ensures that the appliances are installed in compl...
Page 11 - Heating elements may be hot even; CHILD SAFETY
English 11 Impor tant saf ety ins truc tions SAVE THESE INSTRUCTIONS OVEN • DO NOT TOUCH THE HEATING ELEMENTS OR INTERIOR SURFACES OF THE OVEN. Heating elements may be hot even though they are dark in color. Interior surfaces of an oven become hot enough to cause burns. During and after use, do not ...
Page 12 - Do not attempt to operate the oven during a power failure.; REMOTE OPERATION; Use care when opening the door.
12 English Important safety instructions Impor tant saf ety ins truc tions SAVE THESE INSTRUCTIONS CAUTION Do not attempt to operate the oven during a power failure. If the power fails, always turn the oven off. If the oven is not turned off and the power returns, the oven may begin to operate again...
Page 13 - Clean ventilating hoods frequently.
English 13 Impor tant saf ety ins truc tions SAVE THESE INSTRUCTIONS • Clean only the parts listed in this manual in the self-clean cycle. Before self-cleaning the oven, remove the partition, rack, utensils, and any food. • Before operating the self-clean cycle, wipe grease and food soils from the o...
Page 14 - - Failing to have a qualified technician install the range; GLASS/CERAMIC COOKING SURFACES; DO NOT TOUCH SURFACE UNITS OR AREAS NEAR UNITS.
14 English Important safety instructions Impor tant saf ety ins truc tions SAVE THESE INSTRUCTIONS CRITICAL INSTALLATION WARNINGS WARNING • This appliance must be installed by a qualified technician or service company. - Failing to have a qualified technician install the range may result in electric...
Page 20 - Do not overheat food.; CRITICAL CLEANING WARNINGS; - You may hurt yourself on the sharp edges of the
20 English Important safety instructions Impor tant saf ety ins truc tions SAVE THESE INSTRUCTIONS • Do not use sealed containers. Remove seals and lids before cooking. Sealed containers can explode due to the build up of pressure even after the oven has been turned off. • Take care that food you ar...
Page 21 - What’s included with your range; Introducing your new range; Overview
English 21 Intr oducing y our ne w rang e What’s included with your range Wire racks (2) * Air fry tray (1) * Temperature probe (1) * NOTE If you need an accessory marked with a *, you can buy it from the Samsung Contact Center (1-800-726-7864). Introducing your new range Overview 04 05 06 03 07 08 ...
Page 22 - About surface cooking; Before you begin; Energy saving tips
22 English Befor e you begin Before you begin Surface cooking About surface cooking CAUTION BEFORE COOKING • Do not use the glass cooktop surface as a cutting board. • Do not place or store items that can melt or catch fire on the glass cooktop, even when it is not being used. • Turn the surface uni...
Page 24 - Surface cooking; How to set the appliance for surface cooking
24 English Surfac e cooking Surface cooking Hot surface indicator • Comes on when the unit is turned on or hot to the touch. • Stays on even after the unit is turned off. • Glows until the unit is cooled to approximately 150 °F. Cooking areas • The cooking areas on your range are identified by perma...
Page 26 - Using the proper cookware
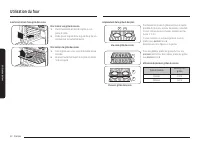
26 English Surfac e cooking Surface cooking 1. To turn the warming center on, press the Warming Center On/Off pad. 2. Select the power setting you want. Press the Warming Center Level pad once for Low, twice for Medium, or three times for High. 3. To turn the warming center off, press the Warming Ce...
Page 28 - How to use dial knob; Operating the oven; The oven control panel
28 English Oper ating the o v en Operating the oven How to use dial knob Pushing Pushing Turning Turning The dial knob can be used in the following ways: 1. Turning • Turning the dial knob clockwise or counterclockwise will show next or previous mode when selecting the cooking mode. • Turning the di...
Page 29 - Display mode
English 29 Oper ating the o v en Display mode Sleep mode The control panel enters Sleep mode if the oven is not used for a while. In Sleep mode, the control panel is inactive, displaying only the time, until it is reactivated by the user. NOTE You can adjust the control panel timeout. (See more info...
Page 30 - Oven cooking; Cooking mode
30 English Oper ating the o v en Operating the oven Oven cooking STEP 1 Put all ingredients in a heat-safe container. STEP 2 Select a cooking mode, and then start preheating. STEP 3 Place the container on a rack. STEP 4 Close the door and start cooking. NOTE The cooling fan automatically runs for a ...
Page 31 - Using the oven racks
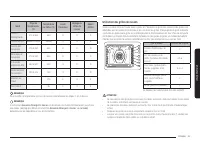
English 31 Oper ating the o v en Mode Temperature range (°F) Default temperature (°F) Temp. Probe Set Cook Time Delay Start Bake 175-550 350 O O O Broil Hi-Lo Hi X X X Convection Bake 175-550 325 O O O Convection Roast 175-550 325 O O O Air Fry 350-500 425 X O O Dehydrate 100-225 150 X O O Keep Warm...
Page 33 - Recipe guide
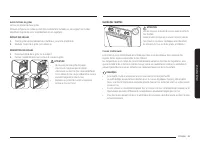
English 33 Oper ating the o v en Before using the racks The oven has two racks.Each rack has stops that need to be placed correctly on the supports. These stops will keep the rack from coming completely out. REMOVING THE RACKS1. Pull the rack straight out until it stops. 2. Lift up the front of the ...
Page 37 - Temperature probe
English 37 Oper ating the o v en Dehydrate Dehydrate dries food or removes moisture from food via heat circulation. After drying the food, keep it in a cool and dry place. For fruit, adding lemon (or pineapple) juice or sprinkling sugar on the fruit helps the fruit retain sweetness. NOTE • There is ...
Page 39 - Cooking options
English 39 Oper ating the o v en Cooking options CAUTION Food that can easily spoil, such as milk, eggs, fish, poultry, and meat, should be chilled in a refrigerator before they are placed in the oven. Even when chilled, they should not stand for more than 1 hour before cooking begins and should be ...
Page 40 - Special features
40 English Oper ating the o v en Operating the oven Special features The Sabbath feature K (For use on the Jewish Sabbath and Holidays) Use this option only for baking on the Jewish Sabbath and Holidays. For more information, visit the website at http://www.star-k.org With the Sabbath feature • The ...
Page 41 - More functions
English 41 Oper ating the o v en More functions Tap the button on the control panel, and then turn the dial knob to change various settings for your oven. Please refer to the following table for detailed descriptions. The Options menu is available only when the oven is off. 1 2 Setting Description T...
Page 43 - System Settings
English 43 Oper ating the o v en Screen Timeout You can set the length of time before the screen saver turns on. 1. Tap , and select Screen Timeout using the dial knob. 2. Turn the dial knob to select setting time. 3. Push the dial knob to save the changes. NOTE Energy consumption may increase depen...
Page 45 - Smart control
English 45 Oper ating the o v en Smart control How to connect the oven1. Download and open the SmartThings app on your smart device. 2. Follow the app's on-screen instructions to connect your range. 3. Once the process is complete, the connected icon located on your range displays and the app will c...
Page 46 - Voice control
46 English Oper ating the o v en Operating the oven WI-FI On/Off If you set the WI-FI mode to Off, mobile devices cannot connect to the range. 1. Tap and hold for 3 sec. 2. Select Wi-Fi mode using the dial knob. 3. Turn the dial knob to select On/Off and push to save the changes. NOTE • Pressing Sma...
Page 48 - Maintaining your appliance
48 English Maint aining y our applianc e Maintaining your appliance Self-cleaning This self-cleaning oven uses high temperatures (well above cooking temperatures) to burn off leftover grease and residue completely or reduce them to a finely powdered ash that you can wipe away with a damp cloth. CAUT...
Page 50 - Care and cleaning of the oven
50 English Maint aining y our applianc e Maintaining your appliance Care and cleaning of the oven WARNING • Be sure all controls are OFF and all surfaces are COOL before cleaning any part of the range. • If your range is moved for cleaning, servicing, or any reason, be sure the Anti-Tip device is re...
Page 52 - Care and cleaning of the glass cooktop
52 English Maint aining y our applianc e Maintaining your appliance Care and cleaning of the glass cooktop Normal daily use cleaning Use only a ceramic cooktop cleaner. Other creams may not be as effective.By following these steps, you can maintain and protect the surface of your glass cooktop. 1. B...
Page 54 - Removing and reinstalling the oven door
54 English Maint aining y our applianc e Maintaining your appliance Removing and reinstalling the oven door How to remove the door CAUTION • The door is very heavy. Be careful when removing and lifting the door. Do not lift the door by the handle. • Turn the power OFF before removing the door. Hinge...
Page 56 - Changing the oven light; Removing and reinstalling the storage drawer
56 English Maint aining y our applianc e Maintaining your appliance Changing the oven light The oven light is a standard 40-watt appliance bulb. It will come on when the oven door is open. When the oven door is closed, press the pad to turn it on or off. It will not work during a self-cleaning cycle...
Page 57 - Troubleshooting
English 57 Tr ouble shoo ting Troubleshooting Troubleshooting Samsung works hard to ensure that you don’t have problems with your new electric range. If you run into unexpected trouble, look first for a solution in the tables below. If you’re still having trouble after trying the suggested solution,...
Page 61 - Information codes
English 61 Tr ouble shoo ting Problem Possible cause Solution Strong odor. An odor coming from the insulation around the inside of the oven is normal for the first few times the oven is used. Operate the oven empty on the bake setting at 400 °F for 1 hour. Fan noise. A convection fan may automatical...
Page 66 - Appendix; Open Source Announcement; Memo
66 English Appendix Appendix Appendix Open Source Announcement The software included in this product contains open source software. The following URL http://opensource.samsung.com/opensource/SMART_TP2_0/seq/0 leads to open source license information as related to this product. Memo
Page 69 - Estufa eléctrica; Manual del usuario
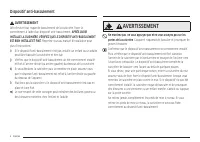
Page 70 - ADVERTENCIA; . Puede causar que la estufa se incline o vuelque, produciendo; Dispositivo antivuelco
2 Español ADVERTENCIA Para reducir el riesgo de inclinación o vuelco de la estufa, ésta debe estar asegurada mediante un dispositivo antivuelco correctamente instalado. DESPUÉS DE INSTALAR LA ESTUFA, CONFIRME QUE EL DISPOSITIVO ANTIVUELCO ESTÉ CORRECTAMENTE INSTALADO Y BIEN ACOPLADO . Consulte el ma...
Page 71 - Aviso sobre regulaciones; DECLARACIÓN DE LA FCC:; PRECAUCIÓN; PRECAUCIÓN DE LA FCC
Español 3 Aviso sobre regulaciones DECLARACIÓN DE LA FCC: Este equipo ha sido sometido a pruebas y se ha determinado que se encuentra dentro de los límites para los dispositivos digitales clase B, de acuerdo con la sección 15 de las Normas de la FCC. Estos límites están destinados a ofrecer una prot...
Page 72 - DECLARACIÓN DE IC SOBRE LA EXPOSICIÓN A LA RADIACIÓN:
4 Español Aviso sobre regulaciones DECLARACIÓN DE IC SOBRE LA EXPOSICIÓN A LA RADIACIÓN: Este equipo cumple con los límites de exposición a la radiación IC RSS-102 establecidos para un entorno no controlado. Este equipo debe ser instalado y operado a una distancia mínima de 8 pulgadas (20 cm) entre ...
Page 73 - Contenido
Español 5 Contenido Contenido Instrucciones de seguridad importantes 6 Introducción a su nueva estufa 21 Descripción general 21 Elementos incluidos con su estufa 21 Antes de comenzar 22 Sugerencias para ahorrar energía 22 Superficie de cocción 22 Acerca de la superficie de cocción 22 Como regular el...
Page 74 - CONSERVE ESTAS INSTRUCCIONES; Instrucciones de seguridad importantes; Esta guía no cubre todas las situaciones que podrían; Símbolos y precauciones de seguridad importantes; Significado de iconos y símbolos en este manual del usuario:; Prácticas peligrosas o inseguras que pueden provocar
6 Español Instrucciones de seguridad importantes Ins truccione s de seg uridad impor tantes CONSERVE ESTAS INSTRUCCIONES PRECAUCIÓN Para reducir el riesgo de incendio, explosión, descarga eléctrica o lesiones personales cuando utilice la estufa, siga estas instrucciones básicas de seguridad. NO inte...
Page 75 - Mantenimiento del usuario
Español 7 Ins truccione s de seg uridad impor tantes CONSERVE ESTAS INSTRUCCIONES PARA SU SEGURIDAD Cuando utilice electrodomésticos, debe seguir precauciones de seguridad básicas, a saber: PRECAUCIÓN • Utilice este electrodoméstico solo para el uso para el que fue destinado, tal como se describe en...
Page 76 - Utilice solamente agarradores aislantes secos.
8 Español Instrucciones de seguridad importantes Ins truccione s de seg uridad impor tantes CONSERVE ESTAS INSTRUCCIONES • Utilice solamente agarradores aislantes secos. Colocar agarradores aislantes mojados o húmedos sobre superficies calientes podría producir quemaduras por vapor. No permita que e...
Page 77 - Utilice recipientes de cocción del tamaño adecuado.; UNIDADES DE SUPERFICIE DE COCCIÓN; No levante la cubierta.
Español 9 Ins truccione s de seg uridad impor tantes CONSERVE ESTAS INSTRUCCIONES • Tenga cuidado cuando coloque cucharas u otros utensilios para revolver sobre la superficie de vidrio de la cubierta mientras se encuentre en uso. Podrían calentarse y causar quemaduras. • Utilice recipientes de cocci...
Page 78 - - apague todas las zonas de cocción; La estufa no debe colocarse sobre una base.; SEGURIDAD ELÉCTRICA; Instalación adecuada
10 Español Instrucciones de seguridad importantes Ins truccione s de seg uridad impor tantes CONSERVE ESTAS INSTRUCCIONES • Los electrodomésticos montados a nivel pueden operarse solo después de que fueron instalados en gabinetes y lugares de trabajo que cumplen con las normas pertinentes. Esto aseg...
Page 79 - Los elementos calentadores pueden estar; SEGURIDAD DE LOS NIÑOS
Español 11 Ins truccione s de seg uridad impor tantes CONSERVE ESTAS INSTRUCCIONES HORNO • NO TOQUE LOS ELEMENTOS CALENTADORES NI LAS SUPERFICIES INTERIORES DEL HORNO. Los elementos calentadores pueden estar calientes aun cuando su color sea oscuro. Las superficies interiores de un horno se calienta...
Page 80 - Durante el uso, el electrodoméstico se calienta.; OPERACIÓN REMOTA; Cuando abra la puerta, hágalo con precaución.
12 Español Instrucciones de seguridad importantes Ins truccione s de seg uridad impor tantes CONSERVE ESTAS INSTRUCCIONES • Durante el uso, el electrodoméstico se calienta. Se debe tener la precaución de evitar tocar los elementos calentadores del interior del horno. • No utilice limpiadores abrasiv...
Page 81 - Limpie con frecuencia las campanas de ventilación.; HORNOS AUTOLIMPIANTES; No limpie la junta selladora de la puerta.
Español 13 Ins truccione s de seg uridad impor tantes CONSERVE ESTAS INSTRUCCIONES • Aplique el ciclo de autolimpieza únicamente a las piezas enumeradas en este manual. Antes de la autolimpieza del horno, quite la partición, la parrilla, los utensilios y los alimentos. • Antes de hacer funcionar el ...
Page 82 - - Si la estufa no es instalada por un técnico calificado, pueden; SUPERFICIES DE COCCIÓN VITROCERÁMICAS; No cocine sobre una cubierta quebrada.
14 Español Instrucciones de seguridad importantes Ins truccione s de seg uridad impor tantes CONSERVE ESTAS INSTRUCCIONES ADVERTENCIAS FUNDAMENTALES PARA LA INSTALACIÓN ADVERTENCIA • La instalación de este electrodoméstico debe estar a cargo de un técnico o una compañía de servicio calificados. - Si...
Page 88 - No caliente en exceso los alimentos.; descarga eléctrica o incendio.
20 Español Instrucciones de seguridad importantes Ins truccione s de seg uridad impor tantes CONSERVE ESTAS INSTRUCCIONES • No utilice recipientes sellados. Quíteles los sellos y las tapas antes de cocinar. Los recipientes sellados pueden explotar debido a la acumulación de presión incluso después d...
Page 89 - Elementos incluidos con su estufa; Introducción a su nueva estufa; Descripción general
Español 21 Introduc ción a su nue va e stuf a Elementos incluidos con su estufa Parrillas de alambre (2) * Bandeja de la freidora de aire (1) * Sonda de temperatura (1) * NOTA Si necesita un accesorio marcado con un *, puede adquirirlo en el Centro de contacto de Samsung (1-800-726-7864). Introducci...
Page 90 - Acerca de la superficie de cocción; Antes de comenzar; Sugerencias para ahorrar energía
22 Español Antes de c omenz ar Antes de comenzar Superficie de cocción Acerca de la superficie de cocción PRECAUCIÓN ANTES DE COCINAR • No utilice la superficie de vidrio de la cubierta como tabla para cortar. • No coloque ni almacene sobre la cubierta de vidrio elementos susceptibles de derretirse ...
Page 92 - Superficie de cocción; Como regular el electrodoméstico para la cocción en superficie
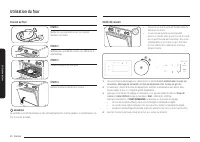
24 Español Super ficie de c oc ción Superficie de cocción Indicador de superficie caliente • Se ilumina cuando la unidad se encuentra encendida o caliente al tacto. • Permanece encendido aún después de que se haya apagado la unidad. • Emite luz hasta que la unidad se haya enfriado hasta aproximadame...
Page 94 - Utilización de los recipientes de cocción correctos
26 Español Super ficie de c oc ción Superficie de cocción 1. Para encender el centro de calentamiento, presione la tecla Warming Center On/Off (Centro de calentamiento Encender/Apagar) . 2. Regule la potencia al nivel deseado. Presione la tecla Warming Center Level (Centro de calentamiento Nivel) un...
Page 95 - Protección de la cubierta
Español 27 Super ficie de c oc ción Protección de la cubierta Limpieza • Limpie la cubierta antes de utilizarla por primera vez. • Limpie su cubierta diariamente o después de cada uso. Esto mantendrá la buena apariencia de la cubierta y puede evitar daños. • Si durante la cocción ocurre un derrame, ...
Page 96 - Cómo utilizar la perilla de disco; Funcionamiento del horno; Panel de control del horno
28 Español Funcionamient o del horno Funcionamiento del horno Cómo utilizar la perilla de disco Presionar Presionar Girar Girar La perilla de disco puede utilizarse de las siguientes maneras: 1. Girar • Al seleccionar el modo de cocción, girar la perilla de disco a la derecha o a la izquierda, mostr...
Page 97 - Modo de visualización
Español 29 Funcionamient o del horno Modo de visualización Modo de reposo Si el horno no se utiliza por un tiempo, el panel de control ingresa en modo de reposo. En el modo de reposo, el panel de control está inactivo, mostrando solo la hora, hasta que es reactivado por el usuario. NOTA Puede ajusta...
Page 98 - Cocción del horno; Modo de cocción
30 Español Funcionamient o del horno Funcionamiento del horno Cocción del horno PASO 1 Ponga todos los ingredientes en un recipiente resistente a la temperatura. PASO 2 Seleccione un modo de cocción y luego comience el precalentamiento. PASO 3 Coloque el recipiente en una parrilla. PASO 4 Cierre la ...
Page 99 - Uso de las parrillas del horno
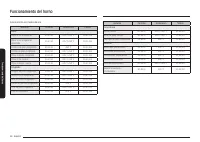
Español 31 Funcionamient o del horno Modo Rango de temperatura (°F) Temperatura predeterminada (°F) Sonda de temperatura Programar tiempo de cocción Retrasar el inicio Hornear 175-550 350 O O O Asar a la parrilla Alto-Bajo Alta X X X Hornear por convección 175-550 325 O O O Asar por convección 175-5...
Page 101 - Guía de recetas
Español 33 Funcionamient o del horno Antes de usar las parrillas El horno tiene dos parrillas.Cada parrilla tiene topes que requieren una colocación correcta sobre las guías. Estos topes impedirán que la parrilla se salga completamente. RETIRAR LAS PARRILLAS1. Jale la parrilla directamente hacia afu...
Page 105 - Sonda de temperatura
Español 37 Funcionamient o del horno Deshidratar Deshidratar seca los alimentos o elimina la humedad de los alimentos a través de la circulación de calor. Después de secar los alimentos, guárdelos en un lugar fresco y seco. Agregar jugo de limón (o ananá) o espolvorear azúcar sobre las frutas ayuda ...
Page 107 - Opciones de cocción
Español 39 Funcionamient o del horno Opciones de cocción PRECAUCIÓN Los alimentos que pueden echarse a perder fácilmente como la leche, los huevos, el pescado, las aves y las carnes, deben enfriarse en un refrigerador antes de colocarse en el horno. Aún enfriados, no deben permanecer en el horno dur...
Page 108 - Funciones especiales
40 Español Funcionamient o del horno Funcionamiento del horno Funciones especiales La función Sabbat K (Para uso en el Sabbat y otras fechas sagradas judías) Use esta opción solo para hornear en el Sabbat y otras fechas sagradas judías. Para obtener más información, visite el sitio web http://www.st...
Page 109 - Más funciones
Español 41 Funcionamient o del horno Más funciones Toque el botón del panel de control y, luego, gire la perilla de disco para cambiar los distintos ajustes del horno. Consulte la siguiente tabla para obtener descripciones detalladas. El menú de opciones está disponible solo cuando el horno está apa...
Page 111 - Ajustes del sistema
Español 43 Funcionamient o del horno Tiempo de espera de pantalla Puede programar el tiempo de espera para que se active el protector de pantalla. 1. Toque y seleccione Screen Timeout (Tiempo de espera de pantalla) usando la perilla de disco. 2. Gire la perilla de disco para seleccionar el tiempo pr...
Page 113 - Smart Control
Español 45 Funcionamient o del horno Smart Control Cómo conectar el horno1. Descargue y abra la aplicación SmartThings en su dispositivo inteligente. 2. Siga las instrucciones en pantalla de la aplicación para conectar la estufa. 3. Una vez completado el proceso, se muestra el icono de conexión ubic...
Page 114 - Control por voz
46 Español Funcionamient o del horno Funcionamiento del horno Activar/Desactivar Wi-Fi Si configura el modo WI-FI en desactivado, los dispositivos móviles no pueden conectarse a la estufa. 1. Mantenga presionado durante 3 segundos. 2. Seleccione Wi-Fi mode (Modo Wi-Fi) usando la perilla de disco. 3....
Page 115 - Mantenimiento de su electrodoméstico; Autolimpieza
Español 47 Mant enimient o de su elec tr odomé stic o Mantenimiento de su electrodoméstico Autolimpieza Este horno autolimpiante utiliza altas temperaturas (mucho más altas que las temperaturas de cocción) para eliminar por incineración los restos de grasa y otros residuos o reducirlas a fino polvo ...
Page 116 - Limpieza con vapor
48 Español Mant enimient o de su elec tr odomé stic o Mantenimiento de su electrodoméstico Cómo hacer funcionar un ciclo de autolimpieza1. Asegúrese de que la puerta del horno esté completamente cerrada y destrabada. Apague todas las funciones del horno y de la cubierta. 2. Toque y seleccione Cleani...
Page 117 - Cuidado y limpieza del horno
Español 49 Mant enimient o de su elec tr odomé stic o Cuidado y limpieza del horno ADVERTENCIA • Asegúrese de que todos los controles estén APAGADOS y todas las superficies FRÍAS antes de limpiar cualquier parte de la estufa. • Si mueve su estufa para limpieza, reparación o cualquier motivo, asegúre...
Page 119 - Cuidado y limpieza de la cubierta de vidrio
Español 51 Mant enimient o de su elec tr odomé stic o Cuidado y limpieza de la cubierta de vidrio Limpieza en el uso normal diario Use solo un producto de limpieza para placas de cocción vitrocerámicas. Otras cremas podrían resultar menos efectivas.Seguir estos pasos le permitirá mantener y proteger...
Page 121 - Cómo retirar y volver a instalar la puerta del horno
Español 53 Mant enimient o de su elec tr odomé stic o Cómo retirar y volver a instalar la puerta del horno Cómo retirar la puerta PRECAUCIÓN • La puerta es muy pesada. Tenga cuidado al retirarla y levantarla. No levante la puerta por la manija. • Desconecte la electricidad antes de retirar la puerta...
Page 123 - Recambio de la luz del horno; Cómo retirar y volver a instalar el cajón de almacenamiento
Español 55 Mant enimient o de su elec tr odomé stic o Recambio de la luz del horno La luz del horno es una bombilla para electrodomésticos estándar de 40 watts. Se encenderá al abrirse la puerta del horno. Cuando la puerta del horno se encuentre cerrada, presione la tecla para encenderla o apagarla....
Page 124 - Resolución de problemas
56 Español Re solución de pr oblemas Resolución de problemas Resolución de problemas Resolución de problemas Samsung hace grandes esfuerzos para asegurar que usted no experimente problemas con su nueva estufa eléctrica. Si se encuentra con problemas inesperados, como primera medida busque la solució...
Page 128 - Códigos de información
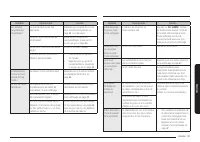
60 Español Re solución de pr oblemas Resolución de problemas Problema Causa posible Solución Olor fuerte. Las primeras veces que se usa el horno, es normal que emane olor del material aislante que envuelve al horno. Opere el horno vacío en el ajuste de horneado a 400 °F durante una hora. Ruido del v...
Page 133 - Notas; Anuncio de código abierto
Español 65 Apéndic e Notas Apéndice Anuncio de código abierto El software incluido en este producto contiene software de código abierto. Consulte la información de licencia de origen relacionada con este producto a través de la siguiente URL http://opensource.samsung.com/opensource/SMART_TP2_0/seq/0...
Page 135 - Cuisinière électrique
Cuisinière électrique Manuel d'utilisation NE63*871*S*
Page 136 - APRÈS AVOIR; AVERTISSEMENT; . L'appareil risquerait de basculer et provoquer de; Dispositif anti-basculement
2 Français AVERTISSEMENT Afin d'éviter tout risque de basculement de la cuisinière, fixez-la correctement à l'aide d'un dispositif anti-basculement. APRÈS AVOIR INSTALLÉ LA CUISINIÈRE, VÉRIFIEZ QUE LE DISPOSITIF ANTI-BASCULEMENT EST BIEN INSTALLÉ ET FIXÉ . Reportez-vous au manuel d'installation pour...
Page 137 - Informations relatives à la réglementation; DÉCLARATION DE LA FCC :; ATTENTION; MISE EN GARDE DE LA FCC
Français 3 Informations relatives à la réglementation DÉCLARATION DE LA FCC : Cet appareil a été testé ; il est conforme aux limitations applicables aux appareils numériques de classe B, selon le paragraphe 15 de la réglementation de la FCC. Ces limitations sont destinées à assurer une protection su...
Page 138 - DÉCLARATION DE LA FCC RELATIVE À L'EXPOSITION AUX RAYONNEMENTS :
4 Français Informations relatives à la réglementation DÉCLARATION D'IC RELATIVE À L'EXPOSITION AUX RAYONNEMENTS : Cet appareil est conforme aux limites d'exposition aux rayonnements établies par la norme RSS-102 d'IC, définies pour un environnement non contrôlé. Cet appareil doit être installé et ut...
Page 139 - Table des matières
Français 5 Table de s matièr es Table des matières Consignes de sécurité importantes 6 Présentation de votre nouvelle cuisinière 21 Présentation 21Accessoires fournis 21 Avant de commencer 22 Conseils pour économiser de l'énergie 22 Table de cuisson 22 À propos de la table de cuisson 22 Comment régl...
Page 140 - CONSERVEZ PRÉCIEUSEMENT CES INSTRUCTIONS; Consignes de sécurité importantes; Le présent guide ne couvre pas toutes les situations; Symboles de sécurité importants et précautions; Signification des icônes et des symboles utilisés dans ce manuel :; Risques ou manipulations dangereuses susceptibles d'entraîner
6 Français Consignes de sécurité importantes Consigne s de sécurit é impor tantes CONSERVEZ PRÉCIEUSEMENT CES INSTRUCTIONS ATTENTION Afin de réduire les risques d'incendie, d'explosion, d'électrocution ou de blessures lors de l'utilisation de votre cuisinière, vous devez respecter ces règles de sécu...
Page 141 - Entretien par l'utilisateur
Français 7 Consigne s de sécurit é impor tantes CONSERVEZ PRÉCIEUSEMENT CES INSTRUCTIONS POUR VOTRE SÉCURITÉ Lorsque vous utilisez des appareils électriques, respectez les consignes de sécurité de base suivantes : ATTENTION • Utilisez cet appareil uniquement pour l'usage auquel il est destiné (tel q...
Page 142 - Utilisez uniquement des maniques sèches.
8 Français Consignes de sécurité importantes Consigne s de sécurit é impor tantes CONSERVEZ PRÉCIEUSEMENT CES INSTRUCTIONS • Utilisez uniquement des maniques sèches. L'utilisation de maniques humides ou mouillées sur les surfaces chaudes peut entraîner des brûlures en raison de la vapeur qui se déga...
Page 143 - Utilisez des plats de taille appropriée.; TABLES DE CUISSON; Ne soulevez pas la table de cuisson.
Français 9 Consigne s de sécurit é impor tantes CONSERVEZ PRÉCIEUSEMENT CES INSTRUCTIONS • Posez les ustensiles de cuisine sur la table de cuisson avec précaution, surtout lorsque celle-ci fonctionne. Ils peuvent devenir chauds et vous risqueriez de vous brûler. • Utilisez des plats de taille approp...
Page 144 - SÉCURITÉ ÉLECTRIQUE; Installation appropriée
10 Français Consignes de sécurité importantes Consigne s de sécurit é impor tantes CONSERVEZ PRÉCIEUSEMENT CES INSTRUCTIONS • Les appareils encastrés ne doivent être mis en marche qu'après avoir été installés dans un meuble ou un lieu de travail conforme aux normes en vigueur. Cela garantit une inst...
Page 145 - Les éléments chauffants peuvent être chauds; SÉCURITÉ ENFANTS
Français 11 Consigne s de sécurit é impor tantes CONSERVEZ PRÉCIEUSEMENT CES INSTRUCTIONS FOUR • NE TOUCHEZ PAS LES ÉLÉMENTS CHAUFFANTS OU LES SURFACES INTERNES DU FOUR. Les éléments chauffants peuvent être chauds même s'ils sont noirs. Les surfaces internes d'un four deviennent suffisamment chaudes...
Page 146 - En cas de; COMMANDE À DISTANCE; Laissez l'air chaud ou
12 Français Consignes de sécurité importantes Consigne s de sécurit é impor tantes CONSERVEZ PRÉCIEUSEMENT CES INSTRUCTIONS • Cet appareil devient chaud pendant son utilisation. Prenez garde à ne pas toucher les éléments chauffants situés à l'intérieur du four. • N'utilisez pas de nettoyants forteme...
Page 147 - Nettoyez fréquemment la hotte d'aspiration.; FOURS AUTO-NETTOYANTS; Ne nettoyez jamais le joint de la porte.
Français 13 Consigne s de sécurit é impor tantes CONSERVEZ PRÉCIEUSEMENT CES INSTRUCTIONS • Procédez au cycle d'auto-nettoyage uniquement sur les parties mentionnées dans le présent manuel. Avant de procéder à l'auto- nettoyage du four, retirez la plaque de séparation, la grille, les ustensiles et t...
Page 148 - - Le non-respect de cette consigne d'installation par un technicien; SURFACES DE CUISSON EN VITROCÉRAMIQUE; Ne faites rien cuire sur une table de cuisson brisée.
14 Français Consignes de sécurité importantes Consigne s de sécurit é impor tantes CONSERVEZ PRÉCIEUSEMENT CES INSTRUCTIONS AVERTISSEMENTS IMPORTANTS RELATIFS À L'INSTALLATION AVERTISSEMENT • Cet appareil doit être installé par un technicien qualifié ou une société de dépannage. - Le non-respect de ...
Page 149 - - Le non-respect de cette consigne peut entraîner un risque
Français 15 Consigne s de sécurit é impor tantes CONSERVEZ PRÉCIEUSEMENT CES INSTRUCTIONS AVERTISSEMENTS IMPORTANTS RELATIFS À L'UTILISATION ATTENTION • Si votre appareil est submergé par un liquide quel qu'il soit, veuillez prendre contact avec le centre de dépannage Samsung le plus proche. Le non-...
Page 154 - Évitez de surchauffer les aliments.; - Cela pourrait entraîner une décoloration, une déformation, des
20 Français Consignes de sécurité importantes Consigne s de sécurit é impor tantes CONSERVEZ PRÉCIEUSEMENT CES INSTRUCTIONS • N'utilisez pas de récipients fermés hermétiquement. Retirez les opercules et les couvercles avant la cuisson. Les récipients fermés hermétiquement peuvent exploser en raison ...
Page 155 - Accessoires fournis; Présentation de votre nouvelle cuisinière; Présentation
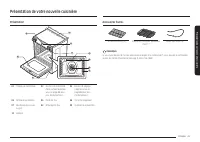
Français 21 Pr ésentation de v otr e nouv elle cuisinièr e Accessoires fournis Grilles de cuisson (2) * Plaque de friture par application d'air (1) * Sonde thermique (1) * REMARQUE Si vous avez besoin de l'un des accessoires marqués d'un astérisque (*), vous pouvez le commander auprès du Centre d'as...
Page 156 - À propos de la table de cuisson; Avant de commencer; Conseils pour économiser de l'énergie
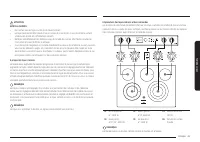
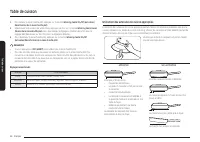
22 Français Av ant de c ommenc er Avant de commencer Table de cuisson À propos de la table de cuisson ATTENTION AVANT LA CUISSON • N'utilisez pas la table de cuisson vitrée comme planche à découper. • Ne placez et ne rangez rien qui soit susceptible de fondre ou de s'enflammer sur la surface vitrée,...
Page 158 - Table de cuisson; Comment régler l'appareil pour utiliser la table de cuisson ?
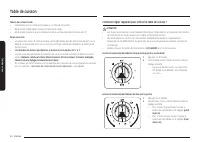
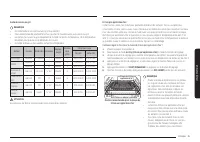
24 Français Table de cuis son Table de cuisson Témoin de surface chaude • S'allume lorsque la surface est allumée ou est chaude au toucher. • Reste allumé même après la mise hors tension du foyer. • Reste allumé jusqu'à ce que la température de la surface descende à environ 150 °F. Zones de cuisson ...
Page 161 - Protection de la table de cuisson
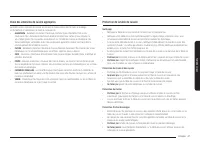
Français 27 Table de cuis son Protection de la table de cuisson Nettoyage • Nettoyez la table de cuisson avant de l'utiliser pour la première fois. • Nettoyez votre table de cuisson quotidiennement ou après chaque utilisation. Ainsi, vous conserverez votre table de cuisson en bon état et éviterez le...
Page 162 - Comment utiliser le bouton de réglage ?; Utilisation du four; Tableau de commande du four
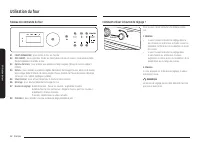
28 Français Utilisation du f our Utilisation du four Comment utiliser le bouton de réglage ? Pression Pression Rotation Rotation Vous pouvez utiliser le bouton de réglage comme suit : 1. Rotation • Si vous tournez le bouton de réglage dans le sens horaire ou antihoraire, le mode suivant ou précédent...
Page 163 - Activation et désactivation de l'éclairage du four
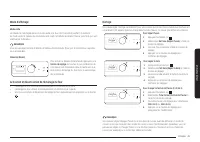
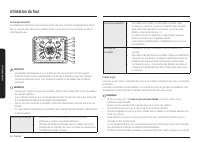
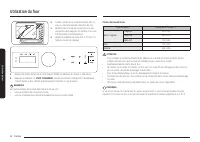
Français 29 Utilisation du f our Mode d'affichage Mode veille Le tableau de commande passe en mode veille si le four n'est pas utilisé pendant un moment. En mode veille, le tableau de commande reste inactif et affiche seulement l'heure, jusqu'à ce qu'il soit réactivé par l'utilisateur. REMARQUE Vous...
Page 164 - Cuisson au four; Mode de cuisson
30 Français Utilisation du f our Utilisation du four Cuisson au four ÉTAPE 1 Mettez tous les ingrédients dans un récipient résistant à la chaleur. ÉTAPE 2 Sélectionnez un mode de cuisson, puis démarrez le préchauffage. ÉTAPE 3 Placez le récipient sur une grille. ÉTAPE 4 Fermez la porte et démarrez l...
Page 165 - Utilisation des grilles de cuisson
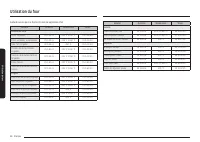
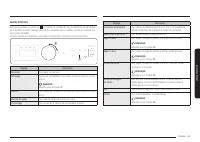
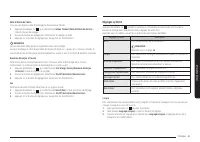
Français 31 Utilisation du f our Mode Plage de températures (°F) Température par défaut (°F) Sonde thermique Réglage du temps de cuisson Départ différé Cuisson traditionnelle 175 à 550 350 O O O Cuisson au gril Élevée à Faible Élevée X X X Cuisson par convection 175 à 550 325 O O O Rôtissage par con...
Page 167 - Guide des recettes
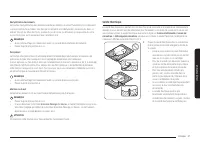
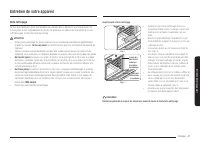
Français 33 Utilisation du f our Avant d'utiliser les grilles Le four est équipé de deux grilles.Chacune comporte une butée qui doit être correctement installée sur son support. Les butées empêchent la grille de sortir complètement de son logement. RETRAIT DES GRILLES1. Tirez la grille horizontaleme...
Page 171 - Sonde thermique
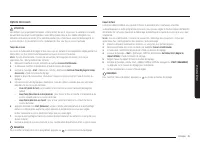
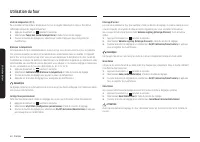
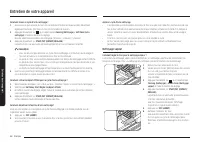
Français 37 Utilisation du f our Déshydratation des aliments La fonction Déshydratation des aliments assèche les aliments ou retire l'humidité qu'ils contiennent via la circulation de la chaleur. Une fois que les aliments sont déshydratés, conservez-les dans un endroit frais et sec. Pour des fruits,...
Page 173 - Options de cuisson
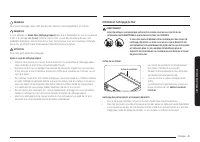
Français 39 Utilisation du f our Options de cuisson ATTENTION Les aliments qui se périment facilement, comme le lait, les œufs, le poisson, la volaille et la viande, doivent être conservés au réfrigérateur avant d'être placés dans le four. Même réfrigérés, ces aliments ne doivent pas rester à l'air ...
Page 174 - Fonctions spéciales
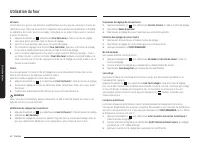
40 Français Utilisation du f our Utilisation du four Fonctions spéciales Utilisation de la fonction Sabbat K (À utiliser pour les fêtes juives et le sabbat) Utilisez cette option uniquement pour la cuisson lors des fêtes juives et du sabbat. Pour en savoir plus, consultez le site Web à l'adresse htt...
Page 175 - Autres fonctions
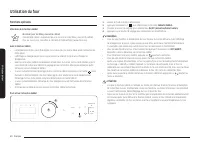
Français 41 Utilisation du f our Autres fonctions Appuyez doucement sur le bouton du tableau de commande, puis tournez le bouton de réglage pour modifier les divers réglages de votre four. Reportez-vous au tableau suivant pour obtenir des descriptions détaillées. Le menu Options est disponible uniqu...
Page 177 - Réglages système
Français 43 Utilisation du f our Délai d'attente de l'écran Vous pouvez régler le délai d'allumage de l'économiseur d'écran. 1. Appuyez doucement sur , puis sélectionnez Screen Timeout (Délai d'attente de l'écran) à l'aide du bouton de réglage. 2. Tournez le bouton de réglage pour sélectionner le ré...
Page 180 - Commande vocale
46 Français Utilisation du f our Utilisation du four Activation/Désactivation de la connexion Wi-Fi Si vous réglez le mode Wi-Fi sur Off (Désactivation de la connexion Wi-Fi), aucun appareil mobile ne peut se connecter à la cuisinière. 1. Appuyez doucement sur pendant 3 secondes. 2. Sélectionnez Wi-...
Page 181 - Entretien de votre appareil
Français 47 Entretien de v otr e appar eil Entretien de votre appareil Auto-nettoyage Ce four auto-nettoyant utilise des températures élevées (bien supérieures aux températures de cuisson) pour brûler complètement les résidus de graisse ou les réduire en fine poudre qu'il vous suffit d'essuyer à l'a...
Page 182 - Nettoyage vapeur
48 Français Entretien de v otr e appar eil Entretien de votre appareil Comment lancer un cycle d'auto-nettoyage ?1. Assurez-vous que la porte du four est correctement fermée et déverrouillée. Désactivez également toutes les fonctions du four et de la table de cuisson. 2. Appuyez doucement sur , puis...
Page 183 - Entretien et nettoyage du four
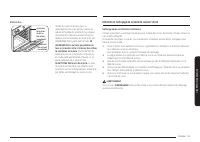
Français 49 Entretien de v otr e appar eil Entretien et nettoyage du four AVERTISSEMENT • Avant de nettoyer une quelconque partie de la cuisinière, assurez-vous que toutes les commandes sont DÉSACTIVÉES et que toutes les surfaces sont FROIDES. • Si vous êtes amené à déplacer votre cuisinière pour de...
Page 185 - Entretien et nettoyage de la table de cuisson vitrée
Français 51 Entretien de v otr e appar eil Entretien et nettoyage de la table de cuisson vitrée Nettoyage après une utilisation quotidienne Utilisez uniquement un nettoyant céramique pour la table de cuisson. L'utilisation d'autres crèmes n'a pas la même efficacité.En respectant les étapes suivantes...
Page 187 - Retrait et réinstallation de la porte du four
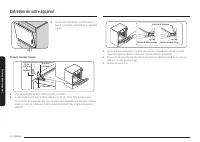
Français 53 Entretien de v otr e appar eil Retrait et réinstallation de la porte du four Comment retirer la porte ? ATTENTION • La porte est très lourde. Soyez prudent lorsque vous retirez et soulevez la porte. Ne soulevez pas la porte par la poignée. • Mettez la cuisinière hors tension avant de ret...
Page 189 - Remplacement de l'ampoule du four; Retrait et réinstallation du tiroir de rangement
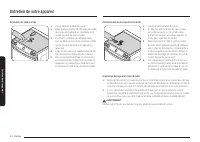
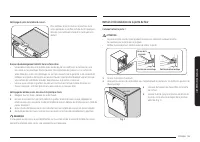
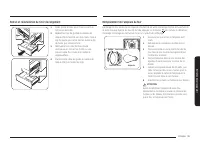
Français 55 Entretien de v otr e appar eil Remplacement de l'ampoule du four L'éclairage du four nécessite une ampoule standard de 40 watts. L'éclairage s'active à l'ouverture de la porte. Lorsque la porte du four est fermée, appuyez sur la touche pour activer ou désactiver l'éclairage. L'éclairage ...
Page 190 - Dépannage
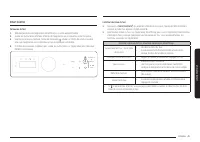
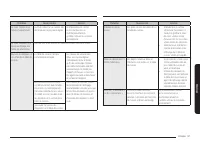
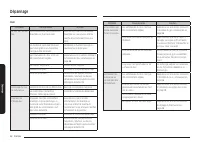
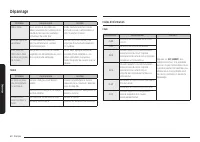
56 Français Dépannag e Dépannage Dépannage Dépannage Samsung veille à ce que vous ne rencontriez pas de problèmes lors de l'utilisation de votre nouvelle cuisinière électrique. En cas de problème inattendu, recherchez en premier lieu une solution dans les tableaux ci-dessous. Si vous rencontrez enco...
Page 199 - Notes; Annonce de logiciel libre
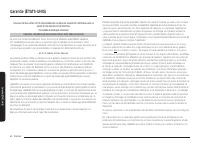
Français 65 Anne xe Notes Annexe Annonce de logiciel libre Le présent produit contient un logiciel libre. L’URL http://opensource.samsung.com/opensource/SMART_TP2_0/seq/0 suivante permet d’accéder aux informations sur la licence de source libre relatives à ce produit.


 Samsung NE63A6111SS/AA
User Manual
Samsung NE63A6111SS/AA
User Manual
 Samsung NE63A6311SS/AA
User Manual
Samsung NE63A6311SS/AA
User Manual
 Samsung NE63A6511SG/AA
User Manual
Samsung NE63A6511SG/AA
User Manual
 Samsung NE63A6711SG/AA
User Manual
Samsung NE63A6711SG/AA
User Manual
 Samsung NE63A6711SS/AA
User Manual
Samsung NE63A6711SS/AA
User Manual
 Samsung NE63A6751SG/AA
User Manual
Samsung NE63A6751SG/AA
User Manual
 Samsung NE63B8211SS
User Manual
Samsung NE63B8211SS
User Manual
 Samsung NE63B8211SS/AA
User Manual
Samsung NE63B8211SS/AA
User Manual
 Samsung NE63B8611SG
User Manual
Samsung NE63B8611SG
User Manual
 Samsung NE63B8611SG/AA
User Manual
Samsung NE63B8611SG/AA
User Manual
 Samsung NE63B8611SS
User Manual
Samsung NE63B8611SS
User Manual
 Samsung NE63BB851112
User Manual
Samsung NE63BB851112
User Manual
 Samsung NE63BB861112
User Manual
Samsung NE63BB861112
User Manual
 Samsung NE63BB861112AA
User Manual
Samsung NE63BB861112AA
User Manual
 Samsung NE63BB871112
User Manual
Samsung NE63BB871112
User Manual
 Samsung NE63BG8315SS
User Manual
Samsung NE63BG8315SS
User Manual
 Samsung NE63CB831512
User Manual
Samsung NE63CB831512
User Manual