Page 5 - de - Ihr Beitrag zum Umweltschutz; Entsorgung der Transportverpackung
de - Ihr Beitrag zum Umweltschutz 5 Entsorgung der Transportverpackung Die Verpackung schützt den Trockner vor Transportschäden. Die Ver-packungsmaterialien sind nach umweltverträglichen und entsorgungs-technischen Gesichtspunkten ausgewählt und deshalb recycelbar.Das Rückführen der Verpackung in de...
Page 6 - de - Sicherheitshinweise und Warnungen; Lesen Sie unbedingt diese Gebrauchsanweisung.; Erweiterte Dokumentation; Bestimmungsgemäße Verwendung
de - Sicherheitshinweise und Warnungen 6 Lesen Sie unbedingt diese Gebrauchsanweisung. Erweiterte Dokumentation Dieses Dokument enthält grundlegende Informationen. Sie finden die vollständige Ge-brauchsanweisung und weitere Dokumente zu Ihrem Gerät auf der Miele Internetseite:http://www.miele.de/p...
Page 7 - den ständig beaufsichtigt.; Vorhersehbare Fehlanwendung; pen und Sie können sich oder andere Personen verletzen.
de - Sicherheitshinweise und Warnungen 7 Wird die Maschine im gewerblichen Bereich betrieben, darf nur eingewiesenes/geschul- tes Personal oder Fachpersonal die Maschine bedienen. Wird die Maschine in einem öf-fentlich zugänglichen Bereich betrieben, muss der Betreiber die gefahrlose Benutzung der...
Page 8 - Technische Sicherheit; ausreichende Raumbelüftung gesorgt ist.
de - Sicherheitshinweise und Warnungen 8 Warnung: Den Trockner niemals vor Beendigung des Trockenprogramms ausschalten. Es sei denn, alle Wäschestücke werden sofort entnommen und so ausgebreitet, dass die Wär-me abgegeben werden kann. Der Trockner darf nicht ohne Flusenfilter oder mit beschädigt...
Page 9 - In der Abluftleitung darf kein Unterdruck vorhanden sein.; Gasbeheizte Trockner
de - Sicherheitshinweise und Warnungen 9 In der Abluftleitung darf kein Unterdruck vorhanden sein. Es besteht Erstickungs- und Vergiftungsgefahr durch das Zurücksaugen von Abgasen, wenn Gasdurchlauferhitzer, Gasraumheizung, Kohleofen mit Kaminanschluss usw. im sel-ben Raum oder in der Wohnung oder...
Page 10 - Sachgemäßer Gebrauch
de - Sicherheitshinweise und Warnungen 10 Vorsichtsmaßnahmen bei Gasgeruch - Löschen Sie sofort alle Flammen.- Schließen Sie sofort das bauseitige Gasabsperrventil, die Gasabsperreinrichtung am Gaszähler oder die Hauptgasabsperreinrichtung. - Öffnen Sie sofort alle Fenster und Türen.- Zünden Sie kei...
Page 11 - Zubehör
de - Sicherheitshinweise und Warnungen 11 Zubehör Zubehörteile dürfen nur dann angebaut oder eingebaut werden, wenn sie ausdrücklich von Miele freigegeben sind. Wenn andere Teile angebaut oder eingebaut werden, gehen An-sprüche aus Garantie, Gewährleistung und/oder Produkthaftung verloren. Miele...
Page 12 - de - Bedienung des Trockners; Bedienblende; Schaltet eine Ebene im Menü zurück.
de - Bedienung des Trockners 12 Bedienblende a Sensortaste Zur Auswahl der aktuellen Sprache für den BedienerNach Programmende wird die Sprache automatisch wieder auf die in der Betreiberebeneeingestellten Sprache zurückgesetzt. b Sensortaste Schaltet eine Ebene im Menü zurück. c Touchdisplay ...
Page 13 - Sensortasten und Touchdisplay mit Sensortasten; Betreiberebene; Bedienungsbeispiele
de - Bedienung des Trockners 13 Sensortasten und Touchdisplay mit Sensortasten Die Sensortasten , und Start/Stop sowie die Sensortasten im Display reagieren auf Fingerkontakt. Jede Berührung wird mit einem Tastenton bestätigt. Sie können die Laut-stärke des Tastentons verändern oder ausschalten...
Page 14 - Extras; Zahlenwerte einstellen; OK
de - Bedienung des Trockners 14 Die orangefarbene Bildlaufleiste im unteren Displaybereich zeigt an, dass weitere Auswahl-möglichkeiten folgen. Um das gewünschte Trockenprogramm auszuwählen, berühren Sie den Programmnamenmit Ihrem Finger. Das Display wechselt nun in das Basismenü des gewählten Pro...
Page 15 - Std; Menü verlassen; Alle Eingaben, die Sie bis dahin getätigt und nicht mit; Hilfe anzeigen; In einigen Menüs wird
de - Bedienung des Trockners 15 12:00 3 4 2 1 5 6 7 8 0 9 Tageszeit OK Um den Zahlenwert einzugeben, berühren Sie die Ziffern auf der rechten Seite und bestä-tigen Sie anschließend mit OK . Pull-down-Menü Im Pull-down-Menü können Sie sich verschiedene Informationen (z. B. zu einem Trocken-prog...
Page 16 - Die richtige Wäschepflege beachten; Schäden durch nicht entnommene Fremdkörper.; Pflegesymbole; Trocknen; Bügeln und Mangeln
de - Trocknen 16 1. Die richtige Wäschepflege beachten Waschen vor demTrocknen Waschen Sie stark verschmutzte Textilien besonders gründlich. Ver-wenden Sie genügend Waschmittel und wählen Sie eine hoheWaschtemperatur. Waschen Sie die Textilien im Zweifelsfall mehr-mals. Wenn industrielle Chemikalien...
Page 17 - Befüllen Sie den Trockner mit der Wäsche.; Tür schließen; Beschädigung durch Einklemmen.
de - Trocknen 17 2. Trockner befüllen Trockner mit Wä-sche befüllen Textilien können beschädigt werden.Lesen Sie vor dem Einfüllen zuerst das Kapitel „1. Die richtige Wä-schepflege beachten“. Öffnen Sie die Tür. Befüllen Sie den Trockner mit der Wäsche. Beschädigungsgefahr durch Einklemmen der W...
Page 18 - Programmeinstellung wählen
de - Trocknen 18 11:02 Programme Favoriten Betreiber Hilfe Berühren Sie die Sensortaste Programme . 11:02 Koch-/ Buntwäsche Programme Baumwolle PRO Pflegeleicht Feinwäsche Baumwolle Wolle Streichen Sie mit dem Finger nach links, bis das gewünschte Pro-gramm erscheint. Berühren ...
Page 19 - Extras wählen
de - Trocknen 19 Trockenstufe wäh-len Sie können bei vielen Programmen die voreingestellte Trockenstufeändern. Abhängig vom Programm sind unterschiedliche Trockenstu-fen wählbar. Extras wählen Trockenprogramme können mit unterschiedlichen Extras ergänztwerden. Einige Extras sind nur bei bestimmten T...
Page 20 - Programm starten; Berühren Sie die Sensortaste
de - Trocknen 20 5. Programm starten Kassiergerät (op-tional) Wenn ein Kassiergerät vorhanden ist, beachten Sie die Zahlungsauf-forderung im Display. Möglicher Wertverlust durch Öffnen der Fülltür oder bei Programm-abbruch.Je nach Einstellung kann durch das Öffnen der Fülltür oder durcheinen Program...
Page 21 - Programmende; Timer; Startvorwahl; Timer einstellen
de - Trocknen 21 Programmlaufzeit/Restzeitprognose Die Programmlaufzeit ist abhängig von der Menge, Art und Restfeuch-te der Wäsche. Deshalb kann die angezeigte Programmlaufzeit derTrockenstufenprogramme variieren oder „springen“. Die lernfähigeElektronik des Trockners passt sich während des laufend...
Page 22 - de - Reinigung und Pflege; Flusensieb reinigen; Brandgefahr durch Betreiben des Trockners ohne Flusensieb.
de - Reinigung und Pflege 22 Flusensieb reinigen Brandgefahr durch Betreiben des Trockners ohne Flusensieb. Luftwege, Heizung und Abluftleitung können während des Trocknerbetriebs ohne Flusen-sieb verstopfen und sich entzünden.Das Flusensieb darf nicht zur Reinigung entfernt werden.Betreiben Sie d...
Page 23 - Trommel und Gehäuseaußenteile reinigen; Lebensgefahr durch elektrischen Schlag.
de - Reinigung und Pflege 23 Trommel und Gehäuseaußenteile reinigen Lebensgefahr durch elektrischen Schlag. Ein nicht vollständig von der Spannungsversorgung getrennter Trockner darf nicht gerei-nigt oder gewartet werden.Schalten Sie den Trockner vor einer Reinigung oder Wartung immer über den bau...
Page 25 - Installationsvoraussetzungen; Allgemeine Betriebsbedingungen
de - Installation *INSTALLATION* 25 Installationsvoraussetzungen Personen- oder Sachschäden durch unsachgemäße Aufstel- lung.Die unsachgemäße Aufstellung des Trockners kann zu Personen-oder Sachschäden führen.Der Trockner darf nur vom Miele Kundendienst oder einem autori-sierten Fachhändler aufges...
Page 26 - Trockner aufstellen
de - Installation *INSTALLATION* 26 Trockner aufstellen Stellen Sie den Trockner auf einer völlig ebenen, waagerechten undfesten Fläche auf, die der angegebenen Bodenbelastung standhält. Die durch den Trockner auftretende Bodenbelastung wirkt als Punkt-belastung im Bereich der Schraubfüße auf die ...
Page 27 - Trockner befestigen; Verletzungsgefahr und Beschädigungsgefahr durch fehlende
de - Installation *INSTALLATION* 27 Ziehen Sie die Muttern auf den Schraubfüßen nach dem Ausrichtenmit einem Maulschlüssel zum Bodenblech fest. Trockner befestigen Gasbeheizte Trockner und Trockner, die auf einem Sockel aufgestelltwerden, müssen unbedingt gegen versehentliches Verschieben ge-siche...
Page 28 - Elektroanschluss; Gefahr durch unsachgemäßen Elektroanschluss.
de - Installation *INSTALLATION* 28 Elektroanschluss Gefahr durch unsachgemäßen Elektroanschluss. Unsachgemäße Installationsarbeiten können hohen Sachschadenund schwere Verletzungen mit Todesfolge verursachen.Alle Arbeiten, die den Elektroanschluss betreffen, dürfen nur von ei-ner zugelassenen ode...
Page 29 - Stromschlaggefahr und Verletzungsgefahr durch Benutzung des
de - Installation *INSTALLATION* 29 Zuluft/Abluft Der Trockner darf nur betrieben werden, wenn eine Abluftleitung ord-nungsgemäß angeschlossen ist und für eine ausreichende Raumbelüf-tung gesorgt ist. Dampfanschluss (nur für dampfbeheizte Varianten) Der Dampfanschluss darf nur von einem zugelassenem...
Page 30 - de - Technische Daten; EU-Konformitätserklärung; Produktnamens oder der Fabrikationsnummer
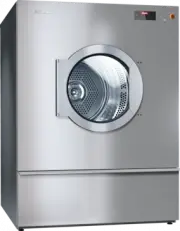
de - Technische Daten 30 PDR 914 PDR 918 PDR 922 PDR 928 PDR 944 Höhe 1400 mm 1400 mm 1400 mm 1640 mm 1640 mm Breite 906 mm 906 mm 906 mm 1206 mm 1206 mm Tiefe 852 mm 1035 mm 1162 mm 1018 mm 1385 mm Tiefe bei geöffneter Tür 1456 mm 1639 mm 1768 mm 1622 mm 1988 mm Trommelinhalt 250 l 325 l 400 l 500 ...
Page 31 - fr - Table des matières; Votre contribution à la protection de l'environnement; Menu «; Séchage
fr - Table des matières 31 Votre contribution à la protection de l'environnement ........................................................ 33 Consignes de sécurité et mises en garde .............................................................................. 34 Documentation ..........................
Page 32 - Installation
fr - Table des matières 32 Installation ..................................................................................................................................... 52 Conditions d'installation ....................................................................................................
Page 33 - fr - Votre contribution à la protection de l'environnement; Nos emballages
fr - Votre contribution à la protection de l'environnement 33 Nos emballages Nos emballages protègent votre sèche-linge des dommages quipeuvent survenir pendant le transport. Nous les sélectionnons enfonction de critères écologiques qui permettent de les recycler.En participant au recyclage de vos e...
Page 34 - fr - Consignes de sécurité et mises en garde; Veuillez impérativement lire ce mode d'emploi.; Documentation; Utilisation conforme; Ce sèche-linge ne convient pas à une utilisation en extérieur.
fr - Consignes de sécurité et mises en garde 34 Veuillez impérativement lire ce mode d'emploi. Documentation Ce document contient un condensé d'informations. Vous pouvez trouver le mode d'emploicomplet et d'autres documents sur le site internet de Miele :https://www.miele.fr/professional/modes-d-e...
Page 35 - sous étroite surveillance.; Erreur d'utilisation prévisible
fr - Consignes de sécurité et mises en garde 35 Les personnes qui en raison de déficiences physiques, sensorielles ou mentales, de leur inexpérience ou de leur ignorance, ne peuvent pas utiliser ce sèche-linge en toute sécuriténe doivent pas l'utiliser sans la surveillance et les instructions d'un...
Page 36 - Sécurité technique; pièce est suffisamment ventilée.
fr - Consignes de sécurité et mises en garde 36 Sécurité technique Avant de l'installer, vérifiez que le sèche-linge ne présente aucun dommage apparent. N'installez et n'utilisez jamais un appareil qui présente des dommages. Pour des raisons de sécurité, n'utilisez pas de rallonge (risque d'ince...
Page 37 - tante, coulissante ou à charnière montée du côté opposé.; Sèche-linge chauffés au gaz; Précautions particulières en cas d'odeur de gaz
fr - Consignes de sécurité et mises en garde 37 Faites confirmer le fonctionnement sans risque de votre installation par un ramoneur com-pétent, et éviter la sous-pression de 4 Pa ou plus . Lors d'installation de plusieurs séche-linge sur un conduit collecteur d'évacuation d'air, il faut installer...
Page 38 - Le filtre à peluches doit être nettoyé régulièrement.; Accessoires; conseils de sécurité et mises en garde.
fr - Consignes de sécurité et mises en garde 38 Le local d’installation du sèche-linge doit toujours être exempt de poussières et de pe- luches. Les particules de poussière aspirées avec l'air favorisent les obstructions. Celapourrait perturber le fonctionnement de l'appareil et causer un incendie...
Page 39 - Bandeau de commande; Revient au niveau précédent dans le menu.
fr - Utilisation 39 Bandeau de commande a Touche sensitive Pour sélectionner la langue d’utilisateur actuelleÀ la fin du programme, la langue est automatiquement réinitialisée dans la langue définieau niveau de l'opérateur. b Touche sensitive Revient au niveau précédent dans le menu. c Écran t...
Page 40 - Mode exploitant; Exemples de fonctionnement
fr - Utilisation 40 Touches sensitives et écran tactile avec touches sensitives Les touches sensitives , et Start/Stop ainsi que les touches sensitives à l’écran ré- agissent au contact du doigt. Tout contact est confirmé par un bip sonore. Vous pouvez mo-difier ou désactiver le volume du bip s...
Page 41 - options; Réglage des données chiffrées
fr - Utilisation 41 La barre de défilement orange en bas de l'écran vous indique que d'autres possibilités desélection suivent. Pour sélectionner le programme de séchage souhaité, touchez le nom du programmeavec votre doigt. L'écran revient au menu de base du programme sélectionné. Menu « Options ...
Page 42 - Menu déroulant; Quitter le menu; Pour revenir à l'écran précédent, effleurez la touche sensitive
fr - Utilisation 42 12:00 3 4 2 1 5 6 7 8 0 9 Heure OK Pour saisir la valeur numérique, touchez les chiffres du côté droit, puis confirmez avec OK . Menu déroulant Dans le menu déroulant, vous pouvez consulter différentes informations, par ex. un pro-gramme de séchage. 11:02 Tps rest. h 2:27...
Page 43 - Fer à repasser et repasseuse
fr - Séchage 43 1. « Conseils d'entretien de votre linge ». Laver votre lingeavant de le sécher Lavez soigneusement les textiles très sales. Utilisez suffisamment delessive et lavez à haute température. En cas de doute, lavez le lingeplusieurs fois. Si des produits chimiques industriels ont été util...
Page 44 - Fermer la porte; Dommage provoqué par des textiles coincés.; Sélectionner un programme; Appuyez sur la touche
fr - Séchage 44 2. Remplir le sèche-linge de linge Remplir le sèche-linge de linge Les textiles peuvent être endommagés.Avant de charger votre sèche-linge, lisez tout d'abord le chapitre« 1. Conseils d'entretien de votre linge ». Ouvrez la porte. Remplissez le sèche-linge de linge. Risque de dom...
Page 45 - Sélection des paramètres du programme
fr - Séchage 45 11:02 Programmes Favoris Exploitant Aide Effleurez la touche sensitive Programmes . 11:02 Blanc/ Couleurs Programmes Coton PRO Non repassable Fin Coton Laine Faites glisser votre doigt vers la gauche jusqu'à ce que le pro-gramme souhaité apparaisse. Effleurez la ...
Page 47 - Démarrer un programme; Dès qu'un programme peut être démarré, la touche sensitive; Le menu déroulant affiche les paramètres du programme de séchage.
fr - Séchage 47 5. Démarrer un programme Monnayeur (enoption) Pour utiliser le monnayeur, suivez les instructions de paiement quis'affichent à l'écran. Perte de valeur possible lors de l'ouverture de la porte de charge-ment ou de l'annulation du programme.Selon le réglage, l'ouverture de la porte de...
Page 48 - Fin du programme; Fin de programme; Départ différé
fr - Séchage 48 Lors des premières utilisations des programmes, le temps affichés'écarte parfois considérablement du temps de séchage restant réel.La différence entre le temps prévu et le temps atteint diminue si leprogramme correspondant est exécuté plus souvent. Si différentesquantités de charge s...
Page 49 - fr - Nettoyage et entretien; Nettoyer le filtre à peluches; Enlevez les peluches du filtre à la main.; Nettoyer le tambour et les parties extérieures de la carrosserie; Il existe un risque de choc électrique !
fr - Nettoyage et entretien 49 Nettoyer le filtre à peluches Risque d'incendie dû au fonctionnement du sèche-linge sans filtre à peluches. Les conduites d'air, le chauffage et l'évacuation peuvent être obstrués pendant le fonc-tionnement du sèche-linge sans filtre à peluches et provoquer un incend...
Page 50 - Séchez tous les éléments avec un chiffon doux.
fr - Nettoyage et entretien 50 Risque d'endommagement par des nettoyants et des produits abrasifs contenant des solvants.N'utilisez ni détergent contenant des solvants, ni produit abrasif, ni produit à vitres oumulti-usages. Ces produits risquent d'endommager les surfaces plastiques et autrespièce...
Page 52 - Conditions d'installation; Dommages corporels ou matériels dus à une mauvaise installa-; Conditions générales de fonctionnement
fr - Installation *INSTALLATION* 52 Conditions d'installation Dommages corporels ou matériels dus à une mauvaise installa- tion.Une mauvaise installation du sèche-linge peut causer des dom-mages corporels ou matériels.Seul un professionnel agréé par Miele ou le service après-venteMiele doit se cha...
Page 53 - Installer le sèche-linge
fr - Installation *INSTALLATION* 53 Installer le sèche-linge Placez le sèche-linge sur une surface rigide, horizontale et totale-ment plane qui résiste aux charges indiquées. La charge au sol du sèche-linge se concentre sur les pieds au niveaude la surface d'installation. Il n'est pas nécessaire d...
Page 54 - Fixation; Raccordement électrique; met de garantir un fonctionnement sûr et fiable de ce dernier.
fr - Installation *INSTALLATION* 54 Serrez les écrous des pieds de vis après les avoir alignés avec uneclé à fourche sur la tôle de fond. Fixation Pour le stabiliser, il faut fixer le sèche-linge au sol à l'aide des pattesde fixation fournies au-dessus des pieds. Le matériel de fixation fourni e...
Page 55 - Raccordez de préférence le sèche-linge à une prise, pour; Arrivée d’air frais/ évacuation d’air
fr - Installation *INSTALLATION* 55 Si plusieurs valeurs de tension sont indiquées sur la plaque signalé- tique, le sèche-linge peut être raccordé à la tension d'entrée corres-pondante. L'adaptation à un autre type de tension ne doit être effec-tuée que par un revendeur spécialisé ou par le servic...
Page 56 - Risque de choc électrique et de blessure lors de l'utilisation du
fr - Installation *INSTALLATION* 56 Raccordement au gaz (uniquement pour variantes chauf-fées au gaz) Le raccordement au gaz doit être effectué uniquement par un instal-lateur agréé par le distributeur de gaz dans le respect des normesen vigueur. En raison d'un débit insuffisant, l'utilisation d'une...
Page 57 - fr - Caractéristiques techniques; Déclaration de conformité UE; du produit ou le numéro de fabrication
fr - Caractéristiques techniques 57 PDR 914 PDR 918 PDR 922 PDR 928 PDR 944 Hauteur 1400 mm 1400 mm 1400 mm 1640 mm 1640 mm Largeur 906 mm 906 mm 906 mm 1206 mm 1206 mm Profondeur 852 mm 1035 mm 1162 mm 1018 mm 1385 mm Profondeur avec porte ouverte 1456 mm 1639 mm 1768 mm 1622 mm 1988 mm Capacité du...
Page 60 - it - Il Vostro contributo alla tutela dell'ambiente; Smaltimento dell'imballaggio
it - Il Vostro contributo alla tutela dell'ambiente 60 Smaltimento dell'imballaggio L'imballaggio impedisce che l'essiccatoio subisca dei danni durante iltrasporto. I materiali utilizzati per l'imballaggio sono riciclabili, per cuiselezionati secondo criteri di rispetto dell'ambiente e di facilità d...
Page 61 - it - Istruzioni per la sicurezza e avvertenze; Leggere assolutamente le presenti istruzioni d'uso.; Documentazione ampliata; Uso corretto
it - Istruzioni per la sicurezza e avvertenze 61 Leggere assolutamente le presenti istruzioni d'uso. Documentazione ampliata Questo documento contiene informazioni di base. Le istruzioni d'uso complete e altri docu-menti relativi al vostro apparecchio sono disponibili sulla pagina internet Miele:h...
Page 62 - Evitare i seguenti errori
it - Istruzioni per la sicurezza e avvertenze 62 Le persone che per le loro capacità fisiche, sensoriali o psichiche o per la loro inesperien- za o non conoscenza non siano in grado di utilizzare in sicurezza l'essiccatoio, non devonofarne uso senza la sorveglianza e la guida di una persona respon...
Page 63 - Sicurezza tecnica; rantisce una sufficiente aerazione dell'ambiente.
it - Istruzioni per la sicurezza e avvertenze 63 L'essiccatoio non può essere messo in funzione senza filtro impurità o con questo filtro danneggiato. Si possono verificare anomalie nel funzionamento. Le impurità ostruiscono icondotti dell'aria, il riscaldamento e il condotto di sfiato e questo pu...
Page 64 - Essiccatoi con riscaldamento a gas; spositivo di arresto sul contatore del gas.; Impiego corretto; evita che
it - Istruzioni per la sicurezza e avvertenze 64 In ogni caso è necessario chiedere conferma sulla sicurezza del funzionamento a uno spaz-zacamino competente per evitare anche una depressione di 4 Pa e superiore. Per l'installazione di più essiccatoi a un collettore di sfiato, installare per ogni ...
Page 65 - Il filtro impurità deve essere pulito regolarmente.; Accessori; rezza e delle avvertenze.
it - Istruzioni per la sicurezza e avvertenze 65 Pulire sempre a fondo il luogo di posizionamento di modo da eliminare polvere e lanugi- ne. Le particelle di sporco contenute nell'area aspirata favoriscono gli intasamenti. Può veri-ficarsi un guasto e sussiste pericolo d'incendio. L'essiccatoio ...
Page 66 - Pannello comandi; Consente di ritornare al livello precedente nel menù.
it - Come si usa l'essiccatoio 66 Pannello comandi a Tasto sensore Per scegliere la lingua del gestoreAl termine del programma la lingua passa in automatico a quella impostata al livello ge-store. b Tasto sensore Consente di ritornare al livello precedente nel menù. c Display touch d Tasto sen...
Page 67 - vello gestore; Elenchi di selezione
it - Come si usa l'essiccatoio 67 Tasti sensore e display touch con tasti sensore I tasti sensore , e Start/Stop nonché i tasti sensore a display reagiscono al contat- to. A ogni contatto è associato un segnale acustico. Il volume dell'acustica tasti può esseremodificato o spento (v. cap. "L...
Page 68 - Opzioni; Impostare i valori numerici
it - Come si usa l'essiccatoio 68 La barra di scorrimento arancione nell'area inferiore del display indica che seguono altrepossibilità di selezione. Per selezionare il programma di asciugatura desiderato, toccare il nome programma con ildito. Il display passa al menù base del programma selezionat...
Page 69 - Menù a tendina; Uscire dal menù; Visualizzare la guida
it - Come si usa l'essiccatoio 69 12:00 3 4 2 1 5 6 7 8 0 9 Orologio OK Per immettere un valore numerico, toccare le cifre sul lato destro e confermare infine con OK . Menù a tendina Nel menù a tendina è possibile visualizzare diverse informazioni (relative a un programma diasciugatura). 11:...
Page 70 - Cura della biancheria; Danni causati da corpi estranei non rimossi.; Stiro a mano e con stiratrice
it - Asciugatura 70 1. Cura della biancheria Lavaggio primadell'asciugatura Lavare accuratamente i capi particolarmente sporchi. Utilizzare unaquantità sufficiente di detersivo e selezionare una temperatura eleva-ta. In caso di dubbi, lavarli più volte. Se per il lavaggio della biancheria sono stati...
Page 71 - Selezionare un programma; Premere il tasto
it - Asciugatura 71 2. Introdurre i capi nell'essiccatoio Introdurre la bian-cheria nell'essic-catoio I capi si possono danneggiare.Prima di introdurre la biancheria leggere il capitolo “1. Cura dellabiancheria". Aprire lo sportello. Introdurre la biancheria nell'essiccatoio. Pericolo di dan...
Page 72 - Selezionare impostazione dei programmi; Attivare le opzioni
it - Asciugatura 72 Toccare il tasto sensore Programmi . 11:02 Cot.resistente colorato Programmi Cotone PRO Lava/indossa Delicati Cotone Lana Scorrere verso sinistra con il dito finché compare il programma desi-derato. Toccare il tasto sensore del programma. Il display passa al menù bas...
Page 74 - Avviare un programma; Quando si avvia un programma, lampeggia il tasto sensore
it - Asciugatura 74 5. Avviare un programma Gettoniera (opzio-nale) Se la macchina è allacciata a una gettoniera, seguire le indicazioni peril pagamento che compaiono sul display. Possibile perdita di valore aprendo lo sportello o in caso di interru-zione del programma.A seconda dell'impostazione, a...
Page 75 - Fine programma; Posticipo avvio; Impostare il timer
it - Asciugatura 75 Con i primi usi dei programmi la durata visualizzata diverge in partesensibilmente dalla durata residua reale dell'asciugatura. La differen-za tra durata prevista e raggiunta diminuisce se il rispettivo program-ma viene eseguito più spesso. Se differenti quantità di carico vengo-...
Page 76 - it - Pulizia e manutenzione; Pulire il filtro impurità; Aprire lo sportello del vano filtro.; Pulire il tamburo e le parti esterne dell'involucro; Pericolo di morte a causa di scossa elettrica.
it - Pulizia e manutenzione 76 Pulire il filtro impurità Pericolo di incendio a causa del funzionamento dell'essiccatoio senza filtro impurità. I circuiti dell'aria, il riscaldamento e il condotto di sfiato possono ostruirsi e incendiarsinel corso del funzionamento dell'essiccatoio senza filtro im...
Page 77 - Asciugare tutte le superfici con un panno morbido.
it - Pulizia e manutenzione 77 Pericolo di danneggiamento a causa di detergenti contenenti solventi e prodotti abra- sivi.Non usare solventi, prodotti abrasivi, per vetro o universali che potrebbero danneggiare lesuperfici in materiale plastico o altri componenti.Pulire l'essiccatoio solo con un p...
Page 78 - it - Assistenza tecnica; Contatti in caso di guasto
it - Assistenza tecnica 78 Contatti in caso di guasto In caso di guasti che non si è in grado di risolvere da soli, contattare il negozio specializzatoMiele o il servizio di assistenza tecnica Miele. Il numero di telefono dell'assistenza tecnica Miele si trova in fondo alle presenti istruzioni. Indi...
Page 79 - Requisiti per l'installazione; Danni a persone e cose a causa di un posizionamento non cor-; Condizioni generali di funzionamento; in caso di specifiche esigenze di silenziosità del luogo; Trasporto
it - Installazione *INSTALLATION* 79 Requisiti per l'installazione Danni a persone e cose a causa di un posizionamento non cor- retto.Il posizionamento non corretto dell'essiccatoio può causare danni apersone o cose.L'essiccatoio può essere installato e messo in servizio per la primavolta solo dal...
Page 81 - Fissaggio; Allacciamento elettrico; se la macchina è allacciata alla rete elettrica pubblica.
it - Installazione *INSTALLATION* 81 Stringere i dadi dei piedini con una chiave sulla lamiera di base dopoaverli regolati. Fissaggio Per una maggiore sicurezza di posizionamento fissare l'essiccatoiocon le griffe d'ancoraggio in dotazione tramite i piedini al pavimento. Il materiale di fissaggi...
Page 82 - Si consiglia di allacciare preferibilmente l'essiccatoio
it - Installazione *INSTALLATION* 82 Se sulla targhetta dati sono riportati più valori di tensione, la mac- china può essere modificata sulla rispettiva tensione per l'allaccia-mento. La modifica deve essere effettuata solo dal servizio di assi-stenza tecnica autorizzato Miele o da rivenditori qua...
Page 83 - Pericolo di scossa elettrica e di ferimento a causa dell'utilizzo
it - Installazione *INSTALLATION* 83 Allacciamento al gas (solo per versioni con riscaldamentoa gas) L'allacciamento gas deve essere predisposto solo da un installatoreautorizzato nel rispetto delle normative vigenti nel paese. A causa di una portata ridotta non è consentito l'utilizzo di una presag...
Page 84 - Dichiarazione di conformità UE; del prodotto o il numero di fabbricazione
it - Dati tecnici 84 PDR 914 PDR 918 PDR 922 PDR 928 PDR 944 Altezza 1400 mm 1400 mm 1400 mm 1640 mm 1640 mm Larghezza 906 mm 906 mm 906 mm 1206 mm 1206 mm Profondità 852 mm 1035 mm 1162 mm 1018 mm 1385 mm Profondità a sportello aperto 1456 mm 1639 mm 1768 mm 1622 mm 1988 mm Volume cesto 250 l 325 l...
Page 87 - nl - Uw bijdrage aan de bescherming van het milieu; Het verpakkingsmateriaal
nl - Uw bijdrage aan de bescherming van het milieu 87 Het verpakkingsmateriaal De verpakking beschermt het apparaat tegen transportschade. Hetverpakkingsmateriaal is uitgekozen, omdat dit het milieu relatief weinigbelast en kan worden hergebruikt.Door hergebruik van verpakkingsmateriaal wordt er op ...
Page 88 - nl - Veiligheidsinstructies en waarschuwingen; Lees beslist deze gebruiksaanwijzing.; Uitgebreide documentatie; Verantwoord gebruik; De droger is bedoeld voor professioneel gebruikt.
nl - Veiligheidsinstructies en waarschuwingen 88 Lees beslist deze gebruiksaanwijzing. Uitgebreide documentatie Dit document bevat basisinformatie. U vindt de volledige gebruiksaanwijzing en andere do-cumenten voor uw apparaat op de internetsite van Miele:http://www.miele.nl/professional/gebruiksa...
Page 89 - ze constant onder toezicht staan.; Problemen voorkomen; zichzelf of anderen verwonden.; Waarschuwing
nl - Veiligheidsinstructies en waarschuwingen 89 Als de machine in een professionele omgeving wordt gebruikt, mag alleen geïnstrueerd/ opgeleid personeel of gekwalificeerd personeel de machine bedienen. Als de machinewordt gebruikt in een openbaar toegankelijke ruimte, moet de exploitant ervoor zo...
Page 90 - Technische veiligheid; ruimte voldoende geventileerd kan worden.
nl - Veiligheidsinstructies en waarschuwingen 90 De droger mag niet zonder pluizenfilter of met een beschadigd pluizenfilter worden ge- bruikt. Dat kan storingen veroorzaken. De pluizen verstoppen de luchtkanalen, de verwar-ming en de luchtafvoerleiding, waardoor brand kan ontstaan. Schakel de dro...
Page 91 - Gasverwarmde droger; Veiligheidsmaatregelen bij gaslucht
nl - Veiligheidsinstructies en waarschuwingen 91 U kunt onderdruk op de plaats van opstelling voorkomen als u bijvoorbeeld de volgendemaatregelen voor voldoende ventilatie neemt: - Installeer niet-afsluitbare ventilatieopeningen in de buitenmuur.- Gebruik vensterschakelaars zodat de droger alleen ka...
Page 92 - Veilig gebruik; Het pluizenfilter moet regelmatig worden gereinigd.
nl - Veiligheidsinstructies en waarschuwingen 92 Veilig gebruik Sluit de deur iedere keer nadat u de droger heeft gebruikt. Zo voorkomt u dat - kinderen proberen in de droger te klimmen of er voorwerpen in verstoppen;- huisdieren in de droger klimmen. Houd de ruimte waar de droger staat altijd v...
Page 93 - nl - Bediening van de droger; Bedieningspaneel; Hiermee gaat u een niveau terug in het menu.
nl - Bediening van de droger 93 Bedieningspaneel a Sensortoets Om de actuele taal voor de gebruiker te kiezenNa het einde van het programma wordt de taal automatisch weer gereset naar de taal dieop het exploitatieniveau is ingesteld. b Sensortoets Hiermee gaat u een niveau terug in het menu. c...
Page 94 - Sensortoetsen en touchscreen met sensortoetsen; Exploitatieniveau; Exploitatieniveau; Bedieningsvoorbeelden
nl - Bediening van de droger 94 Sensortoetsen en touchscreen met sensortoetsen De sensortoetsen , en Start/Stop en de sensortoetsen in het display reageren op aanraking met de vingertoppen. Elke aanraking wordt door een toetssignaal bevestigd. Ukunt het volume van het toetssignaal veranderen of...
Page 95 - Extra functies; Waarde in cijfers instellen
nl - Bediening van de droger 95 De oranje scrollbalk in het onderste gedeelte van het display geeft aan dat er meer keuze-mogelijkheden volgen. Raak de programmanaam met uw vinger aan om het gewenste droogprogramma te kie-zen. In het display verschijnt nu het basismenu van het gekozen programma. M...
Page 96 - Pull down menu; Menu verlaten; Help weergeven
nl - Bediening van de droger 96 12:00 3 4 2 1 5 6 7 8 0 9 Dagtijd OK Raak de cijfers aan de rechterkant aan en bevestig vervolgens met OK om de waarde in cijfers in te voeren. Pull down menu In het pull down menu kunt u verschillende informatie bekijken (bijv. over een droogpro-gramma). 11:0...
Page 97 - Tips voor de juiste wasbehandeling; Schade door vreemde voorwerpen die in het wasgoed zijn blij-; Strijken en mangelen
nl - Drogen 97 1. Tips voor de juiste wasbehandeling Wassen vóór hetdrogen Was ernstig vervuild textiel extra grondig. Gebruik voldoende wasmid-del en was op een hoge temperatuur. Doe dit indien u twijfelt meerde-re keren. Als industriële chemicaliën voor de reiniging van het wasgoed zijngebruikt, m...
Page 98 - Vul de droger met het wasgoed.; Deur sluiten; Beschadiging door vastklemmen.; Programma selecteren; Druk op de toets
nl - Drogen 98 2. Droger vullen De droger metwasgoed vullen Het wasgoed kan beschadigd raken.Lees voordat u de droger belaadt eerst hoofdstuk “1. Tips voor dejuiste wasbehandeling”. Open de deur. Vul de droger met het wasgoed. Gevaar voor beschadiging door wasgoed dat vastgeklemd raakt.Wasgoed k...
Page 102 - Einde programma; Timer instellen
nl - Drogen 102 De adaptieve elektronica van de droger past zich tijdens het actueledroogprogramma aan. De weergegeven programmaduur wordt steedsnauwkeuriger. De eerste paar keer dat de programma's worden gebruikt, wijkt deweergegeven tijd significant af van de werkelijk resterende droogtijd.Het ver...
Page 103 - nl - Reiniging en onderhoud; Pluizenfilter reinigen; Brandgevaar als de droger zonder pluizenfilter wordt gebruikt.
nl - Reiniging en onderhoud 103 Pluizenfilter reinigen Brandgevaar als de droger zonder pluizenfilter wordt gebruikt. Luchtkanalen, verwarming en luchtafvoerleiding kunnen verstopt raken en vlam vatten alsde droger in werking is zonder het pluizenfilter.Het pluizenfilter mag niet worden verwijderd...
Page 104 - Trommel en buitenste delen van de behuizing reinigen; Levensgevaar door een elektrische schok.
nl - Reiniging en onderhoud 104 Trommel en buitenste delen van de behuizing reinigen Levensgevaar door een elektrische schok. Een droger die niet volledig is losgekoppeld van de stroomvoorziening, mag niet wordenschoongemaakt of onderhouden.Schakel de droger altijd uit met de hoofdschakelaar op lo...
Page 106 - Installatievoorwaarden; Algemene gebruiksvoorwaarden
nl - Installatie *INSTALLATION* 106 Installatievoorwaarden Lichamelijk letsel of materiële schade door een verkeerde op- stelling.Een verkeerde opstelling van de droger kan lichamelijk letsel of ma-teriële schade veroorzaken.De droger mag alleen door iemand van de Miele Service of een ge-autorisee...
Page 107 - Droger plaatsen
nl - Installatie *INSTALLATION* 107 Droger plaatsen Plaats de droger op een volkomen vlakke, vaste ondergrond die wa-terpas is en die bestand is tegen de vermelde vloerbelasting. De door de droger veroorzaakte vloerbelasting oefent bij de stelpo-tjes een puntbelasting uit op de ondergrond. Een fun...
Page 108 - Bevestiging; Elektrische aansluiting; het openbare elektriciteitsnet is aangesloten.
nl - Installatie *INSTALLATION* 108 Draai de moeren op de schroefpoten na het afstellen met een steek-sleutel vast op de bodemplaat. Bevestiging Om schuiven tegen te gaan, moet u de droger met de bijgeleverdespanstrips via de machinevoeten op de vloer bevestigen. Het meegeleverde bevestigingsmat...
Page 109 - Luchttoevoer/luchtafvoer
nl - Installatie *INSTALLATION* 109 Als het typeplaatje meerdere spanningswaarden vermeldt, kan de droger worden aangepast voor aansluiting op de betreffende ingangs-spanning. Deze omschakeling mag alleen door de Miele Service of eengeautoriseerde vakhandelaar worden uitgevoerd. Hierbij dienen dea...
Page 110 - Risico op elektrische schokken en letsel als de droger wordt ge-
nl - Installatie *INSTALLATION* 110 Gasaansluiting (alleen voor varianten met gasverwar-ming) De gasaansluiting mag alleen door een erkende installateur met in-achtneming van de landspecifieke voorschriften worden uitgevoerd. Vanwege een onvoldoende debiet is het gebruik van een gasstopcon-tact voor...
Page 111 - nl - Technische gegevens; EU-conformiteitsverklaring; het product of het serienummer in te voeren
nl - Technische gegevens 111 PDR 914 PDR 918 PDR 922 PDR 928 PDR 944 Hoogte 1.400 mm 1.400 mm 1.400 mm 1.640 mm 1.640 mm Breedte 906 mm 906 mm 906 mm 1.206 mm 1.206 mm Diepte 852 mm 1.035 mm 1.162 mm 1.018 mm 1.385 mm Diepte bij geopende deur 1.456 mm 1.639 mm 1.768 mm 1.622 mm 1.988 mm Trommelvolum...
Page 114 - en - Caring for the environment; Disposal of the packing material
en - Caring for the environment 114 Disposal of the packing material The packaging is designed to protect the appliance from damage dur-ing transportation. The packaging materials used are selected frommaterials which are environmentally friendly for disposal and shouldbe recycled.Recycling the pack...
Page 115 - en - Warning and Safety instructions; It is essential to read these instructions.; Extended documentation; Appropriate use; The tumble dryer is not intended for outdoor use.
en - Warning and Safety instructions 115 It is essential to read these instructions. Extended documentation This document contains essential information. You can access the full operating instruc-tions and other up-to-date documentation for your appliance on the Miele website:https://www.miele.co....
Page 116 - constantly supervised.; Foreseeable misuse; injury to yourself or others.
en - Warning and Safety instructions 116 This appliance can only be used by people with reduced physical, sensory or mental cap- abilities, or lack of experience or knowledge, if they are supervised whilst using it or havebeen shown how to use it in a safe way and understand and recognise the cons...
Page 117 - Technical safety; Do not install or use a damaged tumble dryer.
en - Warning and Safety instructions 117 Never operate the tumble dryer without the fluff filter or with a damaged fluff filter. This could lead to malfunctions. Fluff can clog the air channels, heating elements and vent duct-ing, which could result in a fire. In this case, stop the tumble dryer i...
Page 118 - Gas-heated tumble dryers; Correct use
en - Warning and Safety instructions 118 Please always seek approval from your building regulations inspector to confirm that the ap-pliance can be operated without risk and that negative pressure of over 4 Pa can be preven-ted. If multiple tumble dryers are to be connected to one vent ducting, a ...
Page 119 - The fluff filter must be cleaned on a regular basis.; Accessories; ing and Safety instructions.
en - Warning and Safety instructions 119 Keep the room where the tumble dryer is located free from dust and fluff. If the air that is taken into the machine contains dirt particles, this can cause blockages. A fault may thenoccur and there is a risk of fire. Never operate the tumble dryer withou...
Page 120 - en - Operating the tumble dryer; Control panel; Takes you back one level in the menu.
en - Operating the tumble dryer 120 Control panel a sensor control For selecting the current user languageAt the end of the programme, the language is automatically reset to the language set atthe supervisor level. b sensor control Takes you back one level in the menu. c Touch display d / s...
Page 121 - Sensor controls and touch display with sensor controls; Programmes” menu; Favourite programmes; Supervisor” menu; Supervisor level; Operating examples; Selection lists
en - Operating the tumble dryer 121 Sensor controls and touch display with sensor controls The sensor controls , and Start/Stop and the sensor controls in the display re- spond to finger tip contact. Every touch of a sensor control is confirmed with an audiblekeypad tone. You can adjust the vol...
Page 122 - Setting numerical values
en - Operating the tumble dryer 122 The orange scroll bar in the bottom display area shows that there are further options tochoose from. To select the required drying programme, touch the programme name with your finger. The display will now change to the standard menu for that programme. “Extras”...
Page 123 - Exiting the menu; Help display
en - Operating the tumble dryer 123 12:00 3 4 2 1 5 6 7 8 0 9 Clock display OK To enter the numerical value, touch the numbers on the right-hand side and then confirmwith OK . Pull-down menu The pull-down menu can be used to display information (e.g. about a drying programme). 11:02 Time lef...
Page 124 - Notes on correct laundry care; Damage due to foreign objects which were not removed from; Care symbols; Drying; Ironing
en - Drying 124 1. Notes on correct laundry care Washing beforedrying Heavily soiled laundry must be washed particularly thoroughly. Usesufficient detergent and select a high wash temperature. If in doubt,wash the items several times. The tumble dryer must not be used for drying items of laundrywhic...
Page 125 - Loading the tumble dryer; Load laundry into the tumble dryer.; Closing the door; Damage caused by laundry getting trapped.; Selecting a programme; Press the; Touch the
en - Drying 125 2. Loading the tumble dryer Loading laundryinto the tumbledryer Preventing damage to fabrics.Before loading, read chapter “1. Notes on correct laundry care” first. Open the door. Load laundry into the tumble dryer. Risk of damage with laundry getting trapped.Laundry can be damage...
Page 126 - Touch the sensor control for that programme.; cannot be changed via; Touch the required programme.; Selecting programme settings
en - Drying 126 11:02 Cottons Programmes Cottons PRO Minimum iron Delicates Cottons Woollens With your finger, swipe to the left until you reach the required pro-gramme. Touch the sensor control for that programme. The display will change to the standard menu for that drying pro-gramme. Alte...
Page 128 - Starting a programme; The programme can be started as soon as the
en - Drying 128 5. Starting a programme Payment device(optional) If your machine is connected to a payment device, the amount of pay-ment required will appear in the display. Money may be lost if the drum door is opened or the programme iscancelled.Depending on the settings, money may be lost in the...
Page 129 - End of the programme; End of programme; Delay start; Setting the timer
en - Drying 129 When using the programmes for the first time, the displayed timesometimes deviates significantly from the real time left. The differ-ence between the estimated and achieved time becomes smaller ifthe corresponding programme is run more often. If different loadsizes are dried in one p...
Page 130 - en - Cleaning and maintenance; Cleaning the fluff filter; Risk of fire if the tumble dryer is operated without a fluff filter.
en - Cleaning and maintenance 130 Cleaning the fluff filter Risk of fire if the tumble dryer is operated without a fluff filter. If there is no fluff filter, the air channels, heating elements and vent ducting can becomeclogged during drying and may catch fire.The fluff filter must not be removed ...
Page 131 - Cleaning the drum and the outside of the casing; Risk of death due to electric shock.
en - Cleaning and maintenance 131 Cleaning the drum and the outside of the casing Risk of death due to electric shock. The tumble dryer must be completely disconnected from the power supply before per-forming cleaning or maintenance work.Before starting cleaning or maintenance work, always switch ...
Page 132 - en - Customer Service Department; Contact in case of malfunction
en - Customer Service Department 132 Contact in case of malfunction In the event of any faults which you cannot remedy yourself, please contact your MieleDealer or Miele Service. Contact information for Miele Service can be found at the end of this document. Please note that telephone calls may be m...
Page 133 - Installation requirements; Risk of injury or damage to property due to improper installa-; General operating conditions; Have the installation site inspected and seek the advice of a pro-; Transport
en - Installation *INSTALLATION* 133 Installation requirements Risk of injury or damage to property due to improper installa- tion.Incorrect installation of the tumble dryer can lead to personal injuryor damage to property.The tumble dryer must only be installed and commissioned by MieleCustomer S...
Page 135 - Securing the machine; Electrical connection; has been connected to the mains electricity supply.
en - Installation *INSTALLATION* 135 After the machine has been aligned, screw the nuts on the ad-justable feet tightly to the base plate using an open spanner. Securing the machine The tumble dryer must be secured to the floor by fitting the tension-ing strips supplied over the machine feet. Fi...
Page 136 - Air intake/exhaust air
en - Installation *INSTALLATION* 136 Tip: We recommend connecting the tumble dryer to the power supply via a plug and socket so that it is easier to conduct electrical safetychecks (e.g. during maintenance or repair work).It is recommended the tumble dryer is connected with a suitable plugand socket...
Page 137 - Risk of electric shock and injury due to using the tumble dryer
en - Installation *INSTALLATION* 137 If the gas type needs to be changed, please request the appropriateconversion kit from the Miele Customer Service Department. Inform-ation is required on the appliance type, serial number, gas family, gasgroup, gas connection pressure and country of installation....
Page 138 - EU declaration of conformity; name of the product or the serial number; UK declaration of conformity
en - Technical data 138 PDR 914 PDR 918 PDR 922 PDR 928 PDR 944 Height 1400 mm 1400 mm 1400 mm 1640 mm 1640 mm Width 906 mm 906 mm 906 mm 1206 mm 1206 mm Depth 852 mm 1035 mm 1162 mm 1018 mm 1385 mm Depth with door open 1456 mm 1639 mm 1768 mm 1622 mm 1988 mm Drum volume 250 l 325 l 400 l 500 l 800 ...


 Miele APWM 063
Installation Manual
Miele APWM 063
Installation Manual
 Miele APWM 066
Installation Manual
Miele APWM 066
Installation Manual
 Miele UO 811-30
Installation Manual
Miele UO 811-30
Installation Manual
 Miele UO 413-30
Installation Manual
Miele UO 413-30
Installation Manual
 Miele UO 814-25
Installation Manual
Miele UO 814-25
Installation Manual
 Miele UO 818/418-25
Installation Manual
Miele UO 818/418-25
Installation Manual
 Miele APCL 043
User Manual
Miele APCL 043
User Manual
 Miele APWM 062
Installation Manual
Miele APWM 062
Installation Manual
 Miele APWM 065
Installation Manual
Miele APWM 065
Installation Manual
 Miele APWM 070
Installation Manual
Miele APWM 070
Installation Manual
 Miele APWM 069
Installation Manual
Miele APWM 069
Installation Manual
 Miele APWM 020
Installation Manual
Miele APWM 020
Installation Manual
 Miele SC
Installation Manual
Miele SC
Installation Manual
 Miele PR
Installation Manual
Miele PR
Installation Manual
 Miele FP 900
Installation Manual
Miele FP 900
Installation Manual
 Miele RP 900
Installation Manual
Miele RP 900
Installation Manual
 Miele APCL 046
User Manual
Miele APCL 046
User Manual
 Miele APCL 047
User Manual
Miele APCL 047
User Manual
 Miele APWM 019
Installation Manual
Miele APWM 019
Installation Manual