Page 2 - Contents; Super freeze function
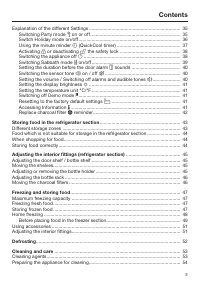
Contents 2 Warning and Safety instructions .......................................................................... 5 Caring for the environment ................................................................................ 12 How to save energy ...................................................
Page 3 - Storing food in the refrigerator section
Contents 3 Explanation of the different Settings ..................................................................... 35 Switching Party mode on or off .................................................................... 35 Switch Holiday mode on/off ...............................................
Page 5 - Warning and Safety instructions; Correct application; This appliance is intended for use in domestic households and
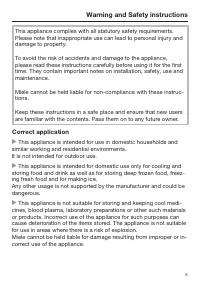
Warning and Safety instructions 5 This appliance complies with all statutory safety requirements.Please note that inappropriate use can lead to personal injury anddamage to property. To avoid the risk of accidents and damage to the appliance,please read these instructions carefully before using it f...
Page 6 - Safety with children
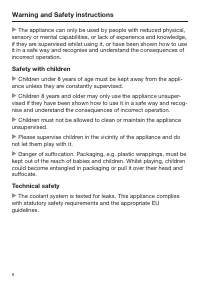
Warning and Safety instructions 6 The appliance can only be used by people with reduced physical, sensory or mental capabilities, or lack of experience and knowledge,if they are supervised whilst using it, or have been shown how to useit in a safe way and recognise and understand the consequences ...
Page 9 - Correct use
Warning and Safety instructions 9 Correct use The appliance is designed for use within a certain climate range (ambient temperatures), and should not be used outside this range.The climate range for your appliance is stated on the data plate in-side the appliance. Installing it in a room with too ...
Page 10 - Cleaning and care
Warning and Safety instructions 10 Do not take ice cubes out with your bare hands and never place ice cubes or ice lollies in your mouth straight from the freezer. Thevery low temperature of the frozen ice or lollies can cause frost burnto the lips and tongue. Do not refreeze partially or fully ...
Page 11 - Transporting the appliance; Symbol on the compressor (depending on model)
Warning and Safety instructions 11 Do not use defrosting sprays or de-icers, as they could contain substances which could damage the plastic parts or which mightcause the build-up of gases and pose a danger to health. Transporting the appliance Always transport the appliance in an upright positi...
Page 12 - Caring for the environment; Disposal of your old appliance
Caring for the environment 12 Disposal of the packing mater-ial The packaging is designed to protectthe appliance from damage duringtransportation. The packaging materialsused are selected from materials whichare environmentally friendly for disposaland should be recycled. Recycling the packaging re...
Page 13 - How to save energy; In a ventilated room.
How to save energy 13 Normal energy consump-tion Increased energy con-sumption Installation site /Maintenance In a ventilated room. In an enclosed, unventilatedroom. Protected from direct sun-light. In direct sunlight. Not near to a heat source(radiator, oven). Near to a heat source (radi-ator, oven...
Page 14 - Use
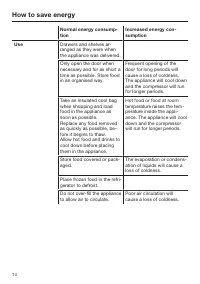
How to save energy 14 Normal energy consump-tion Increased energy con-sumption Use Drawers and shelves ar-ranged as they were whenthe appliance was delivered. Only open the door whennecessary and for as short atime as possible. Store foodin an organised way. Frequent opening of thedoor for long peri...
Page 15 - Guide to the appliance
Guide to the appliance 15 This drawing is for illustration purposes only. a Control panel with display b Interior lighting c Door shelf d Fan e Adjustable shelf f Bottle rack g Condensate channel and drain hole h Fruit and vegetable drawers i Bottle shelf with bottle holder j Recessed handle k Frost...
Page 16 - Symbols in the display
Guide to the appliance 16 Symbols in the display Operation Symbol Function Standby For switching on the whole appliance;For switching on the refrigerator sectionseparately Settings mode For selecting settings (see "Selecting furthersettings") / Minus / Plus For altering a setting (e...
Page 17 - Accessories; Accessories supplied; Bottle holder; Optional accessories; Bottle rack
Accessories 17 Accessories supplied Bottle holder The flexible ribs grip the bottles se-curely when the door is opened andclosed. Ice cube tray Optional accessories A range of useful Miele accessories andcare products are available for your ap-pliance. These products and other useful ac-cessories ca...
Page 18 - Multi-purpose microfibre cloth
Accessories 18 KKF-FF Active AirClean charcoal fil-ters with holder Charcoal filters neutralise unpleasantodours in the refrigerator section for im-proved air quality. The charcoal filter holder clips onto theprotective strip at the back of the shelfand can be moved as necessary. KKF-RFActive AirCle...
Page 19 - Using for the first time; Before using for the first time; Packaging material; Connecting the appliance; will appear in the display.
Using for the first time 19 Before using for the first time Packaging material Remove all packaging material fromthe inside of the appliance. Protective foil The side panels, and appliance doorswhere applicable, have a protective foil. Carefully peel the protective foil off. Cleaning Please refe...
Page 20 - Switching on and off; Touch display; The display can be scratched by; Switching on; Touch
Switching on and off 20 Touch display The display can be scratched by pointed or sharp objects, e.g. pens.Only touch the display with your fin-ger tips. Touching the display with your fingercreates a tiny charge which releases anelectrical impulse. This impulse is re-cognised by the touch display....
Page 21 - Start screen; Settings mode
Switching on and off 21 °C 5 -18 °C Start screen The display changes to the start screen. The interior lighting will come on andbecome brighter until the maximumbrightness is reached. The appliance isswitched on and begins to cool down tothe following pre-set temperatures: – Temperature in the r...
Page 22 - Switching off
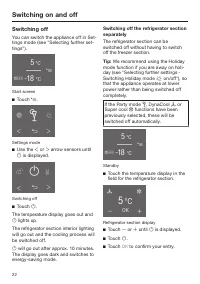
Switching on and off 22 Switching off You can switch the appliance off in Set-tings mode (see "Selecting further set-tings"). °C 5 -18 °C Start screen Touch . Settings mode Use the or arrow sensors until is displayed. Switching off Touch . The t...
Page 24 - switch the appliance off,
Switching on and off 24 Switching off for longer peri-ods of time If, during a long absence, the ap- pliance is switched off but notcleaned and the door(s) left shut,there is a danger of mould buildingup inside the appliance.It is essential to clean the appliance. If the appliance is not going to ...
Page 25 - The correct temperature
The correct temperature 25 It is very important to set the correcttemperature for storing food in the ap-pliance. Micro-organisms will causefood which is not stored at the correcttemperature to deteriorate rapidly. Tem-perature influences the growth rate ofthese micro-organisms. Reducing thetemperat...
Page 26 - Temperature display; the lowest temperature in; Setting the temperature
The correct temperature 26 Temperature display °C 5 -18 °C Start screen In normal operation the upper temper-ature display shows the average, cur- rent temperature in the refrigeratorsection and the lower temperature display the lowest temperature in the freezer section . Depending on the ambien...
Page 27 - Temperature range
The correct temperature 27 Touch OK immediately after setting the temperature to confirm your entry. Or wait approx. 8 seconds after thesensors were last touched. The tem-perature will then be adopted auto-matically. Tip: The newly set temperature can also be confirmed and adopted by closingthe ...
Page 28 - Using Super cool, Super freeze and DynaCool
Using Super cool, Super freeze and DynaCool 28 The following functions are availabledepending on section: – Refrigerator section Super cool and DynaCool – Freezer section Super freeze See the following pages for more in-formation on these functions and howto switch them on. Super freeze fun...
Page 29 - DynaCool function
Using Super cool, Super freeze and DynaCool 29 DynaCool function When the DynaCool function is notswitched on, the natural circulation ofair in the appliance will cause differenttemperature zones in the refrigerator asthe cold, heavy air will sink to the low-est section of the appliance. You shou...
Page 30 - Functions that are switched on are
Using Super cool, Super freeze and DynaCool 30 Functions that are switched on are not displayed in the start screen. Any function which was previouslyswitched on will be switched off fol-lowing an interruption to the powersupply. Displaying a selected function Touch the temperature display for the...
Page 31 - Temperature and door alarm; Temperature alarm
Temperature and door alarm 31 The appliance has a warning systemwhich ensures that the temperature inthe freezer cannot rise unnoticed and toavoid energy being wasted if a door isleft open. Temperature alarm If the temperature in the freezer remains above -18 °C for a longtime, check that the froz...
Page 32 - Door alarm; will light up yellow in the
Temperature and door alarm 32 Door alarm The appliance has a warning system toavoid increased energy consumption ifa door is left open, and to protect frozenfood from warm air. If a door is left open for a longer periodof time will light up yellow in the temperature display and an alarm willsou...
Page 33 - Selecting further settings; Settings overview
Selecting further settings 33 Settings overview The following settings can be activated or changed. Default settings are shown in bold or as marked in the segment bar. Setting Selection / Factory defaultsetting Switch Party mode on/off On (symbol orange) / Off Switch Holiday mode on/off On (symb...
Page 34 - In Settings mode; Scroll left or right using the
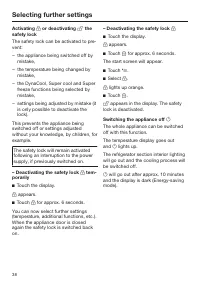
Selecting further settings 34 Selecting further settings In Settings mode certain settings can be adjusted and functions selected,allowing you to adjust the appliance tosuit your requirements. See the following pages for more in-formation on these settings. When you are in Settings mode thedoor a...
Page 35 - Entering values; . If the value is not confirmed; will not be
Selecting further settings 35 Entering values All values entered must be confirmedwith OK . If the value is not confirmed the display will revert to the start screenafter approx. 15 seconds and theentered or altered values will not be ad-opted. Exiting a menu ("Back" ) You can return to ...
Page 36 - Switch Holiday mode on/off
Selecting further settings 36 Switch Holiday mode on/off This function is useful when going onholiday if you do not wish to switch therefrigerator section off completely anddo not need a high degree of cooling. The freezer section remains switchedon at -18 °C. The refrigerator section isregulated at...
Page 37 - Using the minute minder; – Altering a minute minder entry
Selecting further settings 37 Using the minute minder (Quick- Cool timer) The minute minder can be used to mon-itor separate processes, e.g. chillingdough. The audible tone will sound atthe set time. A maximum minute minder duration of9 hours and 59 minutes can be set. Setting the minute minder ...
Page 39 - Switching Sabbath mode; – Switching off Sabbath mode early
Selecting further settings 39 Switching Sabbath mode on/off The appliance offers a Sabbath pro-gramme for the purposes of religiousobservance. The following are switched off: – the interior lighting when the door is opened, – all audible and visual signals, – the temperature display, – the DynaCo...
Page 40 - sounds
Selecting further settings 40 Setting the duration before the dooralarm sounds The appliance has a door alarm. If adoor is open for a longer period of timean alarm will sound (if this has not beenswitched off; see "Setting the volume /Switching off alarms and audibletones") and wil...
Page 41 - Setting the display brightness; – Displaying licence agreements
Selecting further settings 41 Setting the display brightness You can set the display brightness inthe segment bar:If all segments are filled in, the max-imum brightness is selected. You will see the brightness change as itis being adjusted. Setting the temperature unit °C/°F You can choose betwee...
Page 42 - Replace charcoal filter
Selecting further settings 42 Replace charcoal filter reminder This appliance is not supplied withcharcoal filters with a KKF-FF (ActiveAirClean) holder. These are availableas optional accessories (see "Ac-cessories - Optional accessories"). If the Replace charcoal filter reminder isactiv...
Page 43 - If storing food which contains a; Different storage zones; Warmest area
Storing food in the refrigerator section 43 Danger of explosion. Do not store explosive materials inthe appliance or any products con-taining propellants (e.g. spray cans). If storing food which contains a lot of fat or oil in the appliance or theappliance door, make sure that itdoes not come in...
Page 44 - – Fruit which is not yet ripe; When shopping for food; Take a cool bag with you when; Storing food correctly; Food should generally be stored
Storing food in the refrigerator section 44 Food which is not suitable forstorage in the refrigerator sec-tion Not all food is suitable for refrigerationat temperatures below 5°C as somefood is sensitive to cold. The appear-ance, consistency, taste and / or the vit-amin content of certain types of f...
Page 45 - Adjusting the interior fittings (refrigerator section); Moving the shelves
Adjusting the interior fittings (refrigerator section) 45 Adjusting the door shelf /bottle shelf Push the door/bottle shelf upwards,then remove it by pulling it forwards Replace the door/bottle shelf at therequired position. Ensure that it is se-curely pushed back into position. Moving the shelv...
Page 46 - Adjusting the bottle rack; – Place the holder with the charcoal fil-
Adjusting the interior fittings (refrigerator section) 46 Adjusting the bottle rack The bottle rack is available as an op-tional accessory (see "Accessories -optional accessories"). The bottle rack can be placed at differ-ent positions in the appliance. Raise the bottle rack slightly at th...
Page 47 - Freezing and storing food; Maximum freezing capacity; – that the packaging is not damaged,
Freezing and storing food 47 Maximum freezing capacity To ensure that fresh food placed in thefreezer freezes through to the core asquickly as possible, the maximumfreezing capacity must not be ex-ceeded. The maximum freezing capa-city for freezing within a 24-hour periodis given on the data plate: ...
Page 48 - Home freezing
Freezing and storing food 48 Home freezing Only freeze fresh food which is in agood condition. Hints on home freezing – The following types of food are suit- able for freezing: Fresh meat, poultry, game, fish, ve-getables, herbs, fresh fruit, dairyproducts, cakes, leftovers, egg yolks,egg whites and...
Page 49 - Placing food in the freezer section
Freezing and storing food 49 Make a note of the contents and thedate of freezing on the packaging. Before placing food in the freezersection When freezing more than 2 kg offresh food, switch on the Superfreeze function for some time beforeplacing the food in the freezer (see"Using Super cool...
Page 51 - Cooling drinks quickly; Using accessories; Ice cubes; Adjusting the interior fittings
Freezing and storing food 51 Never re-freeze partially or fully de-frosted food. Consume defrostedfood as soon as possible as it willlose its nutritional value and spoil ifleft for too long. Defrosted food mayonly be re-frozen after it has beencooked. Cooling drinks quickly To cool drinks quickly in...
Page 52 - Defrosting; Refrigerator section; Condensate must be able to; Freezer section
Defrosting 52 Refrigerator section The refrigerator section defrosts auto-matically. Condensate and frost can build up onthe back wall of the refrigerator sectionwhilst the compressor is running. Youdo not need to remove this, as it will de-frost and evaporate automatically withthe warmth generated ...
Page 53 - Cleaning agents
Cleaning and care 53 Do not let water get into the electronic unit or the lighting. Steam from a steam cleaning ap- pliance could reach the electricalcomponents and cause a short cir-cuit.Do not use a steam cleaning appli-ance to clean the appliance. Cleaning water must not get into thedrain hol...
Page 54 - Switch the appliance off.
Cleaning and care 54 Preparing the appliance forcleaning Switch the appliance off. appears in the display and cooling is switched off. Disconnect it from the mains. Take any food out of the applianceand store it in a cool place. Remove the shelves and bottle shelffrom the door. Take out...
Page 55 - interior
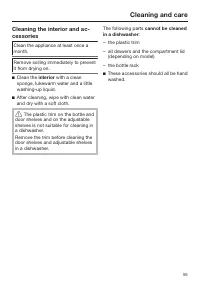
Cleaning and care 55 Cleaning the interior and ac-cessories Clean the appliance at least once amonth. Remove soiling immediately to preventit from drying on. Clean the interior with a clean sponge, lukewarm water and a littlewashing-up liquid. After cleaning, wipe with clean waterand dry with a ...
Page 56 - are suitable; Cleaning the ventilation gaps
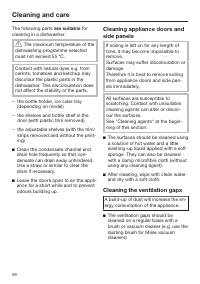
Cleaning and care 56 The following parts are suitable for cleaning in a dishwasher: The maximum temperature of the dishwashing programme selectedmust not exceed 55 °C. Contact with natural dyes e.g. fromcarrots, tomatoes and ketchup maydiscolour the plastic parts in thedishwasher. This discolourat...
Page 57 - When cleaning the compressor; Cleaning the door seals; If a door seal is damaged or if it
Cleaning and care 57 Cleaning the compressor andmetal grille at the back of theappliance When cleaning the compressor and the grille, make sure that thepipework and other components donot get broken or damaged in anyway. The compressor and metal grille at theback of the appliance (heat exchanger)s...
Page 58 - After cleaning
Cleaning and care 58 After cleaning Replace all shelves and accessoriesin the appliance. Reconnect to the mains and switchthe appliance back on. Switch on the Super freeze functionfor a while so that the freezer sectioncan cool down quickly. Switch on the Super cool function fora while so th...
Page 60 - Problem solving guide; Problem
Problem solving guide 60 Some minor problems can be corrected without contacting Miele.If, having followed the suggestions below, you still cannot resolve the problem,please contact Miele. To prevent unnecessary loss of temperature it is advisable not to open the doorswhile waiting for the appliance...
Page 63 - Display warnings
Problem solving guide 63 Display warnings Message Cause and remedy lights up in the dis- play, the appliance doesnot get cold, althoughthe controls and the in-terior lighting are work-ing. Demo mode is activated. Switch off Demo mode (see "Selecting further set-tings - Switching off Demo mo...
Page 64 - Message
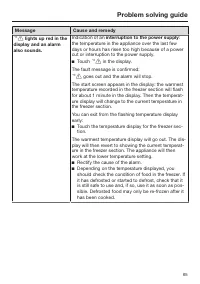
Problem solving guide 64 Message Cause and remedy lights up red in the freezer section temper-ature display and analarm also sounds. The temperature alarm has been activated (see "Temperature and door alarm"). The temperature inthe freezer section has risen higher or fallen lowerthan th...
Page 66 - appliance fault
Problem solving guide 66 Message Cause and remedy lights up red in the display, a fault code Fwith numbers appearsand an alarm alsosounds. There is a fault. To switch the alarm off touch in the display. Contact Miele. To report the fault you need the fault code and alsothe model number and...
Page 67 - The interior lighting is not working.
Problem solving guide 67 The interior lighting is not working. Problem Cause and remedy The interior lighting isnot working. The appliance has not been switched on. Switch the appliance on. Sabbath mode is switched on: the display is dark and the appliance is cooling. Touch the display. will ...
Page 68 - Other problems
Problem solving guide 68 Other problems Problem Cause and remedy The door to the freezersection will not openbecause it has beenopened and closed toomany times in succes-sion. This is not a fault. The suction caused by openingand closing the door is preventing the door fromopening. Wait approx. 1 mi...
Page 69 - Noises; Normal noises
Noises 69 Normal noises What causes them Brrrrr ... A humming noise is made by the motor (compressor). Thisnoise can get louder for brief periods when the motor switcheson. Blubb, blubb ... A gurgling noise can be heard when coolant is circulatingthrough the pipes. Click ... Clicking sounds are made...
Page 70 - After Sales / Guarantee; After sales service; – your Miele Dealer, or
After Sales / Guarantee 70 After sales service In the event of any faults which youcannot easily remedy, please contact – your Miele Dealer, or – the Miele Service Department. See end of this booklet for contact de-tails. When contacting your Dealer or Miele,please quote the model and serial num-ber...
Page 71 - Information for test institutes; relevant standards and directives
Information for test institutes 71 All tests must be carried out accordingto relevant standards and directives . In addition, the following informationprovided by the manufacturer must beobserved: – Loading instructions, – Information contained in the Operat- ing and installation instructions .
Page 72 - Electrical connection; solar
Electrical connection 72 The appliance is supplied with a powercable and moulded plug ready for con-nection to an AC 230 V 50 Hz supply. The fuse rating must be at least 10 A(13 A in the UK). This appliance must be connected to asuitable switched socket which is easilyaccessible. The electrical conn...
Page 73 - Installation; Do not place any appliance; Location; – The socket must be easily accessible
Installation 73 Do not place any appliance which gives off heat, such as atoaster, mini-oven or double burnerhob, on top of this appliance There isthe danger of these catching fire. This appliance must not be installeddirectly next to another refrigerator orfreezer. It does not have side-wallheati...
Page 74 - Climate range; Ventilation; To ensure efficient ventilation the; Fitting wall spacers supplied
Installation 74 Climate range The appliance is designed for use withina certain climate range (ambient tem-peratures) and should not be used out-side this range. The climate range of theappliance is stated on the data plate in-side the appliance. Climate range Ambient room temperature SN +10 to +32 ...
Page 75 - Ensure
Installation 75 Installation Two people are required for in- stalling the appliance. The appliance must be empty when it is installed. Move the appliance carefully on floors that are sensitive to scratchingto prevent damage. For easier installation there are trans-port handles on the back at t...
Page 77 - Appliance dimensions
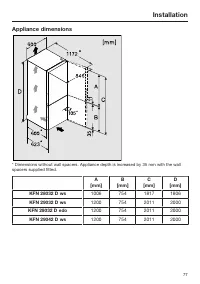
Installation 77 Appliance dimensions * Dimensions without wall spacers. Appliance depth is increased by 35 mm with the wallspacers supplied fitted. A [mm] B [mm] C [mm] D [mm] KFN 28032 D ws 1006 754 1817 1806 KFN 29032 D ws 1200 754 2011 2000 KFN 29032 D edo 1200 754 2011 2000 KFN 29042 D ws 1200 7...
Page 78 - Changing the door hinging; Preparation; Removing the top covers
Changing the door hinging 78 The appliance is supplied right-handhinged. If left-hand hinging is required,the hinges must be changed. Two people are needed for chan- ging the door hinging. If a door seal is damaged or if it has come out of the groove, the doorwill not close properly and coolingp...
Page 79 - Removing the upper door
Changing the door hinging 79 Removing the upper door Danger of injury when removing the upper door.The upper door is not secure assoon as the upper hinge plate is re-moved.The door must be held by a secondperson. Loosen screws in upper hinge plate and pull it upwards and off. Danger of i...
Page 81 - Preparing the doors
Changing the door hinging 81 Changing the middle hingeplate over Pull off cover . Unscrew hinge plate with the pro- tective film underneath. Turn hinge plate through 180° and screw it with the protective film intoposition on the opposite side. The protective film protects the appli-an...
Page 82 - Changing over the spring clip; Refitting the lower door
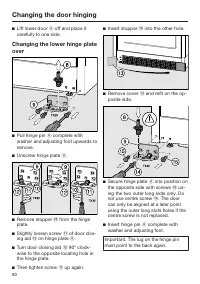
Changing the door hinging 82 Changing over the spring clip Replace spring clip (keeper) on the opposite side: Press the lug downwards and pushspring clip to the side out of the guide. Push spring clip into the guide on the opposite side until it clicks intoplace. Refitting the lower d...
Page 83 - Refitting the upper door
Changing the door hinging 83 Refitting the upper door Place upper door onto middle hinge pin . Close the upper door. Inserting the upper hinge plate Fit hinge plate on the opposite side and secure it with screws . If necessary drill pilot holes for thescrews or use a battery operate...
Page 84 - Aligning the appliance doors
Aligning the appliance doors 84 The appliance doors can be alignedwith the appliance housing after theyhave been fitted. In the following illustration the door isnot shown in the closed position tomake it easier to see what you have todo. To align the lower door use the longouter slots in the lower ...


 Miele 11502710
User Manual
Miele 11502710
User Manual
 Miele 11502940
User Manual
Miele 11502940
User Manual
 Miele K28202DWS
User Manual
Miele K28202DWS
User Manual
 Miele KFN28032DEDTCS
User Manual
Miele KFN28032DEDTCS
User Manual
 Miele KS7743E
User Manual
Miele KS7743E
User Manual
 Miele F 1471 Vi
Manual
Miele F 1471 Vi
Manual
 Miele K 1901 Vi
Manual
Miele K 1901 Vi
Manual
 Miele KF 1901 Vi
Manual
Miele KF 1901 Vi
Manual
 Miele K 1801 Vi
Manual
Miele K 1801 Vi
Manual
 Miele KFN 14947 SDE ed
Manual
Miele KFN 14947 SDE ed
Manual
 Miele KDN 9713 i-1
Manual
Miele KDN 9713 i-1
Manual
 Miele FN 9752 i
Manual
Miele FN 9752 i
Manual