Page 2 - COPYRIGHT & TRADEMARK; Specifications are subject to change without notice.
COPYRIGHT & TRADEMARK Specifications are subject to change without notice. is a registered trademark of MERCUSYS TECHNOLOGIES CO., LTD. Other brands and product names are trademarks or registered trademarks of their respective holders.No part of the specifications may be reproduced in any form o...
Page 3 - CE Mark Warning; in which case the user may be required to take adequate measures.; OPERATING FREQUENCY (the maximum transmitted power); The original EU declaration of conformity may be found at; RF Exposure Information; use this product with care and operate at your own risk.
CE Mark Warning This is a class B product. In a domestic environment, this product may cause radio interference, in which case the user may be required to take adequate measures. OPERATING FREQUENCY (the maximum transmitted power) 2400 MHz -2483.5 MHz (20dBm) EU declaration of conformity MERCUSYS he...
Page 4 - NCC Notice; 注意!; BSMI Notice; 安全諮詢及注意事項
NCC Notice 注意! 依據 低功率電波輻射性電機管理辦法第十二條 經型式認證合格之低功率射頻電機,非經許可,公司、商號或使用者均不得擅自變更頻率、加大功率或變更原設計之特性或功能。第十四條 低功率射頻電機之使用不得影響飛航安全及干擾合法通信;經發現有干擾現象時,應立即停用,並改善至無干擾時方得繼續使用。前項合法通信,指依電信規定作業之無線電信。低功率射頻電機需忍受合法通信或工業、科學以及醫療用電波輻射性電機設備之干擾。 BSMI Notice 安全諮詢及注意事項 • 請使用原裝電源供應器或只能按照本產品注明的電源類型使用本產品。• 清潔本產品之前請先拔掉電源線。請勿使用液體、噴霧清潔劑...
Page 5 - Explanation of the symbols on the product label
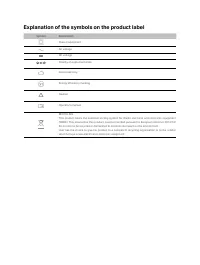
Explanation of the symbols on the product label Symbol Explanation Class II equipment AC voltage DC voltage Polarity of output terminals Indoor use only Energy efficiency marking Caution Operator’s manual RECYCLINGThis product bears the selective sorting symbol for Waste electrical and electronic eq...
Page 6 - Contents
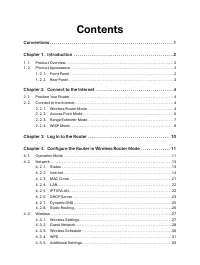
Contents Conventions . . . . . . . . . . . . . . . . . . . . . . . . . . . . . . . . . . . . . . . . . . . . . . . . . . . . . . . . . . . . . . .1 Chapter 1. Introduction . . . . . . . . . . . . . . . . . . . . . . . . . . . . . . . . . . . . . . . . . . . . . . . . . . .2 1. 1. Product Overview . ...
Page 10 - Conventions; examples and may not reflect your actual router experience.; More Info; website; Speed/Coverage Disclaimer
1 Conventions The router or MW306R, or device mentioned in this User Guide stands for MW306R 300Mbps Multi-Mode Wireless N Router without any explanations.Features available in the router may vary by model and software version. Router availability may also vary by region or ISP. All images, steps, a...
Page 11 - Chapter 1; Chapter 1. Introduction; The router’s LED is are located on the front panel.; Status
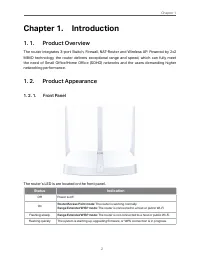
2 Chapter 1 Chapter 1. Introduction 1. 1. Product Overview The router integrates 3-port Switch, Firewall, NAT-Router and Wireless AP. Powered by 2x2 MIMO technology, the router delivers exceptional range and speed, which can fully meet the need of Small Office/Home Office (SOHO) networks and the use...
Page 12 - Item
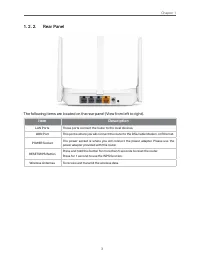
3 Chapter 1 1. 2. 2. Rear Panel The following items are located on the rear panel (View from left to right). Item Description LAN Ports These ports connect the router to the local devices. WAN Port This port is where you will connect the router to the DSL/cable Modem, or Ethernet. POWER Socket The p...
Page 13 - Chapter 2; Chapter 2. Connect to the Internet; The router can be placed on a shelf or desktop.
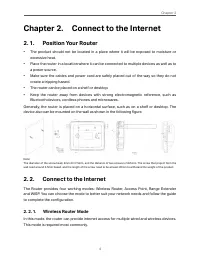
4 Chapter 2 Chapter 2. Connect to the Internet 2. 1. Position Your Router • The product should not be located in a place where it will be exposed to moisture or excessive heat. • Place the router in a location where it can be connected to multiple devices as well as to a power source. • Make sure th...
Page 14 - Follow the steps below to connect your router.; minutes; ) Connect the power adapter to the router.; • Method 2: Wirelessly; bottom of the router.
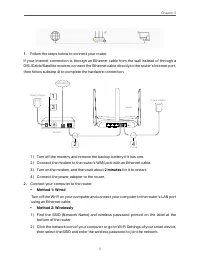
5 Chapter 2 1. Follow the steps below to connect your router. If your Internet connection is through an Ethernet cable from the wall instead of through a DSL/Cable/Satellite modem, connect the Ethernet cable directly to the router’s Internet port, then follow substep 4) to complete the hardware conn...
Page 15 - Quick Setup
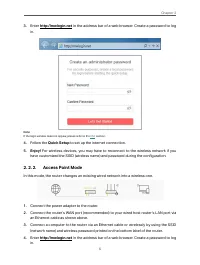
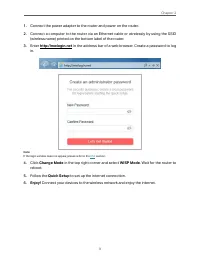
6 Chapter 2 3. Enter http://mwlogin.net in the address bar of a web browser. Create a password to log in. Note: If the login window does not appear, please refer to the FAQ section. 4. Follow the Quick Setup to set up the internet connection. 5. Enjoy! For wireless devices, you may have to reconnect...
Page 16 - Change Mode
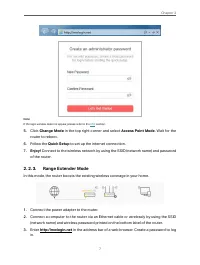
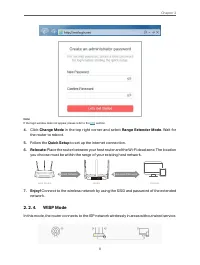
7 Chapter 2 Note: If the login window does not appear, please refer to the FAQ section. 5. Click Change Mode in the top right corner and select Access Point Mode . Wait for the router to reboot. 6. Follow the Quick Setup to set up the internet connection. 7. Enjoy! Connect to the wireless network by...
Page 19 - Chapter 3; Chapter 3. Log In to the Router; Visit
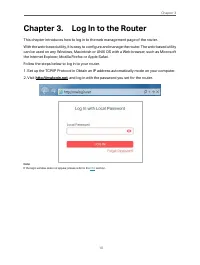
10 Chapter 3 Chapter 3. Log In to the Router This chapter introduces how to log in to the web management page of the router. With the web-based utility, it is easy to configure and manage the router. The web-based utility can be used on any Windows, Macintosh or UNIX OS with a Web browser, such as M...
Page 20 - Chapter 4; Configure the Router in; , and log in with the password you set for the router.; Advanced; Select the working mode as needed and click; SAVE
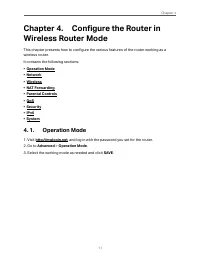
11 Chapter 4 Chapter 4. Configure the Router in Wireless Router Mode This chapter presents how to configure the various features of the router working as a wireless router.It contains the following sections: • Operation Mode• Network• Wireless• NAT Forwarding• Parental Controls• QoS• Security• IPv6•...
Page 22 - , and log in with password you set for the router.
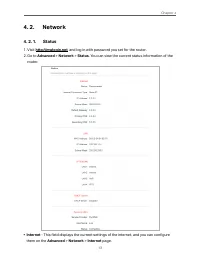
13 Chapter 4 4. 2. Network 4. 2. 1. Status 1. Visit http://mwlogin.net , and log in with password you set for the router. 2. Go to Advanced > Network > Status . You can view the current status information of the router. • Internet - This field displays the current settings of the internet, and...
Page 23 - or; Dynamic IP
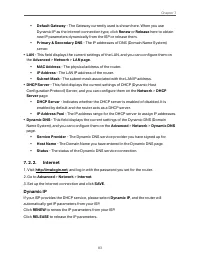
14 Chapter 4 • Status - Indicates whether the router has been connected to the internet. • Internet Connection Type - Indicates the way in which your router is connected to the internet. • IP Address - The WAN IP address of the router. • Subnet Mask - The subnet mask associated with the WAN IP addre...
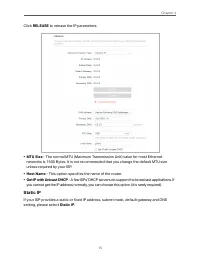
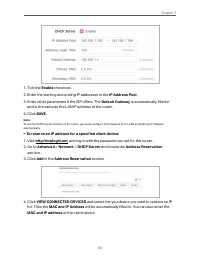
Page 24 - Click; RELEASE; to release the IP parameters.; • MTU Size; - The normal MTU (Maximum Transmission Unit) value for most Ethernet; • Host Name; - This option specifies the name of the router.; • Get IP with Unicast DHCP; - A few ISPs’ DHCP servers do support the broadcast applications. If; Static IP
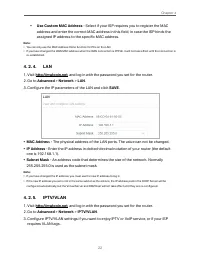
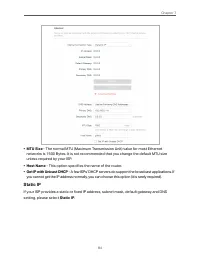
15 Chapter 4 Click RELEASE to release the IP parameters. • MTU Size - The normal MTU (Maximum Transmission Unit) value for most Ethernet networks is 1500 Bytes. It is not recommended that you change the default MTU size unless required by your ISP. • Host Name - This option specifies the name of the...
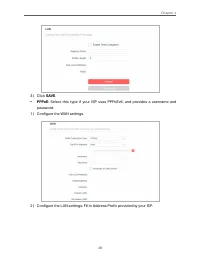
Page 25 - notation provided by your ISP.; PPPoE; If your ISP provides PPPoE connection, select
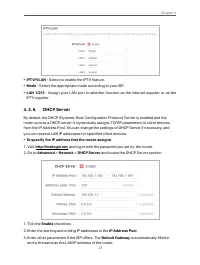
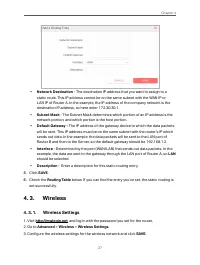
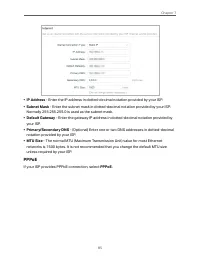
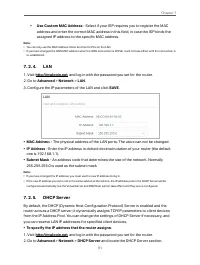
16 Chapter 4 • IP Address - Enter the IP address in dotted-decimal notation provided by your ISP. • Subnet Mask - Enter the subnet mask in dotted-decimal notation provided by your ISP. Normally 255.255.255.0 is used as the subnet mask. • Default Gateway - Enter the gateway IP address in dotted-decim...
Page 26 - • Username/Password; - Enter the user name and password provided by your ISP. These; • Secondary Connection; - It’s available only for PPPoE connection. If your ISP provides; to activate the secondary; the default MTU size unless required by your ISP.
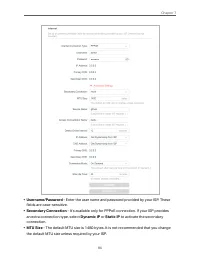
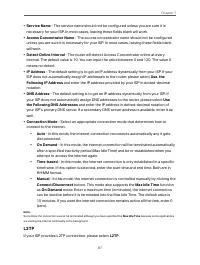
17 Chapter 4 • Username/Password - Enter the user name and password provided by your ISP. These fields are case-sensitive. • Secondary Connection - It’s available only for PPPoE connection. If your ISP provides an extra connection type, select Dynamic IP or Static IP to activate the secondary connec...
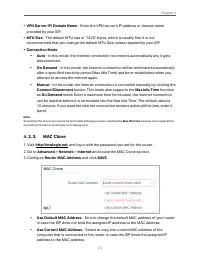
Page 28 - - Enter the username and password provided by your ISP. These; • VPN Server IP/ Domain Name; - Enter the VPN server’s IP address or domain name; - The default MTU size is “1460” bytes, which is usually fine. It is not; • Connection Mode
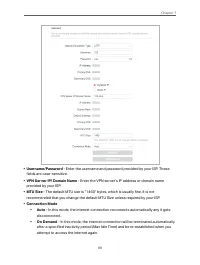
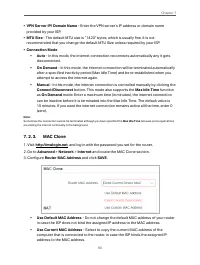
19 Chapter 4 • Username/Password - Enter the username and password provided by your ISP. These fields are case-sensitive. • VPN Server IP/ Domain Name - Enter the VPN server’s IP address or domain name provided by your ISP. • MTU Size - The default MTU size is “1460” bytes, which is usually fine. It...
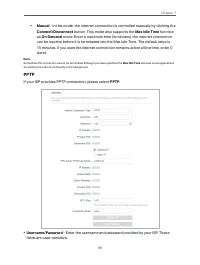
Page 29 - • Manual; button. This mode also supports the; function; On Demand; If your ISP provides PPTP connection, please select; PPTP
20 Chapter 4 • Manual - In this mode, the internet connection is controlled manually by clicking the Connect/Disconnect button. This mode also supports the Max Idle Time function as On Demand mode. Enter a maximum time (in minutes), the internet connection can be inactive before it is terminated int...
Page 35 - LOGIN AND SAVE
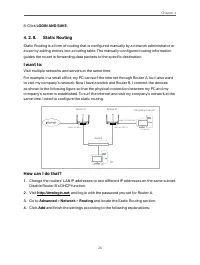
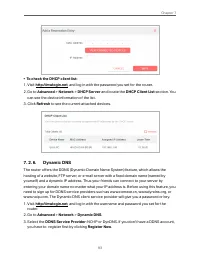
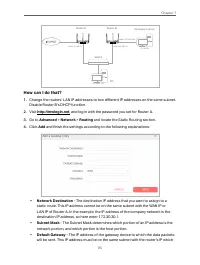
26 Chapter 4 8. Click LOGIN AND SAVE . 4. 2. 8. Static Routing Static Routing is a form of routing that is configured manually by a network administrator or a user by adding entries into a routing table. The manually-configured routing information guides the router in forwarding data packets to the ...
Page 40 - Method 1: Using a PIN
31 Chapter 4 4. 3. 4. WPS WPS (Wi-Fi Protected Setup) can help you to quickly and securely connect to a network. This section will guide you to add a new wireless device to your router’s network quickly via WPS. Note: The WPS function cannot be configured if the wireless function of the router is di...
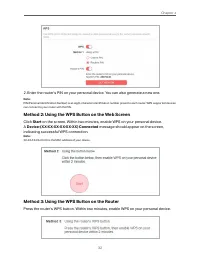
Page 41 - Method 2: Using the WPS Button on the Web Screen; Start; message should appear on the screen,; Method 3: Using the WPS Button on the Router
32 Chapter 4 2. Enter the router’s PIN on your personal device. You can also generate a new one. Note: PIN (Personal Identification Number) is an eight-character identification number preset to each router. WPS supported devices can connect to your router with the PIN. Method 2: Using the WPS Button...
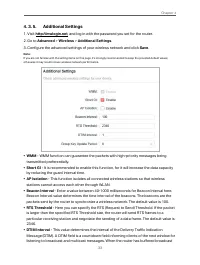
Page 43 - • Group Key Update Period; - Enter a number of seconds (minimum 30) to control the time
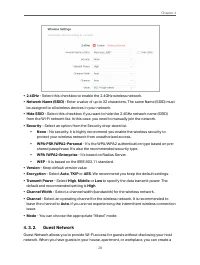
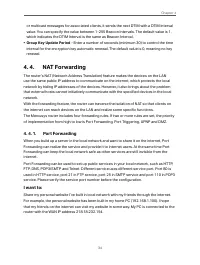
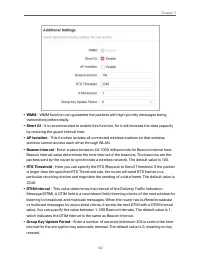
34 Chapter 4 or multicast messages for associated clients, it sends the next DTIM with a DTIM Interval value. You can specify the value between 1-255 Beacon Intervals. The default value is 1, which indicates the DTIM Interval is the same as Beacon Interval. • Group Key Update Period - Enter a number...
Page 45 - Users on the internet can enter; Add
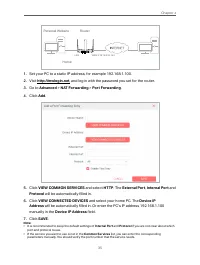
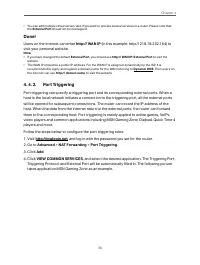
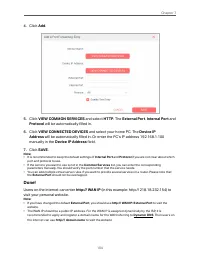
36 Chapter 4 • You can add multiple virtual server rules if you want to provide several services in a router. Please note that the External Port should not be overlapped. Done! Users on the internet can enter http:// WAN IP (in this example: http:// 218.18.232.154) to visit your personal website. No...
Page 47 - If necessary, you can follow the steps to change the status of UPnP.; and toggle on or off according to your needs.
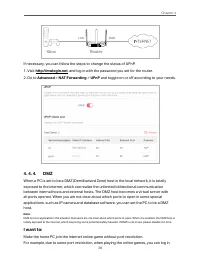
38 Chapter 4 Router Xbox LAN WAN LAN WAN POWER RESET/WPS If necessary, you can follow the steps to change the status of UPnP. 1. Visit http://mwlogin.net , and log in with the password you set for the router. 2. Go to Advanced > NAT Forwarding > UPnP and toggle on or off according to your need...
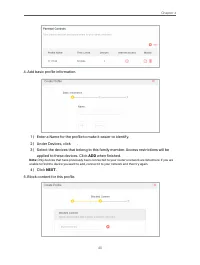
Page 49 - applied to these devices. Click; ADD; Block content for this profile.
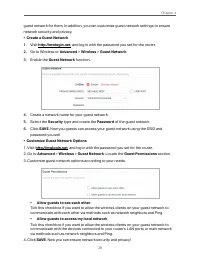
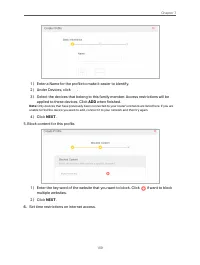
40 Chapter 4 4. Add basic profile information. 1 ) Enter a Name for the profile to make it easier to identify.2 ) Under Devices, click . 3 ) Select the devices that belong to this family member. Access restrictions will be applied to these devices. Click ADD when finished. Note: Only devices that ha...
Page 50 - NEXT
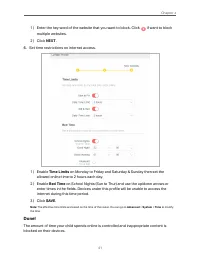
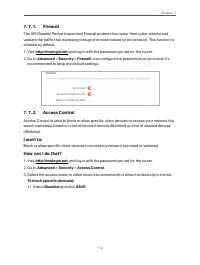
41 Chapter 4 1 ) Enter the key word of the website that you want to block. Click if want to block multiple websites. 2 ) Click NEXT . 6. Set time restrictions on internet access. 1 ) Enable Time Limits on Monday to Friday and Saturday & Sunday then set the allowed online time to 2 hours each day...
Page 51 - How can I do that
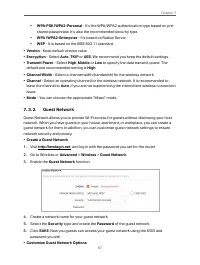
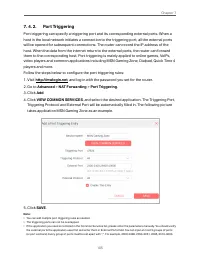
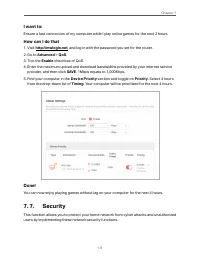
42 Chapter 4 4. 6. QoS QoS (Quality of Service) is designed to ensure the efficient operation of the network when come across network overload or congestion. Devices set as high priority will be allocated more bandwidth and so continue to run smoothly even when there are many devices connected to th...
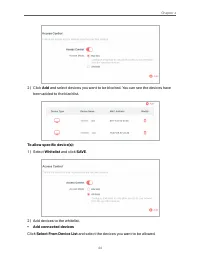
Page 53 - been added to the blacklist.; Whitelist; and click; Select From Device List; and select the devices you want to be allowed.
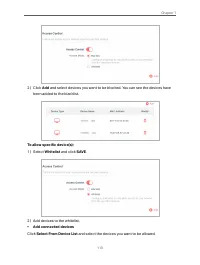
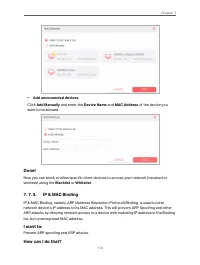
44 Chapter 4 2 ) Click Add and select devices you want to be blocked. You can see the devices have been added to the blacklist. To allow specific device(s): 1 ) Select Whitelist and click SAVE . 2 ) Add devices to the whitelist. • Add connected devices Click Select From Device List and select the de...
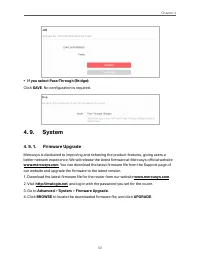
Page 56 - • If you select Router:
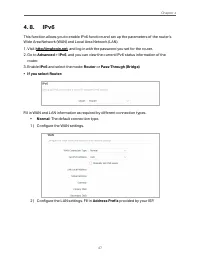
47 Chapter 4 4. 8. IPv6 This function allows you to enable IPv6 function and set up the parameters of the router’s Wide Area Network (WAN) and Local Area Network (LAN). 1. Visit http://mwlogin.net , and log in with the password you set for the router. 2. Go to Advanced > IPv6 , and you can view t...
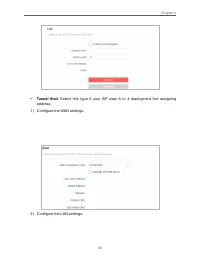
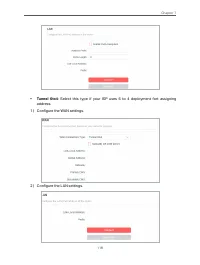
Page 58 - • Tunnel 6to4; : Select this type if your ISP uses 6 to 4 deployment fort assigning
49 Chapter 4 • Tunnel 6to4 : Select this type if your ISP uses 6 to 4 deployment fort assigning address. 1 ) Configure the WAN settings. 2 ) Configure the LAN settings.
Page 61 - Select
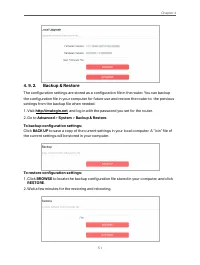
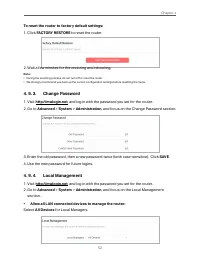
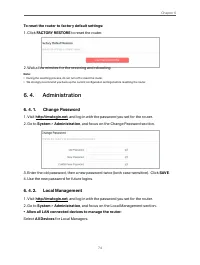
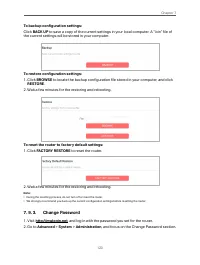
52 Chapter 4 To reset the router to factory default settings: 1. Click FACTORY RESTORE to reset the router. 2. Wait a few minutes for the restoring and rebooting. Note: • During the resetting process, do not turn off or reset the router. • We strongly recommend you back up the current configuration ...
Page 63 - Tick the
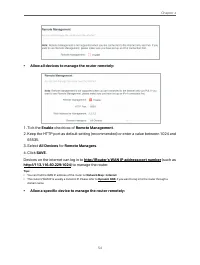
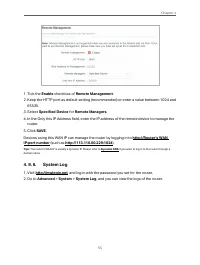
54 Chapter 4 • Allow all devices to manage the router remotely: 1. Tick the Enable checkbox of Remote Management . 2. Keep the HTTP port as default setting (recommended) or enter a value between 1024 and 65535. 3. Select All Devices for Remote Managers . 4. Click SAVE . Devices on the internet can l...
Page 69 - feature to specify a time period during which the LED is off.
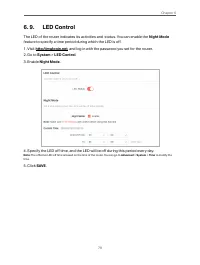
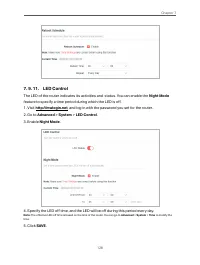
60 Chapter 4 4. 9. 11. LED Control The LED of the router indicates its activities and status. You can enable the Night Mode feature to specify a time period during which the LED is off. 1. Visit http://mwlogin.net , and log in with the password you set for the router. 2. Go to Advanced > System &...
Page 70 - Chapter 5; System
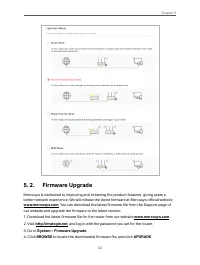
61 Chapter 5 Chapter 5. Configure the Router in Access Point Mode This chapter presents how to configure the various features of the router working as an access point. It contains the following sections: • Operation Mode• Firmware Upgrade• Backup & Restore• Administration• System Log• Diagnostic...
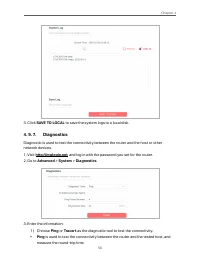
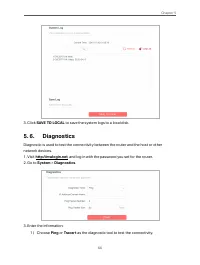
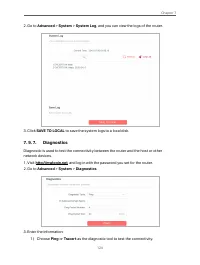
Page 75 - SAVE TO LOCAL; to save the system logs to a local disk.; Enter the information:; Ping; Tracert; as the diagnostic tool to test the connectivity.
66 Chapter 5 3. Click SAVE TO LOCAL to save the system logs to a local disk. 5. 6. Diagnostics Diagnostic is used to test the connectivity between the router and the host or other network devices. 1. Visit http://mwlogin.net , and log in with the password you set for the router. 2. Go to System >...
Page 79 - Enable; Night Mode
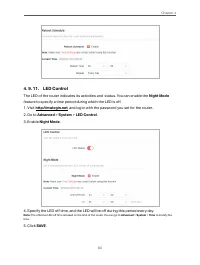
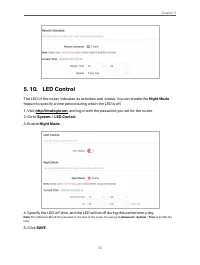
70 Chapter 5 5. 10. LED Control The LED of the router indicates its activities and status. You can enable the Night Mode feature to specify a time period during which the LED is off. 1. Visit http://mwlogin.net , and log in with the password you set for the router. 2. Go to System > LED Control ....
Page 80 - Chapter 6; Operation Mode
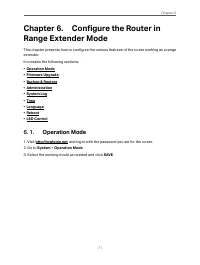
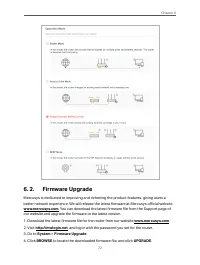
71 Chapter 6 Chapter 6. Configure the Router in Range Extender Mode This chapter presents how to configure the various features of the router working as a range extender. It contains the following sections: • Operation Mode• Firmware Upgrade• Backup & Restore• Administration• System Log• Time• L...
Page 84 - System Log
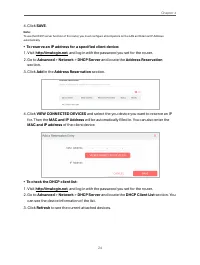
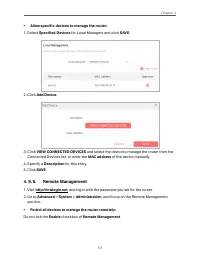
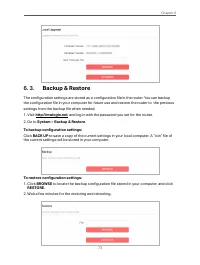
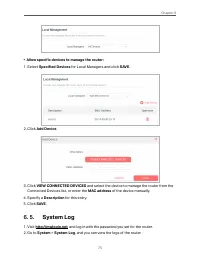
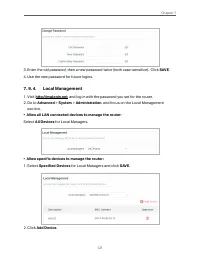
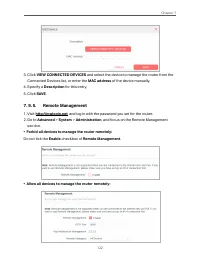
75 Chapter 6 • Allow specific devices to manage the router: 1. Select Specified Devices for Local Managers and click SAVE . 2. Click Add Device . 3. Click VIEW CONNECTED DEVICES and select the device to manage the router from the Connected Devices list, or enter the MAC address of the device manuall...
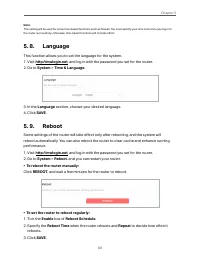
Page 86 - Language
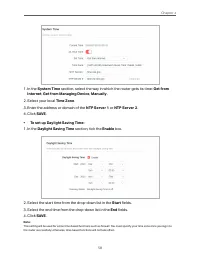
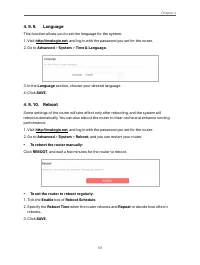
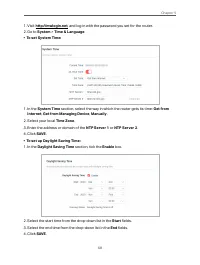
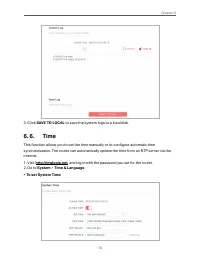
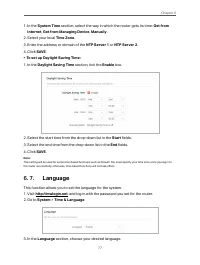
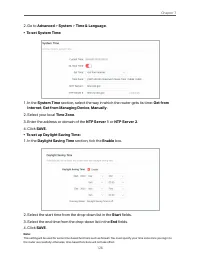
77 Chapter 6 1. In the System Time section, select the way in which the router gets its time: Get from Internet , Get from Managing Device , Manually . 2. Select your local Time Zone . 3. Enter the address or domain of the NTP Server 1 or NTP Server 2 . 4. Click SAVE . • To set up Daylight Saving Ti...
Page 89 - Chapter 7
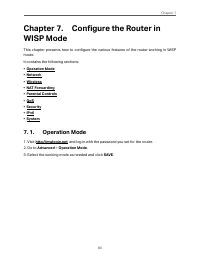
80 Chapter 7 Chapter 7. Configure the Router in WISP Mode This chapter presents how to configure the various features of the router working in WISP mode. It contains the following sections: • Operation Mode• Network• Wireless• NAT Forwarding• Parental Controls• QoS• Security• IPv6• System 7. 1. Oper...
Page 90 - . You can view the current status information of the
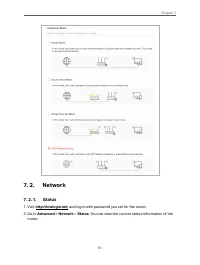
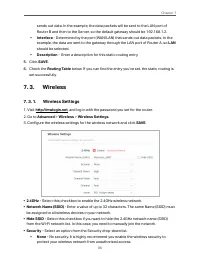
81 Chapter 7 7. 2. Network 7. 2. 1. Status 1. Visit http://mwlogin.net , and log in with password you set for the router. 2. Go to Advanced > Network > Status . You can view the current status information of the router.
Page 91 - them on the
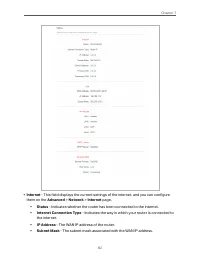
82 Chapter 7 • Internet - This field displays the current settings of the internet, and you can configure them on the Advanced > Network > Internet page. • Status - Indicates whether the router has been connected to the internet. • Internet Connection Type - Indicates the way in which your rou...
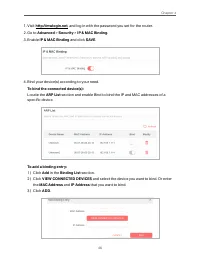
Page 103 - Username
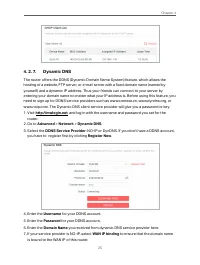
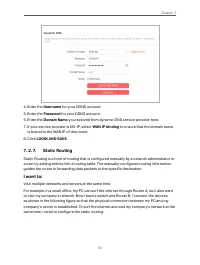
94 Chapter 7 4. Enter the Username for your DDNS account. 5. Enter the Password for your DDNS account. 6. Enter the Domain Name you received from dynamic DNS service provider here. 7. If your service provider is NO-IP, select WAN IP binding to ensure that the domain name is bound to the WAN IP of th...
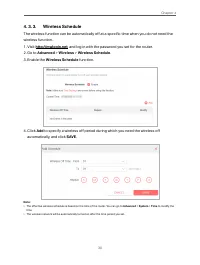
Page 108 - Keep the WPS Status as; Enabled; and select; Client’s PIN
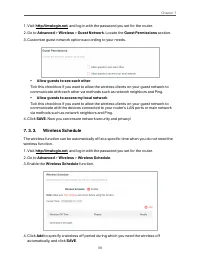
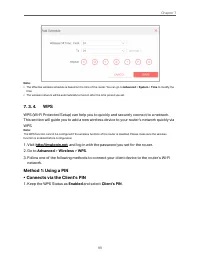
99 Chapter 7 Note: • The effective wireless schedule is based on the time of the router. You can go to Advanced > System > Time to modify the time. • The wireless network will be automatically turned on after the time period you set. 7. 3. 4. WPS WPS (Wi-Fi Protected Setup) can help you to qui...
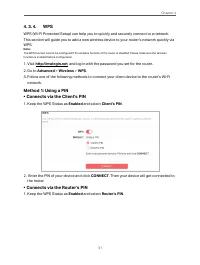
Page 109 - CONNECT; • Connects via the Router’s PIN
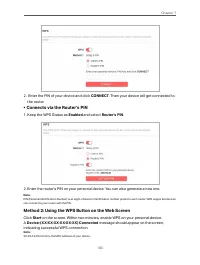
100 Chapter 7 2. Enter the PIN of your device and click CONNECT . Then your device will get connected to the router. • Connects via the Router’s PIN 1. Keep the WPS Status as Enabled and select Router’s PIN . 2. Enter the router’s PIN on your personal device. You can also generate a new one. Note: P...
Page 111 - transmitted preferentially.
102 Chapter 7 • WMM - WMM function can guarantee the packets with high-priority messages being transmitted preferentially. • Short GI - It is recommended to enable this function, for it will increase the data capacity by reducing the guard interval time. • AP Isolation - This function isolates all c...
Page 116 - Enable DMZ; VIEW CONNECTED DEVICES; and select your PC. The DMZ Host IP
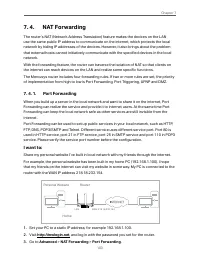
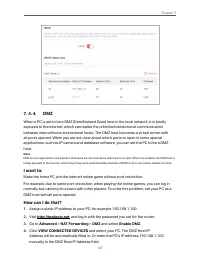
107 Chapter 7 7. 4. 4. DMZ When a PC is set to be a DMZ (Demilitarized Zone) host in the local network, it is totally exposed to the internet, which can realize the unlimited bidirectional communication between internal hosts and external hosts. The DMZ host becomes a virtual server with all ports o...
Page 117 - to create a profile for a family member.
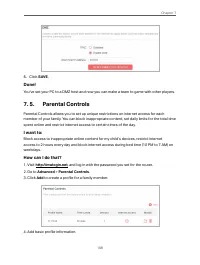
108 Chapter 7 5. Click SAVE . Done! You’ve set your PC to a DMZ host and now you can make a team to game with other players. 7. 5. Parental Controls Parental Controls allows you to set up unique restrictions on internet access for each member of your family. You can block inappropriate content, set ...
Page 118 - Set time restrictions on internet access.
109 Chapter 7 1 ) Enter a Name for the profile to make it easier to identify.2 ) Under Devices, click . 3 ) Select the devices that belong to this family member. Access restrictions will be applied to these devices. Click ADD when finished. Note: Only devices that have previously been connected to y...
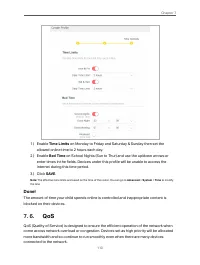
Page 119 - Time Limits; on Monday to Friday and Saturday & Sunday then set the; Bed Time; on School Nights (Sun to Thur) and use the up/down arrows or; QoS
110 Chapter 7 1 ) Enable Time Limits on Monday to Friday and Saturday & Sunday then set the allowed online time to 2 hours each day. 2 ) Enable Bed Time on School Nights (Sun to Thur) and use the up/down arrows or enter times in the fields. Devices under this profile will be unable to access the...
Page 130 - Use the new password for future logins.
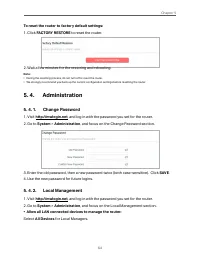
121 Chapter 7 3. Enter the old password, then a new password twice (both case-sensitive). Click SAVE . 4. Use the new password for future logins. 7. 9. 4. Local Management 1. Visit http://mwlogin.net , and log in with the password you set for the router. 2. Go to Advanced > System > Administra...
Page 132 - Allow a specific device to manage the router remotely:
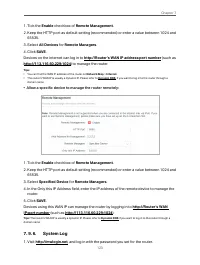
123 Chapter 7 1. Tick the Enable checkbox of Remote Management . 2. Keep the HTTP port as default setting (recommended) or enter a value between 1024 and 65535. 3. Select All Devices for Remote Managers . 4. Click SAVE . Devices on the internet can log in to http://Router’s WAN IP address:port numbe...
Page 138 - FAQ
129 FAQ: FAQ FAQ Q1. What should I do if I forget my wireless password? The default wireless password is printed on the bottom label of the router. If the password has been altered, please connect your computer to the router using an Ethernet cable and follow the steps below: 1. Visit http://mwlogin...
Page 139 - LAN settings; and deselect the following three options, and click; OK
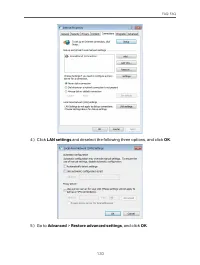
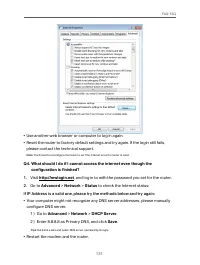
130 FAQ: FAQ 4 ) Click LAN settings and deselect the following three options, and click OK . 5 ) Go to Advanced > Restore advanced settings , and click OK .
Page 140 - Use another web browser or computer to log in again.; configuration is finished?
131 FAQ: FAQ • Use another web browser or computer to log in again. • Reset the router to factory default settings and try again. If the login still fails, please contact the technical support. Note : You’ll need to reconfigure the router to surf the internet once the router is reset. Q4. What shoul...
Page 143 - On Windows XP; Windows cannot configure this wireless; to
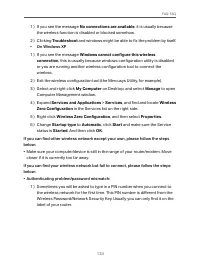
134 FAQ: FAQ 1 ) If you see the message No connections are available , it is usually because the wireless function is disabled or blocked somehow. 2 ) Clicking Troubleshoot and windows might be able to fix the problem by itself. • On Windows XP 1 ) If you see the message Windows cannot configure thi...
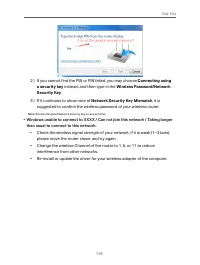
Page 144 - ) If you cannot find the PIN or PIN failed, you may choose; Connecting using; instead, and then type in the; Wireless Password/Network; ) If it continues to show note of; Network Security Key Mismatch
135 FAQ: FAQ 2 ) If you cannot find the PIN or PIN failed, you may choose Connecting using a security key instead, and then type in the Wireless Password/Network Security Key . 3 ) If it continues to show note of Network Security Key Mismatch , it is suggested to confirm the wireless password of you...


 Mercusys AC1200G
User Manual
Mercusys AC1200G
User Manual
 Mercusys AC12G
User Manual
Mercusys AC12G
User Manual
 Mercusys Halo H30
User Manual
Mercusys Halo H30
User Manual
 Mercusys Halo H30G
User Manual
Mercusys Halo H30G
User Manual
 Mercusys Halo H30G AC1200 10/100/1000BASE-TX (2-Pack)
User Manual
Mercusys Halo H30G AC1200 10/100/1000BASE-TX (2-Pack)
User Manual
 Mercusys Halo H30G AC1300 10/100/1000BASE-TX (3-Pack)
User Manual
Mercusys Halo H30G AC1300 10/100/1000BASE-TX (3-Pack)
User Manual
 Mercusys HALO H50 2PK AC1900 3xGE LAN/WAN
User Manual
Mercusys HALO H50 2PK AC1900 3xGE LAN/WAN
User Manual
 Mercusys Halo H50G
User Manual
Mercusys Halo H50G
User Manual
 Mercusys Halo H70X
User Manual
Mercusys Halo H70X
User Manual
 Mercusys Halo H80X
User Manual
Mercusys Halo H80X
User Manual
 Mercusys Halo H90X
User Manual
Mercusys Halo H90X
User Manual
 Mercusys HALO S12
User Manual
Mercusys HALO S12
User Manual
 Mercusys MR50G
User Manual
Mercusys MR50G
User Manual
 Mercusys MW300RE
User Manual
Mercusys MW300RE
User Manual
 Mercusys MW301R
User Manual
Mercusys MW301R
User Manual
 Mercusys MW302R N300 10/100BASE-TX
User Manual
Mercusys MW302R N300 10/100BASE-TX
User Manual