Page 3 - Content Check List
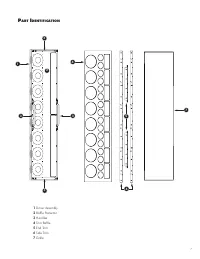
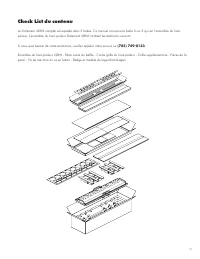
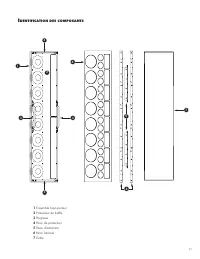
3 Content Check List A complete Statement 40XW is shipped in 3 boxes. This manual refers to box 3 of 3 which is the Driver Assembly. The Statement 40XW Driver Assembly contains the following items. Should you require assistance, please call our service department at (785) 749-0133 . 40XW Driver Asse...
Page 5 - Before painting, remove the grille from speakers
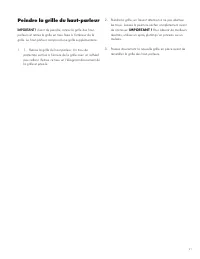
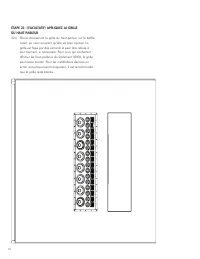
5 P ainting the s Peaker g rille IMPORTANT! Before painting, remove the grille from speakers and remove the cloth scrim attached inside the grille. The speaker includes an extra scrim. 1. Remove the grille from the speaker. A protective cloth scrim is attached to the back of the grille with a low-ta...
Page 6 - PLEASE NOTE: INSTALLATION IS A 2 PERSON JOB .
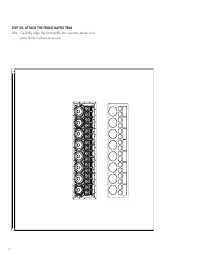
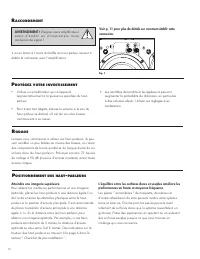
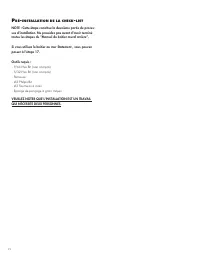
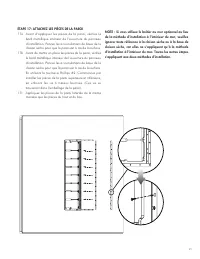
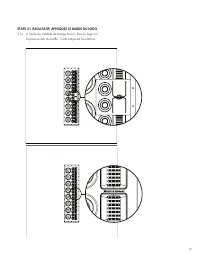
6 P re -i nstallation C heCklist NOTE: This is the second part of the Installation process . Do not proceed until all steps in the “In-wall Back Box Manual” have been completed . If using the Statement On-Wall Enclosure you may pro-ceed from Step 17 . Required Tools: -3/32 Hex Bit (Not Included)-5/3...
Page 8 - STEP 16: DRIVER ASSEMBLY INSTALLATION PREPARATION
8 s Peaker i nstallation STEP 16: DRIVER ASSEMBLY INSTALLATION PREPARATION 16a To prepare the back box for the driver assembly installation, first remove the positioning brackets, 2 corner brackets, and 4 side brackets using a Phillips screwdriver. These brackets are held in place with 2 screws each...
Page 14 - 2a Gently place the speaker grille over the front
14 STEP 22 (OPTIONAL): APPLY THE SPEAKER GRILLE 22a Gently place the speaker grille over the front baffle, ensuring a proper fit. The grille is secured with magnets and may be removed at any time, as desired. For those wanting to display the drivers of the Statement 40XW, the grille can remain off. ...
Page 15 - DIMENSIONS
15 DIMENSIONS 1480.83m m 58.30in 404.45mm 15.92in 1430.03m m 56.30in 353.65mm 13.92in 350.00mm 13.78in 1426.38m m 56.16in DETAIL B 3.18mm 0.13in 1483.43m m 58.40in 407.06mm 16.03in DETAIL C 25.80mm 1.02in
Page 16 - PeCifiCations; back chamber format. Concave dust cap
16 s PeCifiCations Frequency Response:.................................48–25,000 Hz ± 3 dB Tweeter Dispersion (horizontal x vertical).....80° x 52-inch line source Sensitivity.................................................95 dB @ 2.83 volts/ meter Impedance............................................
Page 17 - M a n u e l d e l ’ e n s e m b l e d u h a u t - p a r l e u r
M a n u e l d e l ’ e n s e m b l e d u h a u t - p a r l e u r MD
Page 19 - Check List du contenu
19 Check List du contenu Le Statement 40XW complet est expédié dans 3 boîtes. Ce manuel concerne la boîte 3 sur 3 qui est l’ensemble du haut-parleur. L’ensemble du haut-parleur Statement 40XW contient les éléments suivants. Si vous avez besoin de notre assistance, veuillez appeler notre service au (...
Page 21 - Peindre la grille du haut-parleur; Avant de peindre, retirez la grille des haut-
21 Peindre la grille du haut-parleur IMPORTANT ! Avant de peindre, retirez la grille des haut- parleurs et retirez la grille en tissu fixée à l’intérieur de la grille. Le haut-parleur comprend une grille supplémentaire. 1. 1. Retirez la grille du haut-parleur. Un tissu de protection est fixé à l’arr...
Page 24 - 6a Afin de préparer le boîtier arrière pour l’installation de
24 l ’ installation de l ’ ensemBle du haut - Parleur ÉTAPE 16: PRÉPARATION DE L’INSTALLATION DE L’ENSEMBLE DU HAUT-PARLEUR 16a Afin de préparer le boîtier arrière pour l’installation de l’ensemble du haut-parleur, il faut d’abord retirer les supports de positionnement, 2 supports d’angle et 4 suppo...
Page 26 - STEP 18: MONTAGE DE L’ENSEMBLE DU HAUT-PARLEUR
26 STEP 18: MONTAGE DE L’ENSEMBLE DU HAUT-PARLEUR CETTE ÉTAPE NÉCESSITE 2 PERSONNES POUR LA RÉALISER EN TOUTE SÉCURITÉ 18a Avec 2 personnes, soulevez l’ensemble du haut-parleur de son emballage en utilisant les poignées attachées. 18b Avec 2 personnes, placez avec précaution l’ensemble du haut-parle...
Page 30 - 2a Placez doucement la grille du haut-parleur sur le baffle
30 ÉTAPE 22 : (FACULTATIF) APPLIQUEZ LA GRILLE DU HAUT-PARLEUR 22a Placez doucement la grille du haut-parleur sur le baffle avant, en vous assurant qu’elle est bien ajustée. La grille est fixée par des aimants et peut être retirée à tout moment, si nécessaire. Pour ceux qui souhaitent afficher les h...
Page 31 - DESSIN DIMENSIONNEL
31 DESSIN DIMENSIONNEL 1480.83m m 58.30in 404.45mm 15.92in 1430.03m m 56.30in 353.65mm 13.92in 350.00mm 13.78in 1426.38m m 56.16in DETAIL B 3.18mm 0.13in 1483.43m m 58.40in 407.06mm 16.03in DETAIL C 25.80mm 1.02in
Page 32 - PéCifiCations
32 s PéCifiCations Fréquence de réponse: . . . . . . . . . . . . . . . . . . . . . . . . . . . . . . 48–25,000 Hz ± 3 dB Dispersion des haut-parleurs d’aigus (horizontal x vertical) . . . . . 80° x 52-inch ligne source Sensibilité . . . . . . . . . . . . . . . . . . . . . . . . . . . . . . . . . . ....
Page 33 - otes