Page 2 - SPECIFICATIONS; General power tool safety warnings; Save all warnings and instruc-
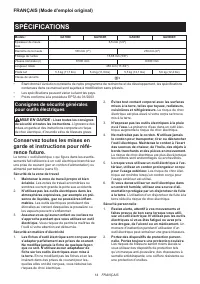
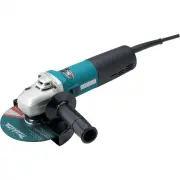
2 ENGLISH ENGLISH (Original instructions) SPECIFICATIONS Model: GA7060 GA7060R GA9060 GA9060R Max. wheel thickness 6.5mm (1/4″) Wheel diameter 180mm (7″) 230mm (9″) Spindle thread 15.88mm (5/8″) Rated speed (n) 8,500/min 6,600/min Overall length 450mm (17-3/4″) Net weight 5.3kg (11.7lbs) 5.4kg (11.9...
Page 3 - Grinder safety warnings
3 ENGLISH Power tool use and care 1. Do not force the power tool. Use the correct power tool for your application. The correct power tool will do the job better and safer at the rate for which it was designed. 2. Do not use the power tool if the switch does not turn it on and off. Any power tool tha...
Page 5 - SAVE THESE INSTRUCTIONS.; Symbols
5 ENGLISH 2. Do not position your body in line with and behind the rotating wheel. When the wheel, at the point of operation, is moving away from your body, the possible kickback may propel the spin- ning wheel and the power tool directly at you. 3. When wheel is binding or when interrupting a cut f...
Page 6 - FUNCTIONAL; Shaft lock; Switch action; For tool with the lock-off switch
6 ENGLISH Class II Construction revolutions or reciprocation per minute FUNCTIONAL DESCRIPTION CAUTION: Always be sure that the tool is switched off and unplugged before adjusting or checking function on the tool. CAUTION: Return the slide switch to the “O (OFF)” position in case of accidental unplu...
Page 7 - Indication lamp; Soft start feature; ASSEMBLY; Installing or removing wheel guard; For tool with locking screw type
7 ENGLISH Indication lamp Only for model GA7060R / GA9060R 1 ► 1. Indication lamp The indication lamp lights up green when the tool is plugged. If the indication lamp does not light up, the mains cord or the controller may be defective. The indication lamp is lit but the tool does not start even if ...
Page 8 - For tool with clamp lever type wheel; Installing or removing flex wheel
8 ENGLISH For tool with clamp lever type wheel guard Loosen the screw, and then pull the lever in the direc- tion of the arrow. Mount the wheel guard with the protru- sions on the wheel guard band aligned with the notches on the bearing box. Then rotate the wheel guard to such an angle that it can p...
Page 9 - Installing or removing abrasive disc; OPERATION; Grinding and sanding operation
9 ENGLISH 1 4 2 3 ► 1. Lock nut 2. Flex wheel 3. Back up pad 4. Inner flange Follow instructions for depressed center wheel but also use back up pad over wheel. See order of assembly on accessories page in this manual. Installing or removing abrasive disc Optional accessory 1 2 3 ► 1. Sanding lock n...
Page 10 - Operation with wire cup brush; Operation with wire wheel brush; diamond wheel
10 ENGLISH Operation with wire cup brush Optional accessory CAUTION: Check operation of brush by run - ning tool with no load, insuring that no one is in front of or in line with brush. CAUTION: Do not use brush that is damaged, or which is out of balance. Use of damaged brush could increase potenti...
Page 11 - MAINTENANCE; Air vent cleaning
11 ENGLISH 1 2 3 4 ► 1. Lock nut 2. Abrasive cut-off wheel / diamond wheel 3. Inner flange 4. Wheel guard for abrasive cut-off wheel / diamond wheel For United States and Canada 1 2 3 4 ø45 ø78 ø78 5 ► 1. Lock nut 2. Outer flange 78 3. Abrasive cut-off wheel / diamond wheel 4. Inner flange 78 5. Whe...
Page 12 - OPTIONAL ACCESSORIES
12 ENGLISH OPTIONAL ACCESSORIES CAUTION: These accessories or attachments are recommended for use with your Makita tool spec- ified in this manual. The use of any other accessories or attachments might present a risk of injury to persons. Only use accessory or attachment for its stated purpose. If y...
Page 13 - Warranty Policy
13 ENGLISH MAKITA LIMITED ONE YEAR WARRANTY Warranty Policy Every Makita tool is thoroughly inspected and tested before leaving the factory. It is warranted to be free of defects from workmanship and materials for the period of ONE YEAR from the date of original purchase. Should any trouble develop ...
Page 14 - SPÉCIFICATIONS; Consignes de sécurité générales; Conservez toutes les mises en
14 FRANÇAIS FRANÇAIS (Mode d’emploi original) SPÉCIFICATIONS Modèle : GA7060 GA7060R GA9060 GA9060R Épaisseur de meule max. 6,5 mm (1/4″) Diamètre de la meule 180 mm (7″) 230 mm (9″) Filetage de l’arbre 15,88 mm (5/8″) Vitesse nominale (n) 8 500 /min 6 600 /min Longueur totale 450 mm (17-3/4″) Poids...
Page 18 - CONSERVEZ CE MODE; Symboles
18 FRANÇAIS Consignes de sécurité spécifiques au brossage métallique : 1. Soyez conscient du fait que des poils de fils métalliques sont éjectés par le brosse pendant l’utilisation ordinaire. Ne malmenez pas les fils métalliques en appliquant une charge exces- sive à la brosse. Les poils de fils mét...
Page 19 - Blocage de l’arbre
19 FRANÇAIS DESCRIPTION DU FONCTIONNEMENT ATTENTION : Assurez-vous toujours que l’outil est hors tension et débranché avant de l’ajuster ou de vérifier son fonctionnement. ATTENTION : Ramenez l’interrupteur à glis - sière sur la positon « O » (arrêt) en cas de débran - chement accidentel, de panne d...
Page 20 - ASSEMBLAGE; Installation de la poignée latérale
20 FRANÇAIS Voyant Uniquement pour le modèle GA7060R / GA9060R 1 ► 1. Voyant Le voyant s’allume en vert lorsque l’outil est branché. Si le voyant ne s’allume pas, il se peut que le cordon d’alimentation ou le contrôleur soit défectueux. Si le voyant est allumé mais que l’outil ne démarre pas même s’...
Page 22 - Pose ou retrait de la meule flexible; Pose ou retrait du disque abrasif; UTILISATION; Travaux de meulage et de ponçage
22 FRANÇAIS Pose ou retrait de la meule flexible Accessoire en option MISE EN GARDE : Utilisez toujours le pro- tecteur fourni quand la meule flexible est montée sur l’outil. La meule peut voler en éclats en cours d’utilisation et le protecteur réduit alors les risques de blessure. 1 4 2 3 ► 1. Cont...
Page 23 - Travaux avec une brosse métallique; Travaux avec meule tronçonneuse
23 FRANÇAIS Travaux avec une brosse coupe métallique Accessoire en option ATTENTION : Vérifiez le fonctionnement de la brosse en faisant fonctionner l’outil sans charge, en vous assurant que personne ne se trouve devant la brosse ou sur sa trajectoire. ATTENTION : N’utilisez pas la brosse si elle es...
Page 24 - ENTRETIEN; Nettoyage des orifices d’aération
24 FRANÇAIS 1 2 3 4 ► 1. Contre-écrou 2. Meule tronçonneuse abrasive / meule diamant 3. Flasque intérieur 4. Protecteur de meule pour meule tronçonneuse abrasive / meule diamant Pour les États-Unis et le Canada 1 2 3 4 ø45 ø78 ø78 5 ► 1. Contre-écrou 2. Flasque extérieur 78 3. Meule tronçonneuse abr...
Page 25 - ACCESSOIRES EN OPTION
25 FRANÇAIS ACCESSOIRES EN OPTION ATTENTION : Ces accessoires ou pièces complémentaires sont recommandés pour l’utilisation avec l’outil Makita spécifié dans ce manuel. L’utilisation de tout autre accessoire ou pièce complémentaire peut comporter un risque de blessure. N’utilisez les accessoires ou ...
Page 26 - Politique de garantie
26 FRANÇAIS GARANTIE LIMITÉE D’UN AN DE MAKITA Politique de garantie Tous les outils Makita sont soigneusement inspectés et mis à l’essai avant de quitter l’usine. Ils sont garantis contre les vices de fabrication et de matériau pour une période d’UN AN suivant la date de l’achat original. Si un pro...
Page 27 - ESPECIFICACIONES; Advertencias generales de; Conserve todas las advertencias
27 ESPAÑOL ESPAÑOL (Instrucciones originales) ESPECIFICACIONES Modelo: GA7060 GA7060R GA9060 GA9060R Especificaciones eléctri - cas en México 127 V 15 A 50/60 Hz Grosor máx. de la rueda o disco abrasivo 6,5 mm (1/4″) Diámetro de la rueda o disco abrasivo 180 mm (7″) 230 mm (9″) Rosca del eje 15,88 m...
Page 31 - GUARDE ESTAS; Símbolos
31 ESPAÑOL Advertencias de seguridad específicas para las operaciones de lijado: 1. No utilice papel de lijado para disco de tamaño excesivo. Siga las recomendaciones de los fabricantes cuando seleccione el papel de lijado. Un papel de lijado de mayor tamaño que se extienda más allá de la almohadill...
Page 32 - Bloqueo del eje
32 ESPAÑOL DESCRIPCIÓN DEL FUNCIONAMIENTO PRECAUCIÓN: Asegúrese siempre de que la herramienta esté apagada y desconectada antes de ajustar o comprobar cualquier función en la herramienta. PRECAUCIÓN: Regrese el interruptor deslizable a la posición de apagado en caso de una desconexión accidental, un...
Page 33 - MONTAJE; Instalación de la empuñadura lateral
33 ESPAÑOL Lámpara de indicación Solamente para el modelo GA7060R / GA9060R 1 ► 1. Lámpara de indicación La lámpara de indicación se ilumina en verde cuando la herramienta está enchufada. Si la lámpara de indicación no se ilumina, puede que el cable de alimentación o el controlador esté defectuoso. ...
Page 35 - Instalación o extracción de un disco; OPERACIÓN
35 ESPAÑOL 1 2 ► 1. Llave de contratuerca 2. Bloqueo del eje Para extraer la rueda, siga el procedimiento de instala - ción en orden inverso. NOTA: En países distintos de Estados Unidos de América y Canadá, también se puede utilizar una brida interior de 45. Instalación o extracción de una rueda fle...
Page 36 - Operación con rueda de cepillo de
36 ESPAÑOL PRECAUCIÓN: Nunca encienda la herra- mienta cuando ésta esté en contacto con la pieza de trabajo, esto podría ocasionar lesiones al operador. PRECAUCIÓN: Use siempre gafas de seguri- dad o careta durante la operación. PRECAUCIÓN: Después de la operación, apague siempre la herramienta y es...
Page 37 - MANTENIMIENTO
37 ESPAÑOL Desconecte la herramienta y póngala al revés para permitir un acceso fácil al eje. Quite cualquier accesorio que haya en el eje. Enrosque la rueda de cepillo de alambre en el eje y apriete con las llaves. AVISO: Cuando utilice la rueda de cepillo de alambre, evite aplicar mucha presión qu...
Page 38 - Limpieza del orificio de ventilación; ACCESORIOS OPCIONALES
38 ESPAÑOL Limpieza del orificio de ventilación La herramienta y sus orificios de ventilación deben mantenerse limpios. Limpie regularmente los orificios de ventilación de la herramienta o siempre que los orificios empiecen a obstruirse. 1 2 ► 1. Ventilación de salida 2. Ventilación de entrada NOTA:...
Page 39 - GARANTÍA LIMITADA DE UN AÑO; Ésta Garantía no aplica para México
39 ESPAÑOL 1 Empuñadura lateral 2 Protector de la rueda 3 Brida interior 45 / brida interior 89 *1 4 Rueda de esmerilado de centro hundido / multidisco 5 Contratuerca de 5/8 - 45 6 Almohadilla de soporte 7 Rueda flexible 8 Plato de goma 170 9 Disco abrasivo 10 Contratuerca de lijado de 5/8 - 48 11 R...
Page 40 - WARNING; productos químicos son:; Makita Corporation
Some dust created by power sanding, sawing, grinding, drilling, and other construction activities contains chemicals known to the State of California to cause cancer, birth defects or other reproductive harm. Some examples of these chemicals are: • lead from lead-based paints, • crystalline silica f...