Page 2 - ENGLISH; SPECIFICATIONS; Read and understand all instructions.; SAVE THESE INSTRUCTIONS; Work Area; Electrical Safety
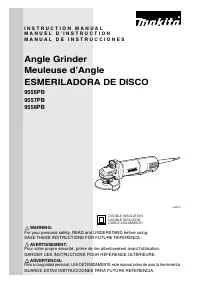
2 ENGLISH SPECIFICATIONS • Due to our continuing programme of research and development, the specifications herein are subject to change without notice. • Note: Specifications may differ from country to country. GENERAL SAFETY RULES USA002-2 (For All Tools) WARNING: Read and understand all instructio...
Page 3 - SPECIFIC SAFETY RULES; AWG
3 14. Use safety equipment. Always wear eye protec- tion. Dust mask, non-skid safety shoes, hard hat, or hearing protection must be used for appropriate con-ditions. Ordinary eye or sun glasses are NOT eyeprotection. Tool Use and Care 15. Use clamps or other practical way to secure and support the w...
Page 4 - FUNCTIONAL DESCRIPTION; Shaft lock
4 wheel immediately. Run the tool (with guard) atno load for about a minute, holding tool awayfrom others. If wheel is flawed, it will likely sepa-rate during this test. 7. Use only flanges specified for this tool. 8. Be careful not to damage the spindle, the flange(especially the installing surface...
Page 5 - ASSEMBLY; Installing or removing wheel guard
5 CAUTION: • Before plugging in the tool, always check to seethat the switch lever actuates properly and returnsto the “OFF” position when released. • Switch can be locked in “ON” position for ease ofoperator comfort during extended use. Applycaution when locking tool in “ON” position andmaintain fi...
Page 6 - OPERATION; Grinding and sanding operation
6 To tighten the lock nut, press the shaft lock firmly so thatthe spindle cannot revolve, then use the lock nut wrenchand securely tighten clockwise. To remove the wheel, follow the installation procedure inreverse. WARNING: • Only actuate the shaft lock when the spindle is notmoving. Installing or ...
Page 7 - MAINTENANCE
7 Operation with wire cup brush(optional accessory) CAUTION: • Check operation of brush by running tool with noload, insuring that no one is in front of or in line withbrush. • Do not use brush that is damaged, or which is outof balance. Use of damaged brush could increasepotential for injury from c...
Page 8 - ACCESSORIES
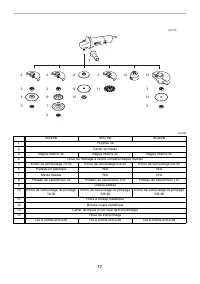
8 ACCESSORIES CAUTION: • These accessories or attachments arerecommended for use with your Makita toolspecified in this manual. The use of any otheraccessories or attachments might present a risk ofinjury to persons. Only use accessory orattachment for its stated purpose. • Your tool is supplied wit...
Page 9 - MAKITA LIMITED ONE YEAR WARRANTY
9 EN0006-1 MAKITA LIMITED ONE YEAR WARRANTY Warranty Policy Every Makita tool is thoroughly inspected and testedbefore leaving the factory. It is warranted to be free ofdefects from workmanship and materials for the period ofONE YEAR from the date of original purchase. Shouldany trouble develop duri...
Page 10 - FRENCH; SPÉCIFICATIONS; (Pour tous les outils; Sécurité des personnes
10 FRENCH SPÉCIFICATIONS • Le fabricant se réserve le droit de modifier sans avertissement les spécifications. • Note: Les spécifications peuvent varier selon les pays. RÈGLES DE SÉCURITÉ GÉNÉRALES USA002-2 (Pour tous les outils ) AVERTISSEMENT: Vous devez lire et comprendre toutes lesinstructions. ...
Page 11 - Calibre américain des fils
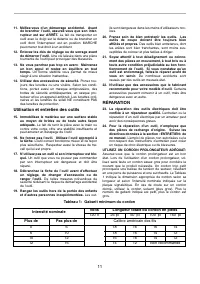
11 11. Méfiez-vous d’un démarrage accidentel. Avant de brancher l’outil, assurez-vous que son inter-rupteur est sur ARRÊT. Le fait de transporter un outil avec le doigt sur la détente ou de brancher unoutil dont l’interrupteur est en position MARCHEpeut mener tout droit à un accident. 12. Enlevez le...
Page 12 - SYMBOLES
12 RÈGLES DE SÉCURITÉ PARTI-CULIÈRES USB005-3 NE PAS se laisser détromper par unexcès de confiance consécutif à unusage fréquent de la meule et se substi-tuant à l’observation scrupuleuse desrègles de sécurité prescrites. L’emploi decet outil de façon incorrecte ou dan-gereuse risque d’entraîner des...
Page 13 - ASSEMBLAGE; Installation de la poignée latérale (poignée)
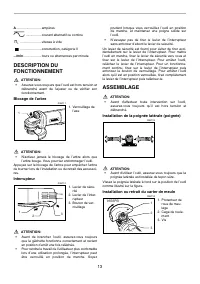
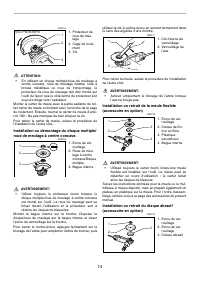
13 A ........................... ampères ................. courant alternatif ou continu ....................... vitesse à vide ....................... construction, catégorie II .../min .................... tours ou alternances par minute DESCRIPTION DU FONCTIONNEMENT ATTENTION: • Assurez-vous touj...
Page 15 - UTILISATION; Opérations de meulage et de ponçage
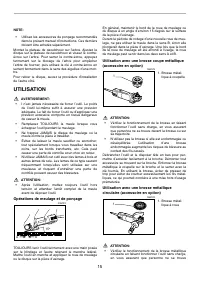
15 NOTE: • Utilisez les accessoires de ponçage recommandésdans le présent manuel d’instructions. Ces derniersdoivent être achetés séparément. Montez le plateau de caoutchouc sur l’arbre. Ajustez ledisque sur le plateau de caoutchouc et vissez le contre-écrou sur l’arbre. Pour serrer le contre-écrou,...
Page 18 - GARANTIE LIMITÉE D’UN AN MAKITA
18 EN0006-1 GARANTIE LIMITÉE D’UN AN MAKITA Politique de garantie Chaque outil Makita est inspecté rigoureusement et testéavant sa sortie d’usine. Nous garantissons qu’il seraexempt de défaut de fabrication et de vice de matériaupour une période d’UN AN à partir de la date de sonachat initial. Si un...
Page 19 - SPANISH; ESPECIFICACIONES; Lea y entienda todas las instrucciones.
19 SPANISH ESPECIFICACIONES • Debido a un programa continuo de investigación y desarrollo, las especificaciones aquí dadas están sujetas a cambios sin previo aviso. • Nota: Las especificaciones pueden ser diferentes de país a país. NORMAS DE SEGURIDAD GEN-ERALES USA002-2 (Para todas las herramientas...
Page 21 - No se recomienda
21 NORMAS DE SEGURIDAD ESPE-CÍFICAS USB005-3 NO deje que la comodidad o familiaridadcon el producto (a base de utilizarlorepetidamente) sustituya la estrictaobservancia de las normas de seguridadpara la amoladora. Si utiliza esta her-ramienta de forma no segura o incor-recta, podrá sufrir graves her...
Page 22 - SÍMBOLOS; Bloqueo del eje; MONTAJE
22 19. Póngase SIEMPRE indumentaria apropiada incluyendo camisas de manga larga, guantes decuero y delantales de taller para proteger la pielcontra el contacto con virutas calientes. 20. La utilización de esta herramienta para amolar o pulir algunos productos, pinturas y maderapodrá exponer al usuar...
Page 23 - Instalación de la empuñadura lateral (mango)
23 Instalación de la empuñadura lateral (mango) PRECAUCIÓN: • Antes de realizar una operación, asegúresesiempre de que la empuñadura lateral estéinstalada firmemente. Rosque la empuñadura lateral firmemente en la posiciónde la herramienta mostrada en la figura. Instalación o desmontaje del protector...
Page 24 - OPERACIÓN; Operación de amolado y lijado
24 Instalación o desmontaje de un disco flexible (accesorio opcional) AVISO: • Utilice siempre el protector de disco suministradocuando instale en la herramienta un disco flexible.El disco puede desintegrarse mientras se usa y elprotector ayuda a reducir las posibilidades de quese produzcan heridas ...
Page 25 - MANTENIMIENTO
25 PRECAUCIÓN: • Compruebe la operación de la grata haciendo girarla herramienta sin carga, asegurándose de que nohaya nadie enfrente ni en línea con la grata. • No utilice una grata que esté dañada odesequilibrada. La utilización de una grata dañadapodrá aumentar la posibilidad de heridas causadasp...
Page 26 - ACCESORIOS
26 ACCESORIOS PRECAUCIÓN: • Estos accesorios o acoplamientos estánrecomendados para utilizar con su herramientaMakita especificada en este manual. El empleo decualesquiera otros accesorios o acoplamientosconllevará un riesgo de sufrir heridas personales.Utilice los accesorios o acoplamientos solamen...
Page 27 - GARANTÍA LIMITADA MAKITA DE UN AÑO
27 EN0006-1 GARANTÍA LIMITADA MAKITA DE UN AÑO Política de garantía Cada herramienta Makita es inspeccionada y probadaexhaustivamente antes de salir de fábrica. Se garantizaque va a estar libre de defectos de mano de obra y mate-riales por el periodo de UN AÑO a partir de la fecha deadquisición orig...
Page 28 - Makita Corporation; Made in China / Hecho en China
WARNING Some dust created by power sanding, sawing, grinding, drilling, and otherconstruction activities contains chemicals known to the State of Californiato cause cancer, birth defects or other reproductive harm. Some examplesof these chemicals are:• lead from lead-based paints, • crystalline sili...