Page 2 - SPECIFICATIONS; GENERAL SAFETY RULES
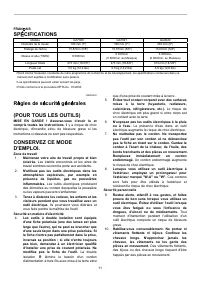
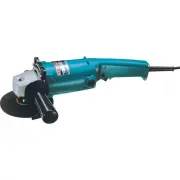
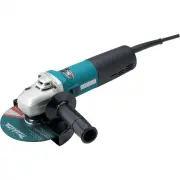
2 ENGLISH SPECIFICATIONS Model GA7020 GA7021 GA9020 Wheel diameter 180 mm (7") 180 mm (7") 230 mm (9") Spindle thread 15.87mm (5/8") 15.87mm (5/8") 15.87mm (5/8") No load speed (RPM) 8,500/min 6,000/min (6,600/min. in Mexico) 6,000/min (6,600/min. in Mexico) Overall length 47...
Page 3 - SPECIFIC SAFETY RULES; Always use proper guard with grinding wheel.
3 Tool Use and Care 15. Use clamps or other practical way to secure and support the workpiece to a stable platform. Holding the work by hand or against your body is unstable and may lead to loss of control. 16. Do not force tool. Use the correct tool for your application. The correct tool will do th...
Page 4 - SAVE THESE INSTRUCTIONS.; Shaft lock
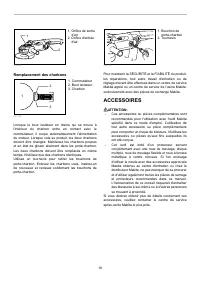
4 damaged wheel immediately. Run the tool (with guard) at no load for about a minute, holding tool away from others. If wheel is flawed, it will likely separate during this test. 7. Use only flanges specified for this tool. 8. Be careful not to damage the spindle, the flange (especially the installi...
Page 5 - Switch action; ASSEMBLY; Installing or removing wheel guard; For tool with locking screw type wheel guard
5 Switch action 1 2 A B 006734 CAUTION: • Before plugging in the tool, always check to see that the switch trigger actuates properly and returns to the "OFF" position when released. • Switch can be locked in "ON" position for ease of operator comfort during extended use. Apply cautio...
Page 6 - OPERATION
6 wheel guard band. To remove wheel guard, follow the installation procedure in reverse. Installing or removing depressed center grinding wheel/Multi-disc (accessory) 12 3 006737 WARNING: • Always use supplied guard when depressed center grinding wheel/Multi-disc is on tool. Wheel can shatter during...
Page 7 - Grinding and sanding operation; MAINTENANCE
7 CAUTION: • Never switch on the tool when it is in contact with the workpiece, it may cause an injury to operator. • Always wear safety goggles or a face shield during operation. • After operation, always switch off the tool and wait until the wheel has come to a complete stop before putting the to...
Page 8 - Replacing carbon brushes; ACCESSORIES
8 1 2 006744 Replacing carbon brushes 1 2 3 001146 When the resin insulating tip inside the carbon brush is exposed to contact the commutator, it will automatically shut off the motor. When this occurs, both carbon brushes should be replaced. Keep the carbon brushes clean and free to slip in the hol...
Page 10 - MAKITA LIMITED ONE YEAR WARRANTY
10 MAKITA LIMITED ONE YEAR WARRANTY Warranty Policy Every Makita tool is thoroughly inspected and tested before leaving the factory. It is warranted to be free of defects from workmanship and materials for the period of ONE YEAR from the date of original purchase. Should any trouble develop during t...
Page 11 - SP; gles de s; Zone de travail
11 FRAN Ç AIS SP É CIFICATIONS Modèle GA7020 GA7021 GA9020 Diamètre de la meule 180 mm (7") 180 mm (7") 230 mm (9") Filetage de l'arbre 15,87mm (5/8") 15,87mm (5/8") 15,87mm (5/8") Vitesse à vide (T/MIN) 8 500/min 6 000/min (6 600/min. au Mexique) 6 000/min (6 600/min. au Mex...
Page 14 - Symboles; Interrupteur
14 19. Portez TOUJOURS des vêtements adéquats pour protéger la peau du contact avec des pièces meulées encore chaudes, ces vêtements incluant les chandails à manches longues, les gants de cuir et les tabliers de travail. 20. L'utilisation de cet outil pour meuler ou poncer certains produits, les sur...
Page 15 - ASSEMBLAGE; Installation de la poign; Pour outil avec carter de meule; moyeu d
15 gâchette (dans le sens B), puis libérez-la. ASSEMBLAGE ATTENTION: • Avant d'effectuer toute intervention sur l'outil, assurez-vous toujours qu'il est hors tension et débranché. Installation de la poign é e lat é rale (poign é e) 006735 ATTENTION: • Avant d'utiliser l'outil, assurez-vous toujours ...
Page 16 - UTILISATION; Op
16 en orientant sa partie saillante vers le bas (vers le disque). Pour serrer le contre-écrou, appuyez fermement sur le blocage de l'arbre pour empêcher l'arbre de tourner, puis utilisez la clé à contre-écrou en serrant fermement dans le sens des aiguilles d'une montre. 1 2 006738 Pour retirer la me...
Page 17 - ENTRETIEN
17 Pendant la période de rodage d'une meule neuve, ne faites pas avancer la meuleuse dans le sens B, sinon elle risque de couper la pièce à travailler. Une fois le bord de la meule rodée, la meule peut être utilisée dans les sens A et B. A B 15 006741 Utilisation avec une brosse coupe m é tallique (...
Page 18 - Remplacement des charbons; ACCESSOIRES
18 1 2 006744 Remplacement des charbons 1 2 3 001146 Lorsque le bout isolateur en résine qui se trouve à l'intérieur du charbon entre en contact avec le commutateur, il coupe automatiquement l'alimentation du moteur. Lorsque cela se produit, les deux charbons doivent être changés. Maintenez les char...
Page 20 - GARANTIE LIMITÉE D’UN AN MAKITA
20 GARANTIE LIMITÉE D’UN AN MAKITA Politique de garantie Chaque outil Makita est inspecté rigoureusement et testé avant sa sortie d’usine. Nous garantissons qu’il sera exempt de défaut de fabrication et de vice de matériau pour une période d’UN AN à partir de la date de son achat initial. Si un prob...
Page 21 - ESPECIFICACIONES; Área de trabajo
21 ESPA Ñ OL ESPECIFICACIONES Modelo GA7020 GA7021 GA9020 Especificaciones eléctricas en México 127 V 15A 50/60 Hz 1 900 W Diámetro de disco 180 mm (7") 180 mm (7") 230 mm (9") Rosca del eje 15,87mm (5/8") 15,87mm (5/8") 15,87mm (5/8") Revoluciones por minuto (r.p.m.) 8 500 r...
Page 23 - Sostenga la herramienta con firmeza.
23 Tabla 1. Calibre mínimo para el cable Volts Longitud total del cable en metros 120 V~ 7,6 m (25 ft) 15,2 m (50 ft) 30,4 m (100 ft) 45,7 m (150 ft) Más de No más de Calibre del cable (AWG) 0 A 6 A 18 16 16 14 18 16 14 12 6 A 10 A 10 A 12 A 16 16 14 12 12 A 16 A 14 12 No se recomienda Amperaje nomi...
Page 24 - Bloqueo del eje
24 18. No toque la pieza de trabajo inmediatamente después de operar la herramienta, puesto que puede estar extremadamente caliente y quemarle la piel. 19. Póngase SIEMPRE indumentaria apropiada incluyendo camisas de manga larga, guantes de cuero y delantales de taller para proteger la piel contra e...
Page 25 - ENSAMBLE
25 herramienta desde la posición trabada, tire el gatillo del interruptor por completo (en la dirección B) y luego suéltelo. ENSAMBLE PRECAUCIÓN: • Asegúrese siempre de que la herramienta esté apagada y desconectada antes de realizar cualquier trabajo en la misma. Instalaci ó n de la empu ñ adura la...
Page 26 - OPERACI
26 ADVERTENCIA: • Utilice siempre el protector de disco suministrado cuando instale en la herramienta un disco de amolar de centro hundido/multidisco. El disco puede desintegrarse durante la utilización y el protector ayuda a reducir las posibilidades de que se produzcan heridas personales. Monte la...
Page 27 - MANTENIMIENTO
27 • Después de la operación, apague siempre la herramienta y espere hasta que el disco se haya parado completamente antes de dejar la herramienta. Operaci ó n de amolado y lijado Sujete SIEMPRE la herramienta firmemente con una mano en la empuñadura trasera y la otra en la empuñadura lateral. Encie...
Page 28 - Reemplazamiento de las escobillas de carb; ACCESORIOS
28 estar obstruidos. 1 2 006744 Reemplazamiento de las escobillas de carb ó n 1 2 3 001146 Cuando la punta de resina aislante del interior de la escobilla de carbón se gaste y haga contacto con el conmutador, detendrá automáticamente el motor. Cuando ocurra esto, ambas escobillas de carbón deberán s...
Page 32 - Makita Corporation
32 Some dust created by power sanding, sawing, grinding, drilling, and otherconstruction activities contains chemicals known to the State of Californiato cause cancer, birth defects or other reproductive harm. Some examplesof these chemicals are:• lead from lead-based paints,• crystalline silica fro...