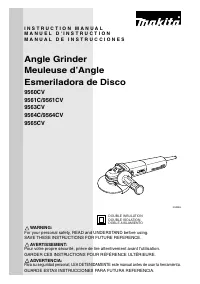
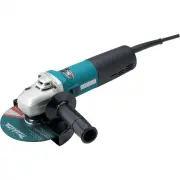
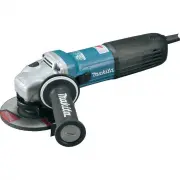
Page 2 - ENGLISH; SPECIFICATIONS; Read and understand all instructions.; SAVE THESE INSTRUCTIONS; Work Area; Electrical Safety
2 ENGLISH SPECIFICATIONS • Due to our continuing programme of research and development, the specifications herein are subject to change without notice. • Note: Specifications may differ from country to country. GENERAL SAFETY RULES USA002-2 (For All Tools) WARNING: Read and understand all instructio...
Page 3 - SPECIFIC SAFETY RULES; AWG
3 14. Use safety equipment. Always wear eye protec- tion. Dust mask, non-skid safety shoes, hard hat, or hearing protection must be used for appropriate con-ditions. Ordinary eye or sun glasses are NOT eyeprotection. Tool Use and Care 15. Use clamps or other practical way to secure and support the w...
Page 4 - FUNCTIONAL DESCRIPTION; Shaft lock
4 wheel immediately. Run the tool (with guard) atno load for about a minute, holding tool awayfrom others. If wheel is flawed, it will likely sepa-rate during this test. 7. Use only flanges specified for this tool. 8. Be careful not to damage the spindle, the flange(especially the installing surface...
Page 5 - ASSEMBLY; Installing or removing wheel guard
5 CAUTION: • Before plugging in the tool, always check to seethat the slide switch actuates properly and returnsto the “OFF” position when the rear of the slideswitch is depressed. • Switch can be locked in “ON” position for ease ofoperator comfort during extended use. Applycaution when locking tool...
Page 6 - OPERATION
6 Loosen the lever on the wheel guard. Mount the wheelguard with the protrusion on the wheel guard bandaligned with the notch on the bearing box. Then rotatethe wheel guard around 180 degrees. Tighten the lever tofasten the wheel guard. If the lever is too tight or tooloosen to fasten the wheel guar...
Page 7 - Grinding and sanding operation
7 • NEVER bang or hit grinding disc or wheel ontowork. • Avoid bouncing and snagging the wheel, especiallywhen working corners, sharp edges etc. This cancause loss of control and kickback. • NEVER use tool with wood cutting blades and othersawblades. Such blades when used on a grinderfrequently kick...
Page 8 - MAINTENANCE
8 Operation with abrasive cut-off wheel (optional accessory) WARNING: • When using an abrasive cut-off wheel, be sure touse only the special wheel guard designed for usewith cut-off wheels. • NEVER use cut-off wheel for side grinding. During cutting operations, never change the angle of thewheel. Pl...
Page 10 - MAKITA LIMITED ONE YEAR WARRANTY
10 EN0006-1 MAKITA LIMITED ONE YEAR WARRANTY Warranty Policy Every Makita tool is thoroughly inspected and testedbefore leaving the factory. It is warranted to be free ofdefects from workmanship and materials for the period ofONE YEAR from the date of original purchase. Shouldany trouble develop dur...
Page 11 - FRANÇAIS; SPÉCIFICATIONS; (Pour tous les outils
11 FRANÇAIS SPÉCIFICATIONS • Le fabricant se réserve le droit de modifier sans avertissement les spécifications. • Note: Les spécifications peuvent varier selon les pays. RÈGLES DE SÉCURITÉ GÉNÉRALES USA002-2 (Pour tous les outils ) AVERTISSEMENT: Vous devez lire et comprendre toutes lesinstructions...
Page 12 - Calibre américain des fils
12 cheveux longs. N’approchez jamais lescheveux, les vêtements ou les gants des piècesen mouvement. Des vêtements flottants, des bijoux ou des cheveux longs risquent d’être happés pardes pièces en mouvement. 11. Méfiez-vous d’un démarrage accidentel. Avant de brancher l’outil, assurez-vous que sonin...
Page 14 - SYMBOLES; Blocage de l’arbre
14 SYMBOLES USD201-2 Les symboles utilisés pour l’outil sont présentés ci-dessous. V ............................ volts A ........................... ampères Hz .......................... hertz .................... courant alternatif ....................... vitesse à vide ....................... con...
Page 15 - Fonction électronique; ASSEMBLAGE; Installation de la poignée latérale (poignée)
15 entre les numéros de réglage du cadran et la vitesse derotation approximative. ATTENTION: • Si l’outil est utilisé de manière continue à vitesseréduite sur une période prolongée, le moteur serasurchargé et chauffera. • Le cadran de réglage de la vitesse ne peut pasdépasser le 5 et le 1. Ne le for...
Page 16 - UTILISATION
16 Pour retirer le carter de meule, suivez la procédure del’installation de l’autre côté. Installation ou démontage du disque multiple/roue de meulage à centre concave. AVERTISSEMENT: • Utiliser toujours le protecteur fourni lorsque ledisque multiple/roue de meulage à centre concaveest monté sur l’o...
Page 17 - Opérations de meulage et de ponçage
17 • Évitez de laisser la meule sautiller ou accrocher,tout spécialement lorsque vous travaillez dans lescoins, sur les bords tranchants, etc. Cela peutcauser une perte de contrôle et un choc en retour. • N’utilisez JAMAIS cet outil avec des lames à bois etautres lames de scie. Les lames de ce type ...
Page 20 - GARANTIE LIMITÉE D’UN AN MAKITA
20 EN0006-1 GARANTIE LIMITÉE D’UN AN MAKITA Politique de garantie Chaque outil Makita est inspecté rigoureusement et testéavant sa sortie d’usine. Nous garantissons qu’il seraexempt de défaut de fabrication et de vice de matériaupour une période d’UN AN à partir de la date de sonachat initial. Si un...
Page 21 - ESPAÑOL; ESPECIFICACIONES; Lea y entienda todas las instrucciones.
21 ESPAÑOL ESPECIFICACIONES • Debido a un programa continuo de investigación y desarrollo, las especificaciones aquí dadas están sujetas a cambios sin previo aviso. • Nota: Las especificaciones pueden ser diferentes de país a país. NORMAS DE SEGURIDAD GENERALES USA002-2 (Para todas las herramientas)...
Page 23 - No se recomienda
23 NORMAS DE SEGURIDAD ESPECÍFICAS USB005-4 NO deje que la comodidad o familiaridadcon el producto (a base de utilizarlorepetidamente) sustituya la estrictaobservancia de las normas de seguridadpara la amoladora. Si utiliza estaherramienta de forma no segura oincorrecta, podrá sufrir graves heridasp...
Page 24 - SÍMBOLOS; Bloqueo del eje
24 cuero y delantales de taller para proteger la pielcontra el contacto con virutas calientes. 20. La utilización de esta herramienta para esmerilar o pulir algunos productos, pinturas y maderapodrá exponer al usuario a polvo que contengasustancias peligrosas. Utilice protecciónespiratoria apropiada...
Page 25 - MONTAJE; Instalación de la empuñadura lateral (mango)
25 Dial de ajuste de velocidad Sólo para el modelo 9560CV, 9561CV, 9563CV,9564CV, 9565CV La velocidad de giro puede cambiarse girando el dial deajuste de velocidad hasta la configuración de un númerodado de 1 a 5. Se obtiene una velocidad superior cuando se gira el dialen dirección del número 5 y un...
Page 27 - OPERACIÓN; Operación de amolado y lijado
27 OPERACIÓN AVISO: • No deberá ser nunca necesario forzar laherramienta. El peso de la herramienta aplica lapresión adecuada . El forzamiento y la presiónexcesivos podrán ocasionar una peligrosa roturadel disco. • Reemplace el disco SIEMPRE si deja caer laherramienta durante el amolado. • No lance ...
Page 30 - GARANTÍA LIMITADA MAKITA DE UN AÑO
30 EN0006-1 GARANTÍA LIMITADA MAKITA DE UN AÑO Política de garantía Cada herramienta Makita es inspeccionada y probadaexhaustivamente antes de salir de fábrica. Se garantizaque va a estar libre de defectos de mano de obra ymateriales por el periodo de UN AÑO a partir de la fechade adquisición origin...
Page 32 - Makita Corporation
WARNING Some dust created by power sanding, sawing, grinding, drilling, and otherconstruction activities contains chemicals known to the State of Californiato cause cancer, birth defects or other reproductive harm. Some examplesof these chemicals are:• lead from lead-based paints, • crystalline sili...