Page 2 - IMPORTANT
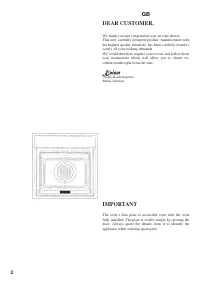
GB 2 DEAR CUSTOMER, We thank you and congratulate you on your choice.This new carefully designed product, manufactured withthe highest quality materials, has been carefully tested tosatisfy all your cooking demands.We would therefore request you to read and follow theseeasy instructions which will a...
Page 3 - WICHTIG
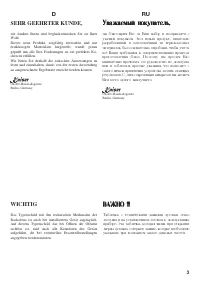
RU D 3 SEHR GEEHRTER KUNDE, wir danken Ihnen und beglückwünschen Sie zu IhrerWahl.Dieses neue Produkt, sorgfältig entworfen und miterstklassigen Materialien hergestellt, wurde genaugeprüft um alle Ihre Forderungen an ein perfektes Ko-chen zu erfüllen.Wir bitten Sie deshalb die einfachen Anweisungen ...
Page 4 - CONTENTS
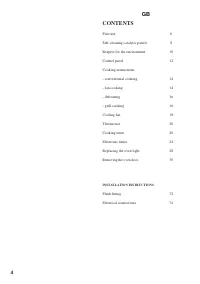
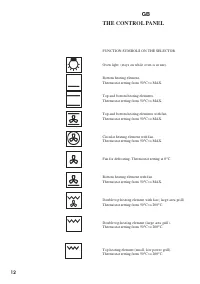
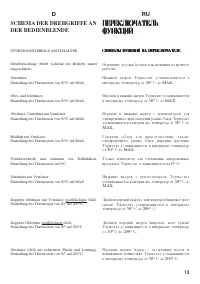
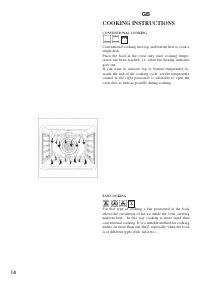
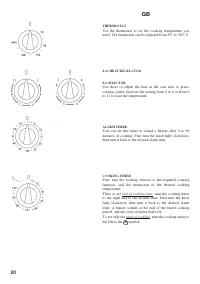
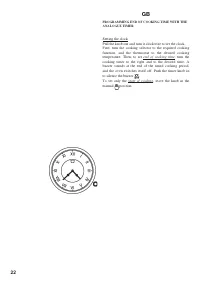
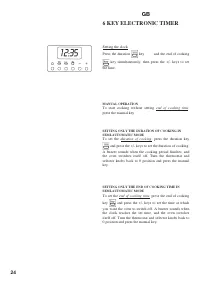
GB 4 CONTENTS First use 6 Self-cleaning catalytic panels 8 Respect for the environment 10 Control panel 12 Cooking instructions: - conventional cooking 14 - fan cooking 14 - defrosting 16 - grill cooking 16 Cooling fan 18 Thermostat 20 Cooking timer 20 Electronic timer 24 Replacing the oven light 28...
Page 5 - INDEX
RU D 5 JUKFDKTYBT JUKFDKTYBT JUKFDKTYBT JUKFDKTYBT JUKFDKTYBT Gthdjt bcgjkmpjdfybt 7 Cfvjjxbof/obtcz gkfcnbys 9 J[hfyf jrhe;f/otq chtls 1 1 Gthtrk/xfntkm aeyrwbq 1 3 Ghfrnbxtcrbt cjdtns% - J,sxyjt ghbujnjdktybt 15 - Ghbujnjdktybt c j,ledjv 15 - Jnnfbdfybt 17 - Uhbkm 17 J[kf;lf/obq dtynbkznjh 1 9 Nth...
Page 7 - ERSTMALIGE BENUTZUNG; GTHDJT BCGJKMPJDFYBT
RU D 7 ERSTMALIGE BENUTZUNG Der Backofen muss gründlich mit Seifenwasser ge-säubert werden. Wie auf der Abbildung dargestellt vor-gehen, um bei den Öfen mit glatten Wänden die seit-lichen Backbleche herauszunehmen.Den Backofen für etwa 30 Minuten auf Höchsttempe-ratur aufheizen; auf diese Weise werd...
Page 11 - UMWELTVERTRÄGLICHKEIT; CHTLS
RU D 11 UMWELTVERTRÄGLICHKEIT Als Beitrag zum Umweltschutz wurde die Doku-mentation dieses Geräts auf chlorfrei gebleichtes oderRecycling-Papier gedruckt. Bei der Verpackung wurde auf deren Umweltverträg-lichkeit Wert gelegt; sie kann gesammelt oder recyceltwerden, da es sich um umweltschonendes Mat...
Page 12 - THE CONTROL PANEL; FUNCTION SYMBOLS ON THE SELECTOR
GB 12 THE CONTROL PANEL FUNCTION SYMBOLS ON THE SELECTOR Oven light (stays on while oven is in use). Bottom heating element.Thermostat setting from 50°C to MAX. Top and bottom heating elements.Thermostat setting from 50°C to MAX. Top and bottom heating elements with fan.Thermostat setting from 50°C ...
Page 13 - FUNKTIONSSYMBOLE AM SCHALTER; MAX
RU D 13 SCHEMA DER DREHGRIFFE ANDER BEDIENBLENDE GTHTRK?XFNTKM GTHTRK?XFNTKM GTHTRK?XFNTKM GTHTRK?XFNTKM GTHTRK?XFNTKM AEYRWBQ AEYRWBQ AEYRWBQ AEYRWBQ AEYRWBQ FUNKTIONSSYMBOLE AM SCHALTER Ofenbeleuchtung (bleibt während des Betriebs immereingeschaltet). Unterhitze.Einstellung des Thermostats von 50°...
Page 14 - COOKING INSTRUCTIONS
GB 14 COOKING INSTRUCTIONS CONVENTIONAL COOKING Conventional cooking uses top and bottom heat to cook asingle dish.Place the food in the oven only once cooking tempe-rature has been reached, i.e. when the heating indicatorgoes out.If you want to increase top or bottom temperature to-wards the end of...
Page 15 - BACKEMPFEHLUNGEN; GHFRNBXTCRBT CJDTNS
RU D 15 BACKEMPFEHLUNGEN KONVENTIONELLES BACKEN Klassisches System, bei dem Unter- oder Oberhitzeverwendet wird, die für das Garen nur eines Gerichtsgeeignet ist.Die Speisen sollten möglichst eingeschoben werden,wenn der Backofen bereits die vorgegebene Temperaturerreicht hat, das heißt, nach Erlösc...
Page 16 - Use the grill to grill or brown foods.
GB 16 It is not essential to pre-heat the oven, but you areadvised to do so when cooking pastries. GRILL COOKING Use the grill to grill or brown foods. Symbol Some ovens may be equipped with an electric motor, spitand skewers for turning on the spit.Place the shelf with the food to be cooked in the ...
Page 17 - Zum Grillen oder Bräunen der Speisen.
RU D 17 Ein Vorheizen des Ofens ist eigentlich nicht notwendig,aber für Patisserie dennoch empfehlenswert. GRILLEN Zum Grillen oder Bräunen der Speisen. Symbol Einige Backöfen sind komplett mit Stabmotor undDrehspieß für Spießbraten ausgestattet.Der Rost mit dem Gargut wird in der 1. oder 2. Schiene...
Page 19 - C dtynbkznjh fdnjvfnbxtcrb jnrk/
RU D 19 KÜHLVENTILATOR Der Kühventilator befindet sich auf der oberen Seite desBackofens und dient zur Kühlung sowohl des Einbau-möbels als auch der Backofentüre.Der Ventilator schaltet sich selbstättig ein, wenn dasäußere Gehäuse des Backofens eine Temperatur von60°C überschreitet.Wird der Backofen...
Page 20 - end of cooking time
GB 20 THERMOSTAT Use the thermostat to set the cooking temperature youneed. The thermostat can be adjusted from 50° to 250° C. 0-11 HEAT REGULATOR 0-6 SELECTOR Use these to adjust the heat in the cast iron or glass-ceramic plates. Increase the setting from 0 to 6 or from 0to 11 to raise the temperat...
Page 21 - bestimmte
RU D 21 THERMOSTAT Temperaturregler, mit dem die je nach Gargut geeigneteGartemperatur eingestellt wird, und der auf Tem-peraturen zwischen 50° und 250° C eingestellt werdenkann. ENERGIEREGLER 0-11 UMSCHALTER 0-6 Leistungsregler der elektrischen Platten aus Gusseisenoder Glaskeramik. Bei Erhöhung de...
Page 24 - KEY ELECTRONIC TIMER
GB 24 6 KEY ELECTRONIC TIMER Setting the clock Press the duration key and the end of cooking key simultaneously, then press the +/- keys to set the time. MANUAL OPERATION To start cooking without setting end of cooking time , press the manual key . SETTING ONLY THE DURATION OF COOKING INSEMI-AUTOMAT...
Page 25 - unbestimmte
RU D 25 ELEKTRONISCHEZEITSCHALTUHR MIT 6TASTEN Einstellung der Uhr Gleichzeitig die Tasten für Gardauer und Garende drücken und die Tasten +/- betätigen, bis die gewünschte Uhrzeit eingestellt ist. MANUALBETRIEB Für unbestimmte Garzeiten die Taste Manualbetrieb drücken. HALBAUTOMATISCHER BETRIEB GAR...
Page 26 - To set the; buzzer
GB 26 FULLY AUTOMATIC OPERATION To set the end of cooking time , press the duration key and press the +/- keys to set the duration of cooking. Press the end of cooking key and press the +/- keys to set the time at which you want the oven to switch off.When you finish setting these times, the AUTO sy...
Page 27 - Für; Signalton
RU D 27 AUTOMATIKBETRIEB Für bestimmte Garzeiten. Die Taste für Gardauer drücken und mit den Tasten +/- die erforderliche Garzeit einstellen. Die Taste für Garende drücken und die Uhrzeit einstellen, in der der Backofen ausge-schaltet werden soll.Bei Programmende blinkt das Symbol AUTO und esertönt ...
Page 28 - REPLACING THE OVEN LIGHT; one
GB 28 REPLACING THE OVEN LIGHT IMPORTANT:The oven light must have these precise features:a) it must be able to resist high temperatures (up to 300°C) b) power supply: see V/Hz indicated on data plate.c) power 25W.d) E 14 connection.Before proceeding, disconnect the appliance from themain electricity...
Page 30 - REMOVING THE OVEN DOOR
GB 30 REMOVING THE OVEN DOOR The oven door can be removed quickly and easily. To doso, proceed as follows:- Open the door fully.- Lift the two levers shown in fig.- Close the door as far as the first stop (caused by theraised levers).- Lift the door upwards and outwards to remove it fromits mounting...
Page 31 - AUSBAUEN DER OFENTÜR
RU D 31 AUSBAUEN DER OFENTÜR Die Backofentür kann mühelos ausgebaut werden. Dazufolgendermaßen vorgehen:- die Tür ganz öffnen;- die zwei auf Abb. dargestellten Hebel anheben;- die Tür wieder bis zur ersten, von den zwei zuvorangehobenen Hebeln bestimmten Einrastung schließen;- die Tür nach oben und ...
Page 32 - Flush fitting
GB 32 INSTALLATION INSTRUCTIONS Flush fitting The oven can be installed under a work top or in a cook-ing column. Figure shows the installation dimensions.Make sure that surrounding materials are heat resistant.Align the oven centrally with respect to the side walls ofthe units surrounding it and fi...
Page 33 - Einbau des Backofens; ERFPFYBZ LKZ VJYNTHF; Ecnfyjdrf
RU D 33 FÜR DEN INSTALLATEUR Einbau des Backofens Der Ofen kann unter einem Kochfeld oder in einenSchrank eingebaut werden. Die Einbaumaße müssenden auf der Abbildung dargestellten entsprechen. DasMöbelmaterial muss hitzebeständig sein. Der Backofenmuss zu den Möbelwänden zentriert, und mit denmitge...
Page 34 - ELECTRICAL CONNECTIONS
GB 34 ELECTRICAL CONNECTIONS Before connecting the oven to the mains power supply,make sure that:- The supply voltage corresponds to the specifications onthe data plate on the front of the oven.- The mains supply has an efficient earth (ground) con-nection complying with all applicable laws and re-g...
Page 35 - STROMANSCHLUSS
RU D 35 STROMANSCHLUSS Vor der Durchführung des Stromanschluss muss sicher-gestellt werden, dass:- die Eigenschaften der Stromnetzes mit den Werten aufdem vorne am Ofen angebrachten Typenschildübereinstimmen;- das Stromnetz gemäß den geltenden Bestimmungenund Rechtsvorschriften geerdet ist. Die Erdu...
Page 39 - УСЛОВИЯ ГАРАНТИИ; ГАРАНТИЯ НЕ РАСПРОСТРАНЯЕТСЯ:
1 УСЛОВИЯ ГАРАНТИИ 1. Гарантия на исправное действие прибора действительна на период 12 месяцев со дня покупки прибора (подтверждена оттиском печати пункта розничной продажи и подписью продавца). 2. Фирма - изготовитель обеспечивает безвозмездный ремонт в случае обнаружения в гарантийный период заво...