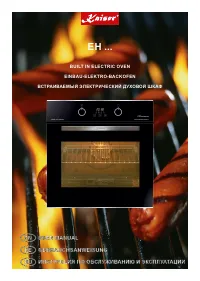
Page 2 - EN
2 EN DEAR CUSTOMERS, we thank to you for the acquisition of our technology. We are convinced that you have made a right choice. This product which satisfies the high quality demands and corresponds to world comprehensive standards realizes your cookeries, and his modern appearance which has been dev...
Page 3 - ВА А
3 DE RU LIEBE KUNDIN, LIEBER KUNDE, wir danken Ihnen für den Erwerb unserer Technik. Wir sind überzeug, dass Sie eine richtige Wahl getroffen haben. Dieses Produkt, das die hohen Forderungen zur Qualität befriedigt und weltumfassenden Standards entspricht, verwirklicht Ihre Kochkünste, und sein mode...
Page 4 - CONTENTS; Touch control
4 EN CONTENTS SAFETY INSTRUCTIONS 6 INSTALLATION INSTRUCTIONS 14 Electrical connection 14 Installation of the oven 16 Preparation 16 BRIEF DESCRIPTION 18 Location drawing 18 Control panel 20 EQUIPMENT 22 Multifunction oven control 22 Operation functions of the oven 26 USAGE 30 Digital clock timer wi...
Page 5 - INHALTSVERZEICHNIS
5 DE RU INHALTSVERZEICHNIS SICHERHEITSHINWEISE 7 FÜR DEN INSTALLATEUR 15 Stromanschluss 15 Einbau des Backofen 17 Vorbereitung 17 KURZBESCHREIBUNG 19 Gesamtansicht 19 Bedienblende 21 AUSSTATUNG 23 Steuerung von Multifunktionsbackofen 23 Betriebsfunktion des Backofens 27 BENUTZUNG 31 Elektronische Ze...
Page 6 - SAFETY INSTRUCTIONS; contains
6 EN SAFETY INSTRUCTIONS This appliance complies with statutory safety requirements. Inappropriate use can, however, lead to personal injury and damage to property. Please read this instruction carefully before using the appliance for the first time, to avoid the risk of accidents and damage of the ...
Page 7 - SICHERHEITSHINWEISE; В щ
7 DE RU SICHERHEITSHINWEISE Dieses Gerät entspricht den vorgeschriebenen Sicherheitsbestimmungen. Ein unsachgemäßer Gebrauch kann jedoch zu Schäden an Personen und Sachen führen. Lesen Sie bitte diese Gebrauchs- und Montageanweisung aufmerksam durch, bevor Sie das Gerät in Betrieb nehmen. Sie enthäl...
Page 9 - DE
9 ! , . Achtung! V or dem Auswechseln der Lampe schalten Sie das Gerät ab, um einen möglichen elektrischen Schlag zu vermeiden. DE RU TECHNISCHE SICHERHEIT Das Gerät darf nur von einer qualifizierten Fachperson eingebaut und angeschlossen werden. Kontrollieren Sie das Gerät auf sichtbare Schäden...
Page 14 - INSTALLATION INSTRUCTIONS; ELECTRICAL CONNECTION
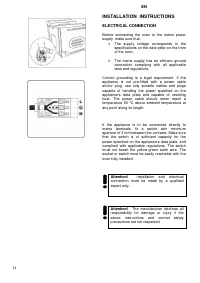
14 EN INSTALLATION INSTRUCTIONS ELECTRICAL CONNECTION Before connecting the oven to the mains power supply, make sure that: The supply voltage corresponds to the specifications on the data plate on the front of the oven. The mains supply has an efficient ground connection complying with all appl...
Page 15 - FÜR DEN INSTALLATEUR; STROMANSCHLUSS
15 DE RU FÜR DEN INSTALLATEUR STROMANSCHLUSS Vor der Durchführung des Stromanschlusses muss sichergestellt werden, dass: die Eigenschaften des Stromnetzes mit den Werten auf dem angebrachten Typenschild auf der hinteren Wand des Backofens übereinstimmen; das Stromnetz gemäß den geltenden Bestimm...
Page 16 - Digital clock timer
16 EN INSTALLATION OF THE OVEN The oven can be installed under a work top or in a cooking column. Figure shows the installation dimensions. Make sure that surrounding materials are heat resistant. Align the oven centrally with respect to the side walls of the units surrounding it and fix it in place...
Page 17 - Elektronische Zeitschaltuhr mit Sensor
17 DE RU EINBAU DES BACKOFENS Der Backofen kann unter eine Arbeitsplatte oder in einen Schrank eingebaut werden. Die Einbaumaße müssen den auf der Abbildung dargestellten Maßen entsprechen. Das Möbelmaterial muss hitzebeständig sein. Der Backofen muss zu den Möbelwänden zentriert und mit den mitgeli...
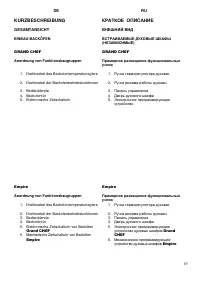
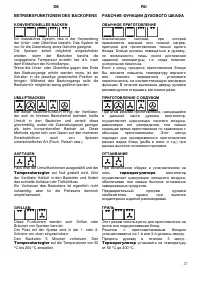
Page 18 - BRIEF DESCRIPTION; LOCATION DRAWING; GRAND CHEF; Arrangement of functional assemblies; Grand
18 EN BRIEF DESCRIPTION LOCATION DRAWING BUILT-IN OVENS GRAND CHEF Arrangement of functional assemblies 1. Rotary knob of the oven temperature regulator 2. Rotary knob of the oven operating functions 3. Control panel 4. Oven door 5. Digital clock timer Empire Arrangement of functional assemblies 1. ...
Page 19 - KURZBESCHREIBUNG; GESAMTANSICHT
19 DE RU KURZBESCHREIBUNG GESAMTANSICHT EINBAU-BACKÖFEN GRAND CHEF Anordnung von Funktionsbaugruppen 1. Drehknebel des Backofentemperaturreglers 2. Drehknebel der Backofenbetriebsfunktionen 3. Bedienblende 4. Backofentür 5. Elektronische Zeitschaltuhr Empire Anordnung von Funktionsbaugruppen 1. Dreh...
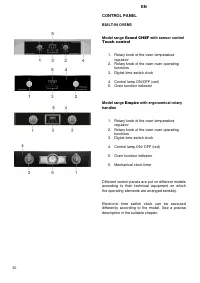
Page 20 - Grand CHEF; with sensor control; with ergonomical rotary
20 EN CONTROL PANEL BUILT-IN OVENS Model range Grand CHEF with sensor control Touch control 1. Rotary knob of the oven temperature regulator 2. Rotary knob of the oven oven operating functions 3. Digital time switch clock 4. Control lamp ON/OFF (red) 5. Oven function indicator Model range Empire wit...
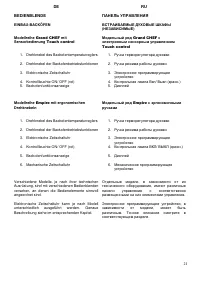
Page 21 - Modellreihe
21 DE RU BEDIENBLENDE EINBAU-BACKÖFEN Modellreihe Grand CHEF mit Sensorbedienung Touch control 1. Drehknebel des Backofentemperaturreglers 2. Drehknebel der Backofenbetriebsfunktionen 3. Elektronische Zeitschaltuhr 4. Kontrollleuchte ON/ OFF (rot) 5. Backofenfunktionsanzeige Modellreihe Empire mit e...
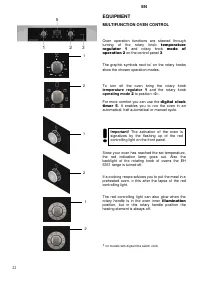
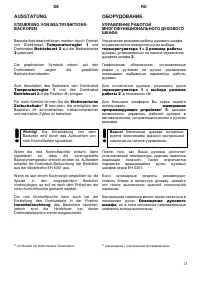
Page 22 - EQUIPMENT; MULTIFUNCTION OVEN CONTROL; temperature regulator
22 EN EQUIPMENT MULTIFUNCTION OVEN CONTROL Oven operation functions are steered through turning of the rotary knob temperature regulator 1 and rotary knob mode of operation 2 on the control panel 3 . The graphic symbols next to/ on the rotary knobs show the chosen operation modes. To turn off the ov...
Page 23 - AUSSTATUNG; STEUERUNG VON MULTIFUNKTIONS-
23 DE RU AUSSTATUNG STEUERUNG VON MULTIFUNKTIONS- BACKOFEN Backofenbetriebsfunktionen werden durch Drehen von Drehknebel Temperaturregler 1 und Drehknebel Betriebsart 2 auf der Bedienblende 3 gesteuert. Die graphischen Symbole neben/ auf den Drehknebeln zeigen die gewählten Backofenbetriebarten. Zum...
Page 24 - Empire
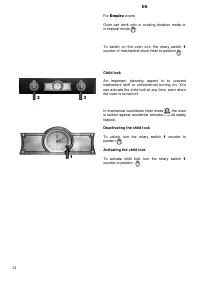
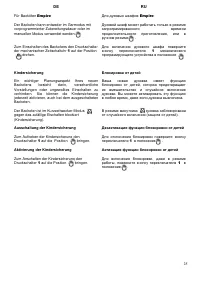
24 EN For Empire ovens Oven can work only in cooking duration mode or in manual mode . To switch on the oven turn the rotary switch 1 counter of mechanical clock timer to position . Child lock An important planning aspect is to prevent inadvertent shift or unintentional turning on. You can activate ...
Page 25 - Ausschaltung der Kindersicherung
25 DE RU Für Backöfen Empire Der Backofen kann entweder im Garmodus mit vorprogrammierter Zubereitungsdauer oder im manuellen Modus verwendet werden Zum Einschalten des Backofens den Druckschalter der mechanischen Zeitschaltuhr 1 auf der Position drehen. Kindersicherung Ein wichtiger Planungsaspekt ...
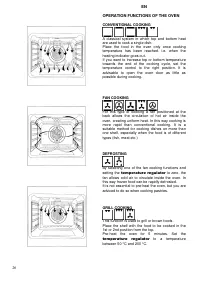
Page 26 - CONVENTIONAL COOKING; GRILL COOKING; temperature
26 EN OPERATION FUNCTIONS OF THE OVEN CONVENTIONAL COOKING A classical system in which top and bottom heat are used to cook a single dish. Place the food in the oven only once cooking temperature has been reached, i.e. when the heating indicator goes out. If you want to increase top or bottom temper...
Page 27 - KONVENTIONELLES BACKEN; GRILLEN; Temperaturregler
27 DE RU BETRIEBSFUNKTIONEN DES BACKOFENS KONVENTIONELLES BACKEN Ein klassisches System, das in der Verwendung der Unter- oder Oberhitze besteht. Das System ist nur für die Zubereitung eines Gerichts geeignet. Die Speisen sollen möglichst eingeschoben werden, wenn der Backofen bereits die vorgegeben...
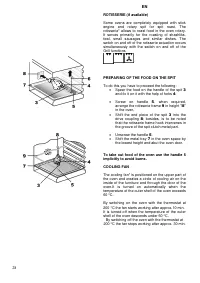
Page 28 - PREPARING OF THE FOOD ON THE SPIT; II; To take out food of the oven use the handle 5
28 EN ROTISSERIE (if available) Some ovens are completely equipped with stick engine and rotary spit for spit roast. The rotisserie* allows to roast food in the oven rotary. It serves primarily for the roasting of shashliks, fowl, small sausages and similar dishes. The switch on and off of the rotis...
Page 29 - an der Höhe „
29 DE RU DREHSPIEß (wenn verfügbar) Einige Backöfen sind komplett mit Stabmotor und Drehspieß für das Spießbraten ausgestattet. Der Spieß* erlaubt es, die Speisen im Backofen rotierend zu rösten. Er dient hauptsächlich zum Rösten von Schaschliks, Geflügel, Würstchen u.ä. Speisen. Die Ein- und Aussch...
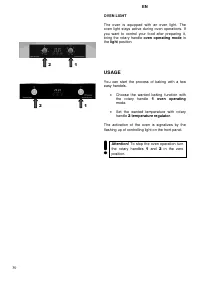
Page 30 - OVEN LIGHT; USAGE; oven operating
30 EN OVEN LIGHT The oven is equipped with an oven light. The oven light stays active during oven operations. If you want to control your food after preparing it, bring the rotary handle oven operating mode in the light position. USAGE You can start the process of baking with a few easy handels. C...
Page 31 - INNENBELEUCHTUNG; BENUTZUNG; Backofenbetriebsart
31 DE RU INNENBELEUCHTUNG Der Backofen ist mit der Innenbeleuchtung ausgestattet. Die Innenbeleuchtung bleibt während des Betriebes von dem Backofen aktiv. Wenn Sie nach Zubereitung Ihr Gericht kontrollieren möchten, dann stellen Sie den Drehknebel Backofenbetriebsart in die Position Licht. BENUTZUN...
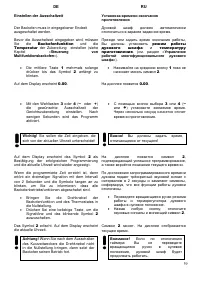
Page 32 - OF THE OVENS; Setting the clock
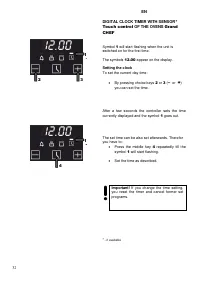
32 EN DIGITAL CLOCK TIMER WITH SENSOR * Touch control OF THE OVENS Grand CHEF Symbol 1 will start flashing when the unit is switched on for the first time. The symbols 12.00 appear on the display. Setting the clock To set the current day time: By pressing choice keys 2 or 3 ( – or + ) you can set ...
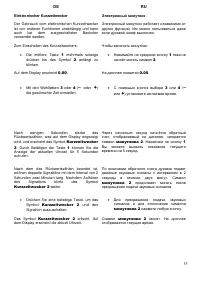
Page 33 - VON BACKÖFEN; Uhrzeiteinstellung; Touch
33 DE RU ELEKTRONISCHE ZEITSCHALUHR MIT SENSOR-BEDIENUNG * Touch control VON BACKÖFEN Grand CHEF Wird die Uhr zum ersten Mal eingeschaltet, blinkt das Symbol 1 . Auf dem Display erscheint 12.00 . Uhrzeiteinstellung Zur Einstellung der aktuellen Uhrzeit: Mit den Wahltasten 2 oder 3 ( – oder + ) die...
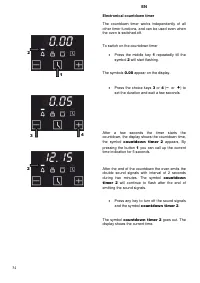
Page 34 - Electronical countdown timer; countdown timer
34 EN Electronical countdown timer The countdown timer works independently of all other timer functions, and can be used even when the oven is switched off. To switch on the countdown timer Press the middle key 1 repeatedly till the symbol 2 will start flashing. The symbols 0.00 appear on the disp...
Page 35 - Elektronischer Kurzzeitwecker; Kurzzeitwecker
35 DE RU Elektronischer Kurzzeitwecker Der Gebrauch vom elektronischen Kurzzeitwecker ist von anderen Funktionen unabhängig und kann auch bei dem ausgeschalteten Backofen verwendet werden. Zum Einschalten des Kurzzeitweckers: Die mittlere Taste 1 mehrmals solange drücken bis das Symbol 2 anfängt z...
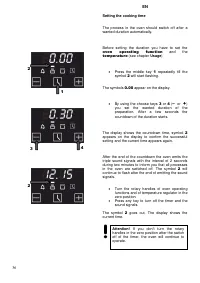
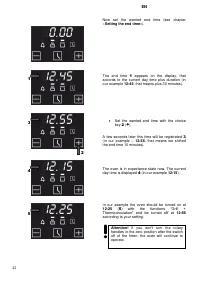
Page 36 - Setting the cooking time; oven; Usage
36 EN Setting the cooking time The process in the oven should switch off after a wanted duration automatically. Before setting the duration you have to set the oven operating function and the temperature (see chapter Usage ) Press the middle key 1 repeatedly till the symbol 2 will start flashing. ...
Page 37 - Einstellen der Betriebsdauer; Backofenfunktion; Benutzung
37 DE RU Einstellen der Betriebsdauer Der Vorgang im Backofen soll nach einer gewünschten Dauer automatisch abgeschaltet werden. Bevor die Dauer der Gerichtszubereitung eingegeben wird, müssen Sie die Backofenfunktion und die Temperatur der Zubereitung einstellen (siehe Kapitel Benutzung ). Die mi...
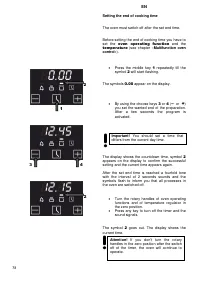
Page 38 - Setting the end of cooking time; oven operating function; Multifunction oven
38 EN Setting the end of cooking time The oven must switch off after the set end time. Before setting the end of cooking time you have to set the oven operating function and the temperature (see chapter « Multifunction oven control» ). Press the middle key 1 repeatedly till the symbol 2 will start...
Page 39 - Einstellen der Ausschaltzeit; »Steuerung
39 DE RU Einstellen der Ausschaltzeit Der Backofen muss in eingegebener Endzeit ausgeschaltet werden. Bevor die Ausschaltzeit eingegeben wird, müssen Sie die Backofenfunktion und die Temperatur der Zubereitung einstellen (siehe Kapitel »Steuerung von Multifunktionsbackofen« ). Die mittlere Taste 1...
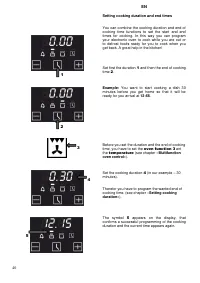
Page 40 - Setting cooking duration and end times; oven function 3; Multifunction
40 EN Setting cooking duration and end times You can combine the cooking duration and end of cooking time functions to set the start and end times for cooking. In this way you can program your electronic oven to cook while you are out or to defrost foods ready for you to cook when you get back. A gr...
Page 41 - Einstellen der Betriebsdauer und Ausschaltzeit; und „Ausschaltzeit“ kombinieren, wobei Sie eine
41 DE RU Einstellen der Betriebsdauer und Ausschaltzeit Sie können die beiden Funktionen "Betriebsdauer" und „Ausschaltzeit“ kombinieren, wobei Sie eine gewünschte Zeit eingeben, um den Backofen ein- und auszuschalten. So können Sie Ihren Backofen für die Zeit programmieren, wenn Sie nicht z...
Page 42 - Setting the end time»; Thermocirculation” and be turned off at
42 EN Now set the wanted end time (see chapter « Setting the end time» ). The end time 1 appears on the display, that accords to the current day time plus duration (in our example 12:45 , that means plus 30 minutes). Set the wanted end time with the choice key 2 ( + ). A few seconds later this tim...
Page 43 - »Einstellen der; den Funktionen „Grill + Thermozirkulation“
43 DE RU Programmieren Sie jetzt die gewünschte Ausschaltzeit (siehe Kapitel »Einstellen der Ausschaltzeit« ). Auf dem Display erscheint die Ausschaltzeit 1 , die der aktuellen Tageszeit plus Betriebsdauer entspricht (in unserem Fall 12:45 , d.h. plus 30 Minuten). Mit der Wahltaste 2 ( + ) die gew...
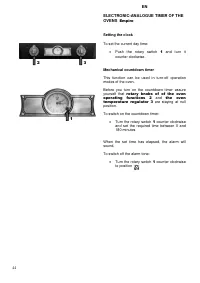
Page 44 - rotary knobs of of the oven
44 EN ELECTRONIC-ANALOGUE TIMER OF THE OVENS Empire Setting the clock To set the current day time: Push the rotary switch 1 and turn it counter clockwise. Mechanical countdown timer This function can be used in turn-off operation modes of the oven. Before you turn on the countdown timer assure you...
Page 45 - Mechanischer Kurzzeitwecker; Drehknebel der
45 DE RU ELEKTRONISCH-ANALOGE ZEITSCHALTUHR VON BACKÖFEN Empire Tageszeiteinstellung Zur Einstellung der aktuellen Uhrzeit: Den Drehknopf 1 drücken und gegen Uhrzeigersinn drehen. Mechanischer Kurzzeitwecker Diese Funktion kann verwendet werden, wenn alle Funktionen außer Betrieb sind. Bevor Sie d...
Page 46 - operating function
46 EN Setting the cooking duration The oven must switch off after the set duration. Before setting the end of cooking time you have to set the oven operating function and the temperature (see chapter « Multifunction oven control» ). Turn the rotary switch 1 counter clockwise and set the duration o...
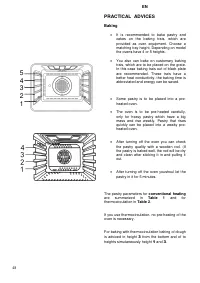
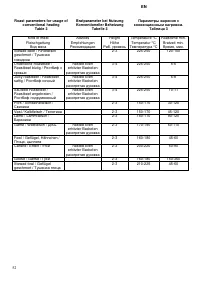
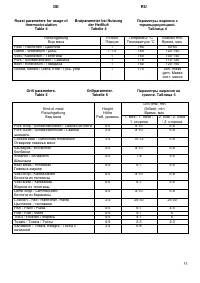
Page 48 - PRACTICAL ADVICES; conventional heating
48 EN 5 4 3 2 1 PRACTICAL ADVICES Baking It is recommended to bake pastry and cakes on the baking trais, which are provided as oven equipment. Choose a matching tray height. Depending on model the ovens have 4 or 5 heights. You also can bake on customary baking trais, which are to be placed on t...
Page 49 - PRAKTISCHE EMPFEHLUNGEN; konventioneller
49 DE RU PRAKTISCHE EMPFEHLUNGEN Backen Es wird empfohlen, die Gebäcke und Kuchen auf den Backblechen zu backen, die als Herdausrüstung mitgeliefert sind. Wählen Sie eine passende Höhe für die Backbleche. Je nach Modell verfügen die Backöfen über 4 bzw. 5 Höhen. Backen ist auch in den handelsübl...
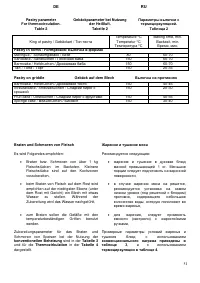
Page 54 - refill water while preparing. (Don’t sparkle the
54 EN Note! The shown parameters concern roasting on the grid. If you use closed jars the temperature is to be set to 200 °C. After the run off of the predetermined halftime the meat should be reversed. It is more advantageousto roast bigger meat shares. Baste the meat with gravy while roasting. It ...
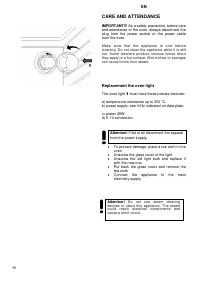
Page 56 - CARE AND ATTENDANCE; Replacement the oven light
56 EN CARE AND ATTENDANCE IMPORTANT!!! As a safety precaution, before care and attendance of the oven, always disconnect the plug from the power socket or the power cable from the oven. Make sure that the appliance is cool before cleaning. Do not clean the appliance while it is still hot. Some clean...
Page 57 - PFLEGE UND WARTUNG; Austausch der Ofenbeleuchtung
57 DE RU PFLEGE UND WARTUNG WICHTIG!!! Als Sicherheitsvorkehrung soll vor jeder Pflege- und Wartungarbeit des Backofens immer das Stromnetz abgeschaltet werden. Vergewissern Sie sich, dass das Gerät vor dem Beginn der Reinigung abgekühlt ist. Reinigen Sie das Gerät nicht, solange es noch heiß ist. E...
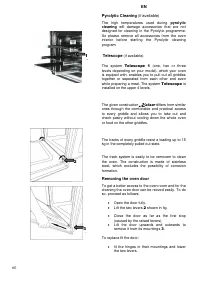
Page 60 - pyrolytic; Telescope; Kaiser; Removing the oven door
60 EN Pyrolytic Cleaning (if available) The high temperatures used during pyrolytic cleaning will damage accessories that are not designed for cleaning in the Pyrolytic programme. So please remove all accessories from the oven interior before starting the Pyrolytic cleaning program. Telescope (if av...
Page 61 - Teleskop; Ausbauen der Ofentür
61 DE RU Pyrolyse-Reinigung (falls vorhanden) Durch die hohen Temperaturen bei der Pyrolyse-Reinigung wird nicht pyrolysetaugliches Zubehör beschädigt. Nehmen Sie sämtliches nicht pyrolysetaugliches Zubehör aus dem Garraum heraus, bevor Sie die Pyrolyse-Reinigung starten. Teleskop (falls vorhanden) ...
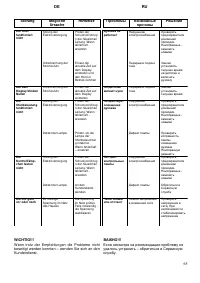
Page 64 - Error; If despite of the recommendation the problems could
64 EN Error Possible reason Advices IMPORTANT!!! If despite of the recommendation the problems could not be abolished – contact the customer service. Oven does n’t work Disturbance in power supply Interruption of the stream supply Check the protection device of your home conduction. If defective - r...
Page 65 - Störung; Wenn trotz der Empfehlungen die Probleme nicht
65 DE RU Störung Mögliche Ursache Hinweise WICHTIG!!! Wenn trotz der Empfehlungen die Probleme nicht beseitigt werden konnten – wenden Sie sich an den Kundendienst. Der Ofen funktioniert nicht Sörung der Elektroversorgung Unterbrechung der Stromzufuhr Prüfen der Schutzvorrichtug n der häuslichen Lei...
Page 66 - RESPECT FOR THE ENVIRONMENT; Disposing of the packaging
66 EN RESPECT FOR THE ENVIRONMENT The documentation provided with this oven has been printed on chlorine free bleached paper or recycled paper to show respect for the environment. The packaging has also been designed to avoid environmental impact. Packaging material is ecological and can be re-used ...
Page 67 - UMWELTVERTRÄGLICHKEIT; Verpackungsentsorgung; Recycling von Verpackungsmaterialien spart die; Entsorgung der Altgeräte
67 DE RU UMWELTVERTRÄGLICHKEIT Als Beitrag zum Umweltschutz wurde die Dokumentation zum diesen Geräts auf einem chlorfrein und gebleichten oder Recycling-Papier gedruckt. Bei der Herstellung der Verpackung wurde auf die Umweltverträglichkeit Wert gelegt. Die Verpackung kann gesammelt oder recycelt w...
Page 68 - GARANTIEBEDINGUNGEN FÜR HAUSHALTSGERÄTE:; GARANTIE GILT NICHT FÜR:
GARANTIEBEDINGUNGEN FÜR HAUSHALTSGERÄTE: 1. Die Garantie für das einwandfreie Funktionieren des Geräts ist für die Dauer von 24 Monaten gültig, gerechnet von dem Tag des Kaufs (es ist jeweils die Rechnung und der Kaufbeleg mit Kauf- und/oder Lieferdatum vorzulegen). Bei Nichtvorlage ist die Reparatu...
Page 69 - WARRANTY CONDITIONS FOR HOME APPLIANCES; WARRANTY NOT VALID WHEN:
WARRANTY CONDITIONS FOR HOME APPLIANCES 1. The warranty for a broken part is valid for the full period of 24 months from the day of purchase. 2. The manufacturer only covers the servicing in the event of a manufacturer fault, such as but not limited to: inappropriate design, installation by technici...
Page 70 - CONDITIONS DE GARANTIE POUR LES APPAREILS ÉLECTROMÉNAGERS
CONDITIONS DE GARANTIE POUR LES APPAREILS ÉLECTROMÉNAGERS 1. La garantie pour le bon fonctionnement de l'appareil est valable pour une période de 24 mois à compter de la date d'achat (la facture et la preuve d'achat avec la date d'achat et / ou de livraison doivent être présentées). S'il n'est pas p...
Page 71 - УСЛОВИЯ ГАРАНТИИ; ГАРАНТИЯ НЕ РАСПРОСТРАНЯЕТСЯ:
УСЛОВИЯ ГАРАНТИИ 1. Гарантия на исправное действие прибора на территории России действительна на период 12 месяцев со дня покупки прибора (подтверждена оттиском печати пункта розничной продажи и подписью продавца). 2. Фирма-изготовитель обеспечивает безвозмездный ремонт в случае обнаружения в гарант...
Page 72 - ГАРАНТІЯ НЕ РОЗПОВСЮДЖУЄТЬСЯ:
ГАРАНТІЙНІ УМОВИ 1. Гарантія на справну роботу пристрою є дійсною на період 12 місяців з дня придбання приладу (підтверджена відбитком печатки пункту роздрібної торгівлі ті підписом продавця). 2. Фірма-виробник забезпечує безкоштовний ремонт в разі виявлення у гарантійний період заводського дефекту ...
Page 74 - ServicePoint International GmbH; ESECO; Service Center – Haushaltsgeräte; SFG; Societe Francaise de Garantie
SPI-Kundendienst ServicePoint International GmbH Thunbuschstr. 8 D-42781 Haan Tel.: +49 (0)2104-9640-0 Fax.: +49 (0)2104-9640-20 E-Mail: [email protected] Internet: www.spi-kundendienst.de ESECO Service Center – Haushaltsgeräte Wienerbergstr. 11/12 A, 1100 Wien, Austria Tel.: +43 1 5967946 Fax.: +43...
Page 75 - CARTE DE GARANTIE; und Reparatur der Geräte zuständig sind, finden Sie in der Anlage.
GARANTIEKARTE (Nr. entspricht der Nummer des Geräts, siehe auf der Rückseite dieser Bedienungsanleitung) Die oben angegebenen Garantieverpflichtungen beeinträchtigen nicht die gesetzlichen Verbraucherrechte Wir gratulieren Ihnen zur Anschaffung der Haushaltsgeräte von ausgezeichneter Qualität! Bitte ...
Page 76 - Вітаємо Вас з придбанням побутової техніки відмінної якості!
ГАРАНТИЙНЫЙ ТАЛОН (№. соответствует номеру аппарата, смотри на задней странице обложки настоящей инструкции) Данные гарантийные обязательства не ограничивают определенные законом права потребителей Поздравляем Вас с приобретением бытовой техники отличного качества! Пожалуйста ознакомьтесь с настоящи...
Page 80 - OLAN-Haushaltsgeräte • Berlin • Germany
OLAN-Haushaltsgeräte • Berlin • Germany www.kaiser-olan.de