Page 2 - D RU; УВАЖАЕМЫЙ
3 D RU LIEBE KUNDIN, LIEBER KUNDE, wir danken Ihnen für den Erwerb unserer Technik. Wir sind überzeug, dass Sie eine richtige Wahl getroffen haben. Dieses Produkt, das die hohen Forderungen zur Qualität befriedigt und weltumfassenden Standards entspricht, verwirklicht Ihre Kochkünste, und sein moder...
Page 3 - EN; INSTALLATION INSTRUCTIONS; Electrical connection
4 EN CONTENTS INSTALLATION INSTRUCTIONS 6 Electrical connection 6 Installation of the oven 8 Preparation 8 BRIEF DESCRIPTION 10 Location drawing 10 Control panel 12 EQUIPMENT 16 Cooking zones control 16 Multifunction oven control 18 Operation functions of the oven 20 USAGE 24 Digital clock timer of ...
Page 4 - FÜR DEN INSTALLATEUR; mit; PRAKTISCHE EMPFEHLUNGEN; ОГЛАВЛЕНИЕ
5 D RU INHALTSVERZEICHNIS FÜR DEN INSTALLATEUR 7 Stromanschluss 7 Einbau des Backofen 9 Vorbereitung 9 KURZBESCHREIBUNG 11 Gesamtansicht 11 Bedienblende 13 AUSSTATUNG 17 Kochfeldersteuerung 17 Steuerung von Multifunktionsbackofen 19 Betriebsfunktion des Backofens 21 BENUTZUNG 25 Elektronische Zeitsc...
Page 5 - INSTALLATION INSTRUCTIONS; ELECTRICAL CONNECTION; The supply voltage corresponds to the
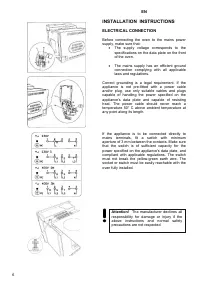
6 EN INSTALLATION INSTRUCTIONS ELECTRICAL CONNECTION Before connecting the oven to the mains power supply, make sure that: • The supply voltage corresponds to the specifications on the data plate on the front of the oven. • The mains supply has an efficient ground connection complying with all appli...
Page 6 - FÜR DEN INSTALLATEUR; STROMANSCHLUSS; die Eigenschaften des Stromnetzes mit den; ИНСТРУКЦИЯ; ПОДКЛЮЧЕНИЕ; Внимание; Der Hersteller ist nicht haftbar,
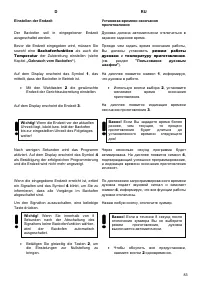
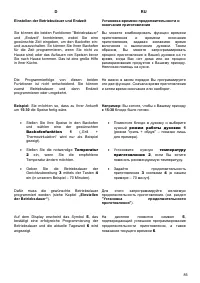
7 D RU FÜR DEN INSTALLATEUR STROMANSCHLUSS Vor der Durchführung des Stromanschlusses muss sichergestellt werden, dass: • die Eigenschaften des Stromnetzes mit den Werten auf dem angebrachten Typenschild auf der hinteren Wand des Backofens übereinstimmen; • das Stromnetz gemäß den geltenden Bestimmun...
Page 7 - You must set the time on the; “Digital clock timer“; If the time is not set, the oven will not work.
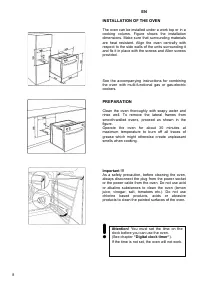
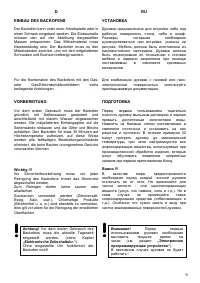
8 EN INSTALLATION OF THE OVEN The oven can be installed under a work top or in a cooking column. Figure shows the installation dimensions. Make sure that surrounding materials are heat resistant. Align the oven centrally with respect to the side walls of the units surrounding it and fix it in place ...
Page 8 - Важно; Vor dem ersten Gebrauch des; „Elektronische Zeitschaltuhr.“
9 D RU EINBAU DES BACKOFENS Der Backofen kann unter einer Arbeitsplatte oder in einen Schrank eingebaut werden. Die Einbaumaße müssen den auf der Abbildung dargestellten Massen entsprechen. Das Möbelmaterial muss hitzebeständig sein. Der Backofen muss zu den Möbelwänden zentriert, und mit den mitgel...
Page 9 - BRIEF DESCRIPTION
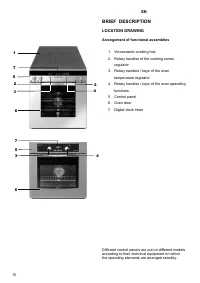
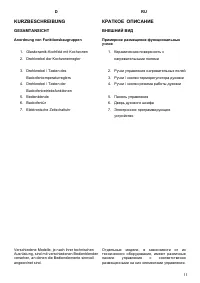
10 EN BRIEF DESCRIPTION LOCATION DRAWING Arrangement of functional assemblies 1. Vitroceramic cooking hob 2. Rotary handles of the cooking zones regulator 3. Rotary handles / keys of the oven temperature regulator 4. Rotary handles / keys of the oven operating functions 5. Control panel 6. Oven door...
Page 10 - RU; KURZBESCHREIBUNG; Drehknebel der Kochzonenregler; КРАТКОЕ; ВНЕШНИЙ; Примерное
11 D RU KURZBESCHREIBUNG GESAMTANSICHT Anordnung von Funktionsbaugruppen 1. Glaskeramik-Kochfeld mit Kochzonen 2. Drehknebel der Kochzonenregler 3. Drehknebel / Tasten des Backofentemperaturreglers 4. Drehknebel / Tasten der Backofenbetriebsfunktionen 5. Bedienblende 6. Backofentür 7. Elektronische ...
Page 11 - Control Panels of the models; temperature regulator; Control panels of the models; Full; with sensor
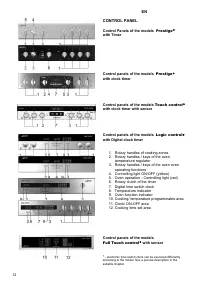
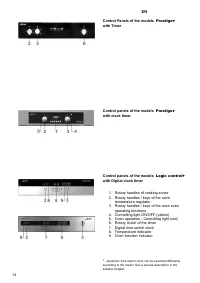
12 EN CONTROL PANEL Control Panels of the models Prestige* with Timer Control panels of the models Prestige* with clock timer Control panels of the models Touch control* with clock timer with sensor Control panels of the models Logic control* with Digital clock timer 1. Rotary handles of cooking zon...
Page 12 - Backofentemperaturreglers; Bedienblende von Modellen; mit elektronischer Zeitschaltuhr mit; ПАНЕЛЬ
13 D RU BEDIENBLENDE Bedienblende von Modellen Prestige* mit Kurzzeitwecker Bedienblende von Modellen Prestige* mit elektronischer Zeitschaltuhr Bedienblende von Modellen Touch control * mit elektronischer Zeitschaltuhr mit Sensorbedienung Bedienblende von Modellen Logic control* mit elektronischer ...
Page 15 - EQUIPMENT; Push
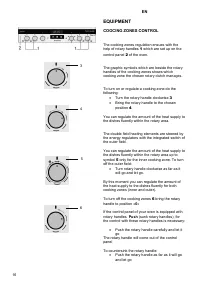
16 EN EQUIPMENT COOCING ZONES CONTROL The cooking zones regulation ensues with the help of rotary handles 1 which are set up on the control panel 2 of the oven. The graphic symbols which are beside the rotary handles of the cooking zones shows which cooking zone the chosen rotary clutch manages. To ...
Page 16 - AUSSTATUNG; ОБОРУДОВАНИЕ; УПРАВЛЕНИЕ
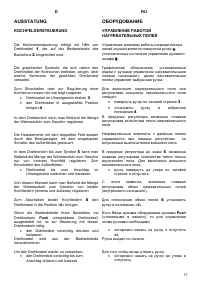
17 D RU AUSSTATUNG KOCHFELDERSTEUERUNG Die Kochzonensteuerung erfolgt mit Hilfe von Drehknebel 1 , die auf der Bedienblende des Backofens 2 eingerichtet sind. Die graphischen Symbole, die sich neben den Drehknebel der Kochzonen befinden, zeigen, über welche Kochzone der gewählten Drehknebel verwalte...
Page 19 - CONVENTIONAL COOKING; GRILL COOKING; temperature
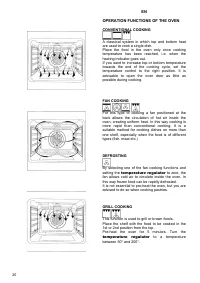
20 EN OPERATION FUNCTIONS OF THE OVEN CONVENTIONAL COOKING A classical system in which top and bottom heat are used to cook a single dish. Place the food in the oven only once cooking temperature has been reached, i.e. when the heating indicator goes out. If you want to increase top or bottom temper...
Page 20 - KONVENTIONELLES BACKEN; Falls eine der Umluftfunktionen ausgewählt und der; GRILLEN; Temperaturregler; РАБОЧИЕ; терморегуляторе
21 D RU BETRIEBSFUNKTIONEN DES BACKOFENS KONVENTIONELLES BACKEN Ein klassisches System, bei dem Unter- oder Oberhitze verwendet werden, die für die Zubereitung nur eines Gerichts geeignet ist. Die Speisen sollten möglichst eingeschoben werden, wenn der Backofen bereits die vorgegebene Temperatur err...
Page 21 - SPIT; or; No separate controlling rotary
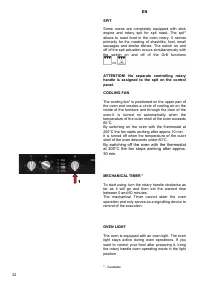
22 EN SPIT Some ovens are completely equipped with stick engine and rotary spit for spit roast. The spit* allows to roast food in the oven rotary. It serves primarily for the roasting of shashliks, fowl, small sausages and similar dishes. The switch on and off of the spit actuation occurs simultaneo...
Page 22 - DREHESPIESS; Ausschaltung von Grillfunktionen; MECHANISCHER KURZZEITWECKER; in die Position
23 D RU DREHESPIESS Einige Backöfen sind komplett mit Stabmotor und Drehspieß für Spießbraten ausgestattet. Der Spieß* erlaubt es, Speisen im Backofen rotierend zu rösten. Er dient hauptsächlich zum Rösten von Schaschliks, Geflügel, Würstchen u.ä. Speisen. Die Ein- und Ausschaltung vom Spießantrieb ...
Page 23 - USAGE; oven operating; II; To take out food of the oven use the handle
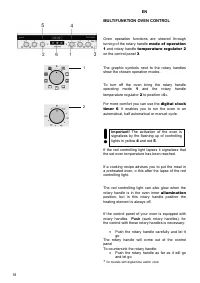
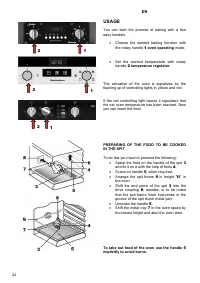
24 EN USAGE You can start the process of baking with a few easy handels. • Choose the wanted baking function with the rotary handle 1 oven operating mode. • Set the wanted temperature with rotary handle 2 temperature regulator . The activation of the oven is signalizes by the flashing up of controll...
Page 24 - BENUTZUNG; Backofenbetriebsart; Verbrennung zu vermeiden.; ИСПОЛЬЗОВАНИЕ
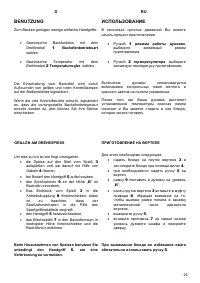
25 D RU BENUTZUNG Zum Backen genügen wenige einfache Handgriffe. • Gewünschte Backfunktion mit dem Drehknebel 1 Backofenbetriebsart wählen. • Gewünschte Temperatur mit dem Drehknebel 2 Temperaturregler wählen. Die Einschaltung vom Backofen wird durch Aufleuchten von gelben und roten Kontrolllampen a...
Page 25 - Prestige; Setting the clock
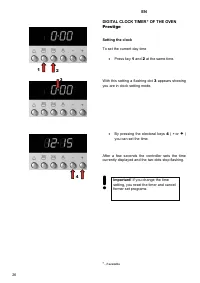
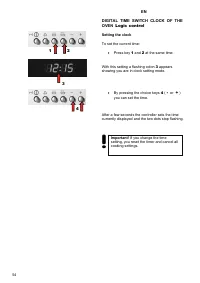
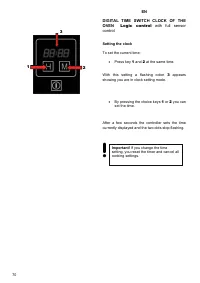
26 EN DIGITAL CLOCK TIMER * OF THE OVEN Prestige Setting the clock To set the current day time • Press key 1 and 2 at the same time. With this setting a flashing dot 3 appears showing you are in clock setting mode. • By pressing the electoral keys 4 ( - or + ) you can set the time. After a few secon...
Page 26 - ЭЛЕКТРОННОЕ; Установка
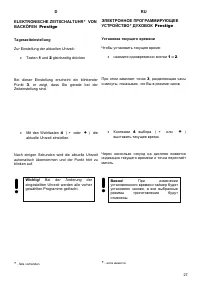
27 D RU ELEKTRONISCHE ZEITSCHALTUHR * VON BACKÖFEN Prestige Tageszeiteinstellung Zur Einstellung der aktuellen Uhrzeit: • Tasten 1 und 2 gleichzeitig drücken Bei dieser Einstellung erscheint ein blinkender Punkt 3 , er zeigt, dass Sie gerade bei der Zeiteinstellung sind. • М it den Wahltasten 4 ( - ...
Page 27 - Electronical countdown timer
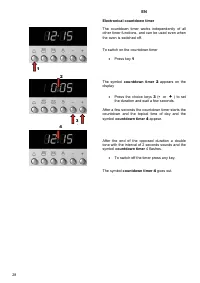
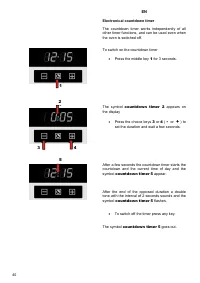
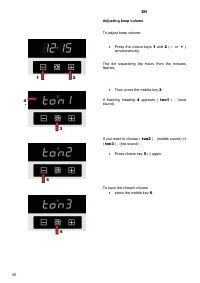
28 EN Electronical countdown timer The countdown timer works independently of all other timer functions, and can be used even when the oven is switched off. To switch on the countdown timer • Press key 1 The symbol countdown timer 2 appears on the display • Press the choice keys 3 ( - or + ) to set ...
Page 28 - Elektronischer Kurzzeitwecker; Kurzzeitwecker 2; Электронный; минутника
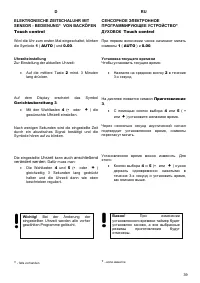
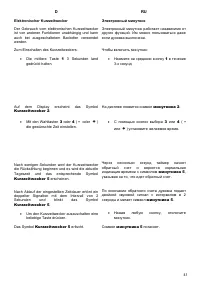
29 D RU Elektronischer Kurzzeitwecker Der Gebrauch vom elektronischen Kurzzeitwecker ist von anderen Funktionen unabhängig und kann auch bei ausgeschaltetem Backofen verwendet werden. Zum Einschalten des Kurzzeitweckers: • Taste 1 drücken Auf dem Display erscheint das Symbol Kurzzeitwecker 2 . • Mit...
Page 29 - “Cooking”
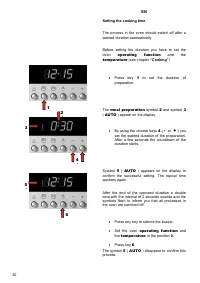
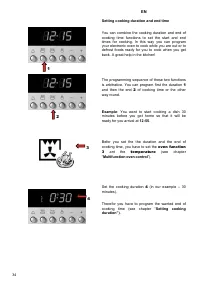
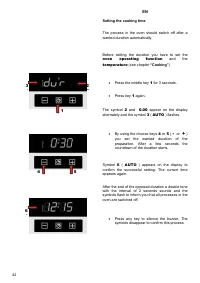
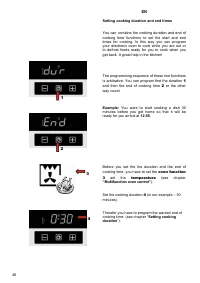
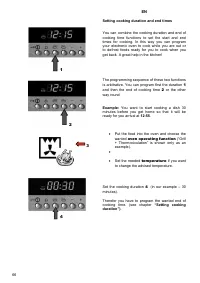
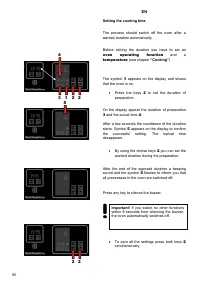
30 EN Setting the cooking time The process in the oven should switch off after a wanted duration automatically. Before setting the duration you have to set the oven operating function and the temperature (see chapter “Cooking” ) • Press key 1 to set the duration of preparation. The meal preparation ...
Page 30 - „Gebrauch; das Symbol
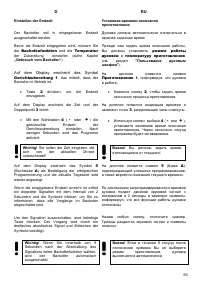
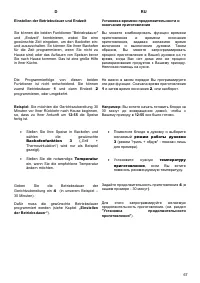
31 D RU Einstellen der Betriebsdauer Der Vorgang im Backofen soll nach einer gewünschten Dauer automatisch abgeschaltet werden. Bevor die Dauer der Gerichtszubereitung eingegeben wird, müssen Sie die Backofenfunktion und die Temperatur der Zubereitung einstellen (siehe Kapitel „Gebrauch vom Backofen...
Page 31 - Cooking
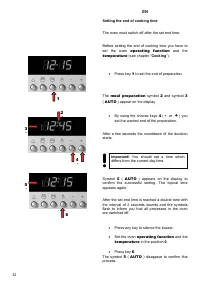
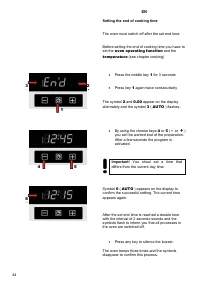
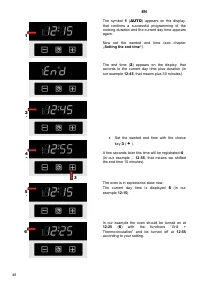
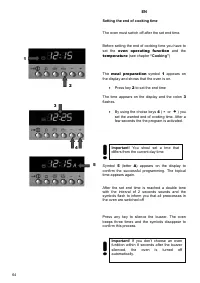
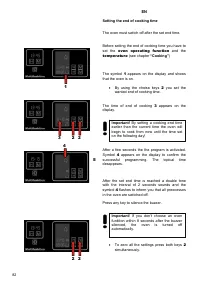
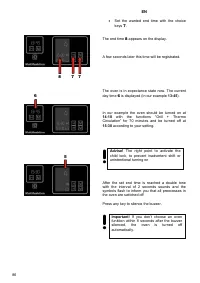
32 EN Setting the end of cooking time The oven must switch off after the set end time. Before setting the end of cooking time you have to set the oven operating function and the temperature (see chapter “ Cooking ”). • Press key 1 to set the end of preparation. The meal preparation symbol 2 and symb...
Page 32 - „Gebrauch vom Backofen“
33 D RU Einstellen der Endzeit Der Backofen muss in eingegebener Endzeit ausgeschaltet werden. Bevor die Endzeit eingegeben wird, müssen Sie die Backofenfunktion und die Temperatur der Zubereitung einstellen (siehe Kapitel „Gebrauch vom Backofen“ ). • Taste 1 drücken, um die Endzeit einzugeben. Auf ...
Page 33 - and then the end; Example; : You want to start cooking a dish 30; Multifunction oven control; (in our example – 30; Setting cooking
34 EN Setting cooking duration and end time You can combine the cooking duration and end of cooking time functions to set the start and end times for cooking. In this way you can program your electronic oven to cook while you are out or to defrost foods ready for you to cook when you get back. A gre...
Page 34 - Backofenfunktion 3; Steuerung; режим
35 D RU Einstellen der Betriebsdauer und Endzeit Sie können die beiden Funktionen „Betriebsdauer“ und „Endzeit“ kombinieren, wobei Sie eine gewünschte Zeit eingeben, um den Backofen ein- und auszuschalten. So können Sie Ihren Backofen für die Zeit programmieren, wenn Sie nicht zu Hause sind; oder da...
Page 35 - AUTO; “Setting the end time”
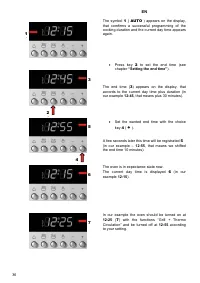
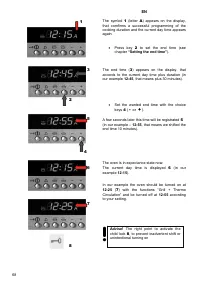
36 EN The symbol 1 ( AUTO ) appears on the display, that comfirms a successful programming of the cooking duration and the current day time appears again. • Press key 2 to set the end time (see chapter “Setting the end time” ). The end time ( 3 ) appears on the display, that accords to the current d...
Page 36 - „Einstellen der
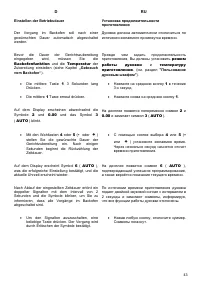
37 D RU Auf dem Display erscheint das Symbol 1 ( AUTO ), das bestätigt eine erfolgreiche Programmierung der Betriebsdauer und die aktuelle Tageszeit wird wieder angezeigt. • Die Taste 2 drücken, um die Endzeit einzugeben (siehe Kapitel „Einstellen der Endzeit“ ). Auf dem Display erscheint die Endzei...
Page 37 - Touch control
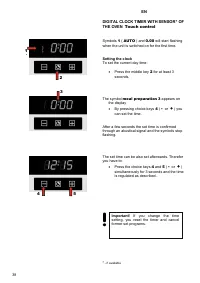
38 EN DIGITAL CLOCK TIMER WITH SENSOR * OF THE OVEN Touch control Symbols 1 ( AUTO ) and 0.00 will start flashing when the unit is switched on for the first time. Setting the clock To set the current day time: • Press the middle key 2 for at least 3 seconds. The symbol meal preparation 3 appears on ...
Page 38 - Uhrzeiteinstellung; Gerichtzubereitung 3; Uhrzeit; СЕНСОРНОЕ; Приготовление
39 D RU ELEKTRONISCHE ZEITSCHALUHR MIT SENSOR - BEDIENUNG * VON BACKÖFEN Touch control Wird die Uhr zum ersten Mal eingeschaltet, blinken die Symbole 1 ( AUTO ) und 0.00 . Uhrzeiteinstellung Zur Einstellung der aktuellen Uhrzeit: • Auf die mittlere Taste 2 mind. 3 Minuten lang drücken. Auf dem Displ...
Page 39 - countdown timer
40 EN Electronical countdown timer The countdown timer works independently of all other timer functions, and can be used even when the oven is switched off. To switch on the countdown timer • Press the middle key 1 for 3 seconds. The symbol countdown timer 2 appears on the display • Press the choice...
Page 41 - oven operating function
42 EN Setting the cooking time The process in the oven should switch off after a wanted duration automatically. Before setting the duration you have to set the oven operating function and the temperature (see chapter “Cooking” ) • Press the middle key 1 for 3 seconds. • Press key 1 again. The symbol...
Page 43 - Setting the end of cooking time
44 EN Setting the end of cooking time The oven must switch off after the set end time. Before setting the end of cooking time you have to set the oven operating function and the temperature (see chapter cooking) • Press the middle key 1 for 3 seconds • Press key 1 again twice consecutively The symbo...
Page 44 - die
45 D RU Einstellen der Endzeit Der Backofen muss in eingegebener Endzeit ausgeschaltet werden. Bevor die Endzeit eingegeben wird, müssen Sie die Backofenfunktion und die Temperatur der Zubereitung einstellen (siehe Kapitel „Gebrauch vom Backofen“ ). • Die mittlere Taste 1 3 Sekunden lang drücken. • ...
Page 45 - and then the end of cooking time; “Multifunction oven control”
46 EN Setting cooking duration and end times You can combine the cooking duration and end of cooking time functions to set the start and end times for cooking. In this way you can program your electronic oven to cook while you are out or to defrost foods ready for you to cook when you get back. A gr...
Page 47 - „Setting the end time“
48 EN The symbol 1 ( AUTO ) appears on the display, that confirms a successful programming of the cooking duration and the current day time appears again. Now set the wanted end time (see chapter „Setting the end time“ ). The end time ( 2 ) appears on the display, that accords to the current day tim...
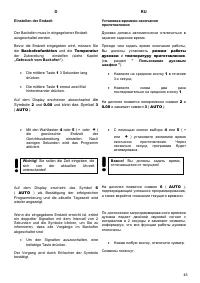
Page 48 - Auf dem Display erscheint das Symbol; „Einstellen der Endzeit“; Mit der Wahltaste
49 D RU Auf dem Display erscheint das Symbol 1 ( AUTO ), das bestätigt eine erfolgreiche Programmierung der Betriebsdauer und die aktuelle Tageszeit wird wieder angezeigt. Programmieren Sie jetzt die gewünschte Endzeit (siehe Kapitel „Einstellen der Endzeit“ ). Auf dem Display erscheint die Endzeit ...
Page 51 - SPECIALITIES OF THE OVEN; Logic control; Logic
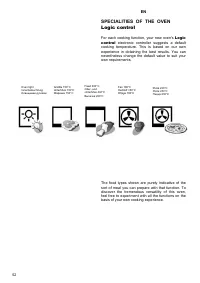
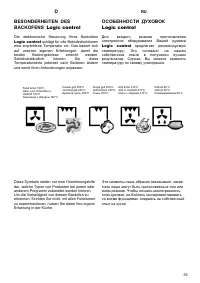
52 EN SPECIALITIES OF THE OVEN Logic control For each cooking function, your new oven's Logic control electronic controller suggests a default cooking temperature. This is based on our own experience in obtaining the best results. You can nevertheless change the default value to suit your own requir...
Page 52 - ОСОБЕННОСТИ
53 D RU BESONDERHEITEN DES BACKOFENS Logic control Die elektronische Steuerung Ihres Backofens Logic control schlägt für alle Betriebsfunktionen eine empfohlene Temperatur vor. Das basiert sich auf unseren eigenen Erfahrungen, damit die besten Backergebnisse erreicht werden. Selbstverständlich könne...
Page 55 - Usage of the oven
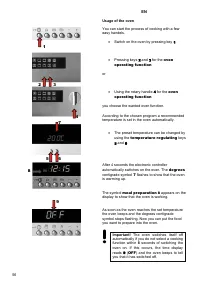
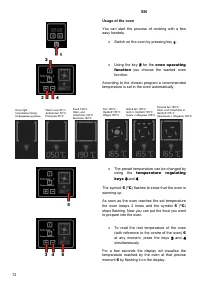
56 EN Usage of the oven You can start the process of cooking with a few easy handels. • Switch on the oven by pressing key 1 . • Pressing keys 2 and 3 for the oven operating function or • Using the rotary handle 4 for the oven operating function you choose the wanted oven function. According to the ...
Page 56 - Gebrauch von Backofen
57 D RU Gebrauch von Backofen Mit wenigen einfachen Handgriffen können Sie den Prozess der Zubereitung beginnen. • Den Backofen mit Hilfe von Taste 1 einschalten. • mit Hilfe von Tasten 2 und 3 , Backofenbetriebsfunktionen oder • mit Hilfe des Drehknebeles 4 , Backofenbetriebsfunktionen gewünschte B...
Page 57 - All; “Countdown timer”; key
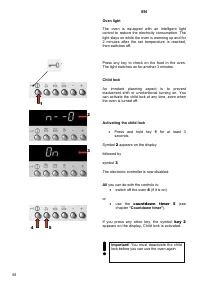
58 EN Oven light The oven is equipped with an intelligent light control to reduce the electricity consumption. The light stays on while the oven is warming up and for 2 minutes after the set temperature is reached, then switches off. Press any key to check on the food in the oven. The light switches...
Page 58 - nur; Kurzzeitwecker; “Elektronischer; Schlüssel; см; блокировки
59 D RU Innenbeleuchtung Der Backofen ist mit einem intelligenten Kontrollsystem der Beleuchtung ausgestattet, die den Konsum der Elektroenergie vermindert. Das Licht bleibt angeschaltet nur für die Zeit der Erwärmung und wird nach 2 Minuten nach dem Erreichen der angegebenen Temperatur ausgeschalte...
Page 59 - Deactivating the child lock; ) appears on the display; countdown time
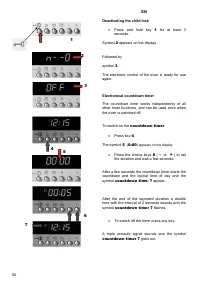
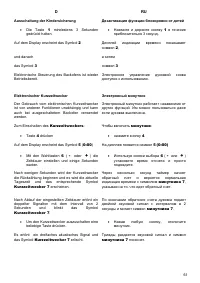
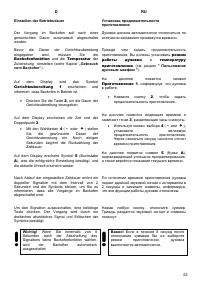
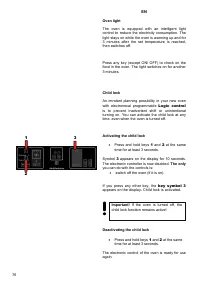
60 EN Deactivating the child lock • Press and hold key 1 for at least 3 seconds. Symbol 2 appears on the display Followed by symbol 3 . The electronic control of the oven is ready for use again. Electronical countdown timer The countdown timer works independently of all other timer functions, and ca...
Page 60 - Ausschaltung der Kindersicherung; Kurzzeitweckers
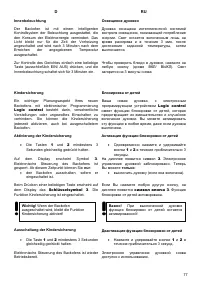
61 D RU Ausschaltung der Kindersicherung • Die Taste 1 mindestens 3 Sekunden gedrückt halten. Auf dem Display erscheint das Symbol 2 und danach das Symbol 3 Elektronische Steuerung des Backofens ist wieder Betriebsbereit. Elektronischer Kurzzeitwecker Der Gebrauch vom elektronischen Kurzzeitwecker i...
Page 61 - meal preparation
62 EN Setting the cooking time The process in the oven shoul switch off after a wanted duration automatically. Before setting the duration you have to set the oven operating function and the temperature (see chapter “Cooking” ) The meal preparation symbol 1 appears on the display and shows that the ...
Page 62 - Backofenfunktion; Gerichtzubereitung 1
63 D RU Einstellen der Betriebsdauer Der Vorgang im Backofen soll nach einer gewünschten Dauer automatisch abgeschaltet werden. Bevor die Dauer der Gerichtszubereitung eingegeben wird, müssen Sie die Backofenfunktion und die Temperatur der Zubereitung einstellen (siehe Kapitel „Gebrauch vom Backofen...
Page 65 - “Setting cooking
66 EN Setting cooking duration and end times You can combine the cooking duration and end of cooking time functions to set the start and end times for cooking. In this way you can program your electronic oven to cook while you are out or to defrost foods ready for you to cook when you get back. A gr...
Page 66 - „Einstellen
67 D RU Einstellen der Betriebsdauer und Endzeit Sie können die beiden Funktionen "Betriebsdauer" und „Endzeit“ kombinieren, wobei Sie eine gewünschte Zeit eingeben, um den Backofen ein- und auszuschalten. So können Sie Ihren Backofen für die Zeit programmieren, wenn Sie nicht zu Hause sind;...
Page 72 - режима; Turbo heat
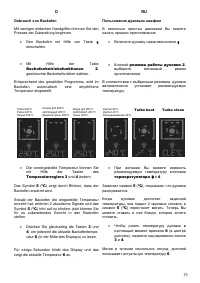
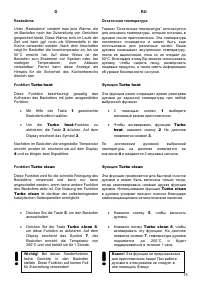
73 D RU Gebrauch von Backofen Mit wenigen einfachen Handgriffen können Sie den Prozess der Zubereitung beginnen. • Den Backofen mit Hilfe von Taste 1 einschalten. • Mit Hilfe der Taste Backofenbetriebsfunktionen 2 , gewünschte Backofenfunktion wählen. Entsprechend des gewählten Programms, wird im Ba...
Page 73 - Residual heat
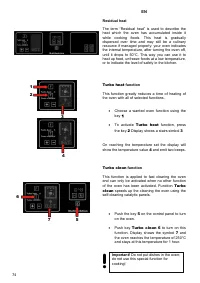
74 EN Residual heat The term “Residual heat” is used to describe the heat which the oven has accumulated inside it while cooking foods. This heat is gradually dispersed over time and may still be a culinary resource if managed properly: your oven indicates the internal temperature, after turning the...
Page 74 - Restwärme
75 D RU Restwärme Unter „Restwärme“ versteht man jene Wärme, die im Backofen nach der Zubereitung von Gerichten gespeichert bleibt. Diese Wärme sinkt im Laufe der Zeit und kann ggf. noch als Wärmestelle in der Küche verwendet werden: Nach dem Abschalten zeigt Ihr Backofen die Innentemperatur an, bis...
Page 75 - The only; key symbol
76 EN Oven light The oven is equipped with an intelligent light control to reduce the electricity consumption. The light stays on while the oven is warming up and for 3 minutes after the set temperature is reached, then switches off. Press any key (except ON/ OFF) to check on the food in the oven. T...
Page 76 - Schlüsselsymbol 3
77 D RU Innenbeleuchtung Der Backofen ist mit einem intelligenten Kontrollsystem der Beleuchtung ausgestattet, die den Konsum der Elektroenergie vermindert. Das Licht bleibt nur für die Zeit der Vorheizung angeschaltet und wird nach 3 Minuten nach dem Erreichen der angegebenen Temperatur ausgeschalt...
Page 77 - Electronical countdown timer and alarm clock; Countdown timer
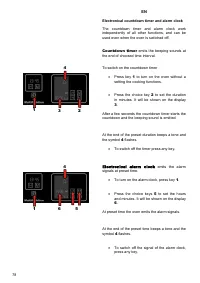
78 EN Electronical countdown timer and alarm clock The countdown timer and alarm clock work independently of all other functions, and can be used even when the oven is switched off. Countdown timer emits the beeping sounds at the end of choosed time interval. To switch on the countdown timer • Press...
Page 78 - Elektronischer Kurzzeitwecker und Wecker; Mit der; Elektronischer Wecker; Электроный
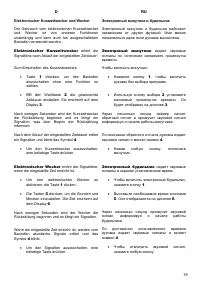
79 D RU Elektronischer Kurzzeitwecker und Wecker Der Gebrauch vom elektronischen Kurzzeitwecker und Wecker ist von anderen Funktionen unabhängig und kann auch bei ausgeschaltetem Backofen verwendet werden.. Elektronischer Kurzzeitwecker ertönt die Signaltöne nach Ablauf der eingestellten Zeitdauer. ...
Page 80 - funktion; „Gebrauch vom
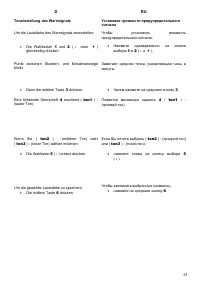
81 D RU Einstellen der Betriebsdauer Der Vorgang im Backofen soll nach einer gewünschten Dauer automatisch abgeschaltet werden. Bevor die Dauer der Gerichtszubereitung eingegeben wird, müssen Sie eine Backofen- funktion und eine Temperatur der Zubereitung einstellen (siehe Kapitel „Gebrauch vom Back...
Page 86 - Совет
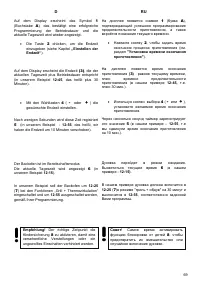
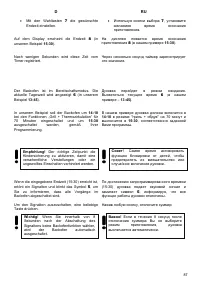
87 D RU • Mit den Wahltasten 7 die gewünschte Endzeit einstellen. Auf dem Display erscheint die Endzeit 8 (in unserem Beispiel 15:30 ). Nach wenigen Sekunden wird diese Zeit vom Timer registriert. Der Backofen ist im Bereitschaftsmodus. Die aktuelle Tageszeit wird angezeigt 6 (in unserem Beispiel 13...
Page 87 - PRACTICAL ADVISES; conventional heating
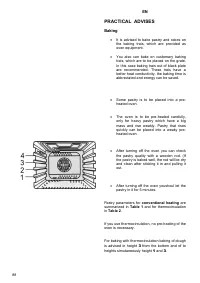
88 EN PRACTICAL ADVISES Baking • It is advised to bake pastry and cakes on the baking trais, which are provided as oven equipment. • You also can bake on customary baking trais, which are to be placed on the grate. In this case baking trais out of black plate are recommended. These trais have a bett...
Page 88 - PRAKTISCHE EMPFEHLUNGEN; konventioneller; ПРАКТИЧЕСКИЕ; Выпечка
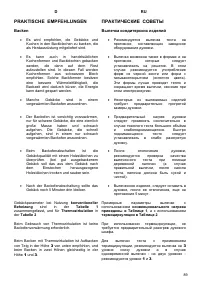
89 D RU PRAKTISCHE EMPFEHLUNGEN Backen • Es wird empfohlen, die Gebäcke und Kuchen in den Backblechen zu backen, die als Herdausrüstung mitgeliefert sind. • Es kann auch in handelsüblichen Kuchenformen und Backblechen gebacken werden, die dann auf dem Rost aufzustellen sind. In diesem Fall werden Ku...
Page 91 - Параметры
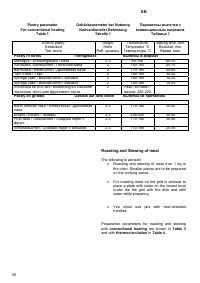
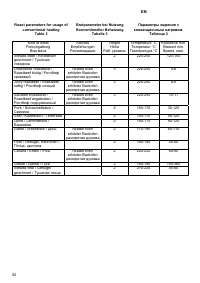
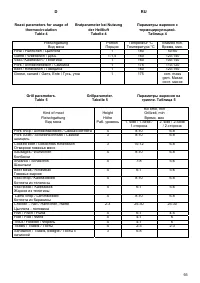
92 EN Roast parameters for usage of conventional heating Table 3 Bratparameter bei Nutzung Konventioneller Beheizung Tabelle 3 Параметры жарения с конвенционным нагревом . Таблица 3 Kind of meat Fleischgattung Вид мяса Advises Empfehlungen Рекомендации Height Höhe Раб . уровень Temperature °C Temper...
Page 93 - The shown parameters concern roasting on
94 EN Note! The shown parameters concern roasting on the grid. If you use closed jars the temperature is to be set to 200°C. After the run off of the predetermined halftime the meat should be reversed. It is more advantageousto roast bigger meat shares. Baste the meat with gravy while roasting. It i...
Page 94 - Die dargestellten Parameter; Примечание
95 D RU Bemerkung! Die dargestellten Parameter betreffen das Braten auf dem Rost. Bei der Verwendung von geschlossenen Gefäßen ist die Temperatur auf 200°C einzustellen. Nach Ablauf der Halbzeit, die für das Braten vorbestimmt ist, sollte das Fleisch umgewendet werden. Es ist günstiger größere Fleis...
Page 95 - CARE AND ATTENDANCE; Replacing the oven light
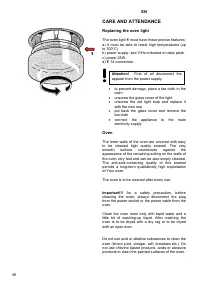
96 EN CARE AND ATTENDANCE Replacing the oven light The oven light 1 must have these precise features: a) it must be able to resist high temperatures (up to 300°C) b) power supply: see V/Hz indicated on data plate. c) power 25W. d) E 14 connection. • to prevent damage, place a tea cloth in the oven •...
Page 96 - PFLEGE UND WARTUNG; Auswechslung der Ofenbeleuchtung; ОБСЛУЖИВАНИЕ; ВАЖНО
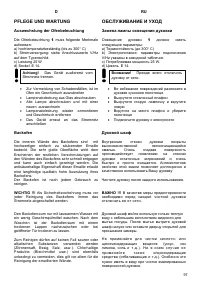
97 D RU PFLEGE UND WARTUNG Auswechslung der Ofenbeleuchtung Die Ofenbeleuchtung 1 muss folgende Merkmale aufweisen: a) hochtemperaturbeständig (bis zu 300° С ) b) Stromversorgung: siehe Anschlusswerte V/Hz auf dem Typenschild. c) Leistung 25 W d) Sockel E 14. • Zur Vermeidung von Schadensfällen, ist...
Page 97 - Telescope 2; Removing the oven door
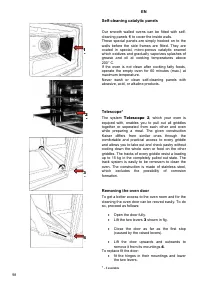
98 EN Self-cleaning catalytic panels Our smooth walled ovens can be fitted with self-cleaning panels 1 to cover the inside walls. These special panels are simply hooked on to the walls before the side frames are fitted. They are coated in special, micro-porous catalytic enamel which oxidizes and gra...
Page 98 - Teleskop 2; Ausbauen der Ofentür; Телескоп; Kaiser
99 D RU Selbstreinigende katalytische Platten Unsere Backöfen mit glatten Wänden bieten die Möglichkeit, in der Muffel selbstreinigende Platten 1 zu montieren, mit denen die Wände verkleidet werden. Diese Spezialplatten, die vor den seitlichen Rahmen an den Wänden eingehängt werden, sind mit einem m...
Page 102 - Что
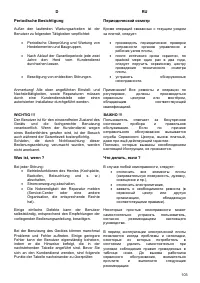
103 D RU Periodische Besichtigung Außer den laufenden Wartungsarbeiten ist der Benutzer zu folgenden Tätigkeiten verpflichtet: • Periodische Überprüfung und Wartung von Herdelementen und Baugruppen, • Nach Ablauf der Garantieperiode jede zwei Jahre den Herd vom Kundendienst durchsehen lassen. • Bese...
Page 103 - Error
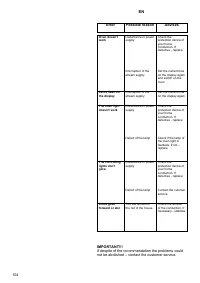
104 EN Error Possible reason Advises IMPORTANT!!! If despite of the recommendation the problems could not be abolished – contact the customer service. Oven doesn’t work Disturbance in power supply Interruption of the stream supply Check the protection device of your home conduction. If defective - r...
Page 104 - Störung Mögliche
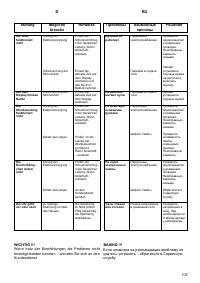
105 D RU Störung Mögliche Ursache Hinweise WICHTIG !!! Wenn trotz der Empfehlungen die Probleme nicht beseitigt werden konnten – wenden Sie sich an den Kundendienst Der Ofen funktioniert nicht Sörung der Elektroversorgung Unterbrechung der Stromzufuhr Prüfen der Schutzvorrichtugn der häuslichen Leit...
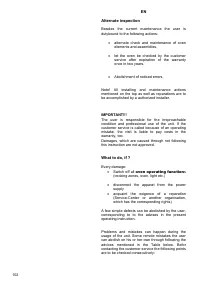
Page 105 - RESPECT FOR THE ENVIRONMENT; Disposing of the packaging
106 EN RESPECT FOR THE ENVIRONMENT The documentation provided with this oven has been printed on chlorine free bleached paper or recycled paper to show respect for the environment. The packaging has also been designed to avoid environmental impact. Packaging material is ecological and can be re-used...
Page 106 - UMWELTVERTRÄGLICHKEIT; Verpackungs-Entsorgung; Sie das; ОХРАНА; Утилизация
107 D RU UMWELTVERTRÄGLICHKEIT Als Beitrag zum Umweltschutz wurde die Dokumentation dieses Geräts auf chlorfrei gebleichtes oder Recycling-Papier gedruckt. Bei der Verpackung wurde auf deren Umweltverträglichkeit Wert gelegt; sie kann gesammelt oder recycelt werden, da es sich um umweltschonendes Ma...
Page 108 - ОТМЕТКА
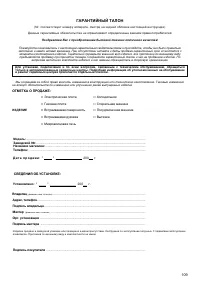
109 ГАРАНТИЙНЫЙ ТАЛОН (Nr. соответствует номеру аппарата , смотри на задней обложке настоящей инструкции ) Данные гарантийные обязательства не ограничивают определенные законом права потребителей Поздравляем Вас с приобретением бытовой техники отличного качества ! Пожалуйста ознакомьтесь с настоящим...


 Kaiser EG 6345 ElfEm
User Manual
Kaiser EG 6345 ElfEm
User Manual
 Kaiser EG 6345 Em
User Manual
Kaiser EG 6345 Em
User Manual
 Kaiser EG 6372
User Manual
Kaiser EG 6372
User Manual
 Kaiser EG 6374 Sp
User Manual
Kaiser EG 6374 Sp
User Manual
 Kaiser EG 6374 W
User Manual
Kaiser EG 6374 W
User Manual
 Kaiser EH 4747
User Manual
Kaiser EH 4747
User Manual
 Kaiser EH 4796 ElfAD
User Manual
Kaiser EH 4796 ElfAD
User Manual
 Kaiser EH 6000
User Manual
Kaiser EH 6000
User Manual
 Kaiser EH 6310
User Manual
Kaiser EH 6310
User Manual
 Kaiser EH 6322
User Manual
Kaiser EH 6322
User Manual
 Kaiser EH 6324 W
User Manual
Kaiser EH 6324 W
User Manual
 Kaiser EH 6337
User Manual
Kaiser EH 6337
User Manual
 Kaiser EH 6338 S
User Manual
Kaiser EH 6338 S
User Manual
 Kaiser EH 6355 ElfEm
User Manual
Kaiser EH 6355 ElfEm
User Manual
 Kaiser EH 6355 RotEm
User Manual
Kaiser EH 6355 RotEm
User Manual
 Kaiser EH 6361 S
User Manual
Kaiser EH 6361 S
User Manual
 Kaiser EH 6363
User Manual
Kaiser EH 6363
User Manual
 Kaiser EH 6424 BluBE
User Manual
Kaiser EH 6424 BluBE
User Manual
 Kaiser EH 6424 ElfBE
User Manual
Kaiser EH 6424 ElfBE
User Manual