Page 2 - In the box you will find
69-2809EF—01 ii In the box you will find • Thermostat • Wallplate • Screws and anchors • Quick Start Guide Features of your Wi-Fi thermostat With your new thermostat, you can: • Connect to the Internet to monitor and control your heating/cooling system. • View and change your heating/cooling system ...
Page 3 - Welcome
Welcome Congratulations on your purchase of a Honeywell Wi-Fi color touchscreen programmable thermostat. When registered to Honeywell’s Total Connect Comfort Solutions, you can remotely monitor and control the heating and cooling system in your home or business—you can stay connected to your comfort...
Page 4 - Do not place your old thermostat in the trash if it contains
69-2809EF—01 2 This thermostat works with common 24 volt systems such as forced air, hydronic, heat pump, oil, gas, and electric. It will not work with millivolt systems, such as a gas fireplace, or with 120/240 volt systems such as baseboard electric heat. MERCURY NOTICE: Do not place your old ther...
Page 5 - Table of contents
69-2809EF—01 3 About your new thermostat Home screen quick reference .............. 4Business screen quick reference ......... 5 Installation Installing your thermostat ..................... 7Connecting to your Wi-Fi network ...... 25Registering your thermostat online .... 30 Operation Setting the t...
Page 6 - Quick reference: home use; Current date and time.
69-2809EF—01 4 Quick reference: home use HOME. Touch to display Home screen. FAN. Select fan mode. SYSTEM. Select system mode (heat/cool). MENU. Touch to display options. Start here to set a program schedule. Current schedule. Change temperature setting and select temporary or permanent hold. Indoor...
Page 7 - Quick reference: business use
5 69-2809EF—01 Quick reference: business use HOME. Touch to display Home screen. FAN. Select fan mode. SYSTEM. Select system mode (heat/cool). MENU. Touch to display options. Start here to set a program schedule. Thermostat location. Quickly identify which thermostat is in control of a specific area...
Page 8 - Setting up your thermostat
69-2809EF—01 6 Setting up your thermostat Setting up your Wi-Fi programmable touchscreen thermostat is easy. It is preprogrammed and ready to go as soon as it is installed and registered. Install your thermostat. Connect it to your home wireless network. Register online for remote access. Before you...
Page 9 - Installing your thermostat; To protect your
7 69-2809EF—01 Installing your thermostat You might need the following tools to install this thermostat: • No. 2 Phillips screwdriver • Pen • Pencil • Level (optional) • Drill and bits (3/16” for drywall, 7/32” for plaster) (optional) • Hammer (optional) • Electrical tape (optional) 1 Switch OFF pow...
Page 12 - Mount wallplate for Wi-Fi; Wallplate
69-2809EF—01 10 LEVEL HERE R Y C W G MCR34499 CK Rc R W- O/B YG W2- Aux/E Y2L 5 Mount wallplate for Wi-Fi thermostat. Mount your new wallplate using screws and anchors included with the thermostat. If necessary: Drill 3/16-in holes for drywall. Drill 7/32-in holes for plaster. Note: You may be able ...
Page 13 - View the Alternate Wiring videos at wifithermostat.com/videos; Wiring; For; conventional; system, see page 14. See “Glossary” on page 73 for further
11 69-2809EF—01 Important! The Wi-Fi thermostat requires a C wire to operate. The C, or common, wire brings 24 VAC power to the thermostat. Many older mechanical or battery operated thermostats do not require a C wire. If you don’t have a C wire, try: • Looking for an unused wire that is pushed into...
Page 14 - a Starting with the C Wire, match the; R and Rc
69-2809EF—01 12 MCR34540 C K Rc R W- O/B Y G W2- Aux/E Y2 L W Y G R C Installing your thermostat Wiring (Conventional System) 6A Wire the Wi-Fi thermostat to your conventional system. a Starting with the C Wire, match the sticky tag on the wire to the terminal labels. You must have a C wire. See pag...
Page 15 - c In the image on the right, check the; d Verify wire is firmly secured by gently
13 69-2809EF—01 Installing your thermostat Wiring (Conventional System continued) c In the image on the right, check the box next to each connection. You will use this checklist in Step 9. d Verify wire is firmly secured by gently pulling on wire. e Repeat steps a–d for all other wires. f Push any e...
Page 17 - f Push any excess wire back into the
15 69-2809EF—01 Installing your thermostat Wiring (Heat Pump System continued) c In the image on the right, check the box next to each connection. You will use this checklist in Step 9. d Verify wire is firmly secured by gently pulling on wire. e Repeat steps a–d for all other wires. Note: If old th...
Page 18 - You must have a C wire
69-2809EF—01 16 Installing your thermostat Alternate wiring (Conventional System) Use this if your wire labels don’t match the terminal labels. Note: You must have a C wire or equivalent. See page 11. See key to 1 – 2 on page 17. MCR34541 C R W Y G 2 1 2 C K Rc R W- O/B Y G W2- Aux/E Y2 L W1 W2 Y2 R...
Page 19 - Alternate wiring key (Conventional System); • If you have both an; • If your old thermostat had both
17 69-2809EF—01 Installing your thermostat Alternate wiring key (Conventional System) 2 1 Do not use K terminal. For future use. • If you have both an R and Rc wire, unplug the jumper loop by pulling on the wire loop. • If your old thermostat had both R and RH wires, connect the R wire to the Rc ter...
Page 22 - Attach thermostat to wallplate.
69-2809EF—01 20 Installing your thermostat 7 Attach thermostat to wallplate. Align the thermostat with the wallplate and then snap into place. Thermostat Wallplate LEVEL HERE M34498
Page 23 - a Verify that the C wire is
21 69-2809EF—01 Installing your thermostat 8 Switch heating/cooling system ON. Important! 8a Verify that the C wire is connected at the thermostat and at the heating/cooling system. 8b Make sure the heating/cooling system door is firmly secured. 8c Switch power back ON for your heating/cooling syste...
Page 24 - a Touch the language you want the; b Select Home or Business; Next
69-2809EF—01 22 Installing your thermostat Before connecting to your Wi-Fi network, you need to set initial thermostat options to define your heating/cooling system: • Language• Home or business You can customize other options later.9 Follow prompts on the screen to select appropriate options. 9a To...
Page 25 - c Touch; , or name the thermostat
23 69-2809EF—01 Installing your thermostat 9c Touch Next , or name the thermostat location—touch THERMOSTAT and follow the rest of the instructions. 9d Select what your thermostat will control and touch Next . Note: Touch the orange Help button on any screen for more information. Next Next
Page 27 - Connecting to your Wi-Fi network; Done; Touch; to connect the thermostat to your; I’ll do it later; a Touch the name of the network you; Rescan
25 69-2809EF—01 Connecting to your Wi-Fi network After touching Done on the final screen of the initial set up (page 24), the thermostat displays an option to connect to your Wi-Fi network.1 Connect the Wi-Fi network. Touch Yes to connect the thermostat to your Wi-Fi network. The screen displays the...
Page 29 - The Register Online screen remains; If you touch; before you register
27 69-2809EF—01 Connecting to your Wi-Fi network To register your thermostat, follow the instructions beginning on page 30. Note: The Register Online screen remains active until you complete registration and/or touch Done . Note: If you touch Done before you register online, your home screen display...
Page 30 - Disconnecting your Wi-Fi network
69-2809EF—01 28 Disconnecting your Wi-Fi network 1 Touch MENU . 2 Select Wi-Fi Setup . 3 Touch Disconnect from Network . The thermostat will display a question to confirm your selection. 4 Touch Yes to confirm that you want to disconnect from the network. The thermostat will display the Wi-Fi Setup ...
Page 31 - Reconnecting your Wi-Fi network; • If your thermostat is registered, you; • If the screen displays “Register
29 69-2809EF—01 Reconnecting your Wi-Fi network 1 Touch MENU . 2 Select Wi-Fi Setup . 3 Touch the name of the network you want to use. The thermostat may display a password page. 4 To enter a password, touch characters to spell out your home network password, then touch Done . 5 The thermostat displ...
Page 32 - Go to mytotalconnectcomfort.com; Registering your thermostat online
69-2809EF—01 30 M31570 M31570 To view and set your Wi-Fi thermostat remotely, you must have a Total Connect Comfort account. Use the following steps.1 Open the Total Connect Comfort web site. Go to mytotalconnectcomfort.com View the Wi-Fi Thermostat Registration video at wifithermostat.com/videos Re...
Page 33 - Login or create an account.; – or –; Create An Account; a Follow the instructions on the screen.; Check your email; for an activation; If you do not receive a response,; in
31 69-2809EF—01 Registering your thermostat online 2 Login or create an account. If you have an account, click Login – or – click Create An Account 2a Follow the instructions on the screen. 2b Check your email for an activation message from My Total Connect Comfort. This may take several minutes. No...
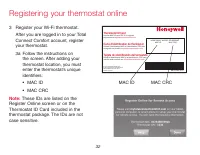
Page 34 - a Follow the instructions on; These IDs are listed on the; MAC ID
69-2809EF—01 32 Registering your thermostat online 3 Register your Wi-Fi thermostat. After you are logged in to your Total Connect Comfort account, register your thermostat. 3a Follow the instructions on the screen. After adding your thermostat location, you must enter the thermostat’s unique identi...
Page 35 - iTunes
33 69-2809EF—01 Registering your thermostat online When the thermostat is successfully registered, the Total Connect Comfort registration screen will display a SUCCESS message.You can now control your thermostat from anywhere through your laptop, tablet, or smartphone. GET IT ON Download on iTunes T...
Page 36 - Setting the time/date; Set Time
69-2809EF—01 34 Setting the time/date 1 Touch the current time. The screen displays Set Time/Set Date . 2 Touch Set Time or Set Date . 3 Touch p or q until the proper time/ date is displayed. 4 Touch Done to save or Cancel to ignore changes. Note: This thermostat will automatically update for daylig...
Page 37 - Setting the fan; Fan runs only when the
35 69-2809EF—01 Setting the fan 1 Touch FAN to display fan settings. 2 Touch On , Automatic , Circulate , or Follow Schedule . 3 Touch Done to save and exit. On: Fan is always on. Automatic: Fan runs only when the heating or cooling system is on. Circulate: Fan runs randomly about 35% of the time (h...
Page 38 - Setting system mode; Thermostat controls only the
69-2809EF—01 36 Setting system mode 1 Touch SYSTEM to display system settings. 2 Touch desired option: Heat: Thermostat controls only the heating system. Cool: Thermostat controls only the cooling system. Off: Heating/cooling systems are off. Automatic: Thermostat selects heating or cooling as neede...
Page 39 - Preset energy-saving schedules; Home Use; On; Business Use
37 69-2809EF—01 Preset energy-saving schedules This thermostat uses default Energy Saver settings that can reduce your heating/cooling expenses by as much as 33%. To customize settings, see next page. Wake 6:00 am 70° 78° 70° 78° Leave 8:00 am 62° 85° 62° 85° Return 6:00 pm 70° 78° 70° 78° Sleep 10:...
Page 40 - Adjusting program schedules; Guide Me; • Touch; I’ll do it myself
69-2809EF—01 38 Adjusting program schedules 1 Touch MENU . 2 Select Create/Edit Schedule . • Touch View/Edit to view the full schedule and make a quick adjustment. • Touch Guide Me to create a schedule by answering simple questions. • Touch I’ll do it myself to manually create a program schedule. Se...
Page 41 - If you selected; Touch; Wake; to set your Wake time for
39 69-2809EF—01 Adjusting program schedules If you selected I’ll do it myself on the Create/ Edit Schedule screen (page 38), follow these steps:1 Select the days to schedule, touch Next . 2 Touch Wake to set your Wake time for selected days. Next 6:00 am Heat: 70°Cool: 78°Fan: Auto WAKE
Page 43 - Overriding schedules: home use; Switch to Permanent Hold
41 69-2809EF—01 Overriding schedules: home use 1 Touch p or q to adjust the temperature (right side of screen) and the Hold Until time (left side). The schedule will resume when the Hold Until time expires. 2 Touch Switch to Permanent Hold to keep the same temperature until you change it or resume t...
Page 44 - Overriding schedules: business use; Override
69-2809EF—01 42 Overriding schedules: business use Touch p or q to adjust the temperature. It will be maintained until the hold time you set. • To change the hold time, touch the Hold Until arrow buttons. This time can be adjusted up to the maximum time set on the Override Duration screen in Advance...
Page 45 - Viewing equipment status; Select; Equipment Status
43 69-2809EF—01 Viewing equipment status 1 Touch MENU . 2 Select Equipment Status . 3 Touch p or q to view the status of all the equipment your thermostat is controlling. Depending on how your thermostat was installed, the Equipment Status screen can report data about the following systems: • Heatin...
Page 46 - Setting vacation hold: home use
69-2809EF—01 44 Setting vacation hold: home use This feature helps you save energy while you are away, and restores comfortable settings just before you return home.1 Touch MENU . 2 Select Vacation Mode . 3 Touch p or q to select the date you leave, then touch Next for further scheduling details, in...
Page 47 - Setting holiday/event schedules: business use; • Custom Events lets you set up
45 69-2809EF—01 Setting holiday/event schedules: business use This feature helps you conserve energy when the workplace is unoccupied for special events and holidays.1 Touch MENU . 2 Select Holiday/Event Scheduler . 3 Select the item you want to schedule. • Custom Events lets you set up other days f...
Page 48 - Setting custom events: business use; Event Scheduler menu.; Create a new event
69-2809EF—01 46 Setting custom events: business use This feature lets you customize temperature settings to be maintained during a specific event. You can set up an event for a specific date or day in a month. The thermostat resumes normal scheduling after the event.1 Select Custom events from the H...
Page 49 - Select; or; Specific Date; • For; to; to
47 69-2809EF—01 Setting custom events: business use 3 Select Specific Date or Month/Weekday . • For Specific Date , you are prompted to select the start date, settings, end date, and frequency for the event. • For Month/Weekday , you are prompted to select the month, day of the week, week of the mon...
Page 50 - Setting holiday schedule: business use
69-2809EF—01 48 Setting holiday schedule: business use This feature lets you customize temperature settings to be maintained on specified national holidays. The thermostat resumes normal scheduling between selected holidays.1 Select US Holidays or Canadian Holidays from the Holiday/Event Scheduler m...
Page 51 - Setting holiday override: business use
49 69-2809EF—01 Setting holiday override: business use This feature lets you customize temperature settings to be maintained from now until a specified date. The thermostat resumes normal scheduling on the date you select.1 Touch MENU . 2 Select Holiday Mode to display temperatures while you are awa...
Page 52 - Initiating occupancy mode: business use; Press
69-2809EF—01 50 Initiating occupancy mode: business use This feature keeps temperature at an energy-saving level until you touch Press to start occupancy . When you arrive, touch the button to maintain a comfortable temperature while the room is occupied.Touch the p or q buttons to set the temperatu...
Page 53 - Customizing screen color; • If you select a color name, the
51 69-2809EF—01 Customizing screen color You can customize your thermostat display to match your décor.1 Touch Menu . 2 Touch Color Themes . 3 Select the name of a color to use a predefined background, or select Custom to define you own background color and text. • If you select a color name, the sc...
Page 54 - Setting preferences; and select; Select an option and follow prompts:; to save your settings.; Cancel
69-2809EF—01 52 Setting preferences Preference menu options let you select how the thermostat displays information or responds to certain situations.1 Touch MENU and select Preferences . 2 Select an option and follow prompts: • Reminders • Utility Schedule Options• Backlight• Smart Response Technolo...
Page 55 - Cleaning the thermostat screen
53 69-2809EF—01 Cleaning the thermostat screen When you select the Clean Screen option, the screen is locked so you don’t accidentally change settings while you clean.1 Touch MENU . 2 Select Clean Screen . A prompt asks if you want to clean the screen for 30 seconds. 3 Touch Yes . A countdown timer ...
Page 56 - Adjusting security settings; Security Settings; Change Lock Mode; Select an option and follow prompts:; Full access allowed.; If you choose to use a password for
69-2809EF—01 54 Adjusting security settings You can adjust security options to prevent unauthorized changes to system settings.1 Touch MENU and select Security Settings . 2 Select Change Lock Mode . 3 Select an option and follow prompts: Unlocked: Full access allowed. Partially locked: Only temperat...
Page 57 - Software updates; If you are not connected to Wi-Fi or
55 69-2809EF—01 Software updates Honeywell periodically issues updates to the software for this thermostat. The updates occur automatically through your Wi-Fi connection. All your settings are saved, so you will not need to make any changes after the update occurs.Updates occur in the early morning....
Page 58 - Unregistering your thermostat; Under My Account, select Edit My; Delete My Account
69-2809EF—01 56 Unregistering your thermostat If you remove the thermostat from your Total Connect Comfort website account (for example, you’re moving and leaving the thermostat behind), follow these steps:1 On mytotalconnectcomfort.com log into your account. 2 Under My Account, select Edit My Profi...
Page 59 - Smart Response Technology; before
57 69-2809EF—01 Smart Response Technology This feature (home use only) allows the thermostat to “learn” how long the heating/cooling system takes to reach programmed temperature settings, so the temperature is reached at the time you set.For example: Set the Wake time to 6:00 am, and the temperature...
Page 61 - Compressor protection
59 69-2809EF—01 Compressor protection The thermostat keeps the compressor off for a few minutes before restarting, to prevent equipment damage. During this “off ” time, the message “waiting for equipment” is displayed on screen.
Page 62 - Auto changeover; Automatic; Select; Auto Changeover; on the
69-2809EF—01 60 Auto changeover This feature is used in climates where both air conditioning and heating are used on the same day.When the system is set to Automatic , the thermostat automatically selects heating or cooling depending on the indoor temperature.Heat and cool settings must be at least ...
Page 63 - Setting advanced preferences; . The thermostat displays a; On each screen, make changes as; to display new
61 69-2809EF—01 Setting advanced preferences You can change options for a number of system functions. Although many options, such as language and temperature indication settings are the same for all setups, others depend on the type of system you have.1 Touch MENU . The thermostat displays a list of...
Page 64 - Screen Title
69-2809EF—01 62 Setting advanced preferences Advanced Preferences Options (MENU > Preferences > Advanced Preferences) Screen Title Settings and Options Scheduling Options Select Non-programmable or Programmable. Programmable uses default or customized programming to automatically raise and low...
Page 66 - Changing system setup; System Setup
69-2809EF—01 64 Changing system setup System Setup MENU If your needs change, you can change the basic system settings you chose during thermostat installation (page 22).1 Touch MENU. The thermostat displays a list of options. 2 Select System Setup . The thermostat displays the first screen of optio...
Page 67 - Touch the orange Help button on any screen for more information.
65 69-2809EF—01 Changing system setup System Setup Options (MENU > System Setup) Screen Title Settings and Options Language English/Français/Español. Thermostat installed in Home/Business (Thermostat is used in a residential (default) or commercial setting). Your thermostat location Touch THERMOS...
Page 69 - Frequently asked questions; Q Will my thermostat still work if I lose my Wi-Fi connection?; connecting to the thermostat again.; close to the thermostat?; A Verify that the password entered for the Wi-Fi router is correct.
67 69-2809EF—01 Frequently asked questions : Q Will my thermostat still work if I lose my Wi-Fi connection? : A Yes, the thermostat will operate your heating and/or cooling system with or without Wi-Fi. : Q How do I find the password to my router? : A Contact the manufacturer of the router or check ...
Page 70 - using my new account.; A Check for the email in your Junk or Deleted folder.; Q Is there a way to extend the signal strength?
69-2809EF—01 68 Frequently asked questions router has a good internet connection. On your computer, verify that you can open the site at mytotalconnectcomfort.com If you cannot open the site, switch off the internet modem for a few seconds, then power it back on. : Q I registered on the Total Connec...
Page 71 - Getting help and responding to alerts; On screen help; to display instructions for; OK; to redisplay the original
69 69-2809EF—01 Getting help and responding to alerts Your thermostat offers two types of assistance, if these assistance options do not answer your questions, review the FAQs (pages 67-68) and troubleshooting tips (pages 71-72). On screen help Most displays include an orange Help button.1 Touch Hel...
Page 72 - On screen alerts; on the instruction display,
69-2809EF—01 70 Getting help and responding to alerts On screen alerts Your home screen will display a large orange button when you need to correct a setting or system problem.1 Touch the button, the thermostat displays instructions for completing the task to which you were alerted. 2 Touch OK on th...
Page 73 - Troubleshooting
71 69-2809EF—01 If you have difficulty with your thermostat, please try the following suggestions. Most problems can be corrected quickly and easily. Display is blank • Check circuit breaker and reset if necessary.• Make sure power switch at heating and cooling system is on.• Make sure furnace door ...
Page 75 - Glossary; C wire; QR Code
73 69-2809EF—01 Glossary C wire The “C” or common wire brings 24 VAC power to the thermostat from the heating/cooling system. Some older mechanical or battery operated thermostats may not have this wire connection. It is necessary for establishing a Wi-Fi connection to your home network. Heat Pump h...
Page 76 - Regulatory information
69-2809EF—01 74 Regulatory information FCC Compliance Statement (Part 15.19) (USA only) This device complies with Part 15 of the FCC Rules. Operation is subject to the following two conditions:1 This device may not cause harmful interference, and2 This device must accept any interference received, i...
Page 77 - -year limited warranty
75 69-2809EF—01 1-year limited warranty Honeywell warrants this product, excluding battery, to be free from defects in the workmanship or materials, under normal use and service, for a period of one (1) year from the date of purchase by the consumer. If at any time during the warranty period the pro...
Page 80 - Automation and Control Systems
Automation and Control Systems Honeywell International Inc. 1985 Douglas Drive North Golden Valley, MN 55422 wifithermostat.com ® U.S. Registered Trademark.Apple, iPhone, iPad, iPod touch and iTunes are trademarks of Apple Inc. All other trademarks are the property of their respective owners.© 2013 ...
Page 81 - Guide de l’utilisateur
Guide de l’utilisateur Thermostat programmable Wi-Fi à écran tactile couleur RTH9580 Wi-Fi
Page 82 - Vous trouverez dans la boîte; Avec votre nouveau thermostat, vous pouvez :
69-2809EF—01 ii Vous trouverez dans la boîte • Thermostat • Plaque murale • Vis et ancres • Guide de démarrage rapide Caractéristiques de votre thermostat Wi-Fi Avec votre nouveau thermostat, vous pouvez : • Vous connecter à Internet pour surveiller et contrôler votre système de chauffage/refroidiss...
Page 83 - Bienvenue
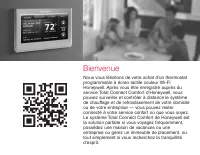
Bienvenue Nous vous félicitons de votre achat d’un thermostat programmable à écran tactile couleur Wi-Fi Honeywell. Après vous être enregistré auprès du service Total Connect Comfort d’Honeywell, vous pouvez surveiller et contrôler à distance le système de chauffage et de refroidissement de votre do...
Page 84 - AVIS RELATIF AU MERCURE :; Ne jetez pas l’ancien thermostat dans la
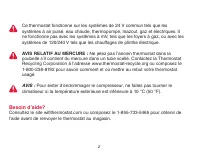
69-2809EF—01 2 Ce thermostat fonctionne sur les systèmes de 24 V commun tels que les systèmes à air pulsé, eau chaude, thermopompe, mazout, gaz et électriques. Il ne fonctionne pas avec les systèmes à mV, tels que les foyers à gaz, ou avec les systèmes de 120/240 V tels que les chauffages de plinthe...
Page 85 - Table des matières
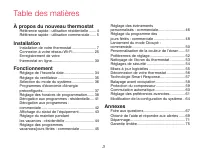
69-2809EF—01 3 À propos du nouveau thermostat Référence rapide : utilisation résidentielle ....... 4 Référence rapide : utilisation commerciale ...... 5 Installation Installation de votre thermostat ........................ 7 Connexion à votre réseau Wi-Fi ..................... 25 Enregistrement de ...
Page 86 - Référence rapide : utilisation résidentielle; Conditions intérieures.
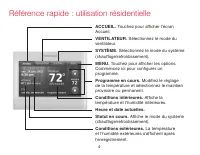
69-2809EF—01 4 Référence rapide : utilisation résidentielle ACCUEIL. Touchez pour afficher l’écran Accueil. VENTILATEUR. Sélectionnez le mode du ventilateur. SYSTÈME. Sélectionnez le mode du système (chauffage/refroidissement). MENU. Touchez pour afficher les options. Commencez ici pour configurer u...
Page 87 - Référence rapide : utilisation commerciale; Emplacement du thermostat.
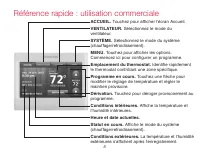
5 69-2809EF—01 Référence rapide : utilisation commerciale ACCUEIL. Touchez pour afficher l’écran Accueil. VENTILATEUR. Sélectionnez le mode du ventilateur. SYSTÈME. Sélectionnez le mode du système (chauffage/refroidissement). MENU. Touchez pour afficher les options. Commencez ici pour configurer un ...
Page 88 - Configuration de votre thermostat
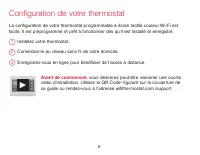
69-2809EF—01 6 Configuration de votre thermostat La configuration de votre thermostat programmable à écran tactile couleur Wi-Fi est facile. Il est préprogrammé et prêt à fonctionner dès qu’il est installé et enregistré. Installez votre thermostat. Connectez-le au réseau sans fil de votre domicile. ...
Page 89 - Installation de votre thermostat; Pour protéger votre
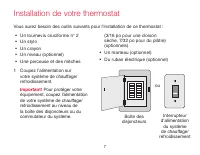
7 69-2809EF—01 Installation de votre thermostat Vous aurez besoin des outils suivants pour l’installation de ce thermostat : • Un tournevis cruciforme n° 2 • Un stylo • Un crayon • Un niveau (optionnel) • Une perceuse et des mèches (3/16 po pour une cloison sèche, 7/32 po pour du plâtre) (optionnels...
Page 92 - Montez la plaque murale du; Plaque murale
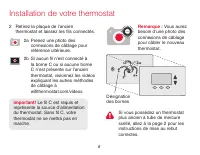
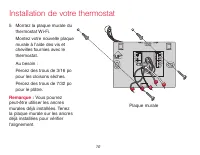
69-2809EF—01 10 LEVEL HERE R Y C W G MCR34499 CK Rc R W- O/B YG W2- Aux/E Y2L 5 Montez la plaque murale du thermostat Wi-Fi. Montez votre nouvelle plaque murale à l’aide des vis et chevilles fournies avec le thermostat. Au besoin : Percez des trous de 3/16 po pour les cloisons sèches. Percez des tro...
Page 93 - Câblage; Pour les systèmes de chauffage/refroidissement; conventionnels; , consultez la page 14. Voir le « Glossaire » à la
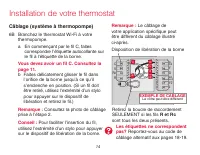
11 69-2809EF—01 Important! Le fonctionnement du thermostat Wi-Fi requiert l’utilisation d’un fil C. Le fil C, ou neutre, amène l’alimentation 24 V c.a. au thermostat. De nombreux thermostats mécaniques ou à piles plus anciens n’ont pas besoin d’un fil C. Si vous ne disposez pas d’un fil C, essayez :...
Page 94 - Vous devez avoir un fil C. Consultez la
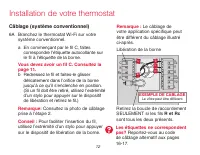
69-2809EF—01 12 MCR34540 C K Rc R W- O/B Y G W2- Aux/E Y2 L W Y G R C Installation de votre thermostat Câblage (système conventionnel) 6A Branchez le thermostat Wi-Fi sur votre système conventionnel. a En commençant par le fil C, faites correspondre l’étiquette autocollante sur le fil à l’étiquette ...
Page 95 - c Dans l’image à droite, cochez la case
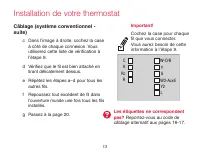
13 69-2809EF—01 Installation de votre thermostat Câblage (système conventionnel - suite) c Dans l’image à droite, cochez la case à côté de chaque connexion. Vous utiliserez cette liste de vérification à l’étape 9. d Vérifiez que le fil est bien attaché en tirant délicatement dessus. e Répétez les ét...
Page 96 - a En commençant par le fil C, faites; R et Rc
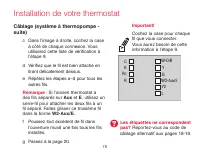
69-2809EF—01 14 Installation de votre thermostat Câblage (système à thermopompe) 6B Branchez le thermostat Wi-Fi à votre thermopompe. a En commençant par le fil C, faites correspondre l’étiquette autocollante sur le fil à l’étiquette de la borne. Vous devez avoir un fil C. Consultez la page 11. b Fa...
Page 97 - Remarque
15 69-2809EF—01 Installation de votre thermostat Câblage (système à thermopompe - suite) c Dans l’image à droite, cochez la case à côté de chaque connexion. Vous utiliserez cette liste de vérification à l’étape 9. d Vérifiez que le fil est bien attaché en tirant délicatement dessus. e Répétez les ét...
Page 98 - Câblage alternatif (système conventionnel); Vous devez
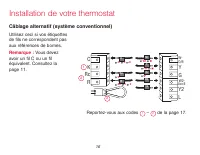
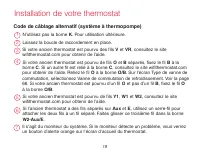
69-2809EF—01 16 Installation de votre thermostat Câblage alternatif (système conventionnel) Utilisez ceci si vos étiquettes de fils ne correspondent pas aux références de bornes. Remarque : Vous devez avoir un fil C ou un fil équivalent. Consultez la page 11. Reportez-vous aux codes 1 – 2 de la page...
Page 99 - Code de câblage alternatif (système conventionnel); • Si un fil; • Si votre ancien thermostat a des fils
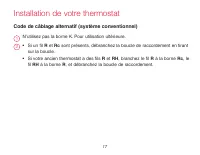
17 69-2809EF—01 Installation de votre thermostat Code de câblage alternatif (système conventionnel) 2 1 N’utilisez pas la borne K. Pour utilisation ultérieure. • Si un fil R et Rc sont présents, débranchez la boucle de raccordement en tirant sur la boucle. • Si votre ancien thermostat a des fils R e...
Page 100 - Câblage alternatif (système à thermopompe)
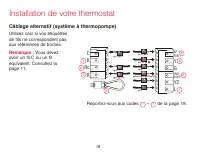
69-2809EF—01 18 Installation de votre thermostat Câblage alternatif (système à thermopompe) Utilisez ceci si vos étiquettes de fils ne correspondent pas aux références de bornes. Remarque : Vous devez avoir un fil C ou un fil équivalent. Consultez la page 11. Reportez-vous aux codes 1 – 7 de la page...
Page 101 - Code de câblage alternatif (système à thermopompe)
19 69-2809EF—01 N’utilisez pas la borne K . Pour utilisation ultérieure. Laissez la boucle de raccordement en place. Si votre ancien thermostat est pourvu des fils V et VR , consultez le site wifithermostat.com pour obtenir de l’aide. Si votre ancien thermostat est pourvu de fils O et B séparés, fix...
Page 102 - Fixez le thermostat à la plaque
69-2809EF—01 20 Installation de votre thermostat 7 Fixez le thermostat à la plaque murale. Alignez le thermostat sur la plaque murale puis emboîtez-le. Thermostat Plaque murale LEVEL HERE M34498
Page 103 - a Vérifiez que le fil C est
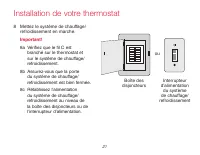
21 69-2809EF—01 Installation de votre thermostat 8 Mettez le système de chauffage/ refroidissement en marche. Important! 8a Vérifiez que le fil C est branché sur le thermostat et sur le système de chauffage/refroidissement. 8b Assurez-vous que la porte du système de chauffage/refroidissement est bie...
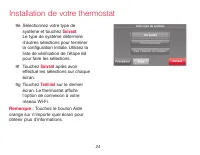
Page 104 - sélectionner les options appropriées.; a Touchez la langue que vous; b Sélectionnez l’application Résidence; Suivant
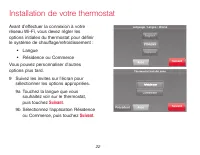
69-2809EF—01 22 Installation de votre thermostat Avant d’effectuer la connexion à votre réseau Wi-Fi, vous devez régler les options initiales du thermostat pour définir le système de chauffage/refroidissement : • Langue• Résidence ou Commerce Vous pouvez personnaliser d’autres options plus tard.9 Su...
Page 105 - c Touchez; ou renommez
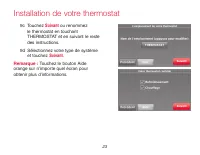
23 69-2809EF—01 Installation de votre thermostat 9c Touchez Suivant ou renommez le thermostat en touchant THERMOSTAT et en suivant le reste des instructions. 9d Sélectionnez votre type de système et touchez Suivant . Remarque : Touchez le bouton Aide orange sur n’importe quel écran pour obtenir plus...
Page 107 - Connexion à votre réseau Wi-Fi; Touchez
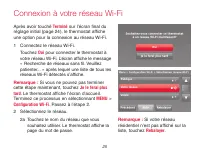
25 69-2809EF—01 Connexion à votre réseau Wi-Fi Après avoir touché Terminé sur l’écran final du réglage initial (page 24), le thermostat affiche une option pour la connexion au réseau Wi-Fi.1 Connectez le réseau Wi-Fi. Touchez Oui pour connecter le thermostat à votre réseau Wi-Fi. L’écran affiche le ...
Page 109 - L’écran Enregistrement; Si vous touchez
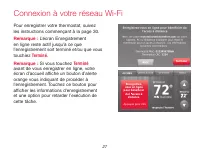
27 69-2809EF—01 Connexion à votre réseau Wi-Fi Pour enregistrer votre thermostat, suivez les instructions commençant à la page 30. Remarque : L’écran Enregistrement en ligne reste actif jusqu’à ce que l’enregistrement soit terminé et/ou que vous touchiez Terminé . Remarque : Si vous touchez Terminé ...
Page 110 - Déconnexion du réseau Wi-Fi
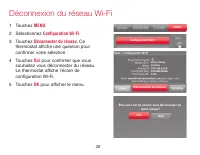
69-2809EF—01 28 Déconnexion du réseau Wi-Fi 1 Touchez MENU . 2 Sélectionnez Configuration Wi-Fi . 3 Touchez Déconnecter du réseau . Ce thermostat affiche une question pour confirmer votre sélection. 4 Touchez Oui pour confirmer que vous souhaitez vous déconnecter du réseau. Le thermostat affiche l’é...
Page 111 - Reconnexion au réseau Wi-Fi; • Si votre thermostat est enregistré, vous verrez; • Si l’écran affiche « Enregistrez-vous en ligne
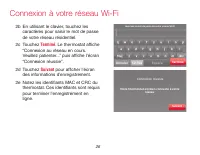
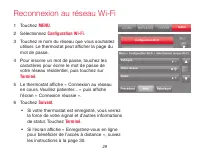
29 69-2809EF—01 Reconnexion au réseau Wi-Fi 1 Touchez MENU . 2 Sélectionnez Configuration Wi-Fi . 3 Touchez le nom du réseau que vous souhaitez utiliser. Le thermostat peut afficher la page du mot de passe. 4 Pour inscrire un mot de passe, touchez les caractères pour écrire le mot de passe de votre ...
Page 112 - Allez à mytotalconnectcomfort.com; Enregistrement de votre thermostat en ligne
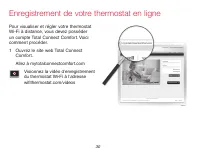
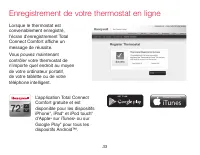
69-2809EF—01 30 M31570 M31570 Pour visualiser et régler votre thermostat Wi-Fi à distance, vous devez posséder un compte Total Connect Comfort. Voici comment procéder.1 Ouvrez le site web Total Connect Comfort. Allez à mytotalconnectcomfort.com Visionnez la vidéo d’enregistrement du thermostat Wi-Fi...
Page 113 - Ouvrez une session ou créez un compte.
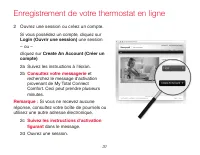
31 69-2809EF—01 Enregistrement de votre thermostat en ligne 2 Ouvrez une session ou créez un compte. Si vous possédez un compte, cliquez sur Login (Ouvrir une session) une session – ou –cliquez sur Create An Account (Créer un compte) 2a Suivez les instructions à l’écran.2b Consultez votre messagerie...
Page 114 - a Suivez les instructions à; Ces identifiants figurent
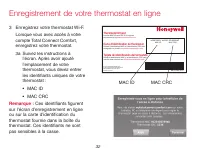
69-2809EF—01 32 Enregistrement de votre thermostat en ligne 3 Enregistrez votre thermostat Wi-F. Lorsque vous avec accès à votre compte Total Connect Comfort, enregistrez votre thermostat. 3a Suivez les instructions à l’écran. Après avoir ajouté l’emplacement de votre thermostat, vous devez entrer l...
Page 116 - Réglage de l’heure/la date; Régler l’heure/Régler la date
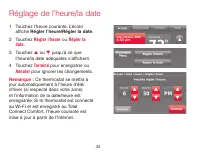
69-2809EF—01 34 Réglage de l’heure/la date 1 Touchez l’heure courante. L’écran affiche Régler l’heure/Régler la date . 2 Touchez Régler l’heure ou Régler la date . 3 Touchez p ou q jusqu’à ce que l’heure/la date adéquates s’affichent. 4 Touchez Terminé pour enregistrer ou Annuler pour ignorer les ch...
Page 117 - Réglage du ventilateur; Suivre le programme :
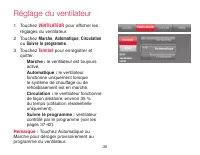
35 69-2809EF—01 Réglage du ventilateur 1 Touchez VENTILATEUR pour afficher les réglages du ventilateur. 2 Touchez Marche , Automatique , Circulation ou Suivre le programme . 3 Touchez Terminé pour enregistrer et quitter. Marche : le ventilateur est toujours activé. Automatique : le ventilateur fonct...
Page 118 - Réglage du mode du système; SYSTÈME; Automatique
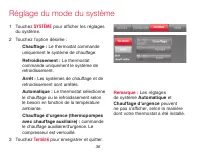
69-2809EF—01 36 Réglage du mode du système 1 Touchez SYSTÈME pour afficher les réglages du système. 2 Touchez l’option désirée : Chauffage : Le thermostat commande uniquement le système de chauffage. Refroidissement : Le thermostat commande uniquement le système de refroidissement. Arrêt : Les systè...
Page 119 - Programmes d’économie d’énergie préconfigurés; Marche; les réglages par défaut.
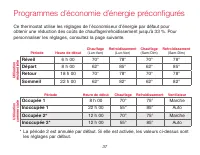
37 69-2809EF—01 Programmes d’économie d’énergie préconfigurés Ce thermostat utilise les réglages de l’économiseur d’énergie par défaut pour obtenir une réduction des coûts de chauffage/refroidissement jusqu’à 33 %. Pour personnaliser les réglages, consultez la page suivante. Réveil 6 h 00 70° 78° 70...
Page 120 - Réglage des horaires de programmation; • Touchez; Je le ferai moi-même
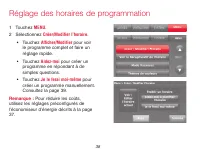
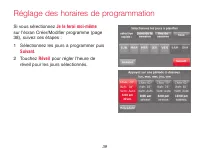
69-2809EF—01 38 Réglage des horaires de programmation 1 Touchez MENU . 2 Sélectionnez Créer/Modifier l’horaire . • Touchez Afficher/Modifier pour voir le programme complet et faire un réglage rapide. • Touchez Aidez-moi pour créer un programme en répondant à de simples questions. • Touchez Je le fer...
Page 121 - Si vous sélectionnez; Touchez; Réveil; pour régler l’heure de
39 69-2809EF—01 Réglage des horaires de programmation Si vous sélectionnez Je le ferai moi-même sur l’écran Créer/Modifier programme (page 38), suivez ces étapes :1 Sélectionnez les jours à programmer puis Suivant . 2 Touchez Réveil pour régler l’heure de réveil pour les jours sélectionnés. Suivant ...
Page 123 - Dérogation aux programmes : utilisation résidentielle; Passez à maintien
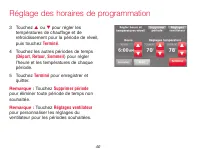
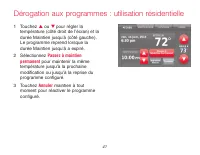
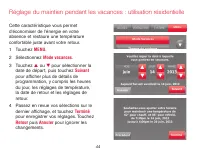
41 69-2809EF—01 Dérogation aux programmes : utilisation résidentielle 1 Touchez p ou q pour régler la température (côté droit de l’écran) et la durée Maintien jusqu’à (côté gauche). Le programme reprend lorsque la durée Maintien jusqu’à a expiré. 2 Sélectionnez Passez à maintien permanent pour maint...
Page 124 - Dérogation aux programmes : utilisation commerciale; Dérivation
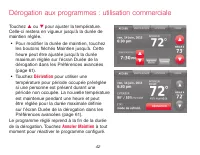
69-2809EF—01 42 Dérogation aux programmes : utilisation commerciale Touchez p ou q pour ajuster la température. Celle-ci restera en vigueur jusqu’à la durée de maintien réglée. • Pour modifier la durée de maintien, touchez les boutons fléchés Maintien jusqu’à. Cette heure peut être ajustée jusqu’à l...
Page 125 - Affichage du statut de l’équipement; Sélectionnez; État du matriel; Touchez
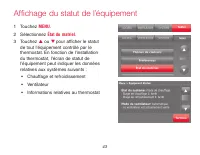
43 69-2809EF—01 Affichage du statut de l’équipement 1 Touchez MENU . 2 Sélectionnez État du matriel . 3 Touchez p ou q pour afficher le statut de tout l’équipement contrôlé par le thermostat. En fonction de l’installation du thermostat, l’écran de statut de l’équipement peut indiquer les données rel...
Page 127 - Gestionnaire des jours fériés/; Sélectionnez l’article à programmer.; pour enregistrer vos réglages.
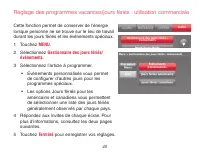
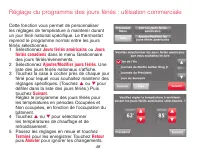
45 69-2809EF—01 Réglage des programmes vacances/jours fériés : utilisation commerciale Cette fonction permet de conserver de l’énergie lorsque personne ne se trouve sur le lieu de travail durant les jours fériés et les événements spéciaux.1 Touchez MENU . 2 Sélectionnez Gestionnaire des jours fériés...
Page 128 - Réglage des événements personnalisés : utilisation commerciale; Événements personnalisés; Créer un nouvel événement
69-2809EF—01 46 Réglage des événements personnalisés : utilisation commerciale Cette fonction vous permet de personnaliser les réglages de température à maintenir durant un événement spécifique. Vous pouvez configurer un événement pour une date ou un jour spécifique du mois. Le thermostat reprend le...
Page 129 - • Pour
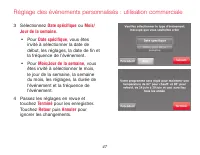
47 69-2809EF—01 Réglage des événements personnalisés : utilisation commerciale 3 Sélectionnez Date spécifique ou Mois/ Jour de la semaine . • Pour Date spécifique , vous êtes invité à sélectionner la date de début, les réglages, la date de fin et la fréquence de l’événement. • Pour Mois/Jour de la s...
Page 130 - Réglage du programme des jours fériés : utilisation commerciale; Réglez le programme des jours fériés pour
69-2809EF—01 48 Réglage du programme des jours fériés : utilisation commerciale Cette fonction vous permet de personnaliser les réglages de température à maintenir durant un jour férié national spécifique. Le thermostat reprend le programme normal entre les jours fériés sélectionnés. 1 Sélectionnez ...
Page 132 - Lancement du mode Occupé : utilisation commerciale; Appuyer pour commencer la période; ou
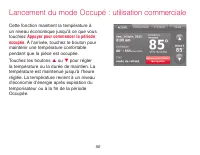
69-2809EF—01 50 Lancement du mode Occupé : utilisation commerciale Cette fonction maintient la température à un niveau économique jusqu’à ce que vous touchiez Appuyer pour commencer la période occupée . À l’arrivée, touchez le bouton pour maintenir une température confortable pendant que la pièce es...
Page 133 - Personnalisation de la couleur de l’écran; • En choisissant un nom de couleur,
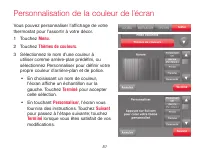
51 69-2809EF—01 Personnalisation de la couleur de l’écran Vous pouvez personnaliser l’affichage de votre thermostat pour l’assortir à votre décor.1 Touchez Menu . 2 Touchez Thèmes de couleurs . 3 Sélectionnez le nom d’une couleur à utiliser comme arrière-plan prédéfini, ou sélectionnez Personnaliser...
Page 134 - Réglages des préférences; et sélectionnez; Sélectionnez une option et suivez les; pour enregistrer vos; Annuler; pour ignorer
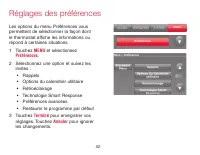
69-2809EF—01 52 Réglages des préférences Les options du menu Préférences vous permettent de sélectionner la façon dont le thermostat affiche les informations ou répond à certaines situations.1 Touchez MENU et sélectionnez Préférences . 2 Sélectionnez une option et suivez les invites : • Rappels • Op...
Page 135 - Nettoyage de l’écran du thermostat; Nettoyer l’écran; . Une minuterie montre le
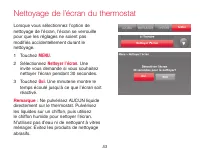
53 69-2809EF—01 Nettoyage de l’écran du thermostat Lorsque vous sélectionnez l’option de nettoyage de l’écran, l’écran se verrouille pour que les réglages ne soient pas modifiés accidentellement durant le nettoyage.1 Touchez MENU . 2 Sélectionnez Nettoyer l’écran . Une invite vous demande si vous so...
Page 136 - Réglages de sécurité; Réglages; Modifier mode de; Sélectionnez une option et suivez les; accès intégral permis.; Partiellement verrouillé :; seule la; Complètement verrouillé :; Aucun; Si un mot de passe est choisi
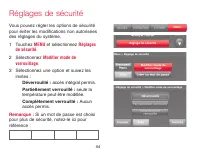
69-2809EF—01 54 Réglages de sécurité Vous pouvez régler les options de sécurité pour éviter les modifications non autorisées des réglages du système.1 Touchez MENU et sélectionnez Réglages de sécurité . 2 Sélectionnez Modifier mode de verrouillage . 3 Sélectionnez une option et suivez les invites : ...
Page 137 - Mises à jour logicielles; Si le thermostat n’est pas
55 69-2809EF—01 Mises à jour logicielles Honeywell publie régulièrement des mises à jour pour le logiciel de ce thermostat. Ces mises à jour se font automatiquement par l’intermédiaire de votre connexion Wi-Fi. Tous vos réglages sont enregistrés, de sorte que vous n’avez à effectuer aucune modificat...
Page 138 - Déconnexion de votre thermostat; Dans Mon Compte, sélectionnez; Delete My
69-2809EF—01 56 Déconnexion de votre thermostat Si vous annulez l’enregistrement de votre thermostat sur le site Web Total Connect Comfort (par exemple vous déménagez sans emporter le thermostat), suivez ces étapes :1 Sur mytotalconnectcomfort.com, ouvrez votre compte. 2 Dans Mon Compte, sélectionne...
Page 139 - Technologie Smart Response; Sélectionnez Technologie
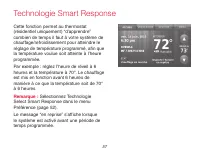
57 69-2809EF—01 Technologie Smart Response Cette fonction permet au thermostat (résidentiel uniquement) “d’apprendre” combien de temps il faut à votre système de chauffage/refroidissement pour atteindre le réglage de température programmé, afin que la température voulue soit atteinte à l’heure progr...
Page 140 - Balayage avant occupation
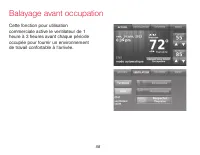
69-2809EF—01 58 Balayage avant occupation Cette fonction pour utilisation commerciale active le ventilateur de 1 heure à 3 heures avant chaque période occupée pour fournir un environnement de travail confortable à l’arrivée.
Page 141 - Protection du compresseur
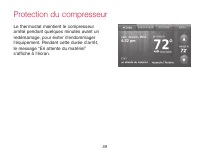
59 69-2809EF—01 Protection du compresseur Le thermostat maintient le compresseur arrêté pendant quelques minutes avant un redémarrage, pour éviter d’endommager l’équipement. Pendant cette durée d’arrêt, le message “En attente du matériel” s’affiche à l’écran.
Page 142 - Commutation automatique; , le thermostat sélectionne; Commutation; sur l’écran de Commutation
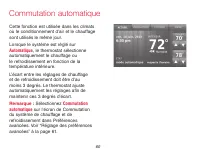
69-2809EF—01 60 Commutation automatique Cette fonction est utilisée dans les climats où le conditionnement d’air et le chauffage sont utilisés le même jour.Lorsque le système est réglé sur Automatique , le thermostat sélectionne automatiquement le chauffage ou le refroidissement en fonction de la te...
Page 143 - Réglage des préférences avancées
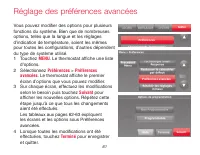
61 69-2809EF—01 Réglage des préférences avancées Vous pouvez modifier des options pour plusieurs fonctions du système. Bien que de nombreuses options, telles que la langue et les réglages d’indication de température, soient les mêmes pour toutes les configurations, d’autres dépendent du type de syst...
Page 144 - Titre de l’écran
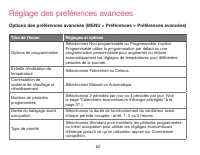
69-2809EF—01 62 Réglage des préférences avancées Options des préférences avancées (MENU > Préférences > Préférences avancées) Titre de l’écran Réglages et options Options de programmation Sélectionnez Non programmable ou Programmable. L’option Programmable utilise la programmation par défaut o...
Page 146 - Modification de la configuration du système; Configuration du système
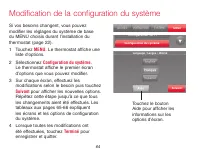
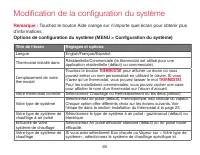
69-2809EF—01 64 Modification de la configuration du système Conf iguration du système MENU Si vos besoins changent, vous pouvez modifier les réglages du système de base du MENU choisis durant l’installation du thermostat (page 22).1 Touchez MENU. Le thermostat affiche une liste d’options. 2 Sélectio...
Page 148 - Options de configuration du système (fin)
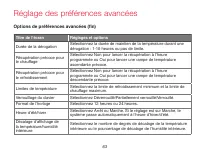
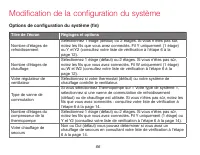
69-2809EF—01 66 Modification de la configuration du système Options de configuration du système (fin) Titre de l’écran Réglages et options Nombre d’étages de refroidissement Sélectionnez 1 étage (défaut) ou 2 étages. Si vous n’êtes pas sûr, notez les fils que vous avez connectés. Fil Y uniquement (1...
Page 149 - Foire aux questions; Q Comment puis-je trouver le mot de passe de mon routeur?; thermostat. Essayez de vous reconnecter au thermostat.
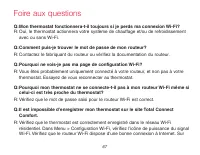
67 69-2809EF—01 Foire aux questions : Q Mon thermostat fonctionnera-t-il toujours si je perds ma connexion Wi-Fi? : R Oui, le thermostat actionnera votre système de chauffage et/ou de refroidissement avec ou sans Wi-Fi. : Q Comment puis-je trouver le mot de passe de mon routeur? : R Contactez le fab...
Page 150 - de session en utilisant mon nouveau compte.; pouvez également acheter et installer un répéteur Wi-Fi.
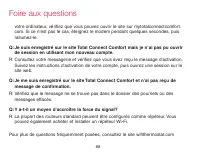
69-2809EF—01 68 Foire aux questions votre ordinateur, vérifiez que vous pouvez ouvrir le site sur mytotalconnectcomfort.com. Si ce n’est pas le cas, éteignez le modem pendant quelques secondes, puis rallumez-le. : Q Je suis enregistré sur le site Total Connect Comfort mais je n’ai pas pu ouvrir de s...
Page 151 - Obtenir de l’aide et répondre aux alertes; Aide sur écran; pour afficher les; pour afficher de nouveau
69 69-2809EF—01 Obtenir de l’aide et répondre aux alertes Votre thermostat offre deux types d’assistance. Si ces options d’assistance ne répondent pas à vos questions, consultez la foire aux questions (pages 67-68) et les conseils de dépannage (pages 71-72). Aide sur écran La plupart des écrans comp...
Page 152 - Alertes à l’écran; sur l’écran d’instructions,
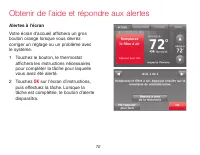
69-2809EF—01 70 Obtenir de l’aide et répondre aux alertes Alertes à l’écran Votre écran d’accueil affichera un gros bouton orange lorsque vous devrez corriger un réglage ou un problème avec le système.1 Touchez le bouton, le thermostat affichera les instructions nécessaires pour compléter la tâche p...
Page 153 - Dépannage
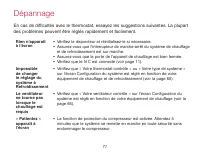
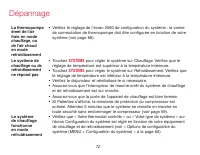
71 69-2809EF—01 En cas de difficultés avec le thermostat, essayez les suggestions suivantes. La plupart des problèmes peuvent être réglés rapidement et facilement. Rien n’apparaît à l’écran • Vérifiez le disjoncteur et réinitialisez-le si nécessaire.• Assurez-vous que l’interrupteur de marche-arrêt ...
Page 155 - Glossaire; Fil C
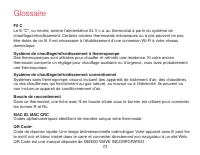
73 69-2809EF—01 Glossaire Fil C Le fil “C”, ou neutre, amène l’alimentation 24 V c.a. au thermostat à partir du système de chauffage/refroidissement. Certains anciens thermostats mécaniques ou à pile peuvent ne pas être dotés de ce fil. Il est nécessaire à l’établissement d’une connexion Wi-Fi à vot...
Page 156 - Informations réglementaires
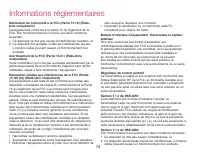
69-2809EF—01 74 Informations réglementaires Déclaration de conformité à la FCC (Partie 15.19) (États-Unis uniquement) Cet appareil est conforme à la partie 15 du règlement de la FCC. Son fonctionnement est soumis aux deux conditions suivantes :1 Ce dispositif ne doit pas causer d’interférences nuisi...
Page 157 - Garantie limitée d’un an
75 69-2809EF—01 Garantie limitée d’un an Honeywell garantit ce produit, à l’exception des piles, contre tout défaut de pièce ou de main-d’œuvre, durant une période d’un (1) an à partir de la date d’achat par le consommateur si le produit est utilisé et entretenu convenablement. En cas de défaillance...
Page 160 - Systèmes d’automatisation et de régulation
69-2809EF-01 ® Marque de commerce déposée américaine.Apple, iPhone, iPad, iPod touch et iTunes sontdes marques de commerce de Apple Inc.Toutes les autres marques de commerce sontpropriété de leurs propriétaires respectifs.© 2013 Honeywell International Inc.69-2809EF— 01 CNG 03-13Imprimé aux États-Un...


 Honeywell DT8050A
Installation Manual
Honeywell DT8050A
Installation Manual
 Honeywell DT8050
Manual
Honeywell DT8050
Manual
 Honeywell TPFIT25WK
User Manual
Honeywell TPFIT25WK
User Manual
 Honeywell TPFIT32AWK
User Manual
Honeywell TPFIT32AWK
User Manual
 Honeywell 24DX47
User Manual
Honeywell 24DX47
User Manual
 Honeywell TPFIT50PWK
User Manual
Honeywell TPFIT50PWK
User Manual
 Honeywell TPFIT50WK
User Manual
Honeywell TPFIT50WK
User Manual
 Honeywell 00010
User Manual
Honeywell 00010
User Manual
 Honeywell ADVBLEWIFI
Manual
Honeywell ADVBLEWIFI
Manual