Page 3 - Eng; Wa r n i n gs
Rev 3 iii G-113077-002 01/07 Eng lish Wa r n i n gs Installation and servicing should be performed only by qualified and experienced personnel to conform to all local codes and to maintain your warranty. WARNING! 12 VDC/24 VAC models require the use of CSA Certified/UL Listed Class 2 power adapters ...
Page 4 - F C C C o m p l i a n c e S t a t e m e n t; Caution
Rev 3 iv G-113077-002 01/07 F C C C o m p l i a n c e S t a t e m e n t Information to the User: This equipment has been tested and found to comply with the limits for a Class A digital device. Pursuant to Part 15 of the FCC Rules, these limits are designed to provide reasonable protection against h...
Page 5 - C o n t e n t s
Rev 3 G-113077-002 01/07 Eng lish C o n t e n t s Introduction . . . . . . . . . . . . . . . . . . . . . . . . . . . . . . . 1 Features . . . . . . . . . . . . . . . . . . . . . . . . . . . . . . . . . 1Before You Begin . . . . . . . . . . . . . . . . . . . . . . . . . 2Unpack Everything . . . . . ....
Page 6 - I n t r o d u c t i o n; Features; C/CS adjustable lens mount adapter
Rev 3 1 G-113077-002 01/07 I n t r o d u c t i o n The Honeywell L-Series Color cameras are ideally suited for use in day-to-day surveillance applications. The L-Series cameras are designed for exceptional value and performance for everyday use. Their off-the-shelf feature set is designed for high p...
Page 7 - Before You Begin; Contact Information; Note
Rev 3 2 G-113077-002 01/07 Eng lish Before You Begin Unpack Everything Check that the items received match those listed on the order form and packing slip. The L-Series packing box should include, in addition to this User Guide: • One L-Series Color camera • One Auto Iris lens plug If any parts are ...
Page 8 - C a m e r a S e t t i n g s; Camera Functions
Rev 3 3 G-113077-002 01/07 C a m e r a S e t t i n g s Camera Functions Figure 2 Camera Rear View Legend # Description 1 DIP switches for mode settings (see Figure 3 ) 2 Auto Iris Lens select switch, VSD for Video or DC for Direct Drive 3 Sync select switch 4 Video output connector 5 Power input con...
Page 9 - Setting Up Your Camera; Selecting the Lens; Manual Lens; Set the EE/ME DIP switch on the rear of the camera (see; Vari-focal Auto Iris Lens; To set a different exposure, see
Rev 3 4 G-113077-002 01/07 Eng lish Setting Up Your Camera Figure 3 shows the factory set DIP switch settings. Automatic Gain Control (AGC) and Auto White Balance Control (AWC) are set ON. Figure 3 Factory Set DIP Switch Settings Selecting the Lens Manual Lens Set the EE/ME DIP switch on the rear of...
Page 10 - Exposure Mode; Automatic Exposure Mode
Rev 3 5 G-113077-002 01/07 2. Slowly turn the LEVEL potentiometer until the picture on the monitor is as clear as possible and is not too bright. Video Drive (VSD) Lens Set the VSD/DC switch on the rear of the camera (see Figure 3 ) to VSD. Exposure Mode Automatic Exposure Mode The Electronic Exposu...
Page 12 - One Push Lock
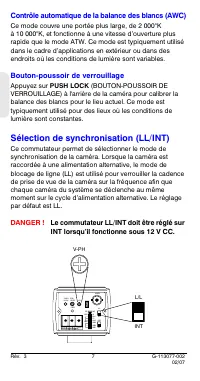
Rev 3 7 G-113077-002 01/07 Auto White Balance Control (AWC) This mode covers a wider range of 2000°K to 10000°K and performs at a faster operating speed than ATW mode. This mode is typically used for outdoor applications or where variable lighting conditions exist. One Push Lock Press PUSH LOCK on t...
Page 14 - L e n s I n s t a l l a t i o n; Adjusting the Back Focus; Loosen the setscrew with a Phillips screwdriver.
Rev 3 9 G-113077-002 01/07 L e n s I n s t a l l a t i o n Adjusting the Back Focus The back focus adjustment is accessible at the front end of the camera housing to adjust the back focal length or picture focus. The range of adjustment allows both C- and CS-mount lenses to be used without the need ...
Page 16 - C o m p l e t i n g t h e I n s t a l l a t i o n; Mounting the Camera; Some installation codes dictate that the mounting
Rev 3 11 G-113077-002 01/07 C o m p l e t i n g t h e I n s t a l l a t i o n Mounting the Camera Mounting points are provided on the top of the camera for mounting the camera on a bracket or tripod. They are designed to accept standard sized 1/4 x 20 mounting screws. This bracket can be unscrewed a...
Page 17 - Connecting the Camera
Rev 3 12 G-113077-002 01/07 Eng lish Connecting the Camera 1. Connect the VIDEO connector on the rear of the camera to the video-in connector on your monitor. 2. Connect the camera to a power supply appropriate for your installation. HCC334L/X, HCC484L/LX: 12 VDC or 24 VAC power supply HCC335LX, HCC...
Page 18 - These specifications refer to all models, except
Rev 3 13 G-113077-002 01/07 Wa r r a n t y a n d S e r v i c e Subject to the terms and conditions listed on the Product warranty, during the warranty period Honeywell will repair or replace, at its sole option, free of charge, any defective product returned prepaid.In the event you have a problem w...
Page 21 - G u i d e d ’ u t i l i s a t i o n; N T S C; is
Document G-113077-002 – 02/07 – Rév. 3 C a m é r a c o u l e u r S é r i e L HCC334L HCC334LX HCC484L HCC484LX HCC335LX HCC485LX G u i d e d ’ u t i l i s a t i o n N T S C PA L Fr a n ç a is
Page 22 - Révisions
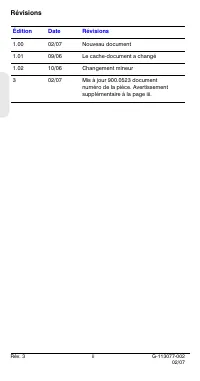
Révisions Édition Date Révisions 1.00 02/07 Nouveau document 1.01 09/06 Le cache-document a changé 1.02 10/06 Changement mineur 3 02/07 Mis à jour 900.0523 document numéro de la pièce. Avertissement supplémentaire à la page iii. Rév. 3 ii G-113077-002 02/07
Page 23 - Av e r t i s s e m e n t s
Rév. 3 iii G-113077-002 02/07 Av e r t i s s e m e n t s L’installation et l’entretien ne doivent être effectués que par du personnel qualifié et expérimenté, afin de respecter toutes les normes locales et de maintenir votre garantie. DANGER ! Les modèles 12 VDC/24 VAC requièrent l’utilisation d’ada...
Page 24 - D é c l a r a t i o n d e c o n f o r m i t é F C C; Attention
Rév. 3 iv G-113077-002 02/07 D é c l a r a t i o n d e c o n f o r m i t é F C C Informations à l’attention de l’utilisateur : Cet équipement a été testé et déclaré conforme aux normes définies pour un dispositif numérique de classe A. Conformément à l’article 15 de la Réglementation FCC, ces normes...
Page 25 - S o m m a i r e
Rév. 3 G-113077-002 02/07 Fr a n ç a is S o m m a i r e Introduction . . . . . . . . . . . . . . . . . . . . . . . . . . . . . . . . . . . . . 1 Caractéristiques . . . . . . . . . . . . . . . . . . . . . . . . . . . . . . . . 1Avant de commencer . . . . . . . . . . . . . . . . . . . . . . . . . . . ...
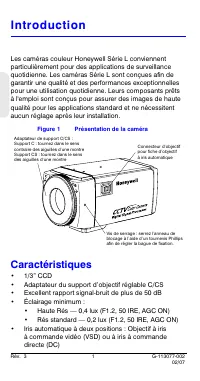
Page 26 - Caractéristiques; Adaptateur du support d’objectif réglable C/CS
Rév. 3 1 G-113077-002 02/07 I n t r o d u c t i o n Les caméras couleur Honeywell Série L conviennent particulièrement pour des applications de surveillance quotidienne. Les caméras Série L sont conçues afin de garantir une qualité et des performances exceptionnelles pour une utilisation quotidienne...
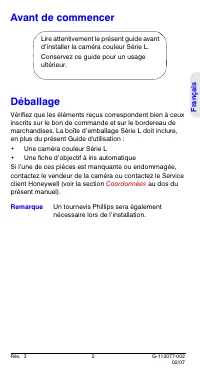
Page 27 - Avant de commencer; Une caméra couleur Série L; Remarque
Rév. 3 2 G-113077-002 02/07 Fr a n ç a is Avant de commencer Déballage Vérifiez que les éléments reçus correspondent bien à ceux inscrits sur le bon de commande et sur le bordereau de marchandises. La boîte d’emballage Série L doit inclure, en plus du présent Guide d'utilisation : • Une caméra coule...
Page 28 - R é g l a g e s d e l a c a m é r a; Fonctions de la caméra
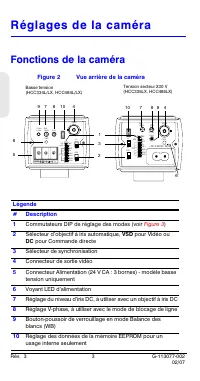
Rév. 3 3 G-113077-002 02/07 R é g l a g e s d e l a c a m é r a Fonctions de la caméra Figure 2 Vue arrière de la caméra Légende # Description 1 Commutateurs DIP de réglage des modes (voir Figure 3 ) 2 Sélecteur d’objectif à iris automatique, VSD pour Vidéo ou DC pour Commande directe 3 Sélecteur de...
Page 29 - Configuration de votre caméra; Choix de l’objectif; Objectif manuel; Objectif à iris automatique et focale variable; Pour définir une exposition différente, voir
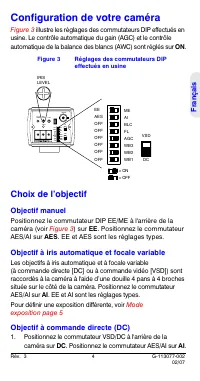
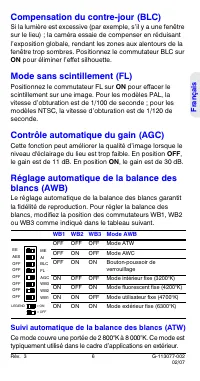
Rév. 3 4 G-113077-002 02/07 Fr a n ç a is Configuration de votre caméra Figure 3 illustre les réglages des commutateurs DIP effectués en usine. Le contrôle automatique du gain (AGC) et le contrôle automatique de la balance des blancs (AWC) sont réglés sur ON. Figure 3 Réglages des commutateurs DIP e...
Page 30 - Mode exposition; Mode exposition automatique
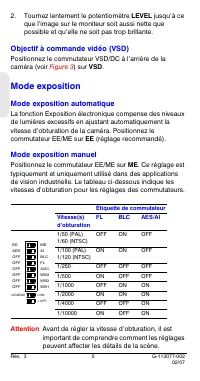
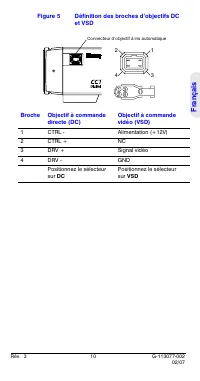
Rév. 3 5 G-113077-002 02/07 2. Tournez lentement le potentiomètre LEVEL jusqu’à ce que l’image sur le moniteur soit aussi nette que possible et qu’elle ne soit pas trop brillante. Objectif à commande vidéo (VSD) Positionnez le commutateur VSD/DC à l’arrière de la caméra (voir Figure 3 ) sur VSD. Mod...
Page 34 - I n s t a l l a t i o n d e l ’ o b j e c t i f; Réglage du tirage optique; Resserrez la vis de blocage.
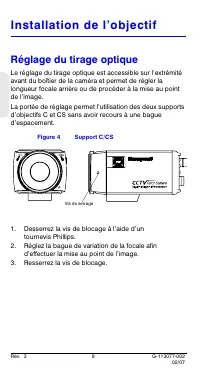
Rév. 3 9 G-113077-002 02/07 I n s t a l l a t i o n d e l ’ o b j e c t i f Réglage du tirage optique Le réglage du tirage optique est accessible sur l’extrémité avant du boîtier de la caméra et permet de régler la longueur focale arrière ou de procéder à la mise au point de l’image. La portée de ré...
Page 36 - F i n d e l ’ i n s t a l l a t i o n; Fixation de la caméra
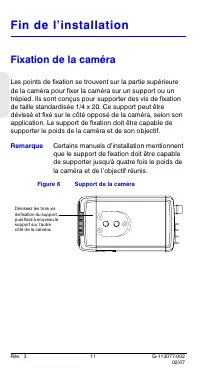
Rév. 3 11 G-113077-002 02/07 F i n d e l ’ i n s t a l l a t i o n Fixation de la caméra Les points de fixation se trouvent sur la partie supérieure de la caméra pour fixer la caméra sur un support ou un trépied. Ils sont conçus pour supporter des vis de fixation de taille standardisée 1/4 x 20. Ce ...
Page 37 - Branchement de la caméra
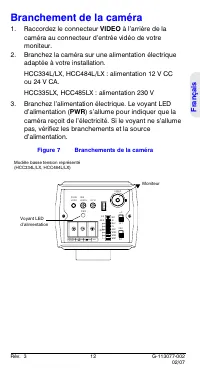
Rév. 3 12 G-113077-002 02/07 Fr a n ç a is Branchement de la caméra 1. Raccordez le connecteur VIDEO à l’arrière de la caméra au connecteur d’entrée vidéo de votre moniteur. 2. Branchez la caméra sur une alimentation électrique adaptée à votre installation. HCC334L/LX, HCC484L/LX : alimentation 12 V...
Page 41 - C á m a r a d e c o l o r; G u í a d e l u s u a r i o; Español
Documento G-113077-002 – 02/07 – Rev. 3 C á m a r a d e c o l o r L - S e r i e s HCC334L HCC334LX HCC484L HCC484LX HCC335LX HCC485LX G u í a d e l u s u a r i o N T S C PA L Español
Page 42 - Revisiones
Revisiones Elaborado Fecha Revisiones 1.00 02/07 Nuevo documento 1.01 09/06 La cubierta de documento cambió. 1.02 10/06 Cambio de menor importancia 3 02/07 Documento actualizado número de pieza; Advertencia agregada a la página iii. Rev. 3 ii G-113077-002 02/07
Page 43 - A d v e r t e n c i a s; ADVERTENCIA
Rev. 3 iii G-113077-002 02/07 A d v e r t e n c i a s La instalación y el mantenimiento deben ser realizados por personal experimentado y especializado para cumplir con las normas locales y mantener la cobertura de la garantía. ADVERTENCIA Es obligatorio que los modelos de 12 V CC/24 V CA utilicen a...
Page 44 - Precaución
Rev. 3 iv G-113077-002 02/07 D e c l a r a c i ó n d e c o n f o r m i d a d c o n l a s N o r m a s F C C Información dirigida al usuario: Este dispositivo ha sido sometido a pruebas y ha demostrado cumplir con los límites establecidos para un dispositivo digital de clase A. Conforme al Apartado 15...
Page 45 - C o n t e n i d o
Rev. 3 G-113077-002 02/07 Español C o n t e n i d o Introducción . . . . . . . . . . . . . . . . . . . . . . . . . . . . . . . . . . . . 1 Características . . . . . . . . . . . . . . . . . . . . . . . . . . . . . . . . 1Antes de comenzar . . . . . . . . . . . . . . . . . . . . . . . . . . . . . 2Des...
Page 46 - I n t r o d u c c i ó n; Características; Adaptador para el montaje de la lente ajustable a C/CS
Rev. 3 1 G-113077-002 02/07 I n t r o d u c c i ó n Las cámaras de color L-Series de Honeywell son perfectas para su uso en aplicaciones de vigilancia diarias. Las cámaras L-Series están diseñadas para ofrecer un valor y rendimiento excepcionales en su uso diario. El conjunto de características de s...
Page 47 - Antes de comenzar; Una cámara de color L-Series; Nota; Necesitará también un destornillador Phillips para
Rev. 3 2 G-113077-002 02/07 Español Antes de comenzar Desembalaje de todo Compruebe que los artículos recibidos coinciden con los que figuran en el pedido y el comprobante de la caja. La caja de la cámara L-Series debería incluir además de esta guía del usuario: • Una cámara de color L-Series • Un c...
Page 48 - Funciones de la cámara
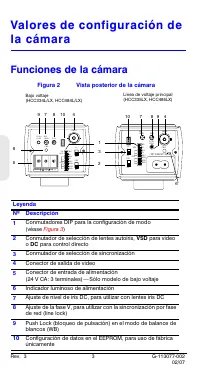
Rev. 3 3 G-113077-002 02/07 Va l o r e s d e c o n f i g u r a c i ó n d e l a c á m a r a Funciones de la cámara Figura 2 Vista posterior de la cámara Leyenda Nº Descripción 1 Conmutadores DIP para la configuración de modo (véase Figura 3 ) 2 Conmutador de selección de lentes autoiris, VSD para vid...
Page 49 - Instalación de la cámara; La; Selección de lentes; Lentes manuales; a AES. EE y AES son los valores de configuración normales.; Lentes autoiris varifocales; Modo de
Rev. 3 4 G-113077-002 02/07 Español Instalación de la cámara La Figura 3 muestra los valores del conmutador DIP definidos en fábrica. El control automático de ganancia (AGC) y el control automático de balance de blancos (AWC) están en posición ACT. Figura 3 Valores del conmutador DIP definidos en fá...
Page 50 - Modo de exposición; Modo de exposición automático
Rev. 3 5 G-113077-002 02/07 2. Gire lentamente el potenciómetro LEVEL hasta que la imagen del monitor aparezca lo más clara posible, sin ser demasiado brillante. Lente de tipo vídeo (VSD) Cambie el conmutador VSD/DC situado en la parte posterior de la cámara (véase Figura 3 ) a VSD. Modo de exposici...
Page 54 - I n s t a l a c i ó n d e l a l e n t e; Ajuste del enfoque posterior; Ajuste el anillo de enfoque para enfocar la imagen.
Rev. 3 9 G-113077-002 02/07 I n s t a l a c i ó n d e l a l e n t e Ajuste del enfoque posterior Se puede acceder al ajuste del enfoque posterior en el extremo frontal de la carcasa de la cámara para ajustar la longitud focal posterior o el enfoque de la imagen. El rango de ajuste permite que se uti...
Page 56 - F i n a l d e l a i n s t a l a c i ó n; Montaje de la cámara; Algunas normas de instalación establecen que el
Rev. 3 11 G-113077-002 02/07 F i n a l d e l a i n s t a l a c i ó n Montaje de la cámara Aparecen unos puntos de montaje marcados en la parte superior de la cámara para montarla sobre un soporte o trípode. Están diseñados para admitir tornillos de montaje de tamaño 1/4 x 20 estándar. Se puede desat...
Page 57 - Conexión de la cámara
Rev. 3 12 G-113077-002 02/07 Español Conexión de la cámara 1. Conecte el conector de VIDEO situado en la parte posterior de la cámara al conector de entrada de vídeo de su monitor. 2. Conecte la cámara a una fuente de alimentación adecuada para su instalación. HCC334L/LX, HCC484L/LX: alimentación 12...
Page 58 - Estas especificaciones sirven para todos los
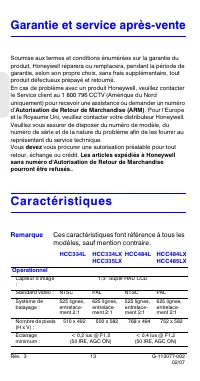
Rev. 3 13 G-113077-002 02/07 G a r a n t í a y s e r v i c i o Conforme a todos los términos dispuestos en la garantía del producto, durante el período de garantía, Honeywell reparará o sustituirá gratuitamente a su entera discreción, cualquier producto defectuoso que se haya devuelto previo pago de...
Page 61 - G u i d a p e r l ’ u t e n t e; Italian
Documento G-113077-002 - 02/07 - Rev 3 Te l e c a m e r a a c o l o r i L - S e r i e s HCC334L HCC334LX HCC484L HCC484LX HCC335LX HCC485LX G u i d a p e r l ’ u t e n t e N T S C PA L Italian o
Page 62 - Revisioni
Revisioni Edizione Data Revisioni 1.00 02/07 Nuovo documento 1.01 09/06 Copertura di documento cambiata. 1.02 10/06 Minor cambio 3 02/07 Modificato 900.0523 documento numero del pezzo; Avvertimento aggiunto alla pagina iii. Rev 3 ii G-113077-002 02/07
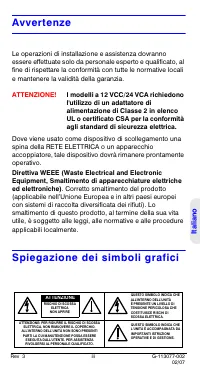
Page 63 - Av v e r t e n z e
Rev 3 iii G-113077-002 02/07 Av v e r t e n z e Le operazioni di installazione e assistenza dovranno essere effettuate solo da personale esperto e qualificato, al fine di rispettare la conformità con tutte le normative locali e mantenere la validità della garanzia. ATTENZIONE! I modelli a 12 VCC/24 ...
Page 64 - Attenzione
Rev 3 iv G-113077-002 02/07 D i c h i a r a z i o n e d i c o n f o r m i t à a l l e n o r m e F C C Informazioni per l’utente: questa apparecchiatura è stata sottoposta a test ed è risultata conforme ai limiti previsti per i dispositivi digitali della Classe A. In base alla Parte 15 della normativ...
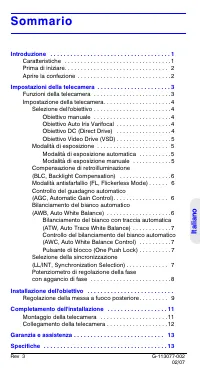
Page 65 - S o m m a r i o
Rev 3 G-113077-002 02/07 Italian o S o m m a r i o Introduzione . . . . . . . . . . . . . . . . . . . . . . . . . . . . . . . . . . . . 1 Caratteristiche . . . . . . . . . . . . . . . . . . . . . . . . . . . . . . . . . 1Prima di iniziare. . . . . . . . . . . . . . . . . . . . . . . . . . . . . . . ...
Page 66 - I n t r o d u z i o n e; Caratteristiche; Eccellente rapporto segnale/disturbo, superiore a 50 dB
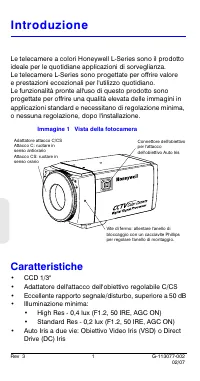
Rev 3 1 G-113077-002 02/07 I n t r o d u z i o n e Le telecamere a colori Honeywell L-Series sono il prodotto ideale per le quotidiane applicazioni di sorveglianza. Le telecamere L-Series sono progettate per offrire valore e prestazioni eccezionali per l'utilizzo quotidiano. Le funzionalità pronte a...
Page 67 - Prima di iniziare; Una telecamera a colori L-Series; Per completare l'installazione sarà inoltre
Rev 3 2 G-113077-002 02/07 Italian o Prima di iniziare Aprire la confezione Verificare che la confezione contenga tutti gli articoli elencati nel modulo d'ordine e nella ricevuta. La confezione del modello L-Series contiene, oltre a questa Guida per l'utente: • Una telecamera a colori L-Series • Un ...
Page 68 - Funzioni della telecamera
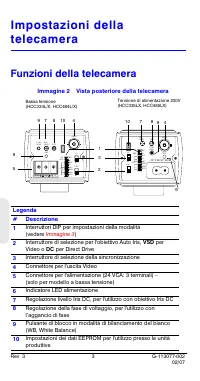
Rev 3 3 G-113077-002 02/07 I m p o s t a z i o n i d e l l a t e l e c a m e r a Funzioni della telecamera Immagine 2 Vista posteriore della telecamera Legenda # Descrizione 1 Interruttori DIP per impostazioni della modalità (vedere Immagine 3 ) 2 Interruttore di selezione per l'obiettivo Auto Iris,...
Page 69 - Impostazione della telecamera; Selezione dell'obiettivo; Obiettivo manuale; su AES. EE e AES sono le impostazioni tipiche.; Obiettivo Auto Iris Varifocal; Modalità di
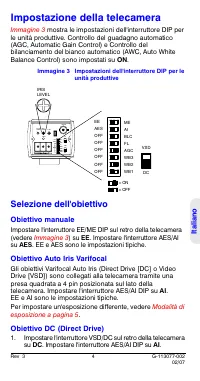
Rev 3 4 G-113077-002 02/07 Italian o Impostazione della telecamera Immagine 3 mostra le impostazioni dell'interruttore DIP per le unità produttive. Controllo del guadagno automatico (AGC, Automatic Gain Control) e Controllo del bilanciamento del bianco automatico (AWC, Auto White Balance Control) so...
Page 70 - Modalità di esposizione; Modalità di esposizione automatica
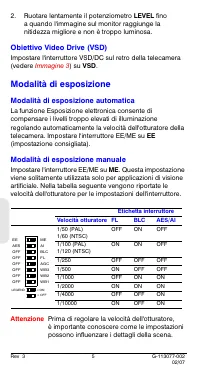
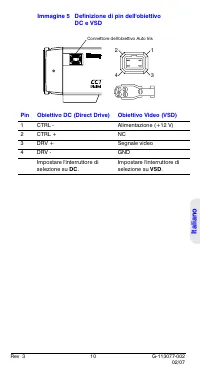
Rev 3 5 G-113077-002 02/07 2. Ruotare lentamente il potenziometro LEVEL fino a quando l'immagine sul monitor raggiunge la nitidezza migliore e non è troppo luminosa. Obiettivo Video Drive (VSD) Impostare l'interruttore VSD/DC sul retro della telecamera (vedere Immagine 3 ) su VSD. Modalità di esposi...
Page 74 - I n s t a l l a z i o n e d e l l ' o b i e t t i v o; Allentare la vite di fermo con un cacciavite Phillips.
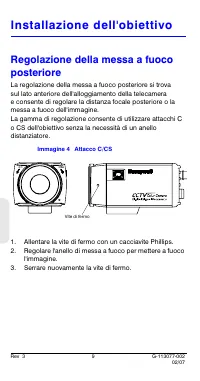
Rev 3 9 G-113077-002 02/07 I n s t a l l a z i o n e d e l l ' o b i e t t i v o Regolazione della messa a fuoco posteriore La regolazione della messa a fuoco posteriore si trova sul lato anteriore dell'alloggiamento della telecamera e consente di regolare la distanza focale posteriore o la messa a ...
Page 76 - Montaggio della telecamera; Alcuni codici di installazione stabiliscono che la
Rev 3 11 G-113077-002 02/07 C o m p l e t a m e n t o d e l l ' i n s t a l l a z i o n e Montaggio della telecamera I punti di innesto si trovano nella parte superiore della telecamera per il montaggio su staffa o treppiede. Sono adatti a viti di montaggio di dimensioni standard 1/4 x 20. Questa st...
Page 77 - Collegamento della telecamera
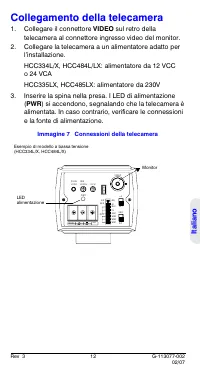
Rev 3 12 G-113077-002 02/07 Italian o Collegamento della telecamera 1. Collegare il connettore VIDEO sul retro della telecamera al connettore ingresso video del monitor. 2. Collegare la telecamera a un alimentatore adatto per l’installazione. HCC334L/X, HCC484L/LX: alimentatore da 12 VCC o 24 VCA HC...
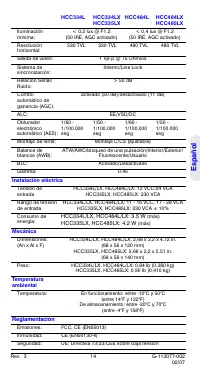
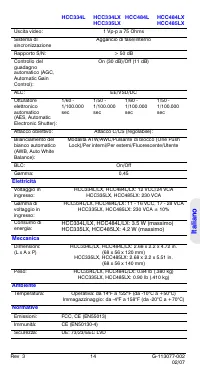
Page 78 - Queste specifiche si riferiscono a tutti i modelli, se
Rev 3 13 G-113077-002 02/07 G a r a n z i a e a s s i s t e n z a In base ai termini e alle condizioni elencati nella garanzia del prodotto, durante il periodo di garanzia Honeywell provvederà a sostituire, come unica opzione, gratuitamente, qualsiasi prodotto difettoso restituito prepagato.Nel caso...
Page 81 - Bedienungsanleitung; Deutsch
Dokument G-113077-002 – 02/07 – Version 3 Fa r b k a m e r a S e r i e L HCC334L HCC334LX HCC484L HCC484LX HCC335LX HCC485LX Bedienungsanleitung N T S C PA L Deutsch
Page 82 - Versionsübersicht
Versionsübersicht Ausgabe Datum Änderungen 1.00 09/06 Neues Dokument 1.01 09/06 Dokumentabdeckung geändert 1.02 10/06 Geringfügige Änderung 3 02/07 Aktualisierte Dokument Zahl des Teils; Zusätzliche Warnung zu Seite iii. Version 3 ii G-113077-002 02/07
Page 83 - Vo r s i c h t s h i n w e i s e
Version 3 iii G-113077-002 02/07 Vo r s i c h t s h i n w e i s e Installations- und Wartungsarbeiten dürfen nur von qualifizierten und erfahrenen Technikern ausgeführt werden. Dabei ist auf die Einhaltung aller am Installationsort geltenden rechtlichen Bestimmungen zu achten. Andernfalls erlischt d...
Page 84 - F C C - Ko n f o r m i t ä t s e r k l ä r u n g; Achtung
Version 3 iv G-113077-002 02/07 F C C - Ko n f o r m i t ä t s e r k l ä r u n g Informationen für den Anwender: Bei der Prüfung dieses Geräts wurde festgestellt, dass die Grenzwerte für digitale Geräte der Klasse nicht überschritten werden. Gemäß Teil 15 der FCC-Bestimmungen bedeutet die Einhaltung...
Page 85 - I n h a l t
Version 3 G-113077-002 02/07 Deutsch I n h a l t Einführung . . . . . . . . . . . . . . . . . . . . . . . . . . . . . . . . . . . . . . 1 Merkmale und Funktionen . . . . . . . . . . . . . . . . . . . . . . . . 1Vorbereitungen . . . . . . . . . . . . . . . . . . . . . . . . . . . . . . . . 2Auspacken...
Page 86 - E i n f ü h r u n g; Merkmale und Funktionen; Einstellbarer C/CS-Objektivmontageadapter
Version 3 1 G-113077-002 02/07 E i n f ü h r u n g Die Farbkameras der Honeywell L-Serie eignen sich ideal für routinemäßige Überwachungsanwendungen. Die Kameras der L-Serie bewähren sich im alltäglichen Einsatz immer weider aufs Neue. Der standardmäßige Funktionsumfang gewährleistet hohe Bildqualit...
Page 87 - Vorbereitungen; Farbkamera der Serie L; Hinweis; Bewahren Sie die Anleitung auf.
Version 3 2 G-113077-002 02/07 Deutsch Vorbereitungen Auspacken Kontrollieren Sie, ob der tatsächliche Lieferumfang mit den Angaben auf dem Auftragsformular und dem Packzettel übereinstimmt. Zusätzlich zu dieser Bedienungsanleitung sollte die Produktverpackung der Kamera die folgenden Teile enthalte...
Page 88 - Einstellungen an der Kamera; Funktionen der Kamera
Version 3 3 G-113077-002 02/07 Einstellungen an der Kamera Funktionen der Kamera Abbildung 2 Rückansicht der Kamera Legende # Beschreibung 1 DIP-Schalter für die Einstellung des Betriebsmodus (siehe Abbildung 3 ) 2 Auswahlschalter für Objektiv mit automatischer Blende (VSD für Video und DC für Direk...
Page 89 - Einrichten der Kamera; Auswählen des Objektivs; Manuelles Objektiv
Version 3 4 G-113077-002 02/07 Deutsch Einrichten der Kamera Abbildung 3 zeigt die werkseitigen Voreinstellungen der DIP-Schalter. Die dynamische Verstärkungsregelung (Automatic Gain Control, AGC) und der automatische Weißabgleich mit Voreinstellung (Auto White Balance Control, AWC) sind auf ON (Ein...
Page 90 - Belichtungsmodus; Automatischer Belichtungsmodus
Version 3 5 G-113077-002 02/07 2. Drehen Sie langsam das Potenziometer LEVEL, bis das Bild die beste Schärfe erreicht und nicht zu hell ist. Videogesteuertes Objektiv (VSD) Stellen Sie den Schalter VSD/DC an der Rückseite der Kamera auf VSD (siehe Abbildung 3 ). Belichtungsmodus Automatischer Belich...
Page 94 - I n s t a l l a t i o n d e s O b j e k t i v s; Einstellung des Auflagemaßes; Stellen Sie das Bild mit dem Einstellring scharf.
Version 3 9 G-113077-002 02/07 I n s t a l l a t i o n d e s O b j e k t i v s Einstellung des Auflagemaßes Die Einstellung des Auflagemaßes erfolgt an der Vorderseite der Kamera. Damit kann die Bildschärfe korrigiert werden. Der Einstellbereich ermöglicht die Verwendung von Objektiven mit C- und CS...
Page 96 - A b s c h l i e ß e n d e r I n s t a l l a t i o n; Montage der Kamera
Version 3 11 G-113077-002 02/07 A b s c h l i e ß e n d e r I n s t a l l a t i o n Montage der Kamera An der Oberseite der Kamera sind Montagepunkte vorgesehen, so dass die Kamera an einer Halterung oder auf einem Stativ befestigt werden kann. Die Bohrungen sind für handelsübliche Schrauben der Grö...
Page 97 - Anschließen der Kamera
Version 3 12 G-113077-002 02/07 Deutsch Anschließen der Kamera 1. Verbinden Sie den Anschluss VIDEO an der Rückseite der Kamera mit dem Video-Eingangsanschluss des Monitors. 2. Schließen Sie die Kamera an die jeweils vorgesehene Stromversorgung an. HCC334L/LX, HCC484L/LX: 12 VDC oder 24 VAC HCC335LX...
Page 98 - Te c h n i s c h e D a t e n
Version 3 13 G-113077-002 02/07 G e w ä h r l e i s t u n g u n d Ku n d e n d i e n s t Gemäß den Bedingungen der Gewährleistungserklärung zu diesem Gerät übernimmt Honeywell während des Gewährleistungszeitraums nach eigenem Ermessen den kostenlosen Austausch oder die kostenlose Reparatur defekter ...
Page 101 - k l e u r e n c a m e r a; G e b r u i k e r s g i d s; Ned
Document G-113077-002 – 02/07 – Rev 3 L - s e r i e k l e u r e n c a m e r a HCC334L HCC334LX HCC484L HCC484LX HCC335LX HCC485LX G e b r u i k e r s g i d s N T S C PA L Ned e rland
Page 102 - Revisies
Revisies Uitgave Datum Revisies 1.00 09/06 Nieuw document 1.01 09/06 Veranderde documentdekking. 1.02 10/06 minder belangrijke woordverandering 3 02/07 Bijgewerkt 900.0523 document aantal deel; Toegevoegde waarschuwing aan pagina iii. Rev 3 ii G-113077-002 02/07
Page 103 - Wa a r s c h uw i n ge n
Rev 3 iii G-113077-002 02/07 Wa a r s c h uw i n ge n Installatie en service mag uitsluitend worden uitgevoerd door hiervoor bevoegd en ervaren personeel, om aan alle plaatselijke voorschriften te voldoen en uw garantie in stand te houden. WAARSCHUWING! De 12 VDC/24 VAC-modellen vereisen het gebruik...
Page 104 - Voorzichtig
Rev 3 iv G-113077-002 02/07 Ve r k l a r i n g v a n n a l e v i n g v a n d e F C C - v o o r s c h r i f t e n Informatie voor de gebruiker: Deze apparatuur is getest en voldoet aan de beperkingen voor een digitaal apparaat van klasse A. Krachtens deel 15 van de FCC-voorschriften zijn deze beperki...
Page 105 - I n h o u d s o p g a v e
Rev 3 G-113077-002 02/07 Ned e rland I n h o u d s o p g a v e Inleiding . . . . . . . . . . . . . . . . . . . . . . . . . . . . . . . . . . . . . . . . 1 Kenmerken . . . . . . . . . . . . . . . . . . . . . . . . . . . . . . . . . . . 1Voordat u begint . . . . . . . . . . . . . . . . . . . . . . . ....
Page 106 - I n l e i d i n g; Kenmerken; Adapter voor C/CS-montage van instelbare lens
Rev 3 1 G-113077-002 02/07 I n l e i d i n g De Honeywell L-serie kleurencamera's zijn bij uitstek geschikt voor dagelijkse bewakingstoepassingen. De L-serie camera's bieden uitstekende waarde voor het geld en prestaties voor dagelijks gebruik. Hun standaardkenmerken leveren hoge beeldkwaliteit bij ...
Page 107 - Voordat u begint; Eén L-serie kleurencamera; Opmerking
Rev 3 2 G-113077-002 02/07 Ned e rland Voordat u begint Alles uitpakken Controleer of de ontvangen artikelen overeenkomen met wat op het bestelformulier en de paklijst staat vermeld. De verpakkingsdoos van de L-serie moet, behalve deze gebruikersgids, het volgende bevatten: • Eén L-serie kleurencame...
Page 108 - C a m e r a - i n s t e l l i n g e n; Camerafuncties
Rev 3 3 G-113077-002 02/07 C a m e r a - i n s t e l l i n g e n Camerafuncties Afbeelding 2 Achteraanzicht van camera Onderschrift # Beschrijving 1 DIP-schakelaars voor modusinstellingen (zie Afbeelding 3 ) 2 Keuzeschakelaar voor auto-iris lens, VSD voor video of DC voor direct drive 3 Synchronisat...
Page 109 - Instellen van de camera; In; Keuze van de lens; Handmatige lens; Afbeelding 3; op AES. EE en AES zijn de normale instellingen.; Voor het instellen van een andere belichting, zie
Rev 3 4 G-113077-002 02/07 Ned e rland Instellen van de camera In Afbeelding 3 ziet u de fabrieksinstelling van de DIP- schakelaars. Automatische versterkingsregeling (AGC) en automatische witbalansregeling (AWC) staan op AAN. Afbeelding 3 Fabrieksinstelling van DIP-schakelaars Keuze van de lens Han...
Page 110 - Belichtingsmodus; Automatische belichtingsmodus
Rev 3 5 G-113077-002 02/07 2. Draai de LEVEL (niveau) potentiometer langzaam totdat het beeld op de monitor zo duidelijk mogelijk en niet te helder is. Video-drive (VSD) lens Zet de schakelaar VSD/DC op de achterkant van de camera (zie Afbeelding 3 ) op VSD. Belichtingsmodus Automatische belichtings...
Page 112 - Drukvergrendeling
Rev 3 7 G-113077-002 02/07 Automatische witbalansregeling (AWC) Deze modus omvat een breder bereik van 2000 °K tot 10000 °K en werkt op hogere snelheid dan de ATW-modus. Deze modus wordt gewoonlijk gebruikt voor toepassingen buitenshuis of bij wisselende belichtingsomstandigheden. Drukvergrendeling ...
Page 114 - I n s t a l l a t i e v a n d e l e n s; Afstellen van de backfocus; Stel de focusring bij om het beeld in focus te brengen.
Rev 3 9 G-113077-002 02/07 I n s t a l l a t i e v a n d e l e n s Afstellen van de backfocus De voorkant van de camerabehuizing geeft toegang tot de backfocus-instelling om de lengte van de backfocus of de beeldfocus in te stellen. Het instellingsbereik is zodanig dat lenzen met zowel C- als CS-mon...
Page 116 - Vo l t o o i i n g v a n d e i n s t a l l a t i e; Monteren van de camera
Rev 3 11 G-113077-002 02/07 Vo l t o o i i n g v a n d e i n s t a l l a t i e Monteren van de camera Er zijn montagepunten op de bovenkant van de camera om de camera op een beugel of statief te monteren. Ze zijn geschikt voor standaard montageschroeven (1/4 x 20). Deze beugel kan worden losgeschroe...
Page 117 - Aansluiten van de camera
Rev 3 12 G-113077-002 02/07 Ned e rland Aansluiten van de camera 1. Sluit de VIDEO connector aan de achterkant van de camera aan op de connector Video-in van de monitor. 2. Sluit de camera aan op een voedingsbron zoals geschikt voor de installatie. HCC334L/LX, HCC484L/LX: 12 V =, of 24 V ~ voedingsb...


 Honeywell DT8050A
Installation Manual
Honeywell DT8050A
Installation Manual
 Honeywell DT8050
Manual
Honeywell DT8050
Manual
 Honeywell TPFIT25WK
User Manual
Honeywell TPFIT25WK
User Manual
 Honeywell TPFIT32AWK
User Manual
Honeywell TPFIT32AWK
User Manual
 Honeywell 24DX47
User Manual
Honeywell 24DX47
User Manual
 Honeywell TPFIT50PWK
User Manual
Honeywell TPFIT50PWK
User Manual
 Honeywell TPFIT50WK
User Manual
Honeywell TPFIT50WK
User Manual
 Honeywell 00010
User Manual
Honeywell 00010
User Manual
 Honeywell ADVBLEWIFI
Manual
Honeywell ADVBLEWIFI
Manual