Goldair GCPF150 - Manuals

User Manual Goldair GCPF150


Summary
General care and safety guide Thank you for choosing this GOLDAIR Fan. This GOLDAIR appliance has been designed and manufactured to high standards of engineering and with proper use and care, as described in this leaflet, will give you years of useful service. Please read these instructions carefull...
Cleaning To avoid risk of electric shock, before cleaning, you MUST ALWAYS switch off and unplug the Fan before cleaning. Use only a soft, damp cloth to gently wipe the Fan and dry well. To access the fan blade , remove the front guard and securing screw. DO NOT immerse the Fan in water and never al...
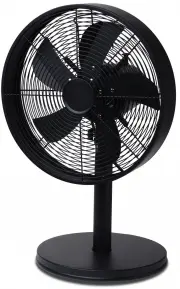
Components 1.Front Grill 2.Blade Cap 3.Blade 4.Plastic Mounting Nut 5.Rear Grille 6.Motor Shaft 7.Oscillating Knob 8.Motor Housing 9.Neck Screw 10.Switch Box 11.Set Screw 12.Inner Tube 13.Height Adjustment Collar 14.Outer Tube 15.Base Decorative Cap 16.Screw 17.Cross Bar A 18.Cross Bar B 19.Screw
Goldair Fans Manuals
-
 Goldair GAS10
User Manual
Goldair GAS10
User Manual
-
 Goldair GCDF220B
User Manual
Goldair GCDF220B
User Manual
-
 Goldair GCDF220W
User Manual
Goldair GCDF220W
User Manual
-
 Goldair GCHV115
User Manual
Goldair GCHV115
User Manual
-
 Goldair GCHV200
User Manual
Goldair GCHV200
User Manual
-
 Goldair GCHV300T
User Manual
Goldair GCHV300T
User Manual
-
 Goldair GCMT300
User Manual
Goldair GCMT300
User Manual
-
 Goldair GCPF170
User Manual
Goldair GCPF170
User Manual
-
 Goldair GCPF240
User Manual
Goldair GCPF240
User Manual
-
 Goldair GCPF265
User Manual
Goldair GCPF265
User Manual
-
 Goldair GCPF270B
User Manual
Goldair GCPF270B
User Manual
-
 Goldair GCPF270W
User Manual
Goldair GCPF270W
User Manual
-
 Goldair GCPF340
User Manual
Goldair GCPF340
User Manual
-
 Goldair GCPTF30
User Manual
Goldair GCPTF30
User Manual
-
 Goldair GCRDF310
User Manual
Goldair GCRDF310
User Manual
-
 Goldair GCTF530
User Manual
Goldair GCTF530
User Manual
-
 Goldair GPDF30S
User Manual
Goldair GPDF30S
User Manual
-
 Goldair GPPF40S
User Manual
Goldair GPPF40S
User Manual
-
 Goldair GPTF390
User Manual
Goldair GPTF390
User Manual
-
 Goldair GPTF470
User Manual
Goldair GPTF470
User Manual