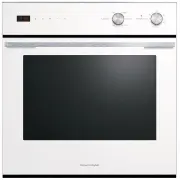
Fisher & Paykel OB90S9MEX3 - Manuals
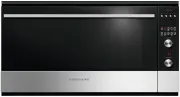
User Manual Fisher & Paykel OB90S9MEX3


Summary
1 Contents Introduction 3 Safety and warnings 4 The control panel 7 Setting the clock and first use 8 Using your oven 9 Oven functions 11 Using the rotisserie 12 Using the timer 14 Automatic cooking 15 Cooking chart 17 User preference settings 18 Sabbath setting 20 Care and cleaning 22 Troubleshooti...
3 Congratulations on your new purchase. Your Fisher & Paykel oven has a number of features to make cooking a great experience for you: a choice of nine oven functions, including Rotisserie intuitive electronic controls and displays illuminated halos around the dials for visual feedback preferenc...
4 Safety and warnings WARNING! Hot Surface Hazard Accessible parts may become hot when in use. To avoid burns and scalds, keep children away. Use oven mitts or other protection when handling hot surfaces such as oven shelves or dishes. Use care when opening the oven door. Let hot air or steam escape...
Fisher & Paykel Ovens Manuals
-
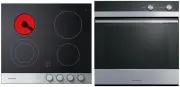 Fisher & Paykel CE604CBX1OB60SC5CEX1
User Manual
Fisher & Paykel CE604CBX1OB60SC5CEX1
User Manual
-
 Fisher & Paykel CG604CWCX1OB60SC5CEX
User Manual
Fisher & Paykel CG604CWCX1OB60SC5CEX
User Manual
-
 Fisher & Paykel OB24SD11PLX1
User Manual
Fisher & Paykel OB24SD11PLX1
User Manual
-
Fisher & Paykel OB24SD16PLX1
User Manual
-
 Fisher & Paykel OB24SDPTDX2
User Manual
Fisher & Paykel OB24SDPTDX2
User Manual
-
 Fisher & Paykel OB30DDPTDX2
User Manual
Fisher & Paykel OB30DDPTDX2
User Manual
-
 Fisher & Paykel OB30DPPTX1
User Manual
Fisher & Paykel OB30DPPTX1
User Manual
-
 Fisher & Paykel OB30SCEPX3N
User Manual
Fisher & Paykel OB30SCEPX3N
User Manual
-
 Fisher & Paykel OB30SD14PLX1
User Manual
Fisher & Paykel OB30SD14PLX1
User Manual
-
 Fisher & Paykel OB30SD17PLX1
User Manual
Fisher & Paykel OB30SD17PLX1
User Manual
-
Fisher & Paykel OB30SDPTB1
User Manual
-
Fisher & Paykel OB30SDPTDB1
User Manual
-
Fisher & Paykel OB30SDPTDX2
User Manual
-
Fisher & Paykel OB30SPPTX1
User Manual
-
 Fisher & Paykel OB60B77CEW3
User Manual
Fisher & Paykel OB60B77CEW3
User Manual
-
 Fisher & Paykel OB60B77CEX3
User Manual
Fisher & Paykel OB60B77CEX3
User Manual
-
 Fisher & Paykel OB60B77DEX3
User Manual
Fisher & Paykel OB60B77DEX3
User Manual
-
 Fisher & Paykel OB60DDEX4
User Manual
Fisher & Paykel OB60DDEX4
User Manual
-
 Fisher & Paykel OB60NC9DEX1
User Manual
Fisher & Paykel OB60NC9DEX1
User Manual
-
 Fisher & Paykel OB60SC5CEW1
User Manual
Fisher & Paykel OB60SC5CEW1
User Manual