Dewalt DWE4517 - Manuals
Dewalt DWE4517 Angle Grinder – User Manual, Manual in PDF format online.
Manuals:
User Manual Dewalt DWE4517
Summary
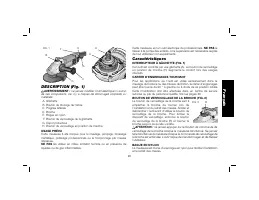
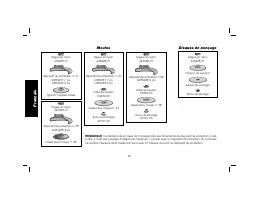
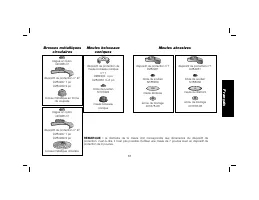
Defi nitions: Safety Guidelines The definitions below describe the level of severity for each signal word. Please read the manual and pay attention to these symbols. DANGER: Indicates an imminently hazardous situation which, if not avoided, will result in death or serious injury . WARNING: Indicates ...
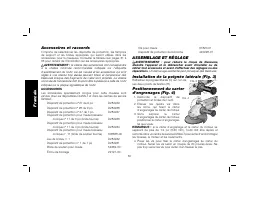
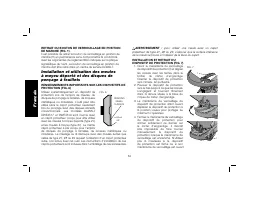
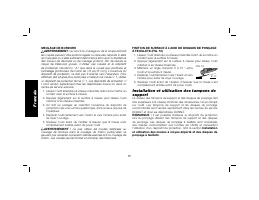
3) PERSONAL SAFETY a) Stay alert, watch what you are doing and use common sense when operating a power tool. Do not use a power tool while you are tired or under the influence of drugs, alcohol or medication. A moment of inattention while operating power tools may result in serious personal injury. ...
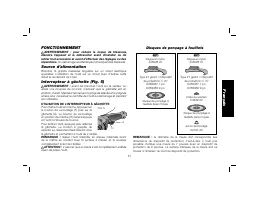
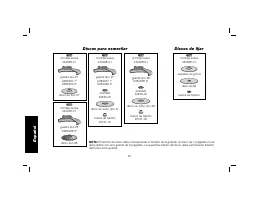
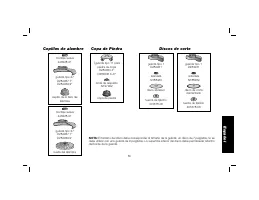
Safety Warnings Specifi c for Wire Brushing Operations a) Be aware that wire bristles are thrown by the brush even during ordinary operation. Do not overstress the wires by applying excessive load to the brush. The wire bristles can easily penetrate light clothing and/or skin. b) If the use of a guar...
• ANSI S12.6 (S3.19) hearing protection,• NIOSH/OSHA/MSHA respiratory protection. WARNING: Some dust created by power sanding, sawing, grinding, drilling, and other construction activities contains chemicals known to the State of California to cause cancer, birth defects or other reproductive harm. ...
F A B G H D E C FIG. 1 COMPONENTS (FIG. 1) WARNING: Never modify the power tool or any part of it. Damage or personal injury could result. A. Trigger switch B. Spindle lock button C. Side handle D. Spindle E. Soft mount F. Trigger lock off button G. Wheel guard H. Lock-on button INTENDED USE This gr...
accessories running over rated speed can fly apart and cause injury. Accessory ratings must always be above tool speed as shown on tool nameplate. ATTACHMENTS Attachments designed specifically for this grinder can be purchased through D E WALT dealers and D E WALT Factory Service centers. 9" Typ...
Power Source Plug the large angle grinder into a dedicated elec trical circuit. Operating this tool on a circuit with other tools will decrease tool performance. Switch (Fig. 5) WARNING: Ensure that the trigger switch is in the off position before connecting the tool to a power source or after a pow...
3. With the guard latch open, rotate the I J FIG. 7 guard into the desired working position that provides maximum protection to the user as shown. 4. Close the guard latch to secure the guard on the gear case. You should be unable to rotate the guard by hand when the latch is closed. Do not operate ...
WARNING: Failure to properly seat the wheel against the soft mount before turning the tool on may result in damage to the tool or the wheel. MOUNTING NON-HUBBED WHEELS (FIG. 8) Depressed center, Type 27 grinding wheels L K F FIG. 8 must be used with available accessory flanges. See the chart on page...
4. Continuously move the tool in a forward and back motion to avoid creating gouges in the work surface. 5. Remove the tool from work surface before turning tool off. Allow the tool to stop rotating before setting it down. Mounting and Using Sanding Backing Pads Sanding pads and sanding discs must b...
wheels provided with a 5/8"–11 threaded hub. A Type 27 guard is required when using wire brushes and wheels. WARNING: Wear work gloves when handling wire brushes or wheels. Wire brushes and wheels can become sharp. MOUNTING WIRE BRUSHES AND WIRE WHEELS 1. Thread the wheel on the spindle by hand,...
NOTICE: Do not tighten adjusting screw with guard latch in open position. Undetectable damage to guard or mounting hub may result. MOUNTING CUTTING WHEELS (FIG. 19) 1. Remove soft mount (E). 2. Install wheel backing flange, aligning flats on spindle (R) with flats on backing flange (S). 3. Place the...
Recommended accessories for use with your tool are available at extra cost from your local dealer or authorized service center. If you need assistance in locating any accessory, please contact D E WALT Industrial Tool Co., 701 East Joppa Road, Baltimore, MD 21286, call 1-800-4-D E WALT (1-800-433-92...
Défi nitions : lignes directrices en matière de sécurité Les définitions ci-dessous décrivent le niveau de danger pour chaque mot-indicateur employé. Lire le mode d’emploi et porter une attention particulière à ces symboles. DANGER : indique une situation dangereuse imminente qui, si elle n’est pas é...
• L’arsenic et le chrome dans le bois ayant subi un traitement chimique. Le risque associé à de telles expositions varie selon la fréquence à laquelle on effectue ces travaux. Pour réduire toute exposition à ces produits : travailler dans un endroit bien aéré, en utilisant du matériel de sécurité ho...
F A B G H D E C FIG. 1 DESCRIPTION (Fig. 1) AVERTISSEMENT : ne jamais modifier l’outil électrique ni aucun de ses composants, car il y a risques de dommages corporels ou matériels. A. Gâchette B. Bouton de blocage de l’arbre C. Poignée latérale D. Broche E. Bague en nylon F. Bouton de verrouillage ...
Accessoires et raccords Il importe de sélectionner les dispostifis de protection, les tampons de support et les brides appropriés qui seront utilisés dans les accessoires pour la meuleuse. Consulter le tableau aux pages 31 à 33 pour obtenir de l’information sur les accessoires appropriés. AVERTISSEM...
FONCTIONNEMENT AVERTISSEMENT : pour réduire le risque de blessures, éteindre l’appareil et le débrancher avant d’installer ou de retirer tout accessoire et avant d’effectuer des réglages ou des réparations. Un démarrage accidentel peut provoquer des blessures. Source d’alimentation Brancher la gran...
RETRAIT DU BOUTON DE VERROUILLAGE EN POSITION DE MARCHE (FIG. 1) Il est possible de retirer le bouton de verrouillage en position de marche (H) en permanence sans compromettre la conformité avec les organismes de réglementation indiqués sur la plaque signalétique de l’outil. Le bouton de verrouillag...
MEULAGE DE BORDURE AVERTISSEMENT : au cours du meulage ou de la coupe de bord, les meules peuvent être endommagées ou faire des rebonds si elles sont arquées ou si elles subissent des torsions alors que l’outil effectue des travaux de découpe ou de meulage profond. Afin de réduire le risque de bless...
2. Enfoncer le bouton de verrouillage de la broche et serrer le moyeu de la brosse à l’aide d’une clé. 3. Pour retirer la brosse, enfoncer le bouton de verrouillage de la broche et desserrer le moyeu de la brosse à l’aide d’une clé. REMARQUE : si le moyeu de la brosse n’est pas bien appuyé contre la...
MAINTENANCE AVERTISSEMENT : pour réduire le risque de blessures, éteindre l’appareil et le débrancher avant d’installer ou de retirer tout accessoire et avant d’effectuer des réglages ou des réparations. Un démarrage accidentel peut provoquer des blessures. Nettoyage AVERTISSEMENT : enlever les sal...
Defi niciones: Normas de seguridad Las siguientes definiciones describen el nivel de gravedad de cada palabra de señal. Lea el manual y preste atención a estos símbolos. PELIGRO: indica una situación de peligro inminente que, si no se evita, provocará la muerte o lesiones graves . ADVERTENCIA: indica...
los hilos de cada alargador tengan el calibre mínimo. La tabla siguiente muestra el tamaño correcto a utilizar, dependiendo de la longitud del cable y del amperaje nominal de la placa de identificación. Si tiene dudas sobre cuál calibre usar, use un calibre mayor. Cuanto más pequeño sea el número de...
F. Botón de bloqueo del gatillo G. Guarda del disco H. Botón de bloqueo en encendido USO DEBIDO Esta esmeriladora está diseñada para aplicaciones profesionales de esmerilado, lijado, escobillado metálico, pulido o corte abrasivo. NO utilice la herramienta en condiciones de humedad o en presencia de ...
Piedra de copa tipo 11 con brida de respaldo 608368-00 Juego de brida tipo 1 D284932 Guarda tipo 1 de 7" (178 mm) D284931 Flanjes para esmerilar 54339-00 Tuerca de fijación 22191-00 Llave para el disco 61820-01 Dispositivo de protección del eje 445928-01 ENSAMBLAJE Y AJUSTES ADVERTENCIA: Para re...
NOTA: Si la caja de engranjes y la carcaza del motor se separan más de 3 mm (1/8"), la herramienta debe recibir servicio y ser reensamblada en un centro de servicio D E WALT. El no darle el mantenimiento apropiado a la herramienta puede ocasionar daño a las escobillas, al motor y a los cojinetes...
2. Coloque el disco contra la centrándola en el flanje. 3. Mientras oprime el botón del seguro del eje, enrosque la tuerca (L) en la fleche. 4. Apriete la tuerca con una llave. 5. Invierta el procedimiento anterior para retirar el disco. ESMERILADO DE CON DISCOS DE ESMERILAR (FIG. 9) 1. Permita que ...
Instalación y utilización de las para lijar Los respaldos y discos para lijar deben de tener una clasificación mayor que la velocidad mínima para accesorios según aparece en la herramienta. Los discos para lijar recomendados se encuentran a la venta a través de lo distribuidores y centros de servici...
ADVERTENCIA: Use guantes para manejar las copas y las ruedas de alambre ya que éstas son puntiagudas. INSTALACIÓN DE COPAS Y DISCOS DE ALAMBRE 1. Enrosque la rueda sobre el eje asentándola contra el montaje suave. 2. Oprima el botón de seguro del flecha y use una llave para apretario. 3. Para retira...
4. Cierre el cerrojo de la guarda para asegurarla a la caja de engranajes. No debe ser posible girar la guarda a mano cuando el seguro esté cerrado. No opere la esmeriladora con la guarda floja o el seguro de la guarda en posición abierta. NOTA: La guarda está preajustada al FIG. 18 J diámetro del c...
ADVERTENCIA: Nunca utilice solventes ni otros químicos abrasivos para limpiar las piezas no metálicas de la herramienta. Estos productos químicos pueden debilitar los materiales plásticos utilizados en estas piezas. Utilice un paño humedecido sólo con agua y jabón neutro. Nunca permita que penetre l...
Póliza de Garantía IDENTIFICACIÓN DEL PRODUCTO:Sello o firma del Distribuidor.Nombre del producto: _____________ Mod./Cat.: ________________Marca: ______________________ Núm. de serie: ________________(Datos para ser llenados por el distribuidor)Fecha de compra y/o entrega del producto: ____________...
específica del país que viene en el empaque, llamar a la compañía local o visitar el sitio Web a fin de obtener esa información. REEMPLAZO GRATUITO DE LAS ETIQUETAS DE ADVERTENCIAS: Si sus etiquetas de advertencia se vuelven ilegibles o faltan, llame al 1-800-4-D E WALT (1-800-433-9258) para que se ...
D E WALT Industrial Tool Co., 701 East Joppa Road, Baltimore, MD 21286 (JUL12) Part No. N190393 DWE4517, DWE4519 Copyright © 2012 D E WALT The following are trademarks for one or more D E WALT power tools: the yellow and black color scheme; the "D" shaped air intake grill; the array of pyram...
Manual Dewalt DWE4517
Dewalt Angle Grinders Manuals
-
Dewalt D28499X
User Manual
-
Dewalt DCB205CKWCG413B
User Manual
-
Dewalt DCG405B
User Manual
-
Dewalt DCG405BWDCB240
User Manual
-
Dewalt DCG405BWDCBP520
User Manual
-
Dewalt DCG405BWP315-2C
User Manual
-
Dewalt DCG409VSB
User Manual
-
Dewalt DCG412B
User Manual
-
Dewalt DCG412BDCB246CK
User Manual
-
Dewalt DCG412BW230
User Manual
-
Dewalt DCG412BW240
User Manual
-
Dewalt DCG412BWCB200-4
User Manual
-
Dewalt DCG412BWDCB204
User Manual
-
Dewalt DCG413B
User Manual
-
Dewalt DCG413BW205
User Manual
-
Dewalt DCG413BW230C
User Manual
-
Dewalt DCG413H1
User Manual
-
Dewalt DCG413R2
User Manual
-
Dewalt DCG413R2W380B
User Manual
-
Dewalt DCG416B
User Manual