Page 2 - ENGLISH; I M P O R TA N T S A F E G U A R D S; SAVE THESE INSTRUCTIONS; THIS PRODUCT IS FOR HOUSEHOLD ONLY; I n t r o d u c t i o n a n d Wa r n i n g
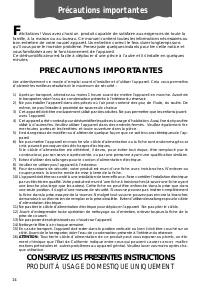
ENGLISH 3 T hank you for choosing this appliance. This Owner's Manual will provide you with valuable information necessary for the proper care and maintenance of your new appliance. If pro- perly maintained, your appliance will give you many years of trouble-free operation. Please take a few moments...
Page 3 - escription of the appliance; Description; escription of the control panel
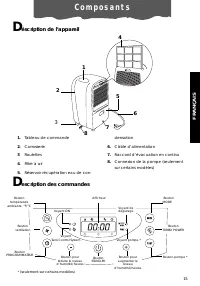
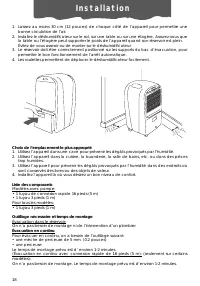
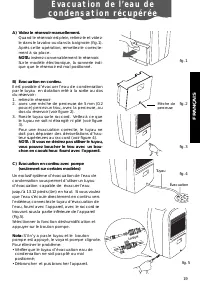
4 1. Control panel 2. Cabinet 3 Wheels 4. Air Filter 5. Water Tank 6. Power Cord 7. Continuous Draining Outlet 8. Pump connection (only on some models) D escription of the appliance Description 5 4 2 1 Room temperature button °F/°C Fan speed button TIMER button MODE button TURBO POWERbutton PUMP but...
Page 4 - C o n t r o l p a n e l
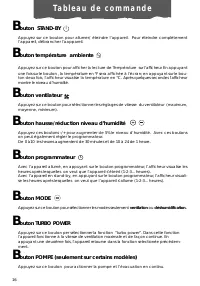
5 ENGLISH S TAND-BY button Press this button to start /stop the appliance. To turn the appliance completely off, remo-ve the plug from the outlet. R oom temperature button Press this button to display the Temperature on the LCD display. If you press the button oncethe display will show the °F . If y...
Page 5 - D i s p l a y l i g h t s
6 O N light When the STAND-BY button is pressed to start the unit, the ON light will come on automati-cally. The light will go off again when the unit is switched off. NOTE: After a power outage, the unit will not switch itself on again automatically. When the power supply has been reestablished, pl...
Page 6 - I n s t a l l a t i o n I n s t r u c t i o n s
7 ENGLISH I n s t a l l a t i o n I n s t r u c t i o n s 1. Allow at least 12 inches (30cm) of space on all sides of the unit for good air circulation.2. Install your dehumidifier on a floor, table, or shelf. When installing the unit on a table or shelf, make sure the table or shelf is strong enoug...
Page 7 - D i s p o s i n g o f t h e c o l l e c t e d
A) Empty the tank manually. When the tank is full, remove (fig.1) andempty it into a sink.When finished, replace it properly. NOTE: The tank must be positioned properly. If you hear the intermittent sound of thebeep, it means the tank is not in the properposition. B) Continuous draining. Condensed w...
Page 8 - ow to Select the Desired Humidity Level; ow to use the FAN function; urbo power; S e l e c t i n g t h e o p e r a t i o n s
9 ENGLISH S tand-by position Once the power outlet is plugged in, the display will show on the left side the degree of humi-dity you want to reach (the default data is 60) and on the right side the display will show (fora minute) two dots, followed by the room humidity level. H ow to Select the Desi...
Page 9 - ow to Program the delayed stop function: From the ON Position
10 S e l e c t i n g t h e o p e r a t i o n s H ow to Program the delayed stop function: From the ON Position 1) Press the button and use the button to set the number of hours after which the appliance should stop functioning. 2) The left side the display will show the number of hours after which t...
Page 10 - leaning the Air Filter; C a r e a n d M a i n t e n a n c e
WARNINGElectrical Shock Hazard Always disconnect power supply cord from outlet before per forming any maintenance.Failure to follow the below precautions could result in the electrical shock or personalinjuries. M aintenance Your dehumidifier is designed to serve you year-round. Listed below are the...
Page 11 - Tr o u b l e s h o o t i n g t i p s
12 Tr o u b l e s h o o t i n g t i p s Often times, a problem is minor and a service call may not be necessary. Use this trouble-shooting guide to identify possible problems you may be experiencing. Problem Possible cause Remedy •Plug into the power outlet •Empty the tank •Position the tank correct...
Page 12 - L i m i t e d Wa r r a n t y
13 ENGLISH This warranty applies to all home appliances with De’Longhi or Kenwood brand names. FOR CONTIGUOUS UNITED STATES ONLY Limited Warranty We warrant each De’Longhi appliance to be free from defects in material and workmanship.From the purchase date, our obligation under this warranty is to p...
Page 14 - P R E C A U T I O N S I M P O R TA N T E S; CONSERVEZ LES PRESENTES INSTRUCTIONS; PRODUIT À USAGE DOMESTIQUE UNIQUEMENT; Précautions importantes
14 F élicitations ! Vous avez choisi un produit capable de satisfaire aux exigences de toute la famille, à la maison ou au bureau. Ce manuel contient toutes les informations nécessaires aubon entretien de votre nouvel appareil. Un entretien correct le fera durer longtemps sansqu’il vous pose le moin...
Page 15 - FRANÇAIS; éscription de l’appareil; C o m p o s a n t s; escription des commandes
15 FRANÇAIS 1. Tableau de commande 2. Carrosserie 3 Roulettes 4. Filtre à air 5. Réservoir récupération eau de con- densation 6. Câble d’alimentation 7. Raccord d’évacuation en continu 8. Connexion de la pompe (seulement sur certains modèles) D éscription de l’appareil C o m p o s a n t s 5 4 2 1 Bo...
Page 16 - Ta b l e a u d e c o m m a n d e
16 B outon STAND-BY Appuyez sur ce bouton pour allumer/ éteindre l’appareil. Pour éteindre complètementl’appareil, débrancher l’aappareil. B outon température ambiente Appuyez sur ce bouton pour afficher la lecture de Température sur l’afficheur. En appuyantune fois sur le bouton , la température en...
Page 17 - oyant “ON”; oyant réservoir; V o y a n t s
17 FRANÇAIS V oyant “ON” Lorsque le bouton STAND-BY est appuyé, le voyant “ON” s’allume. Le voyant s’éteintquand l’appareil s’arrête. NOTA: Après une coupure de courant, l’appareil ne repart pas automatiquement. Appuyez sur le bouton STAND-BY pour mettre l’appareil en marche. V oyant réservoir Si le...
Page 18 - I n s t a l l a t i o n
18 I n s t a l l a t i o n 1. Laissez au moins 30 cm (12 pouces) de chaque côté de l’appareil pour permettre une bonne circulation de l’air. 2. Installez le déshumidificateur sur le sol, sur une table ou sur une étagère. Assurez-vous que la table ou l’étagère peut supporter le poids de l’appareil qu...
Page 19 - É v a c u a t i o n d e l ’ e a u d e
19 FRANÇAIS A) Videz le réservoir manuellement. Quand le réservoir est plein, retirez-le et videz-le dans le lavabo ou dans la baignoire (fig.1).Après cette opération, remettez-le correcte-ment à sa place. NOTA: insérez convenablement le réservoir. Sur le modèle électronique, la sonnerie indi-que qu...
Page 20 - S é l e c t i o n d e s f o n c t i o n s
20 S tand-by Après avoir branché l’appareil, l’afficheur visualise à gauche le niveau d’humidité qu’ on dési-re atteindre (la valeur affichée automatiquement est 60) et à droite l’afficheur visualise pourune minute deux traits d’union suivi par le niveau d’humidité. C omment sélectionner le niveau d...
Page 21 - omment programmer l’arrêt retardé; avec appareil allumé
21 FRANÇAIS S é l e c t i o n d e s f o n c t i o n s C omment programmer l’arrêt retardé avec appareil allumé 2) Avec appareil allumé, appuyer sur le bouton et appuyer sur les boutons pour sélectionner les heures aprè lesquelles vous désirez que l’appareil s’arrête. 2) Sur le côté gauche l’afficheu...
Page 22 - iltre à air; N e t t o y a g e e t e n t r e t i e n
22 ATTENTIONRisque de décharges électriques Avant toute opération d’entretien, débranchez l’appareil.Le non-respect des précautions susmentionnées pourrait provoquer des décharges électriques oudes blessures corporelles. E ntretien Votre déshumidificateur a été conçu pour travailler toute l’année.Ve...
Page 23 - P r o b l è m e s e t s o l u t i o n s
23 FRANÇAIS P r o b l è m e s e t s o l u t i o n s Souvent, les problèmes sont faciles à résoudre, sans appeler le service technique. Ce guidevous aidera à identifier les éventuelles pannes. PROBLÈME CAUSE POSSIBLE SOLUTIONS •Enfoncer la fiche dans la prise de courant •Vider le réservoir•Mettre le ...
Page 24 - G a r a n t i e l i m i t é e
24 Cette garantie s’applique à tous les appareils ménagers de marques De’Longhi ou Kenwood. RÉSERVÉ UNIQUEMENT AUX ÉTATS-UNIS CONTIGUS ET LE CANADA Garantie limitée Nous garantissons que chaque appareil de DeLonghi est exempt de défauts de matériau etde fabrication. À compter de la date d’achat, not...