Page 2 - IMPORTANT; READ ALL INSTRUCTIONS; Contents
2 BREVILLE RECOMMENDS SAFETY FIRST At Breville we are very safety conscious. We design and manufacture consumer products with the safety of you, our valued customer, foremost in mind. In addition we ask that you exercise a degree of care when using any electrical appliance and adhere to the followin...
Page 4 - Misuse can
4 • The use of accessories and attachments not recommended by Breville or supplied with this oven may cause injuries. • This appliance is for household use only. Do not use in any type of moving vehicles. Do not use the appliance outdoors, or for anything other than its intended use. Misuse can caus...
Page 5 - WARNING; FOR HOUSEHOLD USE ONLY
5 SPECIFIC INSTRUCTIONS FOR BOV860 • We recommend the oven is operated on a dedicated circuit separated from other appliances. Consult a licensed and qualified electrician if you are unsure. • Regularly clean the crumb tray. To clean the crumb tray: − Turn OFF the oven, − Allow the oven to cool comp...
Page 6 - Components; Plug; Rating Information
6 Components A. 13'' non-stick pizza panB. Wire rackC. Broiling rackD. 11'' x 13'' enamel roasting panE. Air fry basketF. Oven light G. Door handleH. Ventilation slotsI. Crumb trayJ. Breville Assist ‰ Plug TEMP Darkness TIME Slices FUNCTION START/CANCEL F I J G H B A C D E 120 V~ 60 Hz 1800 W Rating...
Page 7 - Accessories sold separately:; Bamboo Cutting Board/Serving Tray
7 K. LCD screenL. FUNCTION dialM. TEMPERATURE dial/toast and bagel darkness control N. TIME dial/toast and bagel slice selection/ Pizza size selection O. START/CANCEL buttonP. OVEN LIGHT buttonQ. CONVECTION buttonR. FROZEN buttonS. TEMPERATURE CONVERSION button Accessories sold separately: TEMP Dark...
Page 8 - PREPARING THE OVEN; ELEMENT iQ; Before first use
8 PREPARING THE OVEN Before first use, please run the oven empty for 20 minutes to remove protective substances from the heating elements. Ensure the area is well ventilated as the oven may emit vapors. These vapors are safe and are not detrimental to the performance of the oven.1. Remove and safely...
Page 9 - OVEN FUNCTIONS OVERVIEW
9 OVEN FUNCTIONS OVERVIEW FUNCTION SUGGESTED RACK POSITION OPTIONAL SETTINGS PRESETS PREHEAT RANGE TOAST Middle FROZEN Darkness 4Slices 4 No Darkness 1-7Slices 1-6 BAGEL Middle FROZEN Darkness 4Slices 4 No Darkness 1-7Slices 1-6 BAKE Bottom CONVECTIONTEMPERATURE CONVERSION 325°F CONVECTION 30 MINS Y...
Page 10 - Functions; OPERATING YOUR BREVILLE OVEN; ROTATE
10 Functions OPERATING YOUR BREVILLE OVEN 1. Position the wire rack so the spokes face upward and insert it into the desired rack position. The rack positions are conveniently printed on the oven door window. 2. Turn the FUNCTION dial until the indicator on the LCD screen reaches the desired setting...
Page 11 - Desired toast color
11 NOTE The cooking cycle can be stopped at any time by pressing the START/CANCEL button. This will cancel the cycle and the button backlight will illuminate blue. NOTE Press the CONVECTION button to choose between no convection, convection and super convection. Convection and super convection may a...
Page 12 - Desired bagel color; NOTE
12 START/CANCEL SUPER CONVECTION SUPER CONVECTION 5. The darkness setting and number of bagels can be adjusted before or during the toasting cycle.a) The darkness setting is indicated by the row of triangles at the top of the LCD screen. Turn the TEMPERATURE dial to the left to reduce the darkness s...
Page 14 - BROIL FUNCTION
14 5. Press the START/CANCEL button to activate the ROAST function. The button backlight will illuminate red, the oven alert will sound and the LCD screen will illuminate orange. The LCD screen will indicate a blinking ‘PREHEATING’. 6. Once the oven has finished preheating, an alert will sound and f...
Page 15 - PIZZA FUNCTION
15 screen indicates the preset temperature of '500°F', while the bottom figure indicates the preset time of ‘:10 MINS’. SUPER CONVECTION 5. The broiling power level and time can be adjusted before or during the broiling cycle.a) The broiling power level is displayed as the top figure on the LCD scre...
Page 16 - A note on pizza stones; COOKIES FUNCTION; REHEAT FUNCTION
16 the timer will automatically begin to count down. The cycle can be stopped at any time by pressing the START/CANCEL button. START/CANCEL SUPER CONVECTION SUPER CONVECTION 9. At the end of the PIZZA cycle, the oven alert will sound. The START/CANCEL button backlight will go out and the LCD screen ...
Page 17 - WARM FUNCTION
17 2. Place food, positioned on the included roasting pan, pizza pan or other oven-proof dish, on the center of the wire rack so air will flow around all sides of the food. 3. Close the oven door.4. Turn the FUNCTION dial until the indicator on the LCD screen reaches the REHEAT function. The top fig...
Page 18 - AIR FRY FUNCTION
18 6. Press the START/CANCEL button to activate the WARM function. The button backlight will illuminate red, the oven alert will sound and the LCD screen will illuminate orange. 7. The timer will be displayed and automatically begin to count down. The temperature and time can be adjusted during the ...
Page 22 - Cleaning the outer body and door; Cleaning the interior; Cleaning the crumb tray
22 Care & Cleaning Before cleaning, ensure the oven is turned off by removing the power plug from the power outlet. Allow the oven and all accessories to cool completely before disassembling and cleaning. Cleaning the outer body and door 1. Wipe the outer body with a soft, damp sponge. A non-abr...
Page 23 - Troubleshooting; POSSIBLE PROBLEM
23 Troubleshooting POSSIBLE PROBLEM EASY SOLUTION Oven will not switch "ON" • Check that the power plug is securely inserted into the outlet. • Insert the power plug into an independent outlet. • Insert the power plug into a different outlet. • Reset the circuit breaker if necessary. The LCD...
Page 25 - the; Smart Oven
FR-CA MANUEL D'INSTRUCTIONS the Smart Oven ® Air Fryer
Page 26 - IMPORTANTES; LISEZ TOUTES LES
2 BREVILLE VOUS RECOMMANDE LA SÉCURITÉ AVANT TOUT Chez Breville, la sécurité occupe une place de choix. Nous concevons et fabriquons des produits de consommation sans jamais perdre de vue la sécurité de notre précieuse clientèle. De plus, nous vous demandons d'être très vigilant lorsque vous utilise...
Page 30 - AVERTISSEMENT
6 USAGE DOMESTIQUE SEULEMENT CONSERVEZ CES INSTRUCTIONS AVERTISSEMENT Pour réduire le risque d'incendie, d'électrocution, d'exposition excessive aux rayons UV ou de blessures :• Débranchez toujours le four et laissez les pièces (y compris le boîtier de l'ampoule, le couvercle en verre et le contenu)...
Page 31 - Composants; Informations énergétiques
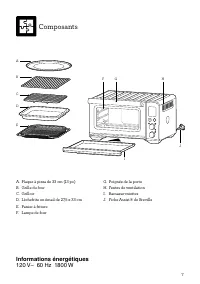
7 Composants A. Plaque à pizza de 33 cm (13 po)B. Grille du fourC. GrilloirD. Lèchefrite en émail de 27,5 x 33 cmE. Panier à fritureF. Lampe de four G. Poignée de la porteH. Fentes de ventilationI. Ramasse-miettesJ. Fiche Assist® de Breville TEMP Darkness TIME Slices FUNCTION START/CANCEL F I J G H ...
Page 32 - Accessoires vendus séparément :; plateau de service en bambou
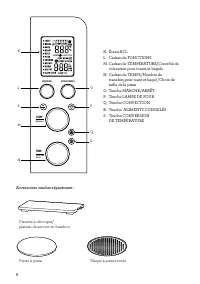
8 K. Écran ACLL. Cadran de FONCTIONSM. Cadran de TEMPÉRATURE/Contrôle de coloration pour toasts et bagels N. Cadran de TEMPS/Nombre de tranches pour toast et bagel /Choix de taille de la pizza O. Touche MARCHE/ARRÊTP. Touche LAMPE DE FOURQ. Touche CONVECTIONR. Touche ALIMENTS CONGELÉSS. Touche CONVE...
Page 33 - PRÉPARATION DU FOUR
9 PRÉPARATION DU FOUR Avant la première utilisation, faites fonctionner le four à vide pendant 20 minutes pour le débarrasser des substances de protection des éléments chauffants. Assurez-vous que l'espace est bien ventilé, car le four peut émettre des vapeurs. Ces vapeurs sont inoffensives et ne nu...
Page 34 - APERÇU DES FONCTIONS DU FOUR
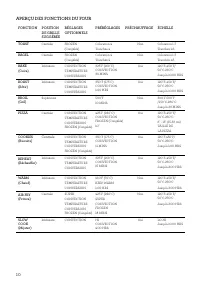
10 APERÇU DES FONCTIONS DU FOUR FONCTION POSITION DE GRILLE SUGGÉRÉE RÉGLAGES OPTIONNELS PRÉRÉGLAGES PRÉCHAUFFAGE ÉCHELLE TOAST Centrale FROZEN(Congelés) Coloration 4Tranches 4 Non Coloration 1-7Tranches 1-6 BAGEL Centrale FROZEN(Congelés) Coloration 4Tranches 4 Non Coloration 1-7Tranches 1-6 BAKE (...
Page 35 - Fonctions; TOURNER
11 Fonctions FONCTIONNEMENT DE VOTRE FOUR BREVILLE 1. Insérez la grille du four à la position recommandée en orientant les rayons vers le haut. Les positions sont imprimées sur la porte en verre. 2. Tournez le cadran de FONCTIONS jusqu'à ce que l'indicateur atteigne la fonction désirée. 3. Le chiffr...
Page 36 - Coloration désirée
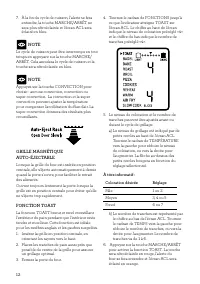
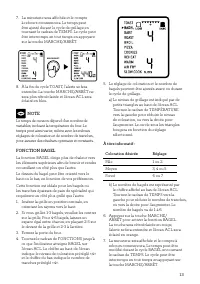
12 7. À la fin du cycle de cuisson, l'alerte se fera entendre, la touche MARCHE/ARRÊT ne sera plus rétroéclairée et l'écran ACL sera éclairé en bleu. NOTE Le cycle de cuisson peut être interrompu en tout temps en appuyant sur la touche MARCHE/ ARRÊT. Cela annulera le cycle de cuisson et la touche se...
Page 39 - FONCTION GRIL; FONCTION RÔTIR
15 rôtissage, de 120°F (50°C) à un maximum de 450°F (230°C). b) Le temps de rôtissage est représenté par le chiffre du bas sur l'écran ACL. Tournez le cadran de TEMPS pour modifier le temps jusqu'à 2 heures pour des températures au-dessus de 300°F/150°C et jusqu'à 10 heures pour des températures en-...
Page 40 - FONCTION PIZZA
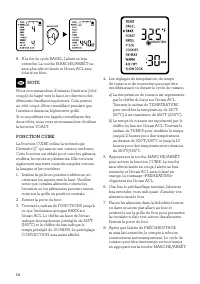
16 1. Insérez la grille en position supérieure, en orientant les rayons vers le haut. 2. Insérez le grilloir dans la lèchefrite fournie et placez les aliments sur le grilloir ou dans un plat allant au four que vous placerez au centre de la grille pour faciliter la circulation d'air autour des alimen...
Page 41 - Une note sur les pierres à pizza; FONCTION BISCUITS
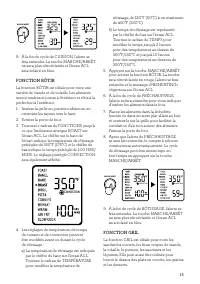
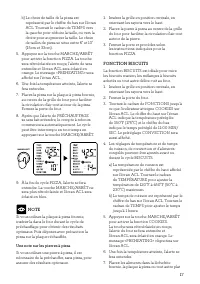
17 b) Le choix de taille de la pizza est représenté par le chiffre du bas sur l'écran ACL. Tournez le cadran de TEMPS vers la gauche pour réduire la taille, ou vers la droite pour augmenter la taille. Le choix de tailles de pizza se situe entre 6'' et 13'' (15cm et 33cm). 5. Appuyez sur la touche MA...
Page 42 - FONCTION RÉCHAUFFER; FONCTION GARDE CHAUD
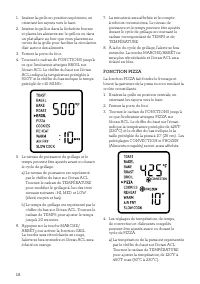
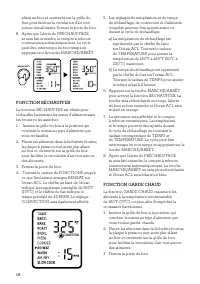
18 allant au four et centrez-le sur la grille du four pour faciliter la circulation d'air tout autour des aliments. Fermez la porte du four. 8. Après que l'alerte de PRÉCHAUFFAGE se sera fait entendre, le compte à rebours commencera automatiquement. Le cycle peut être interrompu en tout temps en app...
Page 43 - FONCTION FRITURE À AIR CHAUD
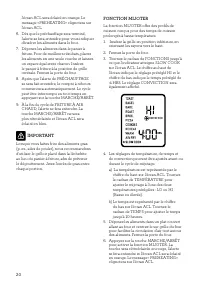
19 4. Tournez le cadran de FONCTIONS jusqu'à ce que l'indicateur atteigne WARM sur l'écran ACL. Le chiffre supérieur indique la température préréglée de 160°F (70°C) et le chiffre du bas indique le temps préréglé de :1 HRS. Le symbole KEEP WARM (Garde chaud) sera également affiché. SUPER CONVECTION ...
Page 47 - Nettoyer le boîtier et la porte; Nettoyer le ramasse-miettes
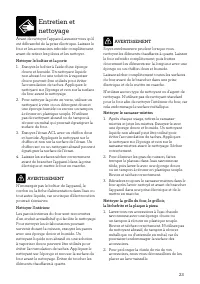
23 Entretien et nettoyage Avant de nettoyer l'appareil, assurez-vous qu'il est débranché de la prise électrique. Laissez le four et les accessoires refroidir complètement avant de retirer les pièces et les nettoyer. Nettoyer le boîtier et la porte 1. Essuyez le boîtier à l'aide d'une éponge douce et...
Page 48 - Rangement
24 Rangement 1. Assurez-vous que le four est éteint en le débranchant de la prise d'alimentation. 2. Laissez le four et tous les accessoires refroidir complètement avant de les retirer et les nettoyer. 3. Assurez-vous que le four et tous les accessoires sont propres et secs. 4. Assurez-vous que le r...
Page 49 - PROBLÈME POSSIBLE SOLUTION FACILE
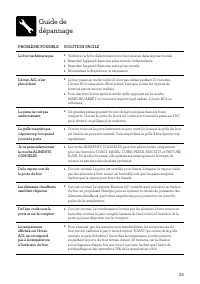
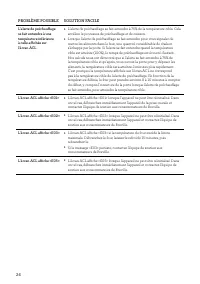
25 Guide de dépannage PROBLÈME POSSIBLE SOLUTION FACILE Le four ne démarre pas • Vérifiez si la fiche d'alimentation est bien insérée dans la prise murale. • Branchez l'appareil dans une prise murale indépendante. • Branchez l'appareil dans une autre prise murale. • Réinitialisez le disjoncteur, si ...
Page 51 - Notes
Page 54 - RACIONES; ANTES DE USAR ESTE; Contenido
2 BREVILLE RECOMIENDA ANTEPONER LA SEGURIDAD En Breville somos muy conscientes de lo importante que es la seguridad. La seguridad es nuestra prioridad a la hora de diseñar y fabricar productos para clientes como usted. En pos de su seguridad, le pedimos que ejerza suma precaución al usar cualquier a...
Page 58 - ADVERTENCIA
6 PARA USO EXCLUSIVO EN EL HOGAR. GUARDE ESTAS INSTRUCCIONES ADVERTENCIA Para reducir el riesgo de INCENDIO, DESCARGA ELÉCTRICA, EXPOSICIÓN A UNA RADIACIÓN UV EXCESIVA O LESIONES A LAS PERSONAS:• Siempre desenchufe el horno y deje que todas las partes (incluida la carcasa del foco, la cubierta de vi...
Page 59 - Componentes; Datos técnicos
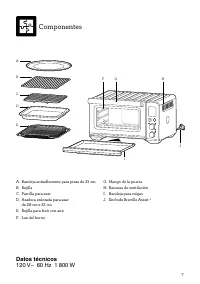
7 A. Bandeja antiadherente para pizza de 33 cmB. RejillaC. Parrilla para asarD. Asadera enlozada para asar de 28 cm x 33 cm E. Rejilla para freír con aireF. Luz del horno G. Mango de la puertaH. Ranuras de ventilaciónI. Bandeja para migasJ. Enchufe Breville Assist ‰ TEMP Darkness TIME Slices FUNCTIO...
Page 60 - Accesorios que se venden por separado:; Tabla de cortar de bambú o bandeja para servir
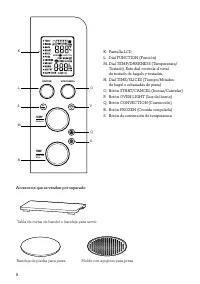
8 K. Pantalla LCDL. Dial FUNCTION (Función)M. Dial TEMP/DARKNESS (Temperatura/ Tostado). Este dial controla el nivel de tostado de bagels y tostadas. N. Dial TIME/SLICES (Tiempo/Mitades de bagel o rebanadas de pizza) O. Botón START/CANCEL (Iniciar/Cancelar)P. Botón OVEN LIGHT (Luz del horno)Q. Botón...
Page 61 - CÓMO PREPARAR EL HORNO
9 CÓMO PREPARAR EL HORNO Antes del primer uso, haga funcionar el horno vacío durante 20 minutos para eliminar cualquier sustancia protectora de los elementos calefactores. Asegúrese de que el área esté bien ventilada, ya que el horno puede emitir vapores. La emanación de vapores es segura y no perju...
Page 62 - DESCRIPCIÓN GENERAL DE LAS FUNCIONES DEL HORNO
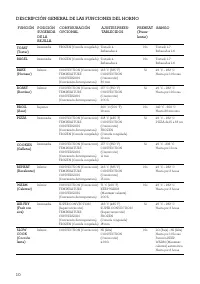
10 DESCRIPCIÓN GENERAL DE LAS FUNCIONES DEL HORNO FUNCIÓN POSICIÓN SUGERIDA DE LA REJILLA CONFIGURACIÓN OPCIONAL AJUSTES PREES-TABLECIDOS PREHEAT (Preca-lentar) RANGO TOAST (Tostar) Intermedia FROZEN (Comida congelada) Tostado 4 Rebanadas 4 No Tostado 1-7 Rebanadas 1-6 BAGEL Intermedia FROZEN (Comid...
Page 63 - CÓMO USAR SU HORNO BREVILLE; GIRAR; Funciones
11 CÓMO USAR SU HORNO BREVILLE 1. Inserte la rejilla con los radios mirando hacia arriba y en la posición deseada. Para su conveniencia, las posiciones de las rejillas están impresas en el vidrio de la puerta del horno. 2. Gire el dial FUNCTION (Función) hasta que el indicador en la pantalla LCD est...
Page 64 - Siga estas instrucciones generales:
12 b) Cierre la puerta del horno.c) El temporizador seguirá con la cuenta regresiva. La temperatura y el tiempo de cocción se pueden ajustar durante el ciclo. 7. Una vez terminado el ciclo de cocción, sonará una alerta, la luz del botón START/ CANCEL (Iniciar/Cancelar) desaparecerá y la pantalla LCD...
Page 65 - NOTA
13 1. Inserte la rejilla en la posición intermedia, con los radios mirando hacia arriba. 2. Si está tostando de 1 a 3 bagels, póngalos al centro de la rejilla. Si está tostando de 4 a 6 bagels, póngalos uniformemente con espacio entre ellos. Coloque 2 a 3 bagels en la parte frontal de la rejilla y 2...
Page 69 - FUNCIÓN PIZZA
17 FUNCIÓN PIZZA La función PIZZA derrite y dora el queso y los ingredientes, mientras hace que la masa de la pizza quede crujiente.1. Inserte la rejilla en la posición intermedia, con los radios mirando hacia arriba. 2. Cierre la puerta del horno.3. Gire el dial FUNCTION (Función) hasta que el indi...
Page 70 - Información sobre las piedras para pizza
18 Información sobre las piedras para pizza Cuando se utiliza una piedra para pizza, es necesario precalentar la piedra, sin la pizza, para obtener resultados óptimos.1. Inserte la rejilla en la posición intermedia, con los radios mirando hacia arriba. 2. Ponga la piedra para pizza en el centro de l...
Page 73 - IMPORTANTE
21 7. Organice los alimentos de manera uniforme en la rejilla para freír con aire incluida con el horno. Para obtener mejores resultados, ponga los alimentos en una sola capa y deje espacio entre las piezas. Inserte la rejilla para freír con aire en la posición superior y cierre la puerta del horno....
Page 76 - Limpieza del interior; Limpieza de la bandeja para migas
24 Limpieza del interior Las paredes del interior del horno cuentan con un revestimiento antiadherente para facilitar la limpieza. Para limpiar cualquier salpicadura que pueda ocurrir mientras cocina, limpie las paredes con una esponja suave y húmeda. Se puede usar un limpiador líquido no abrasivo o...
Page 77 - Almacenamiento
25 Limpieza de la rejilla, rejilla para asar, asadera y bandeja para pizza 1. Lave todos los accesorios en agua jabonosa tibia con una esponja suave o una almohadilla de plástico suave. Enjuague y seque completamente. No utilice limpiadores abrasivos, almohadillas metálicas ni utensilios metálicos p...
Page 78 - Solucionar problemas
26 POSIBLE PROBLEMA SOLUCIÓN SENCILLA El horno no se enciende • Compruebe que el enchufe de alimentación esté bien insertado en el tomacorriente. • Enchufe el cable de alimentación en un tomacorriente independiente. • Enchufe el cable de alimentación en un tomacorriente distinto. • Restablezca el di...
Page 80 - Breville Consumer Support; Breville USA; USA
Breville is a registered trademark of Breville Pty. Ltd. A.B.N. 98 000 092 928. Copyright Breville Pty. Ltd. 2021. • Due to continued product improvement, the products illustrated/photographed in this brochure may vary slightly from the actual product. • En raison de son amélioration continue, le pr...


 Breville BOV450XL
User Manual
Breville BOV450XL
User Manual
 Breville BOV650XL
User Manual
Breville BOV650XL
User Manual
 Breville BOV800XL
User Manual
Breville BOV800XL
User Manual
 Breville BTA440BSS
User Manual
Breville BTA440BSS
User Manual
 Breville BTA630XL
User Manual
Breville BTA630XL
User Manual
 Breville BTA720XL
User Manual
Breville BTA720XL
User Manual
 Breville BTA730BSS
User Manual
Breville BTA730BSS
User Manual
 Breville BTA820XL
User Manual
Breville BTA820XL
User Manual
 Breville BTA825
User Manual
Breville BTA825
User Manual
 Breville BTA830
User Manual
Breville BTA830
User Manual