Page 2 - reading to get the very best from it.; Visit our website for:; CUSTOMER CARE AND SERVICE; Always use original spare parts.; Subject to change without notice.
CONTENTS 1. SAFETY INFORMATION.................................................................................................3 2. CONDITIONS OF USE....................................................................................................5 3. SAFETY INSTRUCTIONS..............................
Page 5 - Installation
• Eggs in their shell and whole hard-boiled eggs should not be heated in the appliance since they may explode, even after microwave heating has ended. • The appliance should be cleaned regularly and any food deposits removed. • Failure to maintain the appliance in a clean condition could lead to det...
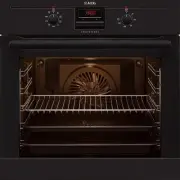
Page 7 - PRODUCT DESCRIPTION; General overview; Wire shelf
cleaning pads, solvents or metal objects. • If you use an oven spray, obey the safety instructions on the packaging. • Do not clean the catalytic enamel (if applicable) with any kind of detergent. 3.5 Internal light • The type of light bulb or halogen lamp used for this appliance is only for househo...
Page 8 - CONTROL PANEL; Electronic programmer; Use the sensor fields to operate the appliance.
5. CONTROL PANEL 5.1 Electronic programmer 2 1 3 4 5 7 6 8 9 10 11 Use the sensor fields to operate the appliance. Sensorfield Function Comment 1 - Display Shows the current settings of the appliance. 2 ON / OFF To activate and deactivate the appliance. 3 Heating Functionsor Assisted Cook-ing To cho...
Page 9 - Display; Other indicators of the display:
Sensorfield Function Comment 9 Home key To go back one level in the menu. To show themain menu, touch the field for 3 seconds. 10 Time and addi-tional functions To set different functions. When a heating func-tion operates, touch the sensor field to set thetimer or the functions: Function Lock, Favo...
Page 10 - BEFORE FIRST USE; Initial Cleaning; DAILY USE; Navigating the menus
Symbol Function Fast Heat Up Indicator The function is active. It decreases theheat up time. Weight Automatic The display shows that the automaticweight system is active or that weightcan be changed. Heat + Hold The function is active. 6. BEFORE FIRST USE WARNING! Refer to Safety chapters. 6.1 Initi...
Page 11 - Submenu for: Basic Settings; Heating Functions
Sym-bol Menu item Application Favourite Programme Contains a list of favourite cooking programmescreated by the user. Submenu for: Basic Settings Sym-bol Submenu Description Set Time of Day Sets the current time on the clock. Time Indication When ON, the display shows the current timewhen you deacti...
Page 13 - Residual heat; MICROWAVE MODE; Information about operation
Heating function Application Plate Warming To preheat your plate for serving. ECO Roasting The ECO functions let you optimize the energyconsumption during cooking. It is necessary to setthe cooking time first. To get more informationabout the recommended settings, refer to thecooking tables with the...
Page 14 - Tips for the microwave
• If possible, cook food covered with material suitable for use in the microwave. Only cook food without a cover if you want to keep a crust. • Do not overcook the dishes by setting the power and time too high. The food can dry out, burn or catch fire in some places. • Do not use the appliance to co...
Page 15 - Suitable cookware and materials; • Food items have different shapes and
Result Remedy After the cooking time has elapsed,the food is overheated at the edgebut is still not ready in the middle. Next time select a lower power and a longertime. Stir liquids, e.g. soup, halfway through. Suitable cookware and materials Cookware / Material Microwave Grilling Defrost-ing Heati...
Page 16 - Microwave functions; Setting the Microwave
vary. As a rough guide: double the quantity = almost double the time. • The microwave creates the heat directly in the food. Because of this, all places cannot be heated at the same time. You must stir or turn the heated dishes, especially with larger quantities of food. • The standing time is given...
Page 18 - CLOCK FUNCTIONS; Clock functions table; Setting the clock functions
9. CLOCK FUNCTIONS 9.1 Clock functions table Clock function Application Minute Minder To set a countdown (max. 2 h 30 min). Thisfunction has no effect on the operation of theappliance. You can also activate it when theappliance is deactivated.Use to activate the function. Press or to set the minutes...
Page 19 - AUTOMATIC PROGRAMMES
When the function ends, an acoustic signal sounds. The function stays on if you change the heating functions. 9.4 Extra Time The function: Extra Time makes the heating function continue after the end of Duration. Applicable to all heating functions with Duration or Weight Automatic. 1. When the cook...
Page 20 - USING THE ACCESSORIES; Inserting the accessories; ADDITIONAL FUNCTIONS; Favourite Programme
11. USING THE ACCESSORIES WARNING! Refer to Safety chapters. 11.1 Inserting the accessories Wire shelf:Push the shelf between the guide bars of the shelf support and make sure that the feet point down. Baking tray:Push the baking tray between the guide bars of the shelf support. Wire shelf and bakin...
Page 22 - Cooling fan; HINTS AND TIPS; Advice for special heating; Baking
display is lower between 10 PM and 6 AM. • Day brightness: – when the appliance is activated. – if you touch a sensor field during the night brightness (apart from ON / OFF), the display goes back to the day brightness mode for the next 10 seconds. – if the appliance is deactivated and you set the f...
Page 23 - Tips on baking; Baking on one oven level; Baking in tins
13.3 Tips on baking Baking results Possible cause Remedy The bottom of the cake isnot browned sufficiently. The shelf position is incor-rect. Put the cake on a lowershelf. The cake sinks and becomessoggy, lumpy or streaky. The oven temperature is toohigh. The next time you bake, seta slightly lower ...
Page 24 - Cakes / pastries / breads on baking trays
Food Function Tempera-ture (°C) Time (min) Shelf posi-tion Flan base - short pas-try 1) True Fan Cook-ing 170 - 180 10 - 25 2 Flan base - sponge mix-ture True Fan Cook-ing 150 - 170 20 - 25 2 Apple pie / Apple pie (2tins Ø 20 cm, diagonallyoff set) True Fan Cook-ing 160 70 - 90 2 Apple pie / Apple p...
Page 25 - Biscuits
Food Function Tempera-ture (°C) Time (min) Shelf posi-tion Fruit flans (made withyeast dough / spongemixture) 2) ConventionalCooking 170 35 - 55 1 Fruit flans made withshort pastry True Fan Cook-ing 160 - 170 40 - 80 3 Yeast cakes with deli-cate toppings (e.g.quark, cream, custard) 1) ConventionalCo...
Page 26 - Bakes and gratins; Multilevel baking
13.5 Bakes and gratins Food Function Temperature(°C) Time (min) Shelf position Pasta bake ConventionalCooking 180 - 200 45 - 60 1 Lasagne ConventionalCooking 180 - 200 25 - 40 1 Vegetables augratin 1) Turbo Grilling 160 - 170 15 - 30 1 Baguettes top-ped with meltedcheese True Fan Cook-ing 160 - 170 ...
Page 27 - Slow Cooking; Pizza Setting
Food Temperature (°C) Time (min) Shelf posi-tion Macaroons 100 - 120 40 - 80 1 / 3 Biscuits made withyeast dough 160 - 170 30 - 60 1 / 3 13.7 Slow Cooking Use this function to prepare lean, tender pieces of meat and fish. This function is not applicable to such recipes as pot roast or fatty roast po...
Page 28 - Roasting
Food Temperature (°C) Time (min) Shelf position Unleavened bread 230 10 - 20 3 Puff pastry flan 160 - 180 45 - 55 3 Flammekuchen 230 12 - 20 3 Piroggen (Russian ver-sion of calzone) 180 - 200 15 - 25 3 13.9 Roasting • Large roasting joints can be roasted directly in the deep pan or on the wire shelf...
Page 29 - Veal; Lamb
Food Func-tion Quantity Power(Watts) Tempera-ture (°C) Time (min) Shelf po-sition Porkknuckle(pre-cooked) TurboGrilling 750 g - 1 kg 200 150 - 170 60 - 75 1 Veal Food Func-tion Quantity Power(Watts) Tempera-ture (°C) Time (min) Shelf po-sition Roast veal Turbo Grilling 1 kg 200 160 - 180 50 - 70 1 K...
Page 30 - Grilling
Dishes Food Func-tion Quantity(kg) Power(Watts) Tempera-ture (°C) Time (min) Shelf po-sition Dishessweet TrueFanCook-ing - 200 160 - 180 20 - 35 1 Savourydishes withcooked in-gredients(noodles,vegetables) TrueFanCook-ing - 400 - 600 160 - 180 20 - 45 1 Savourydishes withraw ingre-dients (po-tatoes,v...
Page 31 - Fast Grilling; Frozen foods; • Remove the food packaging. Put the
Fast Grilling Food Time (min) Shelf position 1st side 2nd side Burgers / Burgers 9 - 13 8 - 10 3 Pork fillet 10 - 12 6 - 10 2 Sausages 10 - 12 6 - 8 3 Fillet steaks / vealsteaks 7 - 10 6 - 8 3 Toast / Toast 1 - 3 1 - 3 3 Toast with topping 6 - 8 - 2 13.12 Frozen foods • Remove the food packaging. Pu...
Page 32 - Frozen Ready Meals Table; Defrost; • Remove the food packaging and put
Frozen Ready Meals Table Food Function Tempera-ture (°C) Time (min) Shelf position Frozen pizza 1) ConventionalCooking as per man-ufacturer'sinstructions as per manufac-turer's instruc-tions 2 Chips 2) (300 - 600 g) ConventionalCooking or TurboGrilling 200 - 220 as per manufac-turer's instruc-tions ...
Page 33 - Preserving; Drying
13.14 Preserving • Use only preserve jars of the same dimensions available on the market. • Do not use jars with twist-off and bayonet type lids or metal tins. • Use the first shelf from the bottom for this function. • Put no more than six one-litre preserve jars on the baking tray. • Fill the jars ...
Page 34 - Bread Baking; Preheating is not recommended.; Microwave cooking; Defrosting meat
Food Temperature (°C) Time (h) Shelf position Herbs 40 - 50 2 - 3 3 Plums 60 - 70 8 - 10 3 Apricots 60 - 70 8 - 10 3 Apple slices 60 - 70 6 - 8 3 Pears 60 - 70 6 - 9 3 13.16 Bread Baking Preheating is not recommended. Food Temperature (°C) Time (min) Shelf position White Bread 180 - 200 40 - 60 2 Ba...
Page 35 - Defrosting poultry; Defrosting fish
Food Power(Watts) Quantity (g) Time (min) Standingtime (min) Comments Goulash 200 500 10 - 15 10 - 15 Turn halfwaythrough, re-move defros-ted parts. Defrosting poultry Food Power(Watts) Quantity (g) Time (min) Standingtime (min) Comments Chicken 200 1000 25 - 30 10 - 20 Turn halfwaythrough, cov-er d...
Page 38 - Cooking table
Food Power(Watts) Quantity Time (min) Standingtime (min) Comments Conveniencefood 600 400 - 500 g 14 - 20 5 Remove anyaluminiumlids, turn half-way through. Frozen readymeals 400 400 - 500 g 4 - 6 5 Remove anyaluminiumlids, turn half-way through. Milk 1000 1 cup ap-prox. 200 ml 1:15 - 1:45 - Put spoo...
Page 39 - • For selected models only.
Food Power(Watts) Quantity Time (min) Standingtime (min) Comments Vegetables,short cookingtime, frozen 1) 600 500 g 14 - 18 - Add approx.50 ml water,cook cov-ered, stirhalfwaythrough. Vegetables,long cookingtime, fresh 1) 600 500 g 14 - 20 - Add approx.50 ml water,cook cov-ered, stirhalfwaythrough. ...
Page 40 - CARE AND CLEANING; Notes on cleaning
Food Ovenware Pow-er(Watts) Tem-pera-ture(°C) Time(min) Shelfposi-tion Comments au gratin po-tatoes (1 kg) Gratin dish 300 200 40 2 10 min stand-ing time. Roast porkneck (1100 g) Glass dish with strainer 300 200 70 1 Turn in be-tween, 10 minstanding time. 14. CARE AND CLEANING WARNING! Refer to Safe...
Page 41 - The top lamp; TROUBLESHOOTING
The top lamp 1. Turn the lamp glass cover counterclockwise to remove it. 2. Clean the glass cover. 3. Replace the lamp with a suitable 300 °C heat-resistant lamp. 4. Install the glass cover. 15. TROUBLESHOOTING WARNING! Refer to Safety chapters. 15.1 What to do if... Problem Possible cause Remedy Th...
Page 42 - Service data; INSTALLATION; Building in
15.2 Service data If you cannot find a solution to the problem yourself, contact your dealer or an Authorised Service Centre.The necessary data for the service centre is on the rating plate. The rating plate is on the front frame of the appliance cavity. Do not remove the rating plate from the appli...
Page 44 - WARRANTY; FOR SALES IN AUSTRALIA AND NEW
alternativ H05VV-FH05RR-F min.1,60 m 90° 13 mm 20 mm 2x3,5x25 17. WARRANTY FOR SALES IN AUSTRALIA AND NEW ZEALAND ALL AEG BRANDED APPLIANCES This document sets out the terms and conditions of the product warranties for AEG Appliances. It is an important document. Please keep it with your www.aeg.com...
Page 47 - ENVIRONMENTAL CONCERNS
FOR SERVICE or to find the address of your nearest state service centre in Australia PLEASE CALL 1300 363 664OR EMAIL [email protected] For the cost of a local call (Australia only) FOR SPARE PARTS or to find the address of your nearest state spare parts centre in Australia PLEASE CALL 13 13 50OR EM...


 AEG BER352110M
User Manual
AEG BER352110M
User Manual
 AEG KS8100001M
User Manual
AEG KS8100001M
User Manual
 AEG KS7415001M
User Manual
AEG KS7415001M
User Manual
 AEG KE8404001M
User Manual
AEG KE8404001M
User Manual
 AEG E6831-4-M
User Manual
AEG E6831-4-M
User Manual
 AEG E5701-4-M
User Manual
AEG E5701-4-M
User Manual
 AEG BE6915001M
User Manual
AEG BE6915001M
User Manual
 AEG B5741-4-M
User Manual
AEG B5741-4-M
User Manual
 AEG KM5840302M
Quick Guide
AEG KM5840302M
Quick Guide
 AEG BEM455120M
User Manual
AEG BEM455120M
User Manual
 AEG BES331111M
User Manual
AEG BES331111M
User Manual
 AEG BP5013001M
Manual
AEG BP5013001M
Manual
 AEG BCR742350W
User Manual
AEG BCR742350W
User Manual
 AEG BE3003001M
User Manual
AEG BE3003001M
User Manual
 AEG BY9314001M
Manual
AEG BY9314001M
Manual
 AEG BE7314401M
User Manual
AEG BE7314401M
User Manual
 AEG BE3002021B
User Manual
AEG BE3002021B
User Manual