Page 2 - Visit our website for:; CUSTOMER CARE AND SERVICE
CONTENTS 1. SAFETY INFORMATION . . . . . . . . . . . . . . . . . . . . . . . . . . . . . . . . . . . . . . . . . . . . . . . . . . . . . . 3 2. SAFETY INSTRUCTIONS . . . . . . . . . . . . . . . . . . . . . . . . . . . . . . . . . . . . . . . . . . . . . . . . . . . . . . 4 3. PRODUCT DESCRIPTION . ....
Page 4 - • To remove the shelf supports first pull the front of the; SAFETY INSTRUCTIONS; Installation
scratch the surface, which may result in shattering ofthe glass. • To remove the shelf supports first pull the front of the shelf support and then the rear end away from theside walls. Install the shelf supports in the oppositesequence. 2. SAFETY INSTRUCTIONS 2.1 Installation WARNING! Only a qualifi...
Page 6 - Disposal; PRODUCT DESCRIPTION; Accessories; Nonstick wire shelf
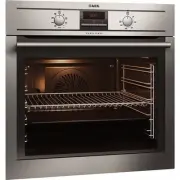
2.5 Disposal WARNING! Risk of injury or suffocation. • Disconnect the appliance from the mains supply. • Cut off the mains cable and discard it.• Remove the door catch to prevent children and pets to get closed in theappliance. 3. PRODUCT DESCRIPTION 12 7 9 11 10 8 4 1 2 3 5 6 1 2 3 4 5 13 1 Control...
Page 7 - Trivet; BEFORE FIRST USE; Initial Cleaning; DAILY USE; Activating and
Trivet • For roasting and grilling. Use the trivet only with theGrill- / roasting pan. 4. BEFORE FIRST USE WARNING! Refer to the Safety chapters. 4.1 Initial Cleaning • Remove all parts from the appliance.• Clean the appliance before first use. Refer to chapter "Care andCleaning". 4.2 Settin...
Page 8 - Oven Functions; Oven function; Electronic programmer
5.2 Oven Functions Oven function Application Light To activate the lamp without a cooking func-tion. True Fan Cooking To bake maximum on 3 shelf positions at thesame time and to dry food. Set the tempera-ture 20 - 40 °C lower than for ConventionalCooking. Pizza Setting To bake food on 1 shelf positi...
Page 9 - CLOCK FUNCTIONS; Clock function; Setting the clock functions; Cancelling the clock; USING THE ACCESSORIES
6. CLOCK FUNCTIONS Clock function Application Time of day To show, set, or change the time. Minute minder To set a countdown time. This function has no effect on the operation of the oven. Duration To set the length of an oven operation. End To set the switch-off time for an oven function. You can u...
Page 11 - ADDITIONAL FUNCTIONS; Cooling fan; HELPFUL HINTS AND TIPS; Inner side of the door; General instructions
You can use the trivet to grill flatdishes in large quantities and to toast: • Put the trivet into the deep pan so that the supports of the wire shelfpoint down. • Put the deep pan into the oven on the necessary shelf position. 8. ADDITIONAL FUNCTIONS 8.1 Cooling fan When the appliance operates, the...
Page 12 - Tips on baking
9.3 Tips on baking Baking results Possible cause Remedy The bottom of the cakeis not browned suffi-ciently. The shelf position is in- correct. Put the cake on a lower shelf. The cake sinks and be-comes soggy, lumpy orstreaky. The oven temperature is too high. The next time you bake, set a slightly l...
Page 16 - Multileveled Baking
Dish Oven func- tion Shelf posi- tion Temperature (°C) Time (min) Vegetables augratin 1) Turbo Grilling or True Fan Cooking 1 160 - 170 15 - 30 Baguettestopped withmeltedcheese Turbo Grilling or True Fan Cooking 1 160 - 170 15 - 30 Sweet bakes Conventional Cooking 1 180 - 200 40 - 60 Fish bakes Conv...
Page 17 - Pizza Setting
Type of bak- ing True Fan Cooking Temperature (°C) Time (min) Shelf position 2 shelf posi- tions 3 shelf posi- tions Biscuits madewith eggwhite / Merin-gues 1 / 4 - 80 - 100 130 - 170 Macaroons 1 / 4 - 100 - 120 40 - 80 Biscuits madewith yeastdough 1 / 4 - 160 - 170 30 - 60 Puff pastries 1 / 4 - 170...
Page 20 - Grilling
Type of meat Quantity Oven func- tion Shelf posi- tion Tempera- ture °C Time (min.) Turkey 2.5 - 3.5 kg Turbo Grill- ing 1 160 - 180 120 - 150 Turkey 4 - 6 kg Turbo Grill- ing 1 140 - 160 150 - 240 Fish (steamed) Type of meat Quantity Oven func- tion Shelf posi- tion Tempera- ture °C Time (min.) Who...
Page 21 - Convenience food
1) Preheat the oven. 9.10 Convenience food True Fan Cooking Convenience food Shelf position Temperature (°C) Time (min.) Pizza, frozen 2 200 - 220 15 - 25 Pizza American,frozen 2 190 - 210 20 - 25 Pizza, chilled 2 210 - 230 13 - 25 Pizza Snacks, fro-zen 2 180 - 200 15 - 30 French Fries, thin 3 200 -...
Page 22 - Defrosting; Turn halfway through.; Preserving - Bottom Heat
9.11 Defrosting Remove the food packaging, and thenput the food on a plate. Do not cover it with a bowl or a plate, asthis can extend the defrost time.Use the first oven shelf position from thebottom. Dish Defrostingtime (min.) Further defrost- ing time (min.) Comment Chicken, 1000 g 100 - 140 20 - ...
Page 23 - Cooking
Stone fruit Preserve Temperature in °C Cooking time un- til simmering (min.) Continue to cook at 100°C (min.) Pears / Quinces /Plums 160 - 170 35 - 45 10 - 15 Vegetables Preserve Temperature in °C Cooking time un- til simmering (min.) Continue to cook at 100°C (min.) Carrots 1) 160 - 170 50 - 60 5 -...
Page 24 - CARE AND CLEANING; Shelf supports; Valid for telescopic runners:; Lamp; Before you change the lamp:
10. CARE AND CLEANING WARNING! Refer to the Safety chapters. Notes on cleaning: • Clean the front of the appliance with a soft cloth with warm water and acleaning agent. • To clean metal surfaces, use a usual cleaning agent. • Clean the appliance interior after each use. Then you can remove dirt mor...
Page 25 - Oven ceiling; Folding down the heating element; Installing the heating element; Cleaning the oven door
CAUTION! Put a cloth on the bottom of theinterior of the appliance. It pre-vents damage to the lamp glasscover and the cavity.Always use the same lamp type. Replacing the lamp at the cavityceiling: 1. Turn the lamp glass cover counter-clockwise to remove it. 2. Clean the glass cover. 3. Replace the ...
Page 26 - WHAT TO DO IF...; Problem; Activate the appliance.
5. Put the door with the outer sidedown on a soft cloth on a stable sur-face. This is to prevent scratches. 2 B 1 6. Hold the door trim (B) on the topedge of the door at the two sidesand push inwards to release the clipseal. 7. Pull the door trim to the front to re-move it. 8. Hold the door glass pa...
Page 27 - INSTALLATION; For UK use only; Connection via
Problem Possible cause Remedy Steam and condensationsettle on the food and inthe appliance cavity. You left the dish in theappliance for too long. Do not leave the dishesin the oven for longerthan 15 - 20 minutes af-ter the cooking processends. The display shows“12.00”. A power cut. Reset the clock....
Page 31 - CUSTOMER SERVICE; Standard guarantee; Service and Spare Parts.
13. GB IE GREAT BRITAIN & IRELAND - GUARANTEE/ CUSTOMER SERVICE 13.1 Standard guarantee conditions: We, Electrolux, undertake that if within12 months of the date of the purchasethis Electrolux appliance or any partthereof is proved to be defective by rea-son only of faulty workmanship or mate-ri...
Page 32 - EUROPEAN GUARANTEE; Česká republika
14. EUROPEAN GUARANTEE GB This appliance is guaranteed by Electrolux in each of the countries listedat the back of this user manual, for theperiod specified in the appliance guar-antee or otherwise by law. If you movefrom one of these countries to anotherof the countries listed, the applianceguarant...
Page 34 - ENVIRONMENT CONCERNS
16. ENVIRONMENT CONCERNS Recycle the materials with thesymbol . Put the packaging inapplicable containers to recycle it.Help protect the environment andhuman health and to recycle wasteof electrical and electronic appliances. Do not disposeappliances marked with the symbol with the household waste. ...