Bosch KIF81PFE0 - User Manual
Bosch KIF81PFE0 Refrigerator – User Manual, read for free online in PDF format. We hope this helps you resolve any issues you may have. If you have further questions, please contact us through the contact form.


Table of Contents:
- Page 2 – Table of contents; Environmental protection and
- Page 4 – Safety; General information; WARNING ‒ Risk of injury!
- Page 5 – Safe installation; WARNING ‒ Risk of electric shock!
- Page 7 – Damaged appliance
- Page 8 – Incorrect repairs are dangerous.
- Page 9 – Disposing of packaging; Selecting the installation location; Scope of delivery
- Page 10 – Criteria for the installation; WARNING; Permitted room temperature; Niche depth; Installing the appliance; Depending on the appliance specifications
- Page 11 – Connecting the appliance
- Page 12 – Familiarising yourself with your appliance; You can find an overview of the parts of your appliance here.
- Page 14 – Features; tainer
- Page 15 – partment; Egg tray; Store eggs safely on the egg tray.; Bottle holder; Basic operation; ance; ance
- Page 16 – Additional functions; Switching on Super cooling; Alarm; Switching off the door alarm; 0 Refrigerator compart-; Tips for storing food in
- Page 17 – gerator compartment; Coldest zone; Store highly perishable food; Warmest zone; Store food that does not spoil; ment; Storage times in the; Food
- Page 18 – 3 Cleaning and servi-; Preparing the appliance; Remove the partition. →; Cleaning the appliance
- Page 19 – Putting the food into the appliance.; Removing the fittings; Removing the shelf; Pull out and remove the shelf.; Removing the extendable shelf; Lift the door rack and remove it.
- Page 20 – Removing appliance; Removing the partition; Telescopic rails; Removing telescopic rails
- Page 21 – Push in the telescopic rail.
- Page 22 – 4 Troubleshooting
- Page 23 – Fault
- Page 24 – Conducting an appliance; flashes for 10 seconds,; 5 Storage and disposal; Taking the appliance out; Remove all of the food.
- Page 25 – 6 Customer Service; Under the terms of the manu-; Only applies to countries in the European Economic Area
- Page 28 – Register your new device on MyBosch now and profit directly from:
Register
your
new device on
MyBosch now and
get free benefits:
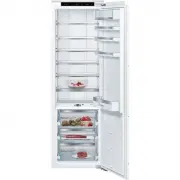
Refrigerator
KIF81..
"Loading the manual" means you need to wait until the file loads and becomes available for online reading. Some manuals are very large, and the time they take to appear depends on your internet speed.
Was this manual helpful?
About this manual
- Brand
- Bosch
- Model
- KIF81PFE0
- Document type
- User Manual
- Category
- Refrigerator
- Language(s)
- English
- Pages
- 28
- File size
- 2.7 MB
- Format
Summary
en 2 Table of contents 1 Safety ............................................ 4 1.1 General information .................... 41.2 Intended use............................... 41.3 Restriction on user group........... 41.4 Safe transport ............................. 41.5 Safe installation ..............
en Safety 4 1 Safety Observe the following safety instructions. 1.1 General information ¡ Read this instruction manual carefully. ¡ Keep the instruction manual and the product information safefor future reference or for the next owner. ¡ Do not connect the appliance if it has been damaged in transi...
Safety en 5 1.5 Safe installation WARNING ‒ Risk of electric shock! Improper installation is dangerous. ▶ Connect and operate the appliance only in accordance with thespecifications on the rating plate. ▶ Connect the appliance to a power supply with alternating cur-rent only via a properly installe...
Ask a question
Related manuals
Popular Bosch Refrigerators
More Bosch Refrigerators models
 Bosch KGV39XL2AR Manual
 Bosch KGV39XL22R Manual
 Bosch KGV39XW2AR Manual
 Bosch KGV39XW22R Manual
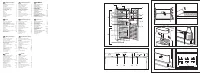 Bosch KGV 3105 User Manual
 Bosch KGV 3604 User Manual
 Bosch KIN86AD30A User Manual
 Bosch KIR81AD30A User Manual
 Bosch KSV33VI3A User Manual
 Bosch B10CB81NVW Manual
 Bosch B11CB50SSS User Manual
 Bosch B24CB50ESS User Manual