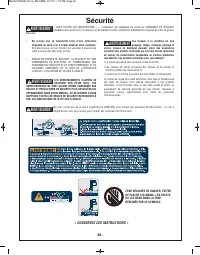
Page 2 - Work Area; Safety; “SAVE THESE INSTRUCTIONS”; WARNING
General Safety Rules for Benchtop Tools Work Area • Keep work area clean and well-lit. Cluttered benches and dark areas invite accidents. • Do not operate power tools in explosive atmospheres, such as in the presence of flammable liquids, gases or dust. Power tools create sparks which may ignite the...
Page 3 - Service; Safety Rules for Miter Saws
3. “SAVE THESE INSTRUCTIONS” • Do not force tool. Use the correct tool for yourapplication. The correct tool will do the job better and safer at the rate for which it is designed. Do notuse the tool for purpose not intended - for example,do not use the miter saw for slicing meats. • Do not use tool ...
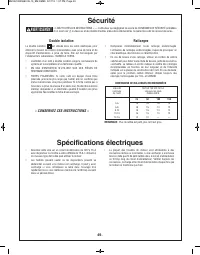
Page 6 - Electrical Requirements; Double-Insulated Tools
Electrical Requirements • Connect this saw to a 120V, 15-amp branch cir- cuit with a 15-amp fuse or circuit breaker. Usingthe wrong size fuse can damage the motor. • Fuses may “blow” or circuit breakers may trip frequently if motor is overloaded. Overloadingcan occur if you feed the blade into thewo...
Page 7 - Table of Contents
7. Safety . . . . . . . . . . . . . . . . . . . . . . . . . . . . . . . . . 2-6 General Safety Rules for Benchtop Tools . . . . 2-3 Safety Rules for Miter Saws . . . . . . . . . . . . . . 3-6 Electrical Requirements . . . . . . . . . . . . . . . . . . . 6 Table of Contents . . . . . . . . . . . . . ...
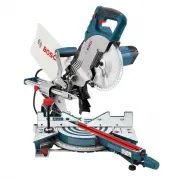
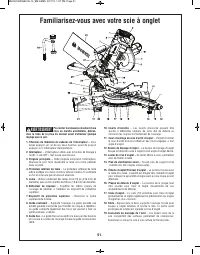
Page 8 - Getting To Know Your Miter Saw
To avoid injury from accidentalstarting, remove plug from power source outlet before making any adjustments. 1. Switch lock-Off Release Buttons – One of these two buttons must be pressed before thepower switch can be pressed. 2. power Switch – The power switch used with the switch “Lock-OFF” release...
Page 10 - Assembly; Unpacking and Checking Contents; Loose Parts - 1 of each shown; Check off for each part
10. Assembly Unpacking and Checking Contents Unpacking the Miter Saw – When removing this tool from packaging materials, reach down to the two sidecarry-handle locations and slowly lift until it clears thepackage. To avoid severe pinching, neverlift or move this saw by gripping any component of the ...
Page 11 - Tools Needed for Assembly and Alignment; Combination Square; Combination Square Must Be True
11. Assembly Tools Needed for Assembly and Alignment Combination Square 5mm Hex Key (supplied) #2 Phillips Screwdriver 4mm Hex Key Combination Square Must Be True Checking Combination Square 1. Position square and draw a light line 2. Flip square (shown in dotted position) 3. Check edge of flipped s...
Page 12 - Attaching loose parts; Storing the 5mm Hex Key
12. Assembly Attaching loose parts To avoid possible injury, disconnect plug from power source before performing any assembly,adjustments or repairs. Storing the 5mm Hex Key There is a storage location on the saw to store the5mm hex key. Insert the short leg of the hex keythrough the rubber grommet ...
Page 13 - Removing and Installing Blades; Moving Blade Bolt Cover plate
13. Assembly Removing and Installing Blades To avoid possible injury, disconnect plug from power source before performing any assembly,adjustments or repairs. Moving Blade Bolt Cover plate 1. Position the saw in the UP position and at 0 bevel. If in the DOWN position, press down slightly on thesaw h...
Page 14 - Attaching a Vacuum Cleaner; Repositioning or Removing the; Assembling Dust Collection System
14. To avoid possible injury, disconnect plug from power source before performing any assembly,adjustments or repairs. Attaching the Dust Bag To attach the dust bag, squeaze the two wire tabstogether and slide the dust bag over the dust port rib(see figure 5). Using and Cleaning the Dust Bag Using D...
Page 15 - Head Assembly lock pin; Adjustments; Using the Head Assembly lock pin
15. To avoid possible injury, disconnect plug from power source before performing any assembly,adjustments or repairs. Head Assembly lock pin The head assembly lock pin (figure 8) is used to holdthe saw’s head assembly in the DOWN position. Thisposition prevents the head from bouncing up anddown dur...
Page 16 - Depth of Cut; Setting Blade Depth for Normal
16. Adjustments Depth of Cut To avoid possible injury, disconnect plug from power source before performing any assembly,adjustments or repairs. When a new blade is installed, it may be necessaryto check the clearance of the blade to the turntablestructure. The depth stop plate is a feature providedt...
Page 17 - Miter Detent System; Calibrating Miter Detent System
17. Adjustments Miter Detent System To avoid possible injury, disconnect plug from power source before performing any assembly,adjustments or repairs. Calibrating Miter Detent System 1. Engage the miter detent at the 0° position. Loosen the miter lock knob 1/2 turn. 2. Look for four round holes in t...
Page 18 - Kerf Insert Adjustment; ° Bevel Stop; Kerf Insert
18. To avoid possible injury, disconnect plug from power source before performing any assembly,adjustment or repair. Kerf Insert Adjustment The kerf inserts should be adjusted close to theblade, but without touching the blade, to avoid tear-out on the bottom of the workpiece.1. Hold the saw head ass...
Page 19 - Calibrating Blade at 0° Bevel
19. Adjustments 0° Bevel Stop (continued) Disconnect plug from powersource before performing any assembly, adjustment or repair to avoid possibleinjury. NOTE: Your miter saw was completely adjusted at thefactory. However, during shipment, slight misalignment may have occurred. Check thefollowing set...
Page 20 - Checking left 45° Bevel Adjustment; 5° Bevel Stop
20. To avoid possible injury, disconnect plug from power source before performing any assembly,adjustment or repair. Checking left 45° Bevel Adjustment 1. Lower head assembly and engage head assembly lock pin. 2. Rotate table to 0° miter position and lock. 3. Slide the head assembly completely to th...
Page 21 - Transporting; preparing To lift The Saw
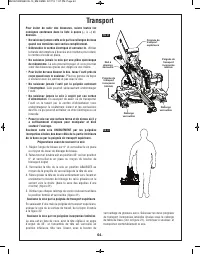
21. Transporting To avoid injury, follow all statements identifiedbelow by the BUllET ( • ) symbol. • Never lift this saw by grasping the baseextensions when they are in the extendedposition. • Unplug electric cord and wind up. Use the hook and loop strap to hold the wrapped cord together. • Never l...
Page 22 - placement and Mounting; Workbench permanent Mounting; Alternate Mounting; Temporary Mounting Using Clamps
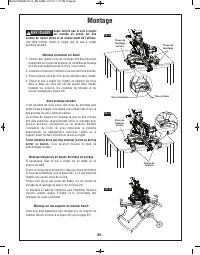
22. placement and Mounting Be certain the miter saw ismounted or placed on a level, firm work surface before using. A level and firm work surface reduces the risk of the miter sawbecoming unstable. Workbench permanent Mounting 1. Each of the four mounting holes should be bolted securely using 5/16&#...
Page 23 - Switch Activation; preparing for Saw Operations
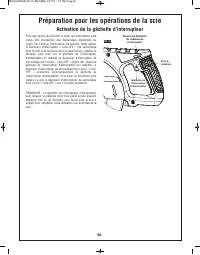
23. Switch Activation For safety, the switch lever is designed to preventaccidental starts. To operate safety switch, slide theswitch “Lock-OFF” release button with either thumb todisengage the lock, then pull the power switch triggerand release the switch “Lock-OFF” release button(figure 26). When ...
Page 24 - Body and Hand position
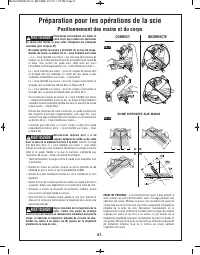
24. preparing for Saw Operations Body and Hand position position your body and handsproperly to make cutting easier and safer. Observe the following instructions (see figure27). • Never place hands near cutting area. Keep handsoutside the “No Hands zone”. The “No Hands Zone” is an area 6 inches wide...
Page 25 - Using the Workpiece Clamp; Workpiece Support
25. Using the Workpiece Clamp This clamp easily secures a workpiece to the table orbase, figure 29. 1. Insert the clamp’s knurled bar down into a clamp post hole. there are two post holes located in thebase behind the fence. The knurled end must be inthe post at least 1/2". The 60˚ Auxiliary Cla...
Page 26 - Removing Sliding fences
26. Sliding fence To provide sufficient (minimum6") spacing from hand to saw blade, extend the sliding fence and sliding baseextensions when making extreme bevel, miter orcompound cuts, figure 31 . Operating Sliding fence 1. Loosen the fence lock knob counter clockwise ½ turn to loosen fence (se...
Page 27 - long Workpiece Support; Additional Workpiece Support
27. preparing for Saw Operations Workpiece Support long Workpiece Support long workpieces have a tendencyto tip over unless clamped down and properly supported from underneath. Do not use another person as asubstitute for a table extension or as additional support. Unstable support for the workpiece...
Page 28 - Adjusting front stabilizing foot; Miter Detent; Using the Miter Detent
Adjusting front stabilizing foot The front stabilizing foot is located at the front of thesaws table near the detent override (figure 36) this footprovides additional support and stability when makingslide cuts. To adjust the foot to the work surface followthese steps: 1. Place the saw on the intend...
Page 29 - Making a Chop Cut; Chop Cut; Saw Operations; Making a Slide Cut; Slide Cut
29. Making a Chop Cut 1. Slide the head assembly to the rear as far as it will go (figure 37). 2. Tighten the slide rail lock knob. 3. Properly position workpiece. Make sure workpiece is clamped firmly against the table and the fence. Useclamping position that does not interfere withoperation. Befor...
Page 30 - Making a Miter Cut; What’s a Miter Cut – Saw features; Reading the Miter Scale; Miter Cuts; MITER SCALE INFORMATION
30. Making a Miter Cut 1. Loosen miter lock knob. Lift miter detent lever and move the saw to the desired angle, using either thedetents or the miter scale. Tighten miter lock knob(figure 40). 2. Extend the base extensions and fence on the side on which the cut will be made. (See Sliding Fence andBa...
Page 31 - Bevel Cuts; Setting the Saw
31. Saw Operations Bevel Cuts A “bevel cut” is a cross-cut made with the bladeperpendicular to the fence and with the table set at 0°miter. The blade can be tilted at any angle within thesaw’s range: 47° left and -2° right from the vertical. The bevel scale is sized and positioned for easyreading. A...
Page 32 - Compound Cuts
32. Saw Operations Compound Cuts A “compound cut” is a cross-cut made with the bladeboth at a miter angle and at a bevel angle. Because it may take several tries to obtain thedesired compound angle, perform test cuts on scrapmaterial before making your cut. follow these instructions for making your ...
Page 33 - Cutting Grooves
33. Saw Operations Cutting Grooves The depth stop adjustment is a feature used to limitblade depth when cutting grooves in the workpiece. NOTE: Read and understand all instructions on page16 in the Adjustments section on “Setting BladeDepth for Non-Through Cuts for Cutting Grooves.”NOTE: For best re...
Page 34 - Cutting Crown Molding; Cutting Base Molding; BASE MOlDING CUTTING INSTRUCTIONS
34. Crown molding cuts must be positioned properly to fitexactly. There are two ways to cut crown molding: flat ontable or angled to table and fence. Crown molding’s “spring angle” is the angle betweenthe back of the molding and the bottom flat surfacethat fits against the wall. This miter saw has s...
Page 35 - Crown Molding Angled to Table and fence
35. The preferred method for cutting crown molding with thissaw is with the molding lying flat on the table. Theadvantage to cutting molding angled against fence isthat no bevel setting is required, only the miter angle isadjusted. The maximum crown molding width that can be cut andangled to table a...
Page 36 - Crown Molding lying flat on Table
36. Saw Operations Crown Molding lying flat on Table “Spring angle” refers to angle between wall and crownmolding. Cutting crown molding flat on the table can be doneeither as a chop cut or a slide cut depending on thewidth of the workpiece. Refer to special auxiliary fence for narrow cutoffs whencu...
Page 37 - Making an Auxiliary fence; Auxiliary fence
37. Saw Operations Making an Auxiliary fence Certain types of molding need a fence face extensionbecause of the size and position of the workpiece.Holes are provided in the fence to attach an auxiliaryfence. The auxiliary fence is used with the saw in the 0°bevel position only. 1. Use ¾” thick piece...
Page 38 - Crown Molding Auxiliary fence
38. Saw Operations Crown Molding Auxiliary fence When making a compound cut on amolding lying flat on the table, narrow cut-off pieces (2" or less in width) may bepropelled at high speed over the fence and beyondthe back of the tool (see figure 50). Use auxiliaryfence as instructed and shown in ...
Page 39 - New Auxiliary Fence
39. 10-19/32" 2-3/4" 4-5/16" 5-13/16" OVERALL LENGTH = 17-1/4" 3/4" OVERALL HEIGHT = 1-1/2" Drill 4 Holes = 5/16" Diameter 3/8" New Auxiliary Fence (assembled to Miter Saw) Stationary Fence Saw Base Top of Base and Table Note: The Stationary Fence is permanently a...
Page 40 - Special Cuts
40. Cutting bowed material and round material are onlytwo examples of special cuts. Use clamping position that doesnot interfere with operation. Before switching on, lower head assembly tomake sure clamp clears guard and headassembly. Be aware of the path of the sawblade. Make a dry run with the saw...
Page 41 - Motor Brushes; Motor Brush Replacement; Maintenance and lubrication
41. Service preventive maintenance performed by unauthorized personnel may result in misplacing of internalwires and components which could causeserious hazard. We recommend that all toolservice be performed by a Bosch factory ServiceCenter or Authorized Bosch Service Station. Motor Brushes The brus...
Page 42 - Troubleshooting; Troubleshooting Guide - Electrical; Cleaning
42. pROBlEM Motor does not start. CAUSE 1. Check that unit is plugged in. 2. Power source fuse or time delay fuse. 3. Brushes worn. 4. Other. CORRECTIVE ACTION - Plug unit in. Use different outlet. - 15-Amp time delay fuse or circuit breaker. - See Motor Brush Replacement in the Maintenance and Lubr...
Page 43 - Troubleshooting Guide - General
43. Troubleshooting Troubleshooting Guide - General pROBlEM Head assembly does not bevel to desired position. Blade hits table. Angle of cut not accurate. Cannot rotate table to change miterangle. Head assembly will not fully raise or blade guard will not fully close. Blade binds, jams, burns wood. ...
Page 44 - Accessories
44. pROBlEM Tool vibrates or shakes. Head assembly does not slide freely when attempting a slide cut. Blade does not cut completelythrough workpiece. Saw blade or lower guard cuts orcontacts sliding fence when saw isset for bevel cuts. CAUSE 1. Saw blade not round. 2. Saw blade damaged. 3. Saw blade...
Page 45 - Sécurité; Consignes générales de sécurité; Zone de travail; AVERTISSEMENT
45. Sécurité Consignes générales de sécurité pour les outils d’établi Zone de travail • Gardez la zone de travail propre et bien éclairée. Les établis encombrés et les endroits sombres invitent les accidents. • N’utilisez pas les outils électriques en atmosphères explo - sives, comme en présence de ...
Page 46 - Consignes de sécurité
46. Utilisation et entretien de l’outil • Utilisez des pinces ou autre façon pratique d’assujettir et de supporter l’ouvrage à une plate-forme stable. Tenir l’ou vrage à la main ou contre son corps n’assure pas la stabilité voulue. L’ouvrage peut ainsi se déplacer, faire gripper l’outil et vous fair...
Page 49 - Spécifications électriques
49. Double isolation La double isolation est utilisée dans les outils électriques pour éliminer le besoin de cordon d’alimentation avec prise de terre et de dispositif d’alimentation à prise de terre. Elle est homologuée par l’Underwriter’s Laboratories, l’ACNOR et l’OSHA. • L’entretien d’un outil à...
Page 50 - Table des matières
50. Table des matières Sécurité . . . . . . . . . . . . . . . . . . . . . . . . . . . . . . . . . . . . .45-49 Consignes générales de sécurité pour les outils d’établi . . . . . . . . . . . . . . . . . . . . . . . . . . . . . .45-46 Consignes de sécurité pour les scies à onglet . . . . . .46-49 Spéc...
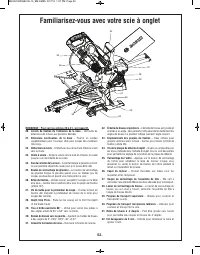
Page 51 - Familiarisez-vous avec votre scie à onglet
51. Familiarisez-vous avec votre scie à onglet Pour éviter les blessures résultant d’une mise en marche accidentelle, dé bran - chez la fiche de la prise de courant avant d’effectuer quelque réglage que ce soit. 1. 1Boutons de libération du cadenas de l’interrupteur – Vous devez appuyer sur un de ce...
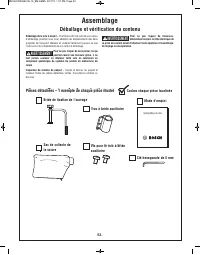
Page 53 - Assemblage; Déballage et vérification du contenu; Pièces détachées – 1 exemple de chaque pièce illustré
53. Assemblage Déballage et vérification du contenu Déballage de la scie à onglet – Pour faire sortir cet outil de son carton d’emballage, penchez-vous pour atteindre les emplacements des deux poignées de transport latérales et soulevez lentement jusqu’à ce que l’outil soit sorti complètement de son...
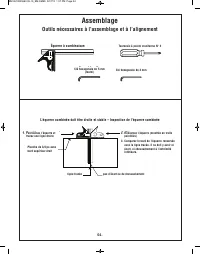
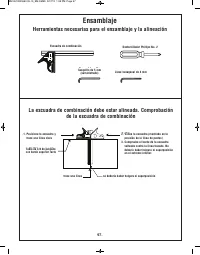
Page 54 - Outils nécessaires à l’assemblage et à l’alignement
54. Assemblage Outils nécessaires à l’assemblage et à l’alignement Combination Square 5mm Hex Key (supplied) #2 Phillips Screwdriver 4mm Hex Key 1. Position square and draw a light line 2. Flip square (shown in dotted position) 3. Check edge of flipped square against the drawn line. There should be ...
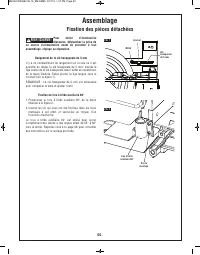
Page 55 - Fixation des pièces détachées
Pour éviter d’éventuelles blessures, débranchez la prise de sa source d’alimentation avant de procéder à tout assemblage, réglage ou réparation. Rangement de la clé hexagonale de 5 mm Il y a un compartiment de rangement sur la scie où il est possible de ranger la clé hexagonale de 5 mm. Insérez la t...
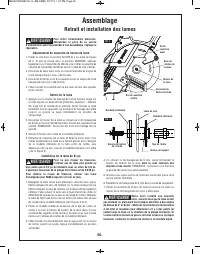
Page 56 - Retrait et installation des lames
Pour éviter d’éventuelles blessures, débranchez la prise de sa source d’alimentation avant de procéder à tout assemblage, réglage ou réparation. Déplacement du couvercle de boulon de lame 1. Placez la scie dans la position ELEVEE et à un angle de biseau de 0. Si elle se trouve dans la position ABAIS...
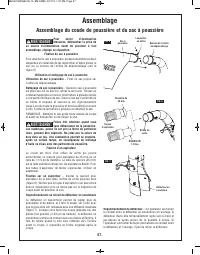
Page 57 - Assemblage du coude de poussière et du sac à poussière
Pour éviter d’éventuelles blessures, débranchez la prise de sa source d’alimentation avant de procéder à tout assemblage, réglage ou réparation. Fixation du sac à poussière Pour attacher le sac à poussière, pressez ensemble les deux languettes en métal afin de les rapprocher et faites glisser le sac...
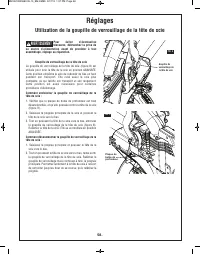
Page 58 - Réglages; Utilisation de la goupille de verrouillage de la tête de scie
Pour éviter d’éventuelles blessures, débranchez la prise de sa source d’alimentation avant de procéder à tout assemblage, réglage ou réparation. Goupille de verrouillage de la tête de scie La goupille de verrouillage de la tête de scie (figure 8) est utilisée pour tenir la tête de la scie en positio...
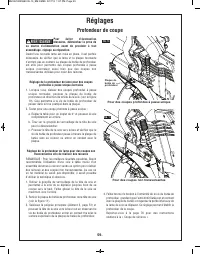
Page 59 - Profondeur de coupe
Pour éviter d’éventuelles blessures, débranchez la prise de sa source d’alimentation avant de procéder à tout assemblage, réglage ou réparation. Quand une nouvelle lame est mise en place, il est parfois nécessaire de vérifier que la lame et la plaque tournante n’entrent pas en contact. La plaque de ...
Page 60 - Système de cran d’arrêt d’onglet
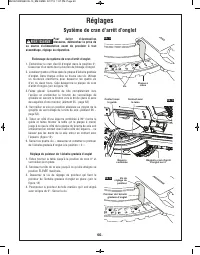
Pour éviter d’éventuelles blessures, débranchez la prise de sa source d’alimentation avant de procéder à tout assemblage, réglage ou réparation. Étalonnage du système de cran d’arrêt d’onglet 1. Enclenchez le cran d’arrêt d’onglet dans la position 0°. Desserrez d’un demi-tour le bouton de blocage d’...
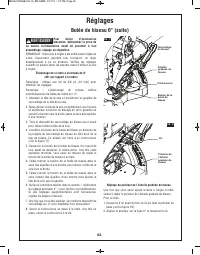
Page 61 - Butée de biseau 0°; Plaquette amovible pour entailles
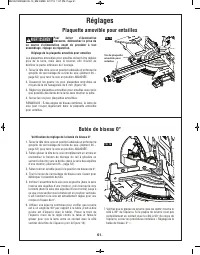
Pour éviter d’éventuelles blessures, débranchez la prise de sa source d’alimentation avant de procéder à tout assemblage, réglage ou réparation. Réglage de la plaquette amovible pour entailles Les plaquettes amovibles pour entailles doivent être réglées près de la lame, mais sans la toucher, afin d’...
Page 63 - Butée de biseau 45°
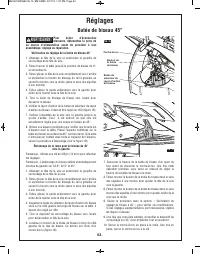
Pour éviter d’éventuelles blessures, débranchez la prise de sa source d’alimentation avant de procéder à tout assemblage, réglage ou réparation. Vérification du réglage de la butée de biseau 45° 1. Abaissez la tête de la scie et enclenchez la goupille de verrouillage de la tête de scie. 2. Faites to...
Page 64 - Transport
Pour éviter de subir des blessures, suivez toutes les consignes contenues dans la liste à puces (« ● ») ci- dessous. • Ne saisissez jamais cette scie par les rallonges de base quand ces dernières sont sorties complètement. • Débranchez le cordon électrique et enroulez-le. Utilisez la bande de fermet...
Page 65 - Montage
Soyez certain que la scie à onglet est montée ou posée sur une surface de travail ferme et de niveau avant de l’utiliser. Une telle surface réduit le risque que la scie à onglet devienne instable. Montage permanent sur établi 1. Chacun des quatre trous de montage doit être boulonné fermement au moye...
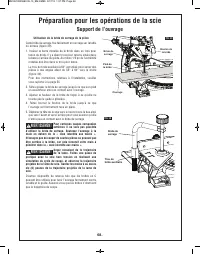
Page 66 - Préparation pour les opérations de la scie; Activation de la gâchette d’interrupteur
Pour des raisons de sécurité, le levier de l’interrupteur a été conçu afin d’empêcher des démarrages accidentels de l’outil. Pour utiliser l’interrupteur de sécurité, faites glisser le basculeur d’interrupteur « Lock-OFF » (de verrouillage hors circuit) avec le pouce droit ou gauche pour relâcher le...
Page 67 - Positionnement des mains et du corps; INCORRECTE; CORRECT
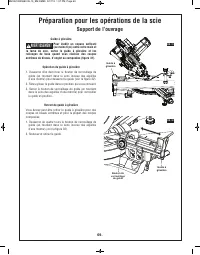
Positionnez correctement vos mains et votre corps pour rendre les opérations de coupe plus faciles et plus sures. Respectez les consignes suivantes (voir la figure 27). • Ne placez jamais les mains à proximité de la zone de coupe. Gardez les mains en dehors de la « zone interdite aux mains ». La « z...
Page 68 - Support de l’ouvrage
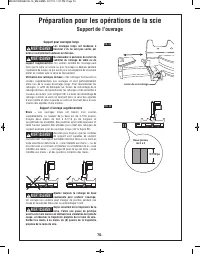
Utilisation de la bride de serrage de la pièce Cette bride de serrage fixe facilement un ouvrage sur la table ou la base (figure 29). 1. Insérez la barre moletée de la bride dans un trou pour tenon de bride. Il y a deux trous pour tenons situés dans la base à l’arrière du guide. Au moins 1/2 po de l...
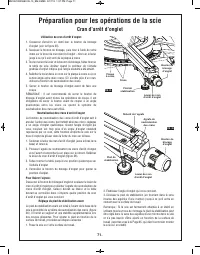
Page 71 - Cran d’arrêt d’onglet
Utilisation du cran d’arrêt d’onglet 1. Desserrez d’environ un demi-tour le bouton de blocage d’onglet (voir la figure 35). 2. Saisissez le bouton de blocage, puis tirez à l’aide de votre index sur le levier de cran d’arrêt d’onglet – tirez sur le levier jusqu’à ce qu’il soit sorti de la plaque à cr...
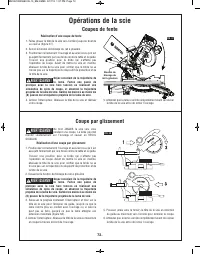
Page 72 - Coupes de fente; Opérations de la scie; Coupe par glissement
Ne tirez JAMAIS la scie vers vous pendant une coupe. La lame pourrait monter soudainement sur l’ouvrage et causer un RECUL SOUDAIN. Réalisation d’une coupe par glissement 1. Positionnez correctement l’ouvrage et assurez-vous qu’il est assujetti fermement par une bride contre la table et le guide. Tr...
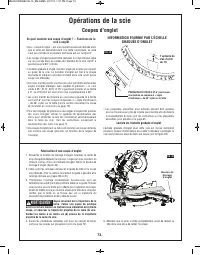
Page 73 - Coupes d’onglet; INFORMATION FOURNIE PAR L’ÉCHELLE
Réalisation d’une coupe d’onglet 1. Desserrez le bouton de blocage d’onglet. Soulevez le levier de cran d’onglet et déplacez la scie vers l’angle qui vous convient, en utilisant soit les crans soit l’échelle d’onglet. Serrez le bouton de blocage d’onglet (figure 40). 2. Faites sortir les rallonges d...
Page 74 - Coupes en biseau
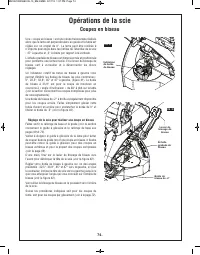
Une « coupe en biseau » est une coupe transversale réalisée alors que la lame est perpendiculaire au guide et la table est réglée sur un onglet de 0°. La lame peut être inclinée à n’importe quel angle dans les limites de l’étendue de la scie : 47° à gauche et -2° à droite par rapport à la verticale....
Page 75 - Coupes composées
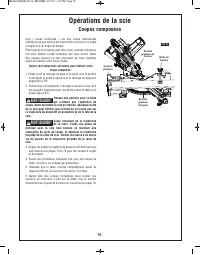
Une « coupe composée » est une coupe transversale réalisée alors que la lame est positionnée à la fois à un angle d’onglet et à un angle de biseau. Étant donné qu’il faudra peut-être vous y prendre plusieurs fois pour obtenir l’angle composé que vous voulez, faites des coupes d’essai sur des morceau...
Page 76 - Coupe de rainures
Le réglage de butée de profondeur est une fonction utilisée pour limiter la profondeur de la lame lors de la coupe de rainures dans l’ouvrage. REMARQUE : Lisez et comprenez toutes les instructions à la page 17 de la section Réglages concernant le « Réglage de la profondeur de lame pour des coupes no...
Page 77 - Coupe de moulures de base; INSTRUCTIONS DE COUPE DE MOULURES DE BASE; Coupe de moulures en couronne
77. Opérations de la scie Coupe de moulures de base Les moulures de base peuvent être sciées en position verticale contre le guide ou à plat sur la table. La taille maximale qui peut être sciée verticalement sur le guide est de 2-3/4 po et de 12-1/4 po à plat sur la table. Reportez-vous au tableau c...
Page 78 - Moulure en couronne à un angle par rapport à la table et au guide; BAS DE LA MOULURE; COIN INTÉRIEUR
La méthode préférée pour couper des moulures en couronne au moyen de cette scie est de poser la moulure à plat sur la table. L’avantage de couper une moulure à un angle contre le guide est qu’aucun réglage de biseau n’est nécessaire, seul l’angle d’onglet doit être ajusté. La largeur maximale de mou...
Page 79 - Moulure en couronne à plat sur la table; COUPES DE MOULURES EN COURONNE – MOULURE À PLAT SUR LA TABLE; PLAFOND; MOULURE À PLAT SUR LA TABLE; TABLE
Un « angle d’inclinaison » est l’angle qui existe entre le mur et la moulure en couronne. La coupe de moulures en couronne à plat sur la table peut se faire soit comme une coupe de fente, soit comme une coupe par glissement, en fonction de la largeur de l’ouvrage. Utilisez un guide auxiliaire spécia...
Page 80 - Guide auxiliaire
Fabrication d'un guide auxiliaire Certains types de moulures ont besoin d’une extension de la surface du guide à cause de la taille et de la position de l’ouvrage. Des trous ont été pratiqués dans le guide pour pouvoir y ajouter un guide auxiliaire. Le guide auxiliaire s’utilise avec la scie dans la...
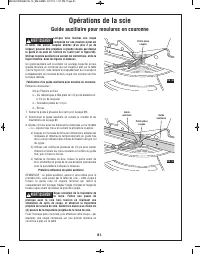
Page 81 - Guide auxiliaire pour moulures en couronne
Lorsque vous réalisez une coupe composée sur une moulure à plat sur la table, des pièces coupées étroites (d’au plus 2 po de largeur) peuvent être projetées à grande vitesse par-dessus le guide et au-delà de l’arrière de l’outil (voir la figure 50). Utilisez le guide auxiliaire en suivant les instru...
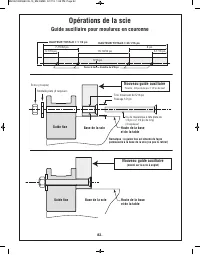
Page 82 - Nouveau guide auxiliaire
82. Opérations de la scie Guide auxiliaire pour moulures en couronne 10-19/32 po 3-1/16 po 7-15/32 po 8 po HAUTEUR TOTALE = 26 1/16 po 3-1/16 po HAUTEUR TOTALE = 1 1/2 po Percez 4 trous = diamètre de 5/16 po 5/16 po Nouveau guide auxiliaire (monté sur la scie à onglet) Remarque : le guide fixe est a...
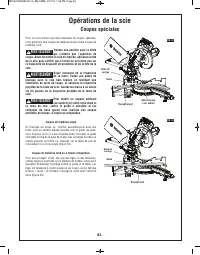
Page 83 - Coupes spéciales
Pour ne vous donner que deux exemples de coupes spéciales, nous parlerons des coupes de matériau arqué et des coupes de matériau rond. Trouvez une position pour la bride qui n’affecte pas l’opération de coupe. Avant de mettre la scie en marche, abaissez la tête de la scie pour vérifier que la bride ...
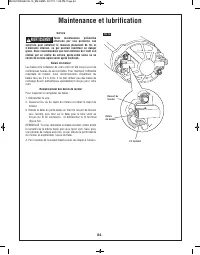
Page 84 - Maintenance et lubrification
Service Toute maintenance préventive effectuée par une personne non autorisée peut entraîner le mauvais placement de fils et d’éléments internes, ce qui pourrait constituer un danger grave. Nous recommandons que tout entretien de l’outil soit réalisé par un centre de service après-vente usine ou un ...
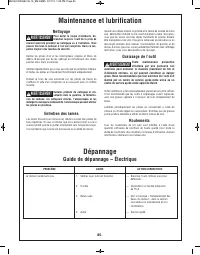
Page 85 - Nettoyage; Dépannage; Guide de dépannage – Électrique
85. Maintenance et lubrification Nettoyage Pour éviter le risque d’accidents, dé - branchez toujours l’outil de la prise de courant avant de procéder au nettoyage ou à l’entretien. Vous pouvez très bien le nettoyer à l’air sec comprimé. Dans ce cas, portez toujours des lunettes de sécurité. Gardez l...
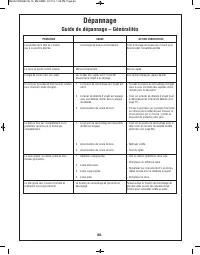
Page 86 - Guide de dépannage – Généralités
86. PROBLÈME L’ensemble de la tête ne s’incline pas à la position désirée. La lame se heurte contre la table. L’angle de coupe n’est pas exact. Il n’est pas possible de faire tourner la tablepour changer l’angle d’onglet. La tête ne lève pas complètement ou leprotecteur de lame ne se ferme pascomplè...
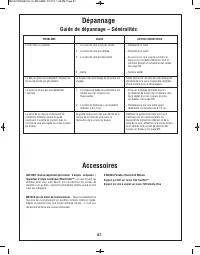
Page 87 - Accessoires
87. Dépannage Guide de dépannage – Généralités PROBLÈME L’outil vibre ou tremble . La tête ne glisse pas librement lorsque l’ontente une coupe par glissement. La lame ne coupe pas complètementl’ouvrage . La lame de la scie ou le dispositif deprotection inférieur coupe le guidecoulissant ou entre en ...
Page 88 - Seguridad; Normas generales de; Area de trabajo; ADVERTENCIA
88. Seguridad Normas generales de seguridad para herramientas para tablero de banco Area de trabajo • Mantenga limpia y bien iluminada el área de trabajo. Los ban - cos desordenados y las áreas oscuras invitan a que se pro duzcanaccidentes. • No utilice herramientas mecánicas en atmósferas ex plo si...
Page 89 - Normas de seguridad para; “CONSERVE ESTAS INSTRUCCIONES”
89. Utilización y cuidado de las herramientas • Utilice abrazaderas u otro modo práctico de fijar y soportarla pieza de trabajo en una plataforma estable. La sujeción de la pieza de trabajo con la mano o contra el cuerpo resultainestable. Permite que la pieza de trabajo se desplace y causeatasco de ...
Page 92 - Requisitos eléctricos
92. Herramientas con aislamiento doble El aislamiento doble es un concepto de diseño utilizado en las herramientas mecánicas eléctricas que elimina la necesidad de un cordón de energía de tres cables conectado a tierra y de un sistema de fuente de energía conectado a tierra. Es un sistema reconocido...
Page 93 - Indice
93. Seguridad . . . . . . . . . . . . . . . . . . . . . . . . . . . . . . . . . 88-92 Normas generales de seguridad para herramientas para tablero de banco . . . . . . . . . 88-89 Normas de seguridad para sierras para cortar ingletes . . . . . . . . . . . . . . . . . . . . . . 89-92 Requisitos eléct...
Page 94 - Familiarización con la sierra para cortar ingletes
94. Para evitar lesiones debidas a un arran que accidental, saque el enchufe del to ma corriente de la fuente de energía antes de hacer cualquier ajuste. 1. Botones de liberación de fijación en APAGADO del interruptor – Se debe presionar uno de estos dos botones antes de que se pueda presionar el in...
Page 96 - Ensamblaje; Desempaquetado y comprobación del contenido
96. Ensamblaje Desempaquetado y comprobación del contenido Desempaquetado de la sierra para cortar ingletes – Cuando saque esta herramienta de los materiales de empaquetamiento, meta las manos hasta las ubicaciones de los dos mangos de transporte laterales y levántela lentamente hasta que salga del ...
Page 97 - Herramientas necesarias para el ensamblaje y la alineación; La escuadra de combinación debe estar alineada. Comprobación
97. Ensamblaje Herramientas necesarias para el ensamblaje y la alineación Combination Square 5mm Hex Key (supplied) #2 Phillips Screwdriver 4mm Hex Key La escuadra de combinación debe estar alineada. Comprobación de la escuadra de combinación 1. Position square and draw a light line 2. Flip square (...
Page 98 - Instalación de las piezas sueltas
Para evitar posibles lesiones, desconecte el enchufe de la fuente de alimentación antes de realizar cualquier ensamblaje, ajuste o reparación. Almacenamiento de la llave hexagonal de 5 mm Hay una ubicación de almacenamiento en la sierra para almacenar la llave hexagonal de 5 mm. Inserte el brazo cor...
Page 99 - Remoción e instalación de las hojas
Para evitar posibles lesiones, desconecte el enchufe de la fuente de alimentación antes de realizar cualquier ensamblaje, ajuste o reparación. Cómo mover la placa de cubierta del perno de la hoja 1. Ubique la sierra en posición hacia ARRIBA y a un bisel de 0. Si la sierra está en la posición hacia A...
Page 100 - Ensamblaje del sistema de recolección de polvo
Para evitar posibles lesiones, desconecte el enchufe de la fuente de alimentación antes de realizar cualquier ensamblaje, ajuste o reparación. Instalación de la bolsa para polvo Para instalar la bolsa para polvo, comprima juntas las dos lenguetas de alambre y deslice la bolsa para polvo sobre el res...
Page 101 - Ajustes; Utilización del pasador de fijación del ensamblaje del cabezal
Para evitar posibles lesiones, desconecte el enchufe de la fuente de alimentación antes de realizar cualquier ensamblaje, ajuste o reparación. Pasador de fijación del ensamblaje del cabezal El pasador de fijación del ensamblaje del cabezal (figura 8) se utiliza para sujetar el ensamblaje del cabezal...
Page 102 - Profundidad de corte
Para evitar posibles lesiones, desconecte el enchufe de la fuente de alimentación antes de realizar cualquier ensamblaje, ajuste o reparación. Cuando se instale una hoja nueva, puede que sea necesario comprobar la holgura de la hoja respecto a la estructura de la mesa giratoria. La placa del tope de...
Page 103 - Sistema de retén de inglete
Para evitar posibles lesiones, desconecte el enchufe de la fuente de alimentación antes de realizar cualquier ensamblaje, ajuste o reparación. Calibración del sistema de retén de inglete 1. Acople el retén de inglete en la posición de 0°. Afloje el pomo de fijación de inglete 1/2 vuelta. 2. Busque c...
Page 104 - Tope de bisel de 0°; Inserto de sección de corte
Comprobación del ajuste del tope de bisel de 0° 1. Sujete hacia abajo el ensamblaje del cabezal de la sierra y empuje hacia dentro el pasador de fijación del ensamblaje del cabezal (artículo 36 – página 95) para mantener la sierra en la posición hacia ABAJO. 2. Deslice el ensamblaje del cabezal comp...
Page 106 - Tope de bisel de 45°
Para evitar posibles lesiones, desconecte el enchufe de la fuente de alimentación antes de realizar cualquier ensamblaje, ajuste o reparación. Comprobación del ajuste de bisel de 45° a la izquierda 1. Baje el ensamblaje del cabezal y acople el pasador de fijación del ensamblaje del cabezal. 2. Rote ...
Page 108 - Montaje
Asegúrese de que la sierra para cortar ingletes esté montada o colocada en una superficie de trabajo nivelada y firme antes de utilizarla. Una superficie de trabajo nivelada y firme reduce el riesgo de que la sierra para cortar ingletes se vuelva inestable. Montaje permanente en un banco de trabajo ...
Page 109 - Preparación para las operaciones de la sierra
Activación del interruptor Por motivos de seguridad, la palanca del interruptor está diseñada para prevenir los arranques accidentales. Para operar el interruptor de seguridad, deslice el basculador de “fijación en APAGADO” del interruptor con cualquiera de los dos pulgares para desacoplar el cierre...
Page 110 - Posición del cuerpo y de las manos; CORRECTO
Posicione el cuerpo y las manos de manera apropiada para hacer que la operación de corte sea más fácil y más segura. Siga las siguientes instrucciones (vea la figura 27). • No ponga nunca las manos cerca del área de corte. Mantenga las manos fuera de la “Zona de manos no”. La “Zona de manos no” es u...
Page 111 - Soporte de la pieza de trabajo
Utilización de la abrazadera para la pieza de trabajo Esta abrazadera sujeta fácilmente una pieza de trabajo a la mesa o la base, figura 29. 1. Inserte la barra estriada de la abrazadera hacia abajo, hacia el interior de un agujero para poste de abrazadera. Hay dos agujeros para poste ubicados en la...
Page 114 - Retén de inglete
Utilización del retén de inglete 1. Afloje el pomo de fijación de inglete aproximadamente 1/2 vuelta (vea la figura 35). 2. Agarre el pomo de fijación y luego baje el dedo índice para jalar hacia arriba la palanca de retén de inglete. Jale la palanca hasta que esté fuera de la placa de retén. 3. Mie...
Page 115 - Corte de troceado; Operaciones de la sierra; Corte deslizante
No jale NUNCA la sierra hacia usted durante un corte. La hoja puede trepar repentinamente por la pieza de trabajo y causar RETROCESO. Realización de un corte deslizante 1. Posicione apropiadamente la pieza de trabajo. Asegúrese de que la pieza de trabajo esté sujeta firmemente con una abrazadera con...
Page 116 - Cortes a inglete; INFORMACIÓN DE LA ESCALA DE INGLETES
Realización de un corte a inglete 1. Afloje el pomo de fijación de inglete. Levante la palanca de retén de inglete y mueva la sierra hasta el ángulo deseado, utilizando ya sea los retenes o la escala de ingletes. Apriete el pomo de fijación de inglete (figura 40). 2. Extienda las extensiones de la b...
Page 117 - Cortes en bisel
Un “corte en bisel” es un corte transversal que se realiza con la hoja perpendicular al tope-guía y con la mesa ajustada a un inglete de 0°. La hoja se puede inclinar hasta cualquier ángulo dentro del intervalo de la sierra: 47° a la izquierda y -2° a la derecha respecto a la vertical. La escala de ...
Page 118 - Cortes compuestos
Un “corte compuesto” es un corte transversal que se realiza con la hoja tanto en un ángulo de inglete como en un ángulo de bisel. Como es posible que se requieran varios intentos para obtener el ángulo compuesto deseado, realice cortes de prueba en material de desecho antes de realizar el corte. Sig...
Page 119 - Corte de ranuras
El ajuste del tope de profundidad es una función que se utiliza para limitar la profundidad de la hoja cuando se cortan ranuras en la pieza de trabajo. NOTA: Lea y entienda todas las instrucciones de la página 17 incluidas en la sección Ajustes de “Ajuste de la profundidad de la hoja para cortes no ...
Page 120 - Moldura de base; INSTRUCCIONES PARA EL CORTE DE MOLDURA DE BASE; Corte de moldura de corona
120. Operaciones de la sierra Moldura de base INSTRUCCIONES PARA EL CORTE DE MOLDURA DE BASE POSICIONES Posición vertical Posición horizontal / La parte posterior de la moldura La parte posterior de la moldura INSTRUCCIONES está contra el tope-guía está horizontal sobre la mesa Aditamento del tope-g...
Page 121 - PARTE INFERIOR DE LA MOLDURA; TECHO; ESQUINA; LADO DERECHO; Moldura de corona angulada con la mesa y el tope-guía
El método preferido para cortar moldura de corona con esta sierra es con la moldura en posición plana sobre la mesa. La ventaja de cortar moldura angulada contra el tope-guía es que no se requiere ajuste de bisel. Sólo se ajusta el ángulo de inglete. La anchura máxima de moldura de corona que se pue...
Page 122 - Moldura de corona colocada horizontalmente sobre la mesa; CORTES DE MOLDURA DE TECHO – MOLDURA HORIZONTAL SOBRE LA MESA
El “ángulo de resorte” se refiere al ángulo entre la pared y la moldura de corona. El corte de moldura de corona colocada horizontalmente sobre la mesa se puede realizar ya sea como un corte de troceado o como un corte deslizante, dependiendo de la anchura de la pieza de trabajo. Consulte las instru...
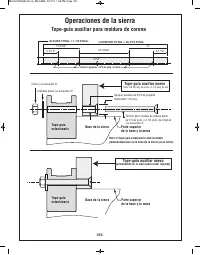
Page 124 - Tope-guía auxiliar para moldura de corona
Cuando haga un corte compuesto en una moldura que esté en posición plana sobre la mesa, las piezas de corte estrechas (de 2 pulgadas o menos de ancho) pueden ser propulsadas a alta velocidad sobre el tope-guía y más allá de la parte trasera de la herramienta (vea la figura 50). Utilice un tope-guía ...
Page 125 - Tope-guía auxiliar nuevo
125. 10-19/32" 3-1/16" 7-15/32" 8" LONGITUD TOTAL = 26-1/16 PULG. 3-1/16" ALTURA TOTAL = 1-1/2 PULG. Taladre 4 agujeros = 5/16 de pulg. de diám. 5/16" Tope-guía auxiliar nuevo (ensamblado en la sierra para cortar ingletes) Nota: El tope-guía estacionario está instalado perman...
Page 126 - Cortes especiales
Los cortes de material arqueado y de material redondo son sólo dos ejemplos de cortes especiales. Utilice una posición de sujeción con abrazadera que no interfiera con la operación. Antes de encender la sierra, baje el ensamblaje del cabezal para asegurarse de que la abrazadera no toque ni el protec...
Page 127 - Mantenimiento y lubricación
Servicio de ajustes y reparaciones El mantenimiento preventivo realizado por personal no autorizado puede tener como resultado la colocación incorrecta de cables y componentes internos, lo cual podría causar un peligro grave. Recomendamos que todo el servicio de ajustes y reparaciones de la herramie...
Page 128 - Localización y reparación de averías; Guía de localización y reparación de averías eléctricas
128. PROBLEMA El motor no arranca. CAUSA 1. Compruebe que la unidad esté enchufada. 2. Fusible de fuente de energía o de acción retardada. 3. Escobillas desgastadas. 4. Otra. MEDIDA DE CORRECCION — Enchufe la unidad. Use otro toma corriente. — Fusible de acción retardada o corta circuito de 15 A. — ...
Page 129 - Guía de localización y reparación de averías generales
129. Localización y reparación de averías Guía de localización y reparación de averías generales PROBLEMA El ensamblaje del cabezal no se inclina hasta la posición deseada. La hoja golpea la mesa. El ángulo de corte no es preciso. No se puede rotar la mesa para cambiar elángulo de inglete El ensambl...
Page 130 - Accesorios
130. Localización y reparación de averías Guía de localización y reparación de averías generales PROBLEMA La herramienta vibra o tiembla. El ensamblaje del cabezal no se deslizalibremente al intentar un corte deslizante. La hoja no corta completamente la pieza detrabajo. La hoja de sierra o el prote...