Page 2 - spend a few minutes reading to get the very best from it.; CUSTOMER CARE AND SERVICE; Always use original spare parts.
CONTENTS 1. SAFETY INFORMATION...........................................................................................3 2. SAFETY INSTRUCTIONS.......................................................................................... 4 3. PRODUCT DESCRIPTION...........................................
Page 4 - SAFETY INSTRUCTIONS; Installation
• Put knives and cutlery with sharp points in the cutlery basket with the points down or in a horizontal position. • Do not keep the appliance door open without supervision to prevent to fall on it. • Before maintenance, deactivate the appliance and disconnect the mains plug from the mains socket. •...
Page 6 - PRODUCT DESCRIPTION
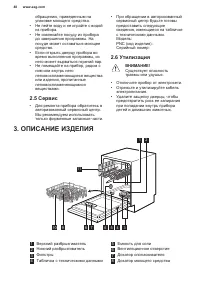
3. PRODUCT DESCRIPTION 4 3 7 9 8 10 5 6 11 1 2 1 Upper spray arm 2 Lower spray arm 3 Filters 4 Rating plate 5 Salt container 6 Air vent 7 Rinse aid dispenser 8 Detergent dispenser 9 Cutlery basket 10 Lower basket 11 Upper basket 3.1 Beam-on-Floor The Beam-on-Floor is a light that shows on the kitche...
Page 7 - CONTROL PANEL; Indicators; PROGRAMMES
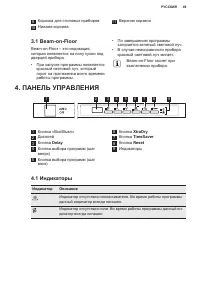
4. CONTROL PANEL 1 2 9 3 4 5 6 7 8 1 On/off button 2 Display 3 Delay button 4 Programme button (up) 5 Programme button (down) 6 XtraDry button 7 TimeSaver button 8 Reset button 9 Indicators 4.1 Indicators Indicator Description Rinse aid indicator. It is always off while the programme operates. Salt ...
Page 8 - Consumption values; Information for test
Programme Degree of soilType of load Programme phases Options P5 5) • All • Prewash 1) With this programme you have the most efficient use of water and energy consumption for crockery and cutlery with normal soil. (This is the standard programme for test institutes). 2) The appliance senses the degr...
Page 9 - SETTINGS; Programme selection; How to set the programme; The water softener
6. SETTINGS 6.1 Programme selection mode and user mode When the appliance is in programme selection mode it is possible to set a programme and to enter the user mode. In user mode, the following settings can be changed: • The level of the water softener according to the water hardness. • The activat...
Page 11 - OPTIONS; XtraDry; BEFORE FIRST USE; The salt container
– = Acoustic signal on. 3. Press to change the setting. 4. Press the on/off button to confirm the setting. 7. OPTIONS Desired options must be activated every time before you start a programme. It is not possible to activate or deactivate options while a programme is running. Not all options are comp...
Page 12 - DAILY USE
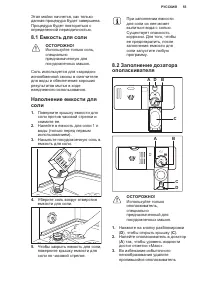
How to fill the salt container 1. Turn the cap of the salt container counterclockwise and remove it. 2. Put 1 litre of water in the salt container (Only for the first time). 3. Fill the salt container with dishwasher salt. 4. Remove the salt around the opening of the salt container. 5. Turn the cap ...
Page 14 - HINTS AND TIPS
Opening the door while the appliance operates If you open the door while a programme is running, the appliance stops. It may affect the energy consumption and the programme duration. When you close the door, the appliance continues from the point of interruption. If the door is opened for more than ...
Page 15 - CARE AND CLEANING
10.3 What to do if you want to stop using multi-tablets Before you start to use separately detergent, salt and rinse aid do the following procedure. 1. Set the highest level of the water softener. 2. Make sure that the salt and rinse aid containers are full. 3. Start the shortest programme with a ri...
Page 17 - TROUBLESHOOTING
11.2 Cleaning the spray arms Do not remove the spray arms. If the holes in the spray arms are clogged, remove remaining parts of soil with a thin pointed object. 11.3 External cleaning • Clean the appliance with a moist soft cloth. • Only use neutral detergents. • Do not use abrasive products, abras...
Page 19 - The washing and drying results are not satisfactory
Refer to "Before first use" , "Daily use" , or "Hints and tips" for other possible causes. Once you have checked the appliance, deactivate and activate the appliance. If the problem occurs again, contact an Authorised Service Centre.For alarm codes not described in the table,...
Page 20 - TECHNICAL INFORMATION
Problem Possible cause and solution Traces of rust on cutlery. • There is too much salt in the water used for washing. Refer to "The water softener" . • Silver and stainless steel cutlery were placed together. Avoid to put silver and stainless steel items close to-gether. There are residues ...
Page 21 - ENVIRONMENT CONCERNS
14. ENVIRONMENT CONCERNS Recycle the materials with the symbol . Put the packaging in applicable containers to recycle it. Help protect the environment and human health and to recycle waste of electrical and electronic appliances. Do not dispose appliances marked with the symbol with the household w...
Page 22 - Vous trouverez ces informations sur la plaque signalétique.
TABLE DES MATIÈRES 1. CONSIGNES DE SÉCURITÉ................................................................................... 23 2. INSTRUCTIONS DE SÉCURITÉ.............................................................................. 24 3. DESCRIPTION DE L'APPAREIL....................................
Page 24 - INSTRUCTIONS DE SÉCURITÉ
• Respectez le nombre maximum de 13 couverts. • Si le câble d'alimentation est endommagé, il doit être remplacé par le fabricant, son service après-vente ou des personnes de qualification similaire afin d'éviter un danger. • Placez les couteaux et les couverts avec des bouts pointus dans le panier à...
Page 27 - Voyants
3 Touche Delay 4 Touche Programme (haut) 5 Touche Programme (bas) 6 Touche XtraDry 7 Touche TimeSaver 8 Touche Reset 9 Voyants 4.1 Voyants Indicateur Description Voyant du réservoir de liquide de rinçage. Ce voyant est toujours éteintpendant le déroulement du programme. Voyant du réservoir de sel ré...
Page 28 - Valeurs de consommation
Programme Degré de salissureType de vaisselle Phases du programme Options P5 5) • Tous • Prélavage 1) Ce programme vous permet d'optimiser votre consommation d'eau et d'énergie pour la vaisselle et les couverts normalement sales. (Il s'agit du programme standard pour les instituts de tests.) 2) L'ap...
Page 29 - RÉGLAGES; Mode Programmation et; Comment régler le mode
6. RÉGLAGES 6.1 Mode Programmation et mode Utilisateur Lorsque l'appareil est en mode Programmation, il est possible de sélectionner un programme et d'entrer en mode Utilisateur. En mode utilisateur, vous pouvez modifier : • Le niveau de l'adoucisseur d'eau en fonction de la dureté de l'eau. • L'act...
Page 32 - AVANT LA PREMIÈRE UTILISATION; Réservoir de sel
8. AVANT LA PREMIÈRE UTILISATION 1. Assurez-vous que le réglage actuel de l'adoucisseur d'eau est compatible avec la dureté de l'arrivée d'eau. Si ce n'est pas le cas, réglez le niveau de l'adoucisseur d'eau. 2. Remplissez le réservoir de sel régénérant. 3. Remplissez le distributeur de liquide de r...
Page 33 - UTILISATION QUOTIDIENNE; Utilisation du produit de
8.2 Comment remplir le distributeur de liquide de rinçage A B D C M A X 1 2 3 4 + - A B D C ATTENTION! Utilisez uniquement du liquide de rinçage spécialement conçu pour les lave-vaisselle. 1. Appuyez sur le bouton d'ouverture ( D ) pour ouvrir le couvercle ( C ). 2. Versez le liquide de rinçage dans...
Page 35 - CONSEILS
Annulation du programme Appuyez et maintenez enfoncée la touche Reset jusqu'à ce que l'appareil soit en mode Sélection de programme. Assurez-vous de la présence de produit de lavage dans le distributeur de produit de lavage avant de lancer un nouveau programme. Fin du programme Lorsque le programme ...
Page 37 - ENTRETIEN ET NETTOYAGE; Nettoyage des filtres
11. ENTRETIEN ET NETTOYAGE AVERTISSEMENT! Avant toute opération d'entretien, éteignez l'appareil et débranchez la fiche de la prise secteur. Les filtres sales et les bras d'aspersion obstrués diminuent les résultats de lavage. Contrôlez-les régulièrement et nettoyez- les si nécessaire. 11.1 Nettoyag...
Page 38 - EN CAS D'ANOMALIE DE FONCTIONNEMENT
ATTENTION! Une position incorrecte des filtres peut donner de mauvais résultats de lavage et endommager l'appareil. 11.2 Nettoyage des bras d'aspersion Ne retirez pas les bras d'aspersion. Si des résidus ont bouché les orifices des bras d'aspersion, éliminez ceux-ci à l'aide d'un objet fin et pointu...
Page 40 - Les résultats de lavage et de séchage ne sont pas
Problème et code d'alarme Cause et solution possibles Petite fuite au niveau de laporte de l'appareil. • L'appareil n'est pas de niveau. Desserrez ou serrez les pieds réglables (si disponibles). • La porte de l'appareil n'est pas centrée avec la cuve. Ré- glez le pied arrière (si disponible). La por...
Page 42 - CARACTÉRISTIQUES TECHNIQUES
Problème Cause et solution possibles Traces de rouille sur les cou-verts. • Il y a trop de sel régénérant dans l'eau utilisée pour le lavage. Reportez-vous au chapitre « Adoucisseur d'eau » . • Les couverts en argent et en acier inoxydable ont été placés ensemble. Évitez de placer les couverts en ar...
Page 43 - EN MATIÈRE DE PROTECTION DE
Consommation électrique Mode « Veille » (W) 5.0 Consommation électrique Mode « Éteint » (W) 0.10 1) Reportez-vous à la plaque signalétique pour d'autres valeurs. 2) Si l'eau chaude est produite à partir de sources d'énergie respectueuses de l'environnement (par exemple, panneaux solaires ou énergie ...
Page 44 - ПОДДЕРЖКА ПОТРЕБИТЕЛЕЙ И СЕРВИСНОЕ
СОДЕРЖАНИЕ 1. СВЕДЕНИЯ ПО ТЕХНИКЕ БЕЗОПАСНОСТИ...............................................45 2. УКАЗАНИЯ ПО БЕЗОПАСНОСТИ................................................................. 47 3. ОПИСАНИЕ ИЗДЕЛИЯ................................................................................... 48 4....
Page 47 - УКАЗАНИЯ ПО БЕЗОПАСНОСТИ; электросети
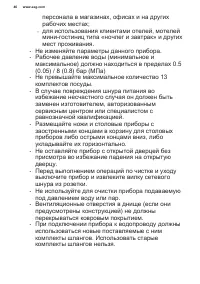
2. УКАЗАНИЯ ПО БЕЗОПАСНОСТИ 2.1 Установка • Удалите всю упаковку. • Не устанавливайте и не подключайте прибор, если он имеет повреждения. • Не устанавливайте и не эксплуатируйте прибор в помещениях с температурой ниже 0°C. • Следуйте приложенным к прибору инструкциям по его установке. • Убедитесь, ч...
Page 51 - имеется возможность изменения
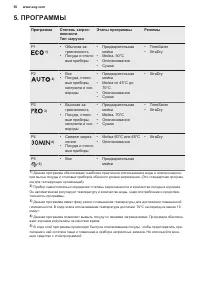
5.1 Показатели потребления Программа 1) Вода (л) Энергопотребле‐ ние (кВт·ч) Продолжитель‐ ность (мин) P1 9.9 0.932 195 P2 7 - 12 0.6 - 1.4 40 - 150 P3 13 - 15 1.3 - 1.5 140 - 160 P4 9 0.9 30 P5 4 0.1 14 1) Указанные показатели могут изменяться в зависимости от давления и температуры воды, на‐ пряже...
Page 52 - Смягчитель для воды; таблетированного моющего; Установка смягчителя для
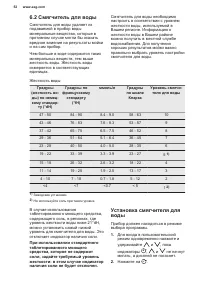
6.2 Смягчитель для воды Смягчитель для воды удаляет из подаваемой в прибор воды минеральные вещества, которые в противном случае могли бы оказать вредное влияние на результаты мойки и на сам прибор.Чем больше в воде содержится таких минеральных веществ, тем выше жесткость воды. Жесткость воды измеря...
Page 54 - ПЕРЕД ПЕРВЫМ ИСПОЛЬЗОВАНИЕМ; настройки смягчителя для воды
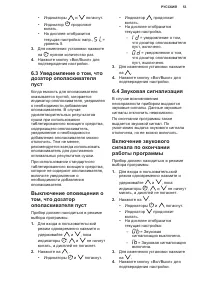
7. РЕЖИМЫ Требуемые режимы необходимо включать перед каждый запуском программы. Режимы невозможно включить или выключить во время выполнения программы. Не все режимы совместимы друг с другом. При выборе несовместимых режимов прибор автоматически отключит один или более режимов. При этом будут гореть...
Page 56 - ЕЖЕДНЕВНОЕ ИСПОЛЬЗОВАНИЕ; Включите прибор нажатием на; моющего средства; Нажмите на кнопку разблокировки; Настройка и запуск
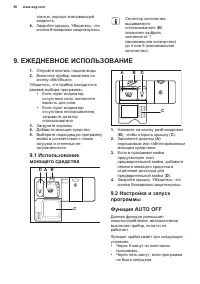
тканью, хорошо впитывающей жидкость. 4. Закройте крышку. Убедитесь, что кнопка блокировки защелкнулась. Селектор количества выдаваемого ополаскивателя (B) позволяет выбрать значения от 1 (минимальное количество) до 4 или 6 (максимальное количество). 9. ЕЖЕДНЕВНОЕ ИСПОЛЬЗОВАНИЕ 1. Откройте вентиль по...
Page 58 - Запустите самую короткую
выбирайте программу с этапом предварительной мойки. • Всегда используйте все пространство корзин. • При загрузке прибора убедитесь, что вода из разбрызгивателей сможет полностью достичь и вымыть всю посуду. Предметы посуды не должны касаться или перекрывать друг друга. • Можно использовать средство ...
Page 59 - Прежде чем доставать посуду из; Очистка фильтров
• Размягчите пригоревшие остатки пищи на посуде. • Загружайте полые предметы (чашки, стаканы и сковороды) отверстием вниз. • Убедитесь, что столовые приборы и тарелки не слиплись. Размещайте ложки вперемежку с другими столовыми приборами. • Проверьте, чтобы стаканы не соприкасались друг с другом. • ...
Page 60 - Установите обратно на место; разбрызгивателей
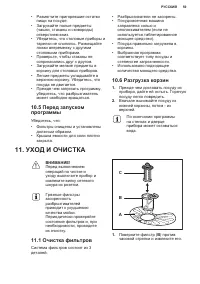
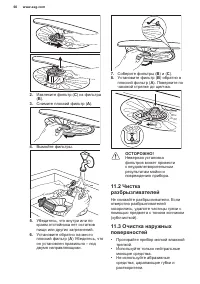
2. Извлеките фильтр (C) из фильтра (B). 3. Снимите плоский фильтр (A). 4. Вымойте фильтры. 5. Убедитесь, что внутри или по краям отстойника нет остатков пищи или других загрязнений. 6. Установите обратно на место плоский фильтр (A) Убедитесь, что он установлен правильно – под двумя направляющими. 7....
Page 61 - ПОИСК И УСТРАНЕНИЕ НЕИСПРАВНОСТЕЙ; При некоторых неисправностях на
11.4 Чистка внутренних частей • Тщательно очистите прибор, включая резиновый уплотнитель дверцы, мягкой влажной тряпкой. • При регулярном использовании программ с малой продолжительностью внутри прибора могут откладываться наслоения жира и накипи. Во избежание этого рекомендуется не реже 2 раз в мес...
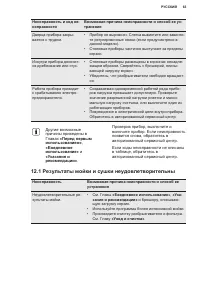
Page 63 - Результаты мойки и сушки неудовлетворительны
Неисправность и код не‐ исправности Возможная причина неисправности и способ ее ус‐ транения Дверца прибора закры‐ вается с трудом. • Прибор не выровнен. Слегка вывинтите или завинти‐ те регулировочные ножки (если предусмотрено в данной модели). • Столовые приборы частично выступают за пределы корзи...
Page 65 - Главах «Перед первым; ТЕХНИЧЕСКИЕ ДАННЫЕ
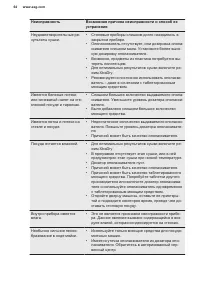
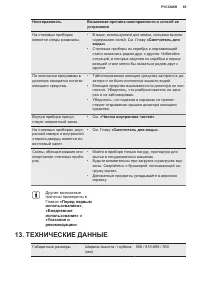
Неисправность Возможная причина неисправности и способ ее устранения На столовых приборах имеются следы ржавчины. • В воде, используемой для мойки, слишком высоко содержание солей. См. Главу «Смягчитель для воды». • Столовые приборы из серебра и нержавеющей стали оказались рядом друг с другом. Избег...
Page 66 - ОХРАНА ОКРУЖАЮЩЕЙ СРЕДЫ
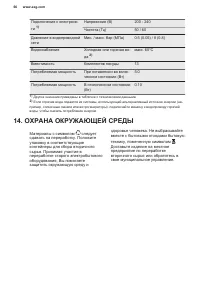
Подключение к электросе‐ти 1) Напряжение (В) 200 - 240 Частота (Гц) 50 / 60 Давление в водопроводной сети Мин. / макс. бар (МПа) 0.5 (0.05) / 8 (0.8) Водоснабжение Холодная или горячая во‐да 2) макс. 60°C Вместимость Комплектов посуды 13 Потребляемая мощность При оставлении во вклю‐ ченном состоянии...