Page 2 - KLANTENSERVICE; Downloaded from Fridge-Manual.com Manuals
INHOUD 1. VEILIGHEIDSINFORMATIE . . . . . . . . . . . . . . . . . . . . . . . . . . . . . . . . . . . . . . . . . . . . . . . . . . . . 3 2. BESCHRIJVING VAN HET PRODUCT . . . . . . . . . . . . . . . . . . . . . . . . . . . . . . . . . . . . . . . . . . . 5 3. BEDIENINGSPANEEL . . . . . . . . . . . ...
Page 3 - VEILIGHEIDSINFORMATIE; Veiligheid van kinderen en
1. VEILIGHEIDSINFORMATIE In het belang van uw veiligheid en omeen correct gebruik te kunnen waarbor-gen is het van belang dat u, alvorens hetapparaat te installeren en in gebruik tenemen, deze gebruiksaanwijzing, inclu-sief de tips en waarschuwingen, grondigdoorleest. Om onnodige vergissingenen onge...
Page 5 - BESCHRIJVING VAN HET PRODUCT
(compressor, condensator) aangeraaktkunnen worden en brandwonden ver-oorzaken. • Het apparaat mag niet vlakbij radiato- ren of kooktoestellen geplaatst wor-den. • Verzeker u ervan dat de stekker be- reikbaar is nadat het apparaat geïn-stalleerd is. • Aansluiten op de drinkwatervoorzie- ning (indien ...
Page 6 - BEDIENINGSPANEEL; Inschakelen
3. BEDIENINGSPANEEL 1 2 3 4 5 1 Controlelampje 2 Temperatuurregelaar 3 FROSTMATIC-lampje 4 FROSTMATIC-schakelaarGeluidssignaal van de resetschake-laar 5 Alarmlampje 3.1 Inschakelen 1. Steek dan de stekker in het stopcon-tact. 2. Draai de temperatuurknop naarrechts op een gemiddelde stand. 3. Het con...
Page 8 - HANDIGE AANWIJZINGEN EN TIPS; Tips voor het invriezen
IIn het geval van onbedoeldeontdooiing, bijvoorbeeld als destroom langer is uitgevallen dande duur die op de kaart mettechnische kenmerken onder"tijdsduur" is vermeld, moet hetontdooide voedsel snel geconsu-meerd worden of onmiddellijkbereid worden en dan weer wor-den ingevroren (nadat het a...
Page 9 - ONDERHOUD EN REINIGING; Periodieke reiniging; De vriezer ontdooien
7. ONDERHOUD EN REINIGING LET OP! Voordat u welke onderhoudshan-deling dan ook verricht, de stek-ker uit het stopcontact trekken. Het koelcircuit van dit apparaatbevat koolwaterstoffen; onder-houd en herladen mag alleen uit-gevoerd worden door bevoegdetechnici. 7.1 Periodieke reiniging Het apparaat ...
Page 10 - Het reinigen van de luchtkanalen; Periodes dat het apparaat; PROBLEMEN OPLOSSEN; Probleem
7.3 Het reinigen van de luchtkanalen C A B 1. Verwijder de plint (A) en daarna hetventilatierooster (B). 2. Reinig het ventilatierooster. 3. Trek het luchtplaatje (C) er voorzich-tig uit, controleer of er geen dooiwa-ter is achtergebleven. 4. Maak het onderste deel van het ap-paraat schoon met een s...
Page 12 - De deur sluiten; TECHNISCHE GEGEVENS; Opstelling
Probleem Mogelijke oorzaak Oplossing Producten liggen te dichtop elkaar. Berg de producten zoda-nig op dat er koude luchtkan circuleren. Er is te veel rijp. Het product is niet goedverpakt. Verpak het op de juistemanier. De deur is niet goed ge-sloten. Zie 'De deur sluiten'. De thermostaatknop isnie...
Page 13 - Omgevingstemperatuur; Elektrische aansluiting; GELUIDEN; OK
met de klimaatklasse die staat aangege-ven op het typeplaatje van het apparaat. Kli-maat-klasse Omgevingstemperatuur SN +10°C tot + 32°C N +16°C tot + 32°C ST +16°C tot + 38°C T +16°C tot + 43°C 10.2 Elektrische aansluiting Zorg er vóór het aansluiten voor dat hetvoltage en de frequentie op het type...
Page 15 - MILIEUBESCHERMING
CRACK! CRACK! 12. MILIEUBESCHERMING Recycle de materialen met hetsymbool . Gooi de verpakking ineen geschikte verzamelcontainer omhet te recyclen.Help om het milieu en devolksgezondheid te beschermen enrecycle het afval van elektrische en elektronische apparaten. Gooiapparaten gemarkeerd met hetsymb...
Page 16 - CUSTOMER CARE AND SERVICE
CONTENTS 1. SAFETY INFORMATION . . . . . . . . . . . . . . . . . . . . . . . . . . . . . . . . . . . . . . . . . . . . . . . . . . . . . 17 2. PRODUCT DESCRIPTION . . . . . . . . . . . . . . . . . . . . . . . . . . . . . . . . . . . . . . . . . . . . . . . . . . . . 19 3. CONTROL PANEL . . . . . . ....
Page 17 - SAFETY INFORMATION; Children and vulnerable
1. SAFETY INFORMATION In the interest of your safety and to en-sure the correct use, before installingand first using the appliance, read thisuser manual carefully, including its hintsand warnings. To avoid unnecessary mis-takes and accidents, it is important toensure that all people using the appli...
Page 19 - Environment Protection; PRODUCT DESCRIPTION; Switching on
• This product must be serviced by an authorized Service Centre, and onlygenuine spare parts must be used. 1.7 Environment Protection This appliance does not containgasses which could damage theozone layer, in either its refriger-ant circuit or insulation materials.The appliance shall not be dis-car...
Page 21 - HELPFUL HINTS AND TIPS
4. FIRST USE 4.1 Cleaning the interior Before using the appliance for the firsttime, wash the interior and all internalaccessories with lukewarm water andsome neutral soap so as to remove the typical smell of a brand-new product,then dry thoroughly. Do not use detergents or abra-sive powders, as the...
Page 22 - CARE AND CLEANING; Periodic cleaning
quently to thaw only the quantity re-quired; • wrap up the food in aluminium foil or polythene and make sure that thepackages are airtight; • do not allow fresh, unfrozen food to touch food which is already frozen,thus avoiding a rise in temperature ofthe latter; • lean foods store better and longer...
Page 23 - Defrosting the freezer; Cleaning the air channels; Periods of non-operation
only cleaned with warm water with a littlewashing-up liquid added.After cleaning, reconnect the equipmentto the mains supply. 7.2 Defrosting the freezer A certain amount of frost will always formon the freezer shelves and around thetop compartment.Defrost the freezer when the frost layerreaches a th...
Page 24 - WHAT TO DO IF...; Problem
8. WHAT TO DO IF… WARNING! Before troubleshooting, discon-nect the mains plug from themains socket.Only a qualified electrician orcompetent person must do thetroubleshooting that is not in thismanual. There are some sounds duringnormal use (compressor, refriger-ant circulation). Problem Possible cau...
Page 25 - Closing the door; TECHNICAL DATA
Problem Possible cause Solution The temperature inthe freezer is toolow. The temperature regula-tor is not set correctly. Set a higher temperature. The Fast Freeze functionis switched on. Refer to" Fast Freeze func-tion". The temperature inthe freezer is toohigh. The temperature regula-tor i...
Page 26 - INSTALLATION; Positioning; Ambient temperature; Electrical connection; NOISES
The technical information are situated inthe rating plate on the internal left sideof the appliance and in the energy label. 10. INSTALLATION WARNING! Read the "Safety Information"carefully for your safety and cor-rect operation of the appliancebefore installing the appliance. 10.1 Positioni...
Page 28 - ENVIRONMENT CONCERNS
SSSRRR! SSSRRR! CRACK! CRACK! 12. ENVIRONMENT CONCERNS Recycle the materials with thesymbol . Put the packaging inapplicable containers to recycle it.Help protect the environment andhuman health and to recycle wasteof electrical and electronic appliances. Do not disposeappliances marked with the sym...
Page 30 - CONSIGNES DE SÉCURITÉ; Sécurité des enfants et
1. CONSIGNES DE SÉCURITÉ Pour votre sécurité et garantir une utili-sation correcte de l'appareil, lisez atten-tivement cette notice, y compris les con-seils et avertissements, avant d'installeret d'utiliser l'appareil pour la premièrefois. Pour éviter toute erreur ou accident,veillez à ce que toute ...
Page 31 - Utilisation quotidienne
AVERTISSEMENT Les éventuelles réparations ouinterventions sur votre appareil,ainsi que le remplacement du câ-ble d'alimentation, ne doiventêtre effectuées que par un pro-fessionnel qualifié. 1. Ne branchez pas le cordon d'ali-mentation à une rallonge. 2. Assurez-vous que la prise n'estpas écrasée ou...
Page 32 - Maintenance; Protection de; DESCRIPTION DE L'APPAREIL
• Placez l'appareil dos au mur pour évi- ter tout contact avec le compresseuret le condenseur (risque de brûlure). • Placez de préférence votre appareil loin d'une source de chaleur (chauffa-ge, cuisson ou rayons solaires trop in-tenses). • Assurez-vous que la prise murale reste accessible après l'i...
Page 33 - BANDEAU DE COMMANDE; Mise en fonctionnement; Réglage de la température; Fonction FROSTMATIC
3. BANDEAU DE COMMANDE 1 2 3 4 5 1 Voyant lumineux 2 Thermostat 3 Voyant FROSTMATIC 4 Touche FROSTMATICTouche de réinitialisation de l'alarmesonore 5 Voyant d'alarme 3.1 Mise en fonctionnement 1. Insérez la fiche dans la prise murale. 2. Tournez le thermostat vers la droitesur une position médiane. ...
Page 34 - Alarme porte ouverte; PREMIÈRE UTILISATION; Nettoyage intérieur; UTILISATION QUOTIDIENNE; Congélation d'aliments
aliments congelés inappropriée (en casde coupure du courant par exemple), levoyant Alarme clignote et l'alarme sono-re retentit. 1. Faites cesser la tonalité d'alarme enappuyant sur la touche FROSTMA-TIC.Le voyant FROSTMATIC s'allume.Le voyant d'alarme clignote jusqu'àce que la température requise s...
Page 35 - CONSEILS UTILES
5.2 Conservation des aliments congelés À la mise en service ou après un arrêtprolongé, placez le thermostat sur la po-sition Max pendant 2 heures environ,avant d'introduire les produits dans lecompartiment. En cas de dégivrage accidentel,dû par exemple à une panne decourant, si la panne doit se pro-...
Page 36 - Conseils pour la; ENTRETIEN ET NETTOYAGE; Nettoyage périodique; Dégivrage du
6.2 Conseils pour la conservation des produitssurgelés et congelés ducommerce Pour obtenir les meilleures performan-ces possibles :• assurez-vous que les denrées surge- lées achetées dans le commerce ontété correctement entreposées par lerevendeur ; • prévoyez un temps réduit au minimum pour le tran...
Page 37 - Nettoyage des dispositifs de ventilation; EN CAS D'ANOMALIE DE FONCTIONNEMENT
5. Le dégivrage terminé, épongez l'eauqui s'est écoulée dans le petit panierdu bas et séchez bien l'intérieur. Branchez l'appareil sur une prise muraleet tournez la manette du thermostat sur une position moyenne. Attendez aumoins deux heures de fonctionnementen mode Fast Freeze, avant de replacerà n...
Page 39 - Fermeture de la porte
Symptôme Cause possible Solution La fonction de congéla-tion rapide est activée. Consultez le paragraphe« Fonction Congélation ra-pide ». La température ducongélateur est tropélevée. Le dispositif de réglagede température n'est pascorrectement réglé. Sélectionnez une tempéra-ture plus basse. La port...
Page 40 - Emplacement; Température ambiante; Branchement électrique
9. CARACTÉRISTIQUES TECHNIQUES Dimension Hauteur 815 mm Largeur 596 mm Profondeur 550 mm Autonomie de fonction-nement 29 h Tension 230-240 V Fréquence 50 Hz Les caractéristiques techniques figurentsur la plaque signalétique située sur le côté gauche à l'intérieur de l'appareil etsur l'étiquette éner...
Page 41 - BRUITS
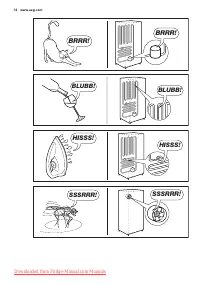
11. BRUITS L'appareil émet certains bruits pendantson fonctionnement (compresseur, cir-cuit frigorifique). BRRR! HISSS! CLICK! BLUBB! CRACK! SSSRRR! OK CLICK! CLICK! BRRR! BRRR! BLUBB! BLUBB! FRANÇAIS 41 Downloaded from Fridge-Manual.com Manuals
Page 42 - EN MATIÈRE DE PROTECTION DE L'ENVIRONNEMENT
HISSS! HISSS! SSSRRR! SSSRRR! CRACK! CRACK! 12. EN MATIÈRE DE PROTECTION DE L'ENVIRONNEMENT Recyclez les matériaux portant lesymbole . Déposez les emballagesdans les conteneurs prévus à ceteffet.Contribuez à la protection del'environnement et à votre sécurité,recyclez vos produits électriques et éle...
Page 43 - KUNDENDIENST UND -BETREUUNG
INHALT 1. SICHERHEITSHINWEISE . . . . . . . . . . . . . . . . . . . . . . . . . . . . . . . . . . . . . . . . . . . . . . . . . . . . . 44 2. GERÄTEBESCHREIBUNG . . . . . . . . . . . . . . . . . . . . . . . . . . . . . . . . . . . . . . . . . . . . . . . . . . . . 46 3. BEDIENFELD . . . . . . . . . ...
Page 44 - SICHERHEITSHINWEISE; Sicherheit von Kindern und
1. SICHERHEITSHINWEISE Lesen Sie zu Ihrer Sicherheit und für dieoptimale Geräteanwendung vor der In-stallation und dem Gebrauch des Gerä-tes die vorliegende Benutzerinformationaufmerksam durch, einschließlich derRatschläge und Warnungen. Es ist wich-tig, dass zur Vermeidung von Fehlernund Unfällen a...
Page 46 - Kundendienst; Umweltschutz; GERÄTEBESCHREIBUNG
densator) möglichst mit der Rückseitegegen eine Wand aufgestellt werden. • Das Gerät darf nicht in der Nähe von Heizkörpern oder Kochern installiertwerden. • Vergewissern Sie sich, dass der Netz- stecker des Gerätes nach der Installati-on frei zugänglich ist. • Wenn ein Wasseranschluss vorgese- hen ...
Page 47 - BEDIENFELD; Einschalten des Geräts
3. BEDIENFELD 1 2 3 4 5 1 Kontrolllampe 2 Temperaturwähler 3 FROSTMATIC Licht 4 Taste FROSTMATICLöschtaste für den Alarmton 5 Alarmleuchte 3.1 Einschalten des Geräts 1. Stecken Sie den Stecker in die Netz-steckdose. 2. Drehen Sie den Temperaturregler imUhrzeigersinn auf eine mittlere Ein-stellung. 3...
Page 48 - Temperaturwarnung; ERSTE INBETRIEBNAHME; Reinigung des Innenraums; TÄGLICHER GEBRAUCH; Einfrieren frischer
Die Kontrolllampe FROSTMATIC er-lischt. 3.5 Temperaturwarnung (Temperatur zu hoch) Wenn die Temperatur im Gefrierschrankso weit ansteigt, dass die sichere Lage-rung des Gefrierguts nicht mehr gewähr-leistet ist (z.B. wegen eines Stromaus-falls), blinkt die Alarmleuchte und derAlarmton ist zu hören. ...
Page 49 - HILFREICHE HINWEISE UND TIPPS
peratur (siehe hierzu "Temperaturrege-lung"). 5.2 Lagerung gefrorener Produkte Lassen Sie das Gerät vor der ersten In-betriebnahme oder nach einer Zeit, inder das Gerät nicht benutzt wurde, min-destens zwei Stunden lang auf den hö-heren Einstellungen laufen, bevor Sie Le-bensmittel in das Ge...
Page 50 - REINIGUNG UND PFLEGE; Regelmäßige Reinigung
• Vergewissern Sie sich, dass die gefro- renen Lebensmittel vom Händler an-gemessen gelagert wurden. • Achten Sie unbedingt darauf, die ein- gekauften gefrorenen Lebensmittel inder kürzest möglichen Zeit in das Ge-friergerät zu bringen. • Öffnen Sie die Tür nicht zu häufig, und lassen Sie die Tür ni...
Page 51 - Reinigen der Luftkanäle; Stillstandzeiten
4. Nehmen Sie die drei großen Schub-laden heraus. 5. Ist alles vollständig abgetaut, entfer-nen Sie das Wasser, das sich in derkleineren unteren Schublade gesam-melt hat, und trocknen Sie das Inne-re gründlich ab. Stecken Sie den Netzstecker in die Netz-steckdose und drehen Sie den Tempera- turregle...
Page 53 - Schließen der Tür
Störung Mögliche Ursache Abhilfe Die Raumtemperatur istzu hoch. Senken Sie die Raumtem-peratur. Die Superfrost-Funktionist eingeschaltet. Siehe hierzu „Superfrost-Funktion“. Die Temperatur imGefrierraum ist zuniedrig. Die Temperatur ist nichtrichtig eingestellt. Stellen Sie eine höhereTemperatur ein...
Page 54 - Aufstellung; Umgebungstemperatur; Elektrischer Anschluss
9. TECHNISCHE DATEN Abmessungen Höhe 815 mm Breite 596 mm Tiefe 550 mm Lagerzeit bei Störung 29 Std. Spannung 230-240 V Frequenz 50 Hz Die technischen Daten befinden sich aufdem Typenschild im Innern des Gerätes auf der linken Seite sowie auf der Ener-gieplakette. 10. MONTAGE WARNUNG! Lesen Sie bitt...
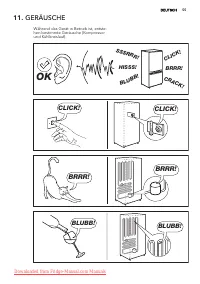
Page 55 - GERÄUSCHE
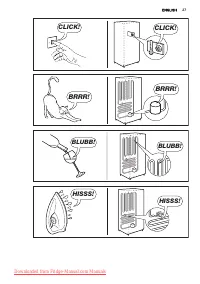
11. GERÄUSCHE Während das Gerät in Betrieb ist, entste-hen bestimmte Geräusche (Kompressorund Kühlkreislauf). BRRR! HISSS! CLICK! BLUBB! CRACK! SSSRRR! OK CLICK! CLICK! BRRR! BRRR! BLUBB! BLUBB! DEUTSCH 55 Downloaded from Fridge-Manual.com Manuals
Page 56 - UMWELTTIPPS
HISSS! HISSS! SSSRRR! SSSRRR! CRACK! CRACK! 12. UMWELTTIPPS Recyceln Sie Materialien mit demSymbol . Entsorgen Sie dieVerpackung in den entsprechendenRecyclingbehältern.Recyceln Sie zum Umwelt- undGesundheitsschutz elektrische und elektronische Geräte. Entsorgen SieGeräte mit diesem Symbol nichtmit ...
Page 57 - SERVIZIO CLIENTI E MANUTENZIONE
INDICE 1. INFORMAZIONI PER LA SICUREZZA . . . . . . . . . . . . . . . . . . . . . . . . . . . . . . . . . . . . . . . . . . . 58 2. DESCRIZIONE DEL PRODOTTO . . . . . . . . . . . . . . . . . . . . . . . . . . . . . . . . . . . . . . . . . . . . . . 60 3. PANNELLO DEI COMANDI . . . . . . . . . . . . ...
Page 58 - INFORMAZIONI PER LA SICUREZZA; Sicurezza dei bambini e
1. INFORMAZIONI PER LA SICUREZZA Per garantire un impiego corretto e sicu-ro dell'apparecchio, prima dell'installa-zione e del primo utilizzo leggere con at-tenzione il libretto istruzioni, inclusi isuggerimenti e le avvertenze. Per evitareerrori e incidenti, è importante garantireche tutte le perso...
Page 60 - DESCRIZIONE DEL PRODOTTO
• Se possibile il retro dell'apparecchio dovrebbe essere posizionato controuna parete per evitare di toccare leparti calde o di rimanervi impigliati(compressore, condensatore), evitan-do così possibili scottature. • L'apparecchio non deve essere posto vicino a radiatori o piani di cottura agas. • In...
Page 61 - PANNELLO DEI COMANDI; Accensione
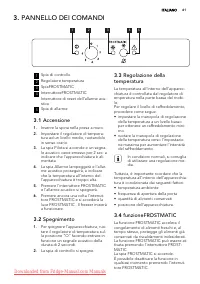
3. PANNELLO DEI COMANDI 1 2 3 4 5 1 Spia di controllo 2 Regolatore temperatura 3 SpiaFROSTMATIC 4 InterruttoreFROSTMATICInterruttore di reset dell’allarme acu-stico 5 Spia di allarme 3.1 Accensione 1. Inserire la spina nella presa a muro. 2. Impostare il regolatore di tempera-tura ad un livello medi...
Page 62 - PRIMO UTILIZZO
La spia FROSTMATIC si spegne. 3.5 Allarme temperatura eccessiva Se la temperatura all'interno del freezerè arrivata a un punto in cui non è più ga-rantita una corretta conservazione deglialimenti (ad esempio a causa di interru-zione dell'energia elettrica), la spia Allar-me lampeggerà e sarà emesso ...
Page 63 - SUGGERIMENTI PRATICI
Se si verifica un'interruzione dellacorrente elettrica di durata supe-riore al "tempo di salita" indicatonella tabella dei dati tecnici, il ci-bo scongelato deve essere con-sumato rapidamente o cucinatoimmediatamente e quindi ricon-gelato (dopo il raffreddamento). 5.3 Scongelamento Prima del...
Page 64 - PULIZIA E CURA; Pulizia periodica; Sbrinamento del
7. PULIZIA E CURA ATTENZIONE Staccare la spina dell'apparec-chio prima di eseguire lavori dimanutenzione. Questo apparecchio contieneidrocarburi nell'unità di raffred-damento; la manutenzione e laricarica devono pertanto essereeffettuate esclusivamente da tec-nici autorizzati. 7.1 Pulizia periodica ...
Page 65 - Pulizia dei canali per l’aria; Periodi di inutilizzo; COSA FARE SE...; Problema
7.3 Pulizia dei canali per l’aria C A B 1. Rimuovere lo zoccolo (A), quindi lagriglia di ventilazione (B). 2. Pulire la griglia di ventilazione. 3. Estrarre con cautela il deflettore del-l'aria (C), controllando che non ci siaacqua residua dallo sbrinamento. 4. Pulire la parte inferiore dell'apparec...
Page 67 - Chiusura della porta; DATI TECNICI
Problema Possibile causa Soluzione Sono stati introdotti moltialimenti contemporanea-mente. Introdurre gli alimenti po-co alla volta. I prodotti sono troppo vi-cini tra loro. Disporre i prodotti in mo-do da consentire una cor-retta circolazione dell'ariafredda. Si forma troppa bri-na. Gli alimenti n...
Page 68 - INSTALLAZIONE; Luogo d'installazione; Temperatura ambiente; Collegamento elettrico; RUMORI
10. INSTALLAZIONE AVVERTENZA! Leggere con attenzione le "Infor-mazioni per la sicurezza" per lavostra sicurezza e per il correttofunzionamento dell'apparecchioprima di procedere all'installazio-ne. 10.1 Luogo d'installazione Questa apparecchiatura può essere in-stallata in un luogo asciutto ...
Page 70 - CONSIDERAZIONI AMBIENTALI
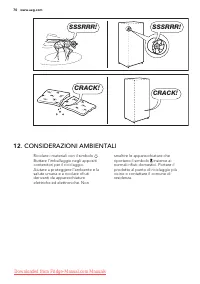
SSSRRR! SSSRRR! CRACK! CRACK! 12. CONSIDERAZIONI AMBIENTALI Riciclare i materiali con il simbolo .Buttare l'imballaggio negli appositicontenitori per il riciclaggio.Aiutare a proteggere l’ambiente e lasalute umana e a riciclare rifiutiderivanti da apparecchiatureelettriche ed elettroniche. Non smalt...