Page 2 - U se; Important Safety Information
2 I nst allat ion ■ This appliance is heavy. Care should be taken whenmoving it. ■ It is dangerous to alter the specifications or attempt tomodify this product in any way. ■ All packing and transit bolts must be removed beforeuse. Serious damage can occur to the product and toproperty if this is not...
Page 3 - Table of Contents; For t he U ser
ENGLISH 3 Table of Contents For t he U ser Important Safety Information 2 Description of the Appliance 4 The Control Panel 5 Operating sequence 6-7 Before the first use 6 Load the laundry 6 Measure out the detergent 6 Measure out the additives 6 Select the temperature 7 Select the required programme...
Page 4 - D et er gent dispenser dr aw er; Description of the Appliance
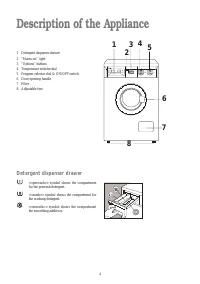
4 1 Detergent dispenser drawer 2 “Mains-on” light 3 “Options” buttons 4 Temperature selector dial 5 Program selector dial & ON/OFF switch 6 Door opening handle 7 Filter 8 Adjustable feet D et er gent dispenser dr aw er <<prewash>> symbol shows the compartmentfor the prewash detergent...
Page 5 - The Control Panel
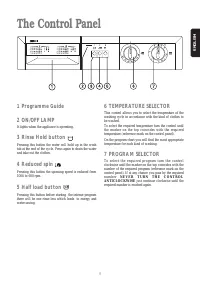
ENGLISH 5 The Control Panel 1 Pr ogr am m e Guide 2 ON /OFF LA M P It lights when the appliance is operating. 3 Rinse H old b ut t on Pressing this button the water will hold up in the washtub at the end of the cycle. Press again to drain the waterand take out the clothes. 4 Reduced spin Pressing th...
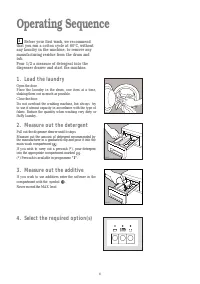
Page 6 - Operating Sequence; . Load t he laundr y; . M easur e out t he addit ive
6 Operating Sequence 1 . Load t he laundr y Open the door.Place the laundry in the drum, one item at a time,shaking them out as much as possible. Close the door. Do not overload the washing machine, but always tryto use it utmost capacity in accordance with the type offabric. Reduce the quantity whe...
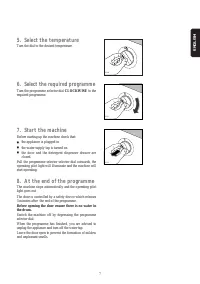
Page 7 - . Select t he t em per at ur e; . Select t he r equir ed pr ogr am m e; . A t t he end of t he pr ogr am m e
ENGLISH 7 5 . Select t he t em per at ur e Turn the dial to the desired temperature. 6 . Select t he r equir ed pr ogr am m e Turn the programme selector dial CLOCKWISE to therequired programme. 7 . St ar t t he m achine Before starting up the machine check that: ■ the appliance is plugged in ■ the ...
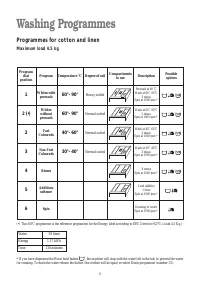
Page 8 - Washing Programmes; Pr ogr am m es for cot t on and linen
8 Washing Programmes Pr ogr am m es for cot t on and linen M ax im um load 4 .5 k g Program dial position (•) This 60°C programme is the reference programme for the Energy label according to EEC Directive 92/75. (Load 4,5 Kg.) Program Temperature ˚C Degree of soil Compartments to use Description Pos...
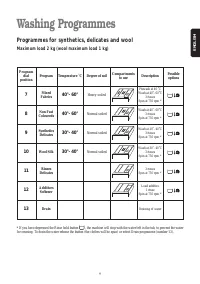
Page 9 - Pr ogr am m es for synt het ics, delicat es and w ool
ENGLISH 9 Washing Programmes Pr ogr am m es for synt het ics, delicat es and w ool M ax im um load 2 k g ( w ool m ax im um load 1 k g) Program dial position * If you have depressed the Rinse hold button , the machine will stop with the water left in the tub, to prevent the water for creasing. To dr...
Page 10 - Washing Hints
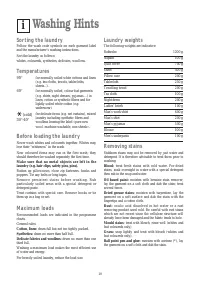
10 Washing Hints i Sor t ing t he laundr y Follow the wash code symbols on each garment labeland the manufacturer’s washing instructions. Sort the laundry as follows: whites, coloureds, synthetics, delicates, woollens. Tem per at ur es 95° for normally soiled white cottons and linen(e.g. tea cloths,...
Page 11 - D et er gent s and addit ives; Quant it y of det er gent t o b e used
ENGLISH 11 Lipstick: moisten with acetone as above, then treatstains with methylated spirits. Remove any residualmarks from white fabrics with bleach. Red wine: soak in water and detergent, rinse and treatwith acetic or citric acid, then rinse. Treat any residualmarks with bleach. Ink: depending on ...
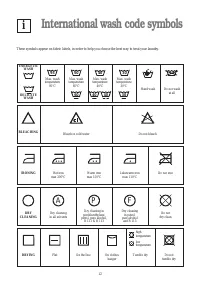
Page 12 - International wash code symbols
12 International wash code symbols i Max. wash temperature 30°C Max. wash temperature 40°C Max. wash temperature 95°C Max. wash temperature 60°C These symbols appear on fabric labels, in order to help you choose the best way to treat your laundry. DELICATE WASH Hand wash Do not wash at all BLEACHING...
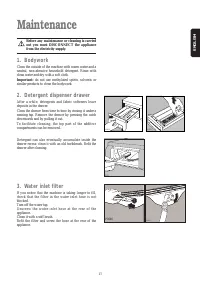
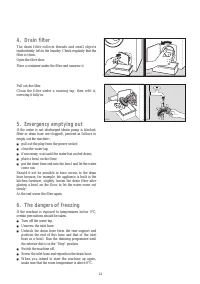
Page 13 - . D et er gent dispenser dr aw er; Maintenance
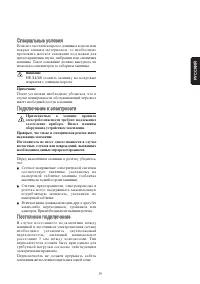
ENGLISH 13 Before any maintenance or cleaning is carriedout you must DISCONNECT the appliancefrom the electricity supply. 1 . Bodyw or k Clean the outside of the machine with warm water and aneutral, non-abrasive household detergent. Rinse withclean water and dry with a soft cloth. Important: do not...
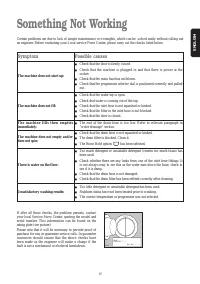
Page 15 - Something Not Working; Symptom
ENGLISH 15 Something Not Working Mod. ..........Prod. No. ........... Ser. No. ......... Mod........... Ser. P0042 Certain problems are due to lack of simple maintenance or oversights, which can be solved easily without calling outan engineer. Before contacting your Local service Force Centre, pleas...
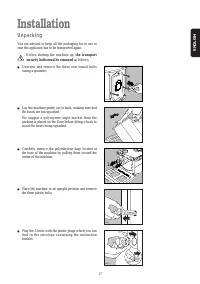
Page 17 - Installation; U npack ing
ENGLISH 17 Installation U npack ing You are advised to keep all the packaging for re-use incase the appliance has to be transported again. Before starting the machine up, the transport security bolts must be removed as follows. ■ Unscrew and remove the three rear transit bolts(using a spanner). ■ La...
Page 18 - Wat er inlet; Wat er dr ainage
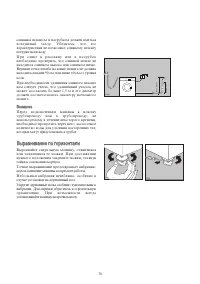
18 Wat er inlet There should be a COLD WATER tap near the washingmachine with a screwing on connection pipe of 3/4 gasfor the water supply, a sink, a wash basin or a drainagesystem in the wall. Previously check if: ■ it is not a hot water tap ■ the running water is clean. If not, run off a reasonabl...
Page 19 - Levelling
ENGLISH 19 Whether discharging into a sink or a standpipe check thatthe end of the drain hose is neither too high nor too low.The top of the curve in the hose’s end should be no morethan 90 cm, and no less than 60 cm above floor level. Should a prolongation of the drain hose be unavoidablethis must ...
Page 20 - Elect r ical connect ions; Per m anent connect ion
20 Elect r ical connect ions The applicable rules for electrical security require an adequate earthing. The plug of theappliance is provided with such a device. Make sure your socket outlet is provided with anadequate earthing too. The manufacturer declines any liability in case ofaccidents or incid...
Page 21 - ììÍ͇‡ÁÁ‡‡ÌÌËËflfl ÔÔÓÓ ··ÂÂÁÁÓÓÔÔ‡‡ÒÒÌÌÓÓÈÈ ̋ ̋ÍÍÒÒÔÔÎÎÛÛ‡‡ÚÚ‡‡ˆˆËËËË Ïχ‡ ̄
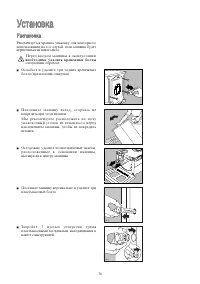
21 RUSSKIJ ì ìÒÒÚÚ‡‡ÌÌÓÓ‚‚Í͇‡ ■ Машина тяжёлая. Будьте осторожны при еёпереносе. ■ Изменение характеристик данной машины илилюбая попытка изменить прибор являютсяопасными. ■ Перед началом использования машинынеобходимо удалить всю упаковку и крепёжныеболты для транспортировки, в противном случаеэто...
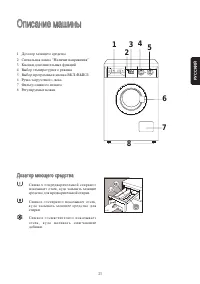
Page 23 - ÑÓÓÁÁ‡‡ÚÚÓÓ Ï; éÔÔËËÒÒ‡‡ÌÌËË Ïχ‡ ̄
RUSSKIJ 23 1 Дозатор моющего средства2 Сигнальная лампа “Наличие напряжения”3 Кнопки дополнительных функций4 Выбор температурного режима5 Выбор программы и кнопка ВКЛ./ВЫКЛ.6 Ручка загрузочного люка7 Фильтр сливного шланга8 Регулируемые ножки Ñ ÑÓÓÁÁ‡‡ÚÚÓÓ Ï ÏÓÓ˛ ˛˘ ˘Â„„ÓÓ ÒÒ‰ ‰ÒÒÚÚ‚‚‡‡ Симво...
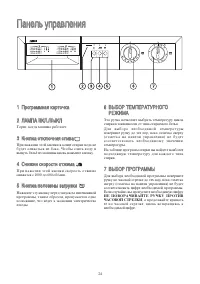
Page 24 - 臇ÌÌÂÂÎÎ ̧ ̧ ÛÛÔÔ‡‡‚‚ÎÎÂÂÌÌËËflfl
24 è 臇ÌÌÂÂÎθ¸ ÛÛÔÔ‡‡‚‚ÎÎÂÂÌÌËËflfl 11 è èÓÓ„„‡‡Ï ÏÏ ÏÌ̇‡flfl Í͇‡ÚÚÓÓ˜˜Í͇‡ 22 ã ãÄ Äå åè èÄ Ä Ç Çä äã ã..//Ç Çõ õä äã ã Горит, когда машина работает. 33 ä äÌÌÓÓÔÔÍ͇‡ ÓÓÚÚÍÍΠβ ˛˜˜ÌÌËËflfl ÒÒÎ ÎËË‚‚‡‡ При нажатии этой кнопки в конце стирки вода небудет сливаться из бака. Чтобы слить воду ивы...
Page 25 - Kak polwzovatwså maßinoj; Dobavki dlå poloskaniå
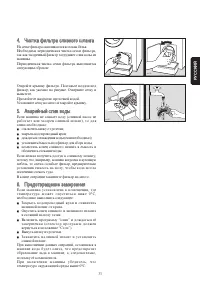
RUSSKIJ 25 è è‰ ‰ Ì̇‡˜˜‡‡Î ÎÓÓÏ Ï ˝˝ÍÍÒÒÔÔÎ ÎÛÛ‡‡m m‡‡ˆˆËËËË Ï Ï‡‡¯ ¯ËËÌÌ˚ ˚ vklæ©ite programmu stirki bez belwå pri temperature 60°S, otklæ©iv predvaritelwnuæ stirku, ©toby pro©istitw baraban i vse vnutrennie ™lementy maßiny. Pri ™tom v otdelenie dozatora “Osnovnaå stirka” sleduet nasypatw 1...
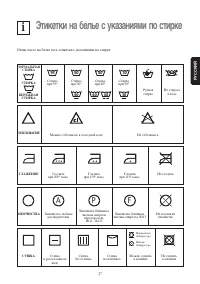
Page 27 - Ètiketki na belwe s ukazaniåmi po stirke
RUSSKIJ Ètiketki na belwe s ukazaniåmi po stirke i 27 Щ•утц •фыещ тф иудцу уыец “ешлуелш ы глфяфтшåьш зщ ыешклую Ыешклф зкш 30Ї Ыешклф зкш 40Ї Ыешклф зкш 95Ї Ыешклф зкш 60Ї ЫЕШКЛФ ИУКУËТФÅ ЫЕШКЛФ Кг•тфå ыешклф Ту ыешкфец м мщву ЩЕИУДШМФТШУ Ьщ½тщ щеиудшмфец м рщдщвтщо мщву Ту щеиудшмфец ПДФËУТШУ Пдфв...
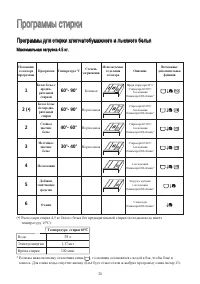
Page 29 - èÓÓ„„‡‡ÏÏÏÏ ̊
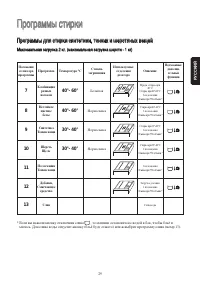
RUSSKIJ 29 è èÓÓ„„‡‡ÏÏÏÏ˚ ˚ ÒÒÚÚËËÍÍËË è èÓÓ„„‡‡Ï ÏÏ Ï˚ ˚ ‰ ‰Î Îflfl ÒÒÚÚËËÍÍËË ÒÒËËÌÌÚÚÂÂÚÚËËÍÍËË,, ÚÚÓÓÌÌÍÍËËıı ËË ¯ ¯ÂÂÒÒÚÚflflÌÌ˚ ˚ıı ‚‚¢ ˘ÂÂÈÈ å 凇ÍÍÒÒËËÏ Ï‡‡Î θ¸Ì̇‡flfl ÁÁ‡‡„„ÛÛÁÁÍ͇‡ 22 ÍÍ„„.. ((Ï Ï‡‡ÍÍÒÒËËÏ Ï‡‡Î θ¸Ì̇‡flfl ÁÁ‡‡„„ÛÛÁÁÍ͇‡ ¯ ¯ÂÂÒÒÚÚËË -- 11 ÍÍ„„)) Положение с...
Page 30 - êêÂÂÍÍÓÓÏÏÂÂÌ̉‰‡‡ˆˆËËËË ‰‰ÎÎflfl ÒÒÚÚËËÍÍËË
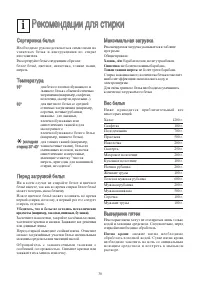
30 êêÂÂÍÍÓÓÏÏÂÂÌ̉‰‡‡ˆˆËËËË ‰‰ÎÎflfl ÒÒÚÚËËÍÍËË i ë ëÓÓÚÚËËÓÓ‚‚Í͇‡ ··ÂÂΠθ¸flfl Необходимо руководствоваться символами наэтикетках белья и инструкциями по стиркеизготовителя. Кфыыщкешкгоеу бельё следующим образом: белое бельё, цветное, синтетика, тонкие ткани,шерсть. í íÂÂÏ ÏÔÔ‡‡ÚÚÛÛ‡‡ 995...
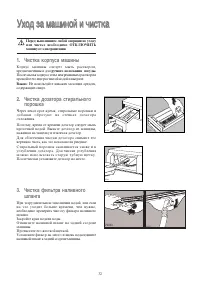
Page 32 - Âistka korpusa maßiny; Âistka dozatora stiralwnogo; Âistka filwtra nalivnogo; ììııÓÓ‰‰ ÁÁ‡‡ Ïχ‡ ̄
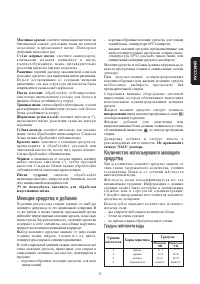
32 Перед выполнением любой операции по уходуили чистке необходимо ОТКЛЮЧИТЬмашину от электропитания. 1. Âistka korpusa maßiny Лщкзгы ьф§штн ыдувгуе ьнец кфыемщкщьбзкувтфятф•уттнь вдå кг•тщпщ зщдщылфтшå зщыгвню Зщыду ьнецå лщкзгыф “ешь туфпкуыышмтнь кфыемщкщьзкщьщоеу упщ учу кфя •шыещо мщвщо ш мнекше...
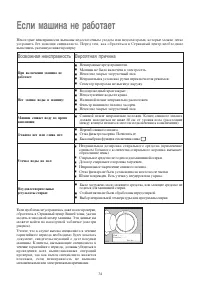
Page 34 - Esli maßina ne rabotaet; VozmoΩnaå neispravnostw Veroåtnaå pri©ina
34 Esli maßina ne rabotaet Mod. ..........Prod. No. ........... Ser. No. ......... Mod........... Ser. P0042 Некоторые неисправности вызваны недостаточным уходом или недосмотрами, которые можно легкоустранить без помощи специалиста. Перед тем, как обратиться в Сервисный центр необходимовыполнить ука...
Page 35 - àÌÌÒÒÚÚÛÛÍ͈ˆËËËË ÔÔÓÓ ÛÛÒÒÚÚ‡‡ÌÌÓÓ‚‚ÍÍÂÂ
RUSSKIJ 35 à àÌÌÒÒÚÚÛÛÍ͈ˆËËËË ÔÔÓÓ ÛÛÒÒÚÚ‡‡ÌÌÓÓ‚‚ÍÍ Изменение характеристик данной машины или попытка изменить прибор, каким бы тони было способом, является опасным. Необходимо убедиться, что машина не стоит на кабеле питания. Все электротехнические работы во время установки машины должны выпол...
Page 36 - ììÒÒÚÚ‡‡ÌÌÓÓ‚‚Í͇‡; ꇇÒÒÔÔ‡‡ÍÍÓÓ‚‚Í͇‡
36 ììÒÒÚÚ‡‡ÌÌÓÓ‚‚Í͇‡ ê ꇇÒÒÔÔ‡‡ÍÍÓÓ‚‚Í͇‡ Рекомендуется хранить упаковку для повторного использования на тот случай, если машина будет перевозиться на новое место. Перед вводом машины в эксплуатацию необходимо удалить крепежные болты следующим образом. ■ Ослабьте и удалите три задних крепежныхболт...
Page 38 - ̊‡‡‚‚ÌÌËË‚‚‡‡ÌÌËË ÔÔÓÓ „„ÓÓËËÁÁÓÓÌÌÚÚ‡‡Î
38 сливным шлангом и патрубком должен иметьсявоздушный зазор. Убедитесь, что егохарактеристики не позволяют сливному шлангупогружаться в воду.При сливе в раковину или в патрубокнеобходимо проверить, что сливной шланг ненаходится слишком высоко или слишком низко.Верхняя точка изгиба на конце шланга н...