Page 2 - ENGLISH; IMPORTANT– Please Read and Follow!; IMPORTANT SAFET Y
2 E ENGLISH IMPORTANT– Please Read and Follow! • Before beginning, read these instructions thoroughly and carefully. • Because the kit includes metal parts, caution should be used in handling and installation to avoid the pos-sibility of injury. • Do not remove permanently affixed labels, warnings o...
Page 3 - Unpacking your oven; Impor tant Notes to the; Choosing a Location; GROUNDING
3 E ENGLISH Unpacking your oven • Remove all packing materials from inside the oven.• Check the oven for any damage, such as misaligned or bent oven, damaged oven seals and sealing surfaces or dents inside the cavity or on the front side of the oven. If there is any damage, do not operate the oven a...
Page 4 - Installation Hardware
4 E ENGLISH Installation Hardware Oven Measurements NAME QTY PART CODE Mounting Screws 4 LANGTB407MRP0 29-1/2” (749.4 mm) 4-3/16” (106.9 mm) 21-1/4” (540.1 mm) BEHIND FRAME 17-1/2” (446.0 mm) 17-7/8” (454.0 mm) 1-29/32” (48.8 mm) 21-3/16” (538.0 mm) 14-3/16” (360.0 mm) OPEN OVEN DOOR Figure 1
Page 5 - Clearances and Dimensions for Standard Surface Mount
5 E ENGLISH Clearances and Dimensions for Standard Surface Mount A. 22 1 / 4 " cutout B. 17 5 / 8 " cutout C. 23 1 / 2 " min. depth Note: Platform must be able to support 125 lbs. Allow 3 5 / 8 " overlap Allow 3 / 8 " overlap Allow 3 5 / 8 " overlap Figure 2
Page 6 - Installation
6 E ENGLISH Over Built-in Oven Installation Under Cooktop Installation 2” minimum wood gap between products (wall oven or warming drawer) Cooktop Dividing Shelf 7” top of counter to dividing shelf 9” top of counter to top of unit Note: A dividing shelf is required to be installed between the cooktop...
Page 7 - Installation Instructions for Standard Surface Mount
7 E ENGLISH Installation Instructions for Standard Surface Mount WARNING: Always take caution lifting heavy products. 1. Move the unit near the opening. 2. Use a minimum of 2 people to lift and install oven. Place the oven adjacent to the cabinet opening, see Figure 3. Plug the power supply cord int...
Page 8 - Model and serial number; maintenance
8 E ENGLISH Viking Range, LLC 111 Front Street Greenwood, Mississippi 38930 USA (662) 455-1200 For product information, call1-888-845-4641or visit our web site atvikingrange.com Model and serial number location Before you call for service Read the BEFORE YOU CALL and operating instruction sections i...
Page 9 - Guía de instalación; Horno microondas con
1 S Guía de instalación Horno microondas con convección/velocidad VMDD5306SS
Page 10 - SPANISH; IMPORTANTE– ¡Lea y siga con atención!; ADVERTENCIA; INSTRUCCIONES
2 S SPANISH IMPORTANTE– ¡Lea y siga con atención! • Antes de comenzar, lea estas instrucciones detenida y atentamente. • El juego incluye partes de metal por lo que debe manipularlo e instalarlo con precaución para evitar el riesgo de lesiones. • No retire las etiquetas, advertencias o placas per- m...
Page 11 - Cómo desempaquetar; Notas impor tantes para el; Requisitos eléctricos; INSTRUCCIONES PAR A
3 S SPANISH Cómo desempaquetar el horno • Retire todos los materiales de embalaje del interior del horno. • Revise que el horno no tenga daños, como mal alin- eamiento o inclinación, sellos del horno y superficies de sellado dañadas, o abolladuras en la cavidad o en la parte frontal del horno. Si en...
Page 12 - Herramientas para instalación
4 S SPANISH Herramientas para instalación Dimensiones del horno NOMBRE CANT. CÓDIGO DE LA PARTE Tornillos de montaje 4 LANGTB407MRP0 Figura 1 29-1/2” (749.4 mm) 4-3/16” (106.9 mm) 21-1/4” (540.1 mm) BEHIND FRAME 17-1/2” (446.0 mm) 17-7/8” (454.0 mm) 1-29/32” (48.8 mm) 21-3/16” (538.0 mm) 14-3/16” (3...
Page 13 - Distancias libres y dimensiones para el montaje
5 S SPANISH Distancias libres y dimensiones para el montaje estándar sobre una superficie A. Recorte de 22 1 / 4 " (56.5 cm) B. Recorte de 17 5 / 8 " (44.7 cm) C. Profundidad mínima 23 1 / 2 " (49.6 cm) Nota: La plataforma debe ser capaz de soportar 125 lb (56 Kg) Ubicación sugerida del ...
Page 14 - Instalación sobre horno
6 S SPANISH Instalación sobre horno incorporado Bajo la instalación de la estufa 2” minimum wood gap between products (wall oven or warming drawer) 2 pulgadas mínimo brecha de madera entre productos (horno de pared o calentamiento Cooktop Dividing Shelf 7” top of counter to dividing shelf 9” top of ...
Page 15 - Instrucciones de instalación para montaje estándar
7 S SPANISH Instrucciones de instalación para montaje estándar sobre una superficie ADVERTENCIA: Tenga siempre cuidado al levantar productos pesados.1. Lleve la unidad cerca de la abertura.2. Utilice un mínimo de 2 personas para subir e instalar el horno. Coloque el horno adyacente a la abertura del...
Page 16 - Ubicación del modelo y el; mantenimiento
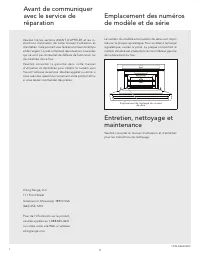
8 S SPANISH Viking Range, LLC 111 Front Street Greenwood, Mississippi 38930 USA (662) 455-1200 Para más información del producto, l lame al 1-888-845-4641 o visite nuestro sitio web en vikingrange.com Ubicación del modelo y el número de serie Antes de solicitar servicio Lea las secciones de ANTES DE...
Page 17 - FRENCH; Guide d’installation; convection
1 F 1 FRENCH Guide d’installation Four à micro-ondes rapide/ convection VMDD5306SS
Page 18 - IMPORTANT – Prière de lire et de suivre!; AVERTISSEMENT; CONSIGNES
2 F FRENCH IMPORTANT – Prière de lire et de suivre! • Veuillez lire attentivement toutes ces directives avant de commencer. • Le kit comprend des parties métalliques, il faut faire attention lors de la manipulation et de l’installation pour éviter d’éventuelles blessures. • Ne retirez pas de façon p...
Page 19 - Déballer votre four; Notes impor tantes pour; Choix d’un; INSTRUCTIONS DE
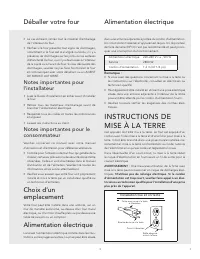
3 F FRENCH Déballer votre four • Le cas échéant, retirez tout le matériel d’emballage de l’intérieur du four. • Vérifiez si le four présente tout signe de dommages, notamment si le four est mal aligné ou tordu, s’il y a présence de dommages sur les joints ou les surfaces d’étanchéité du four, ou s’i...
Page 20 - Quincaillerie d’installation
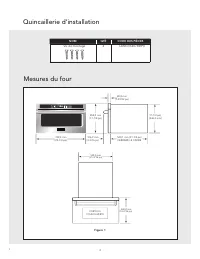
4 F FRENCH Quincaillerie d’installation Mesures du four NOM QTÉ CODE DES PIÈCES Vis de montage 4 LANGTB407MRP0 749,4 mm (29-1/2 po) 106,9 mm (4-3/16 po) 540,1 mm (21-1/4 po) DERRIÈRE LE CADRE 17-1/2 po) (446,0 mm) 454,0 mm (17-7/8 po) 48,8 mm (1-29/32 po) 538,0 mm (21-3/16 po) 360,0 mm (14-3/16 po) ...
Page 21 - Dégagements et dimensions pour une installation
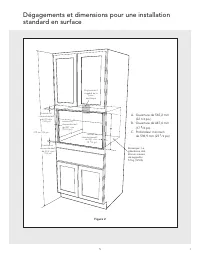
5 F FRENCH Dégagements et dimensions pour une installation standard en surface A. Ouverture de 565,2 mm (22 1 / 4 po ) B. Ouverture de 447,6 mm (17 5 / 8 po) C. Profondeur minimum de 596,9 mm (23 1 / 2 po) Remarque : La plateforme doit être en mesure de supporter 57 kg (125 lb) Emplacement suggéré d...
Page 22 - Installation au-dessus
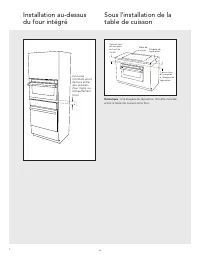
6 F FRENCH Installation au-dessus du four intégré Sous l'installation de la table de cuisson 2” minimum wood gap between products (wall oven or warming drawer) 2 pouces minimum écart de bois entre des produits (four mural ou réchauffement tiroir) Cooktop Dividing Shelf 7” top of counter to dividing ...
Page 23 - Instructions d’installation pour une installation
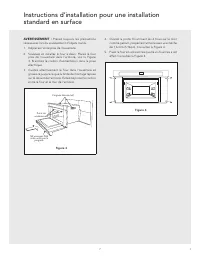
7 F FRENCH Instructions d’installation pour une installation standard en surface AVERTISSEMENT : Prenez toujours les précautions nécessaires lors du soulèvement d’objets lourds.1. Déplacez l’unité près de l’ouverture.2. Soulevez et installez le four à deux. Placez le four près de l’ouver ture dans l...