Page 2 - CONTENTS; Quick Start
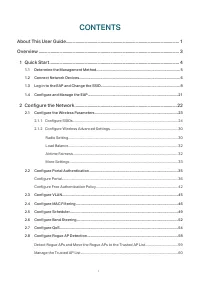
I CONTENTS About This User Guide........................................................................................................ 1Overview ................................................................................................................................. 3 1 Quick Start .........
Page 3 - Monitor the Network
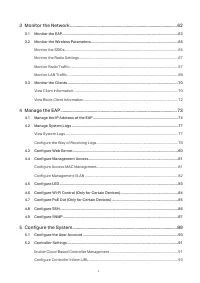
II 3 Monitor the Network .................................................................................................. 62 3.1 Monitor the EAP ........................................................................................................................................63 3.2 Monitor t...
Page 4 - Configure the System Time; Application Example; Configure SSIDs
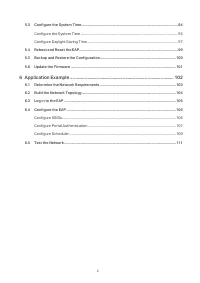
III 5.3 Configure the System Time ..................................................................................................................94 Configure the System Time ..................................................................................................................... 95 Co...
Page 5 - About This User Guide; Conventions; Wireless Speed, Range and Connected Devices Disclaimer
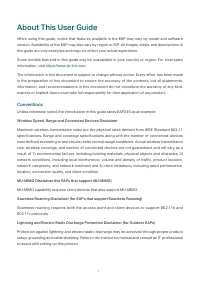
1 About This User Guide When using this guide, notice that features available in the EAP may vary by model and software version. Availability of the EAP may also vary by region or ISP. All images, steps, and descriptions in this guide are only examples and may not reflect your actual experience. Som...
Page 6 - More Info; For technical support, latest software, and management app, visit
2 More Info Some models featured in this guide may be unavailable in your country or region. For local sales information, visit https://www.tp-link.com . For technical support, latest software, and management app, visit https://www.tp-link.com/support . The Quick Installation Guide can be found wher...
Page 7 - Overview
3 Overview Omada series products provide wireless coverage solutions for small-medium business and households. They can either work independently as standalone APs or be centrally managed by Omada Software Controller, Omada Hardware Controller (OC200/OC300), or Omada Cloud-Based Controller, providin...
Page 8 - Quick Start; Determine the Management Method
4 1 Quick Start This chapter introduces how to build a wireless network using the EAPs and how to complete the basic settings. Follow the steps below: 1.1 Determine the Management Method 1.2 Connect Network Devices 1.3 Log in to the EAP and Change the SSID 1.4 Configure and Manage the EAP
Page 9 - Determine the Management Method; Controller Mode
5 1.1 Determine the Management Method Before building your network, choose a proper method to manage your EAPs. You have the following two options: ■ Controller Mode If you want to manage a large-scale network centrally, choose Controller Mode. In Controller Mode, you can configure and monitor mas...
Page 10 - Connect Network Devices; Connect your EAPs to the LAN port of the router.
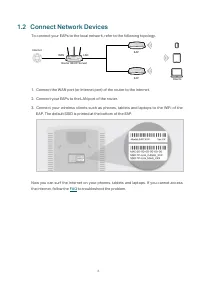
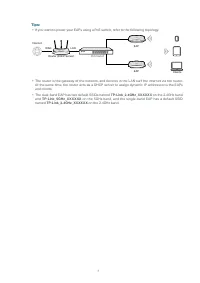
6 1.2 Connect Network Devices To connect your EAPs to the local network, refer to the following topology. Internet Clients Router (DHCP Server) WAN LAN EAP EAP 1. Connect the WAN port (or Internet port) of the router to the internet. 2. Connect your EAPs to the LAN port of the router. 3. Connect you...
Page 12 - Log in to the EAP and Change the SSID; Using Omada App on Your Mobile Device
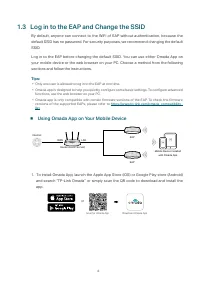
8 1.3 Log in to the EAP and Change the SSID By default, anyone can connect to the WiFi of EAP without authentication, because the default SSID has no password. For security purposes, we recommend changing the default SSID. Log in to the EAP before changing the default SSID. You can use either Omada ...
Page 16 - Continue; FAQ; Using Web Browser on Your PC and Connecting to the WiFi
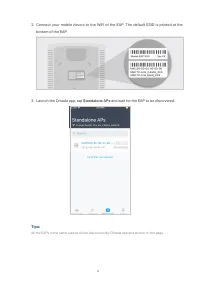
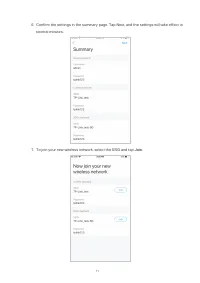
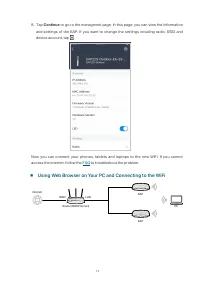
12 8. Tap Continue to go to the managment page. In this page, you can view the information and settings of the EAP. If you want to change the settings incuding radio, SSID and device account, tap . Now you can connect your phones, tablets and laptops to the new WiFi. If you cannot access the interne...
Page 17 - Set your PC to obtain an IP address automatically.
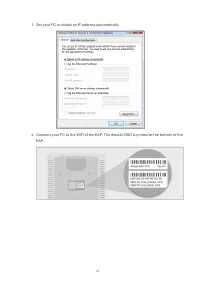
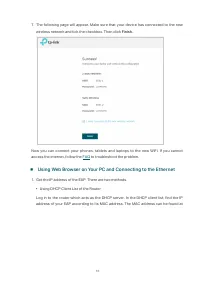
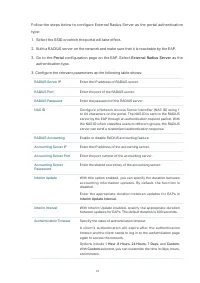
13 1. Set your PC to obtain an IP address automatically. 2. Connect your PC to the WiFi of the EAP. The default SSID is printed at the bottom of the EAP.
Page 19 - Configure the Wireless
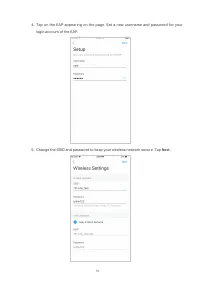
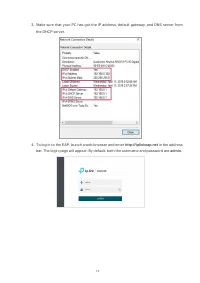
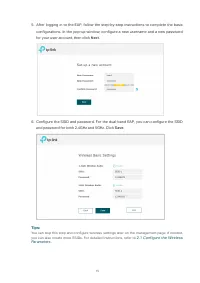
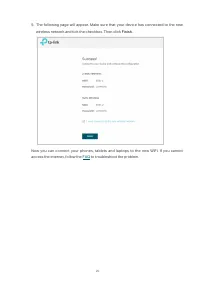
15 5. After logging in to the EAP, follow the step-by-step instructions to complete the basic configurations. In the pop-up window, configure a new username and a new password for your user account, then click Next . 6. Configure the SSID and password. For the dual-band EAP, you can configure the SS...
Page 20 - Using Web Browser on Your PC and Connecting to the Ethernet; Using DHCP Client List of the Router
16 7. The following page will appear. Make sure that your device has connected to the new wireless network and tick the checkbox. Then click Finish . Now you can connect your phones, tablets and laptops to the new WiFi. If you cannot access the internet, follow the FAQ to troubleshoot the problem. ■...
Page 25 - Configure and Manage the EAP; There are four tabs:
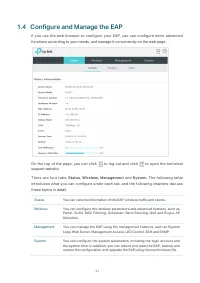
21 1.4 Configure and Manage the EAP If you use the web browser to configure your EAP, you can configure more advanced functions according to your needs, and manage it conveniently on the web page. On the top of the page, you can click to log out and click to open the technical support website. There...
Page 26 - Configure the Network
22 2 Configure the Network This chapter introduces how to configure the network parameters and the advanced features of the EAP, including: • 2.1 Configure the Wireless Parameters • 2.2 Configure Portal Authentication • 2.3 Configure VLAN • 2.4 Configure MAC Filtering • 2.5 Configure S...
Page 27 - Configure the Wireless Parameters; To configure the wireless parameters, go to the
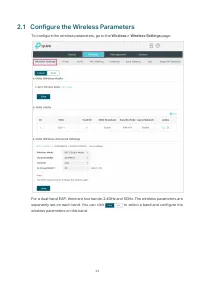
23 2.1 Configure the Wireless Parameters To configure the wireless parameters, go to the Wireless > Wireless Settings page. For a dual-band EAP, there are two bands: 2.4GHz and 5GHz. The wireless parameters are separately set on each band. You can click to select a band and configure the wireless...
Page 29 - View Client Information; OK; WEP
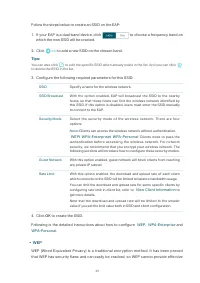
25 Follow the steps below to create an SSID on the EAP: 1. If your EAP is a dual-band device, click to choose a frequency band on which the new SSID will be created. 2. Click to add a new SSID on the chosen band. Tips: You can also click to edit the specific SSID which already exists in the list. An...
Page 31 - The following table introduces how to configure each item:
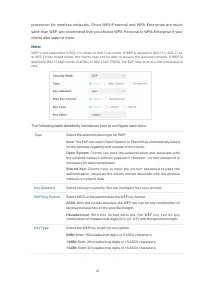
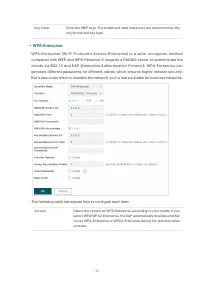
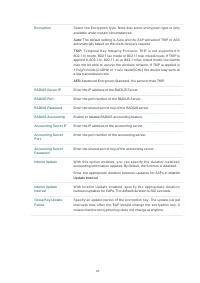
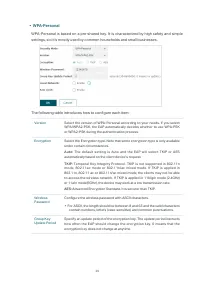
27 Key Value Enter the WEP keys. The length and valid characters are determined by the key format and key type. • WPA-Enterprise WPA-Enterprise (Wi-Fi Protected Access-Enterprise) is a safer encryption method compared with WEP and WPA-Personal. It requires a RADIUS server to authenticate the clien...
Page 34 - Configure Wireless Advanced Settings; Radio Setting
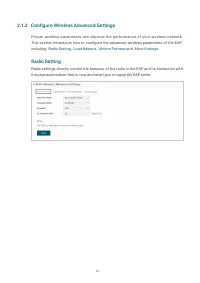
30 2.1.2 Configure Wireless Advanced Settings Proper wireless parameters can improve the performance of your wireless network. This section introduces how to configure the advanced wireless parameters of the EAP, including Radio Setting , Load Balance , Airtime Fairness and More Settings . Radio Se...
Page 36 - Load Balance; Follow the steps below to configure Load Balance:
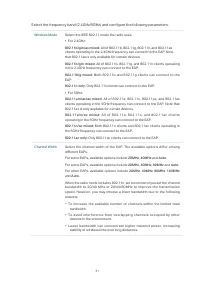
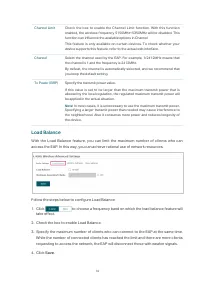
32 Channel Limit Check the box to enable the Channel Limit function. With this function enabled, the wireless frequency 5150MHz~5350MHz will be disabled. This function can influence the available options in Channel.This feature is only available on certain devices. To check whether your device suppo...
Page 37 - Airtime Fairness
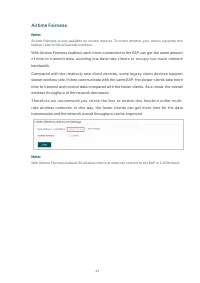
33 Airtime Fairness Note: Airtime Fairness is only available on certain devices. To check whether your device supports this feature, refer to the actual web interface. With Airtime Fairness enabled, each client connected to the EAP can get the same amount of time to transmit data, avoiding low-data-...
Page 38 - More Settings
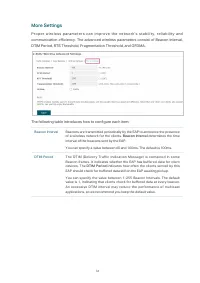
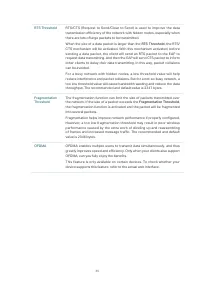
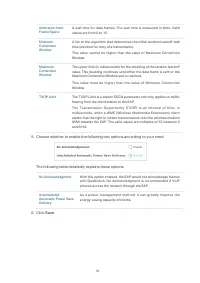
34 More Settings Proper wireless parameters can improve the network’s stability, reliability and communication efficiency. The advanced wireless parameters consist of Beacon Interval, DTIM Period, RTS Threshold, Fragmentation Threshold, and OFDMA. The following table introduces how to configure each...
Page 40 - Configure Portal Authentication; To configure portal authentication, go to the
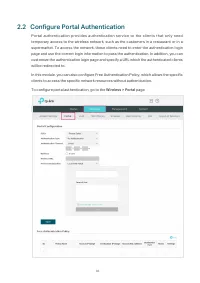
36 2.2 Configure Portal Authentication Portal authentication provides authentication service to the clients that only need temporary access to the wireless network, such as the customers in a restaurant or in a supermarket. To access the network, these clients need to enter the authentication login ...
Page 41 - Configure Portal; Three portal authentication types are available:; No Authentication; Select the SSID on which the portal will take effect.
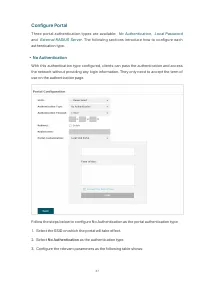
37 Configure Portal Three portal authentication types are available: No Authentication , Local Password and External RADIUS Server . The following sections introduce how to configure each authentication type. • No Authentication With this authentication type configured, clients can pass the authen...
Page 42 - Save
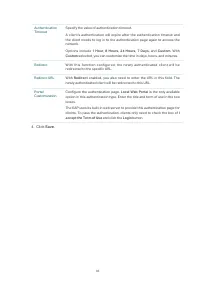
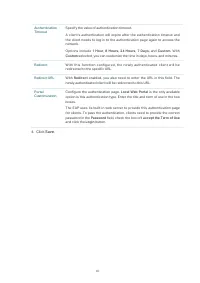
38 Authentication Timeout Specify the value of authentication timeout.A client’s authentication will expire after the authentication timeout and the client needs to log in to the authentication page again to access the network. Options include 1 Hour, 8 Hours, 24 Hours, 7 Days, and Custom . With Cus...
Page 43 - Local Password
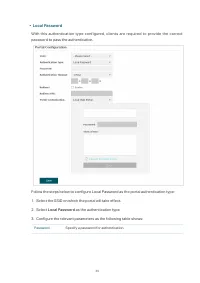
39 • Local Password With this authentication type configured, clients are required to provide the correct password to pass the authentication. Follow the steps below to configure Local Password as the portal authentication type: 1. Select the SSID on which the portal will take effect. 2. Select Lo...
Page 45 - External RADIUS Server; External Radius Server
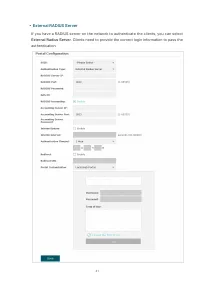
41 • External RADIUS Server If you have a RADIUS server on the network to authenticate the clients, you can select External Radius Server . Clients need to provide the correct login information to pass the authentication.
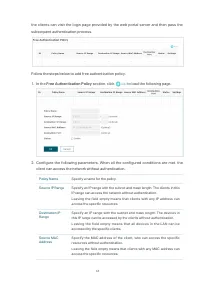
Page 47 - C o n f i g u r e F r e e; Configure Free Authentication Policy
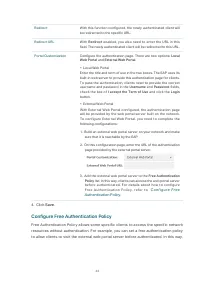
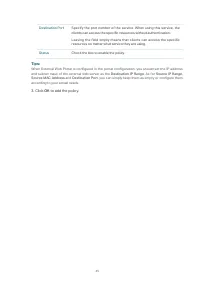
43 Redirect With this function configured, the newly authenticated client will be redirected to the specific URL. Redirect URL With Redirect enabled, you also need to enter the URL in this field. The newly authenticated client will be redirected to this URL. Portal Customization Configure the authen...
Page 50 - Configure VLAN; VLAN
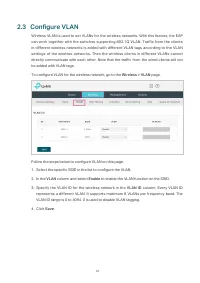
46 2.3 Configure VLAN Wireless VLAN is used to set VLANs for the wireless networks. With this feature, the EAP can work together with the switches supporting 802.1Q VLAN. Traffic from the clients in different wireless networks is added with different VLAN tags according to the VLAN settings of the w...
Page 51 - Configure MAC Filtering; To configure MAC Filtering, go to the
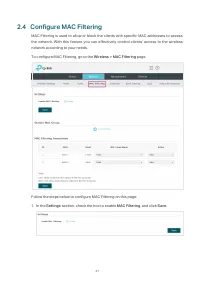
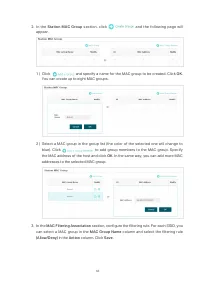
47 2.4 Configure MAC Filtering MAC Filtering is used to allow or block the clients with specific MAC addresses to access the network. With this feature you can effectively control clients’ access to the wireless network according to your needs. To configure MAC Filtering, go to the Wireless > MAC...
Page 54 - Configure Scheduler; Mode
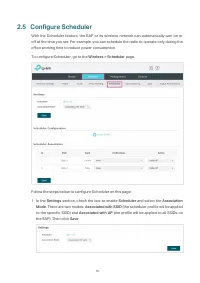
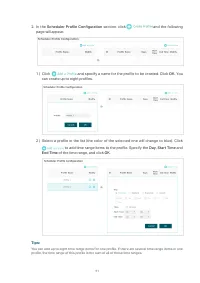
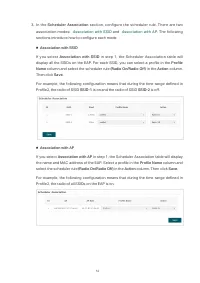
50 2.5 Configure Scheduler With the Scheduler feature, the EAP or its wireless network can automatically turn on or off at the time you set. For example, you can schedule the radio to operate only during the office working time to reduce power consumption. To configure Scheduler, go to the Wireless ...
Page 57 - Configure Band Steering; To configure Band Steering, go to the
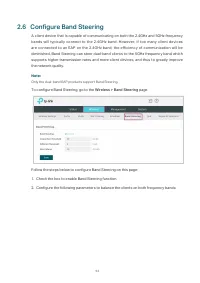
53 2.6 Configure Band Steering A client device that is capable of communicating on both the 2.4GHz and 5GHz frequency bands will typically connect to the 2.4GHz band. However, if too many client devices are connected to an EAP on the 2.4GHz band, the efficiency of communication will be diminished. B...
Page 59 - Configure QoS; To configure QoS, go to the
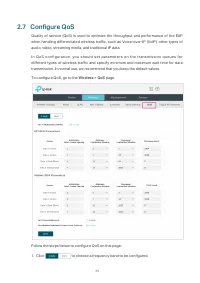
55 2.7 Configure QoS Quality of service (QoS) is used to optimize the throughput and performance of the EAP when handling differentiated wireless traffic, such as Voice-over-IP (VoIP), other types of audio, video, streaming media, and traditional IP data. In QoS configuration, you should set paramet...
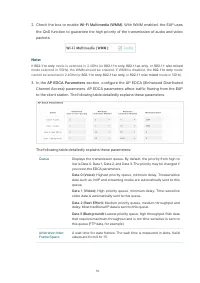
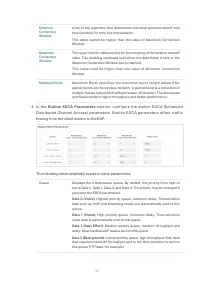
Page 60 - Check the box to enable; AP EDCA Parameters
56 2. Check the box to enable Wi-Fi Multimedia (WMM) . With WMM enabled, the EAP uses the QoS function to guarantee the high priority of the transmission of audio and video packets. Note: If 802.11n only mode is selected in 2.4GHz (or 802.11n only, 802.11ac only, or 802.11 n/ac mixed mode selected i...
Page 63 - Configure Rogue AP Detection; To configure Rogue AP Detection, go to the
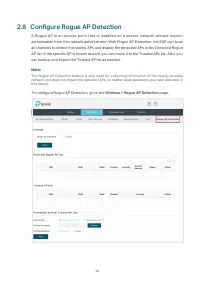
59 2.8 Configure Rogue AP Detection A Rogue AP is an access point that is installed on a secure network without explicit authorization from the network administrator. With Rogue AP Detection, the EAP can scan all channels to detect the nearby APs and display the detected APs in the Detected Rogue AP...
Page 64 - Detect Rogue APs and Move the Rogue APs to the Trusted AP List; Settings
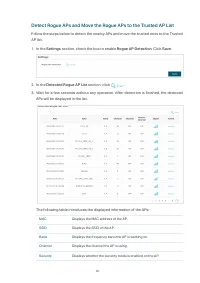
60 Detect Rogue APs and Move the Rogue APs to the Trusted AP List Follow the steps below to detect the nearby APs and move the trusted ones to the Trusted AP list. 1. In the Settings section, check the box to enable Rogue AP Detection . Click Save . 2. In the Detected Rogue AP List section, click . ...
Page 65 - Action; Manage the Trusted AP List; Download the Trusted AP List From the Host; Backup the Trusted AP List to the
61 Beacon Interval Displays the Beacon Interval value of the EAP.Beacon frames are sent periodically by the AP to announce to the stations the presence of a wireless network. Beacon Interval determines the time interval of the beacon frames sent by the AP device. Signal Displays the signal strength ...
Page 66 - and; Backup the Trusted AP List to the Host
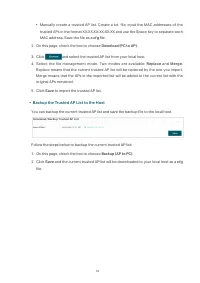
62 • Manually create a trusted AP list. Create a txt. file, input the MAC addresses of the trusted APs in the format XX:XX:XX:XX:XX:XX and use the Space key to separate each MAC address. Save the file as a cfg file. 2. On this page, check the box to choose Download (PC to AP) . 3. Click and select t...
Page 67 - Monitor the Network; Monitor the Wireless Parameters
63 3 Monitor the Network This chapter introduces how to monitor the running status and statistics of the wireless network, including: • 3.1 Monitor the EAP • 3.2 Monitor the Wireless Parameters • 3.3 Monitor the Clients
Page 68 - Monitor the EAP; To monitor the EAP information, go to the; Update the Firmware; Configure the System Time
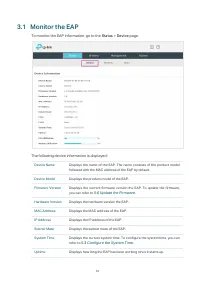
64 3.1 Monitor the EAP To monitor the EAP information, go to the Status > Device page. The following device information is displayed: Device Name Displays the name of the EAP. The name consists of the product model followed with the MAC address of the EAP by default. Device Model Displays the pro...
Page 70 - Monitor the Wireless Parameters; Configure the Wireless Parameters
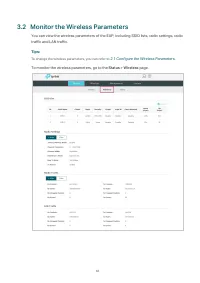
66 3.2 Monitor the Wireless Parameters You can view the wireless parameters of the EAP, including SSID lists, radio settings, radio traffic and LAN traffic. Tips: To change the wireless parameters, you can refer to 2.1 Configure the Wireless Parameters . To monitor the wireless parameters, go to the...
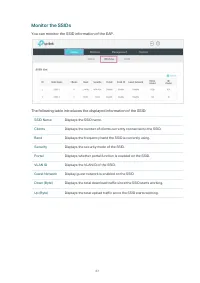
Page 71 - Monitor the SSIDs; You can monitor the SSID information of the EAP.
67 Monitor the SSIDs You can monitor the SSID information of the EAP. The following table introduces the displayed information of the SSID: SSID Name Displays the SSID name. Clients Displays the number of clients currently connected to the SSID. Band Displays the frequency band the SSID is currently...
Page 72 - Monitor the Radio Settings; Monitor Radio Traffic
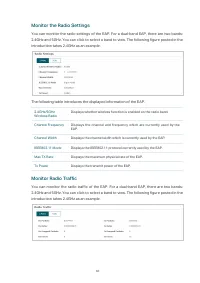
68 Monitor the Radio Settings You can monitor the radio settings of the EAP. For a dual-band EAP, there are two bands: 2.4GHz and 5GHz. You can click to select a band to view. The following figure posted in the introduction takes 2.4GHz as an example. The following table introduces the displayed inf...
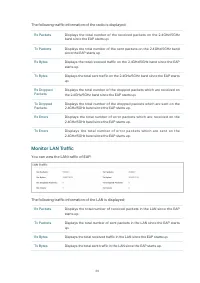
Page 73 - The following traffic information of the radio is displayed:; Monitor LAN Traffic; You can view the LAN traffic of EAP.
69 The following traffic information of the radio is displayed: Rx Packets Displays the total number of the received packets on the 2.4GHz/5GHz band since the EAP starts up. Tx Packets Displays the total number of the sent packets on the 2.4GHz/5GHz band since the EAP starts up. Rx Bytes Displays th...
Page 75 - Monitor the Clients; To monitor the client information, go to the; View Client Information; Click the
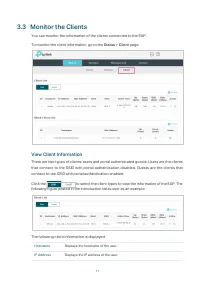
71 3.3 Monitor the Clients You can monitor the information of the clients connected to the EAP. To monitor the client information, go to the Status > Client page. View Client Information There are two types of clients: users and portal authenticated guests. Users are the clients that connect to t...
Page 77 - View Block Client Information; The following information of the blocked client is displayed:
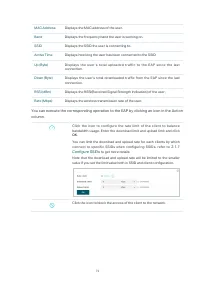
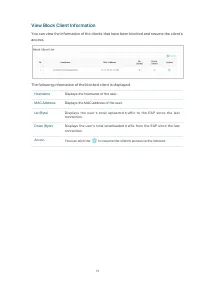
73 View Block Client Information You can view the information of the clients that have been blocked and resume the client’s access. The following information of the blocked client is displayed: Hostname Displays the hostname of the user. MAC Address Displays the MAC address of the user. Up (Byte) Di...
Page 78 - Manage the EAP; Manage the IP Address of the EAP
74 4 Manage the EAP The EAP provides powerful functions of device management and maintenance. This chapter introduces how to manage the EAP, including: • 4.1 Manage the IP Address of the EAP • 4.2 Manage System Logs • 4.3 Configure Web Server • 4.4 Configure Management Access • 4.5 Con...
Page 79 - Manage the IP Address of the EAP; Using Web
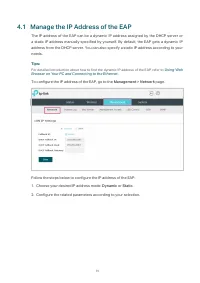
75 4.1 Manage the IP Address of the EAP The IP address of the EAP can be a dynamic IP address assigned by the DHCP server or a static IP address manually specified by yourself. By default, the EAP gets a dynamic IP address from the DHCP server. You can also specify a static IP address according to y...
Page 80 - Dynamic; Static
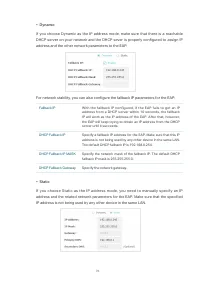
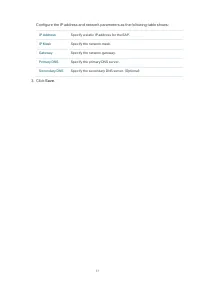
76 • Dynamic If you choose Dynamic as the IP address mode, make sure that there is a reachable DHCP server on your network and the DHCP sever is properly configured to assign IP address and the other network parameters to the EAP. For network stability, you can also configure the fallback IP param...
Page 82 - Manage System Logs; To manage system logs, go to the; View System Logs; In the
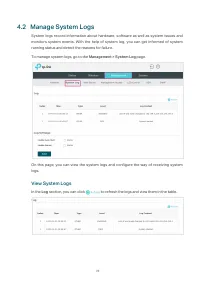
78 4.2 Manage System Logs System logs record information about hardware, software as well as system issues and monitors system events. With the help of system log, you can get informed of system running status and detect the reasons for failure. To manage system logs, go to the Management > Syste...
Page 83 - Configure the Way of Receiving Logs
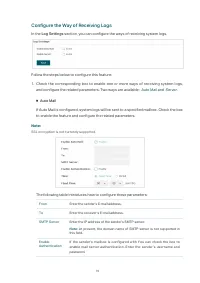
79 Configure the Way of Receiving Logs In the Log Settings section, you can configure the ways of receiving system logs. Follow the steps below to configure this feature: 1. Check the corresponding box to enable one or more ways of receiving system logs, and configure the related parameters. Two way...
Page 84 - Server
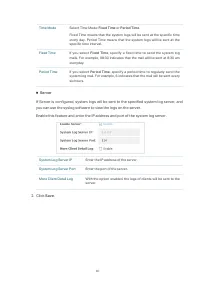
80 Time Mode Select Time Mode: Fixed Time or Period Time . Fixed Time means that the system logs will be sent at the specific time every day. Period Time means that the system logs will be sent at the specific time interval. Fixed Time If you select Fixed Time , specify a fixed time to send the syst...
Page 85 - Configure Web Server; To configure Web Server, go to the
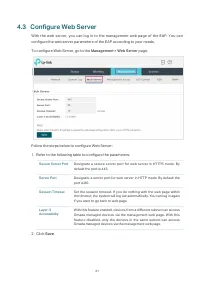
81 4.3 Configure Web Server With the web server, you can log in to the management web page of the EAP. You can configure the web server parameters of the EAP according to your needs. To configure Web Server, go to the Management > Web Server page. Follow the steps below to configure Web Server: 1...
Page 86 - Configure Management Access; To configure Management Access, go to the; Configure Access MAC Management
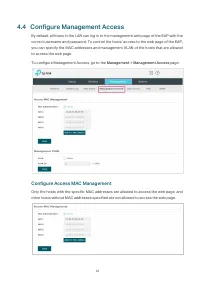
82 4.4 Configure Management Access By default, all hosts in the LAN can log in to the management web page of the EAP with the correct username and password. To control the hosts’ access to the web page of the EAP, you can specify the MAC addresses and management VLAN of the hosts that are allowed to...
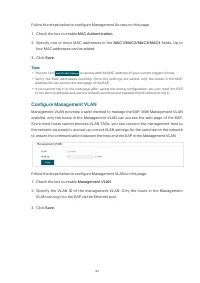
Page 87 - Configure Management VLAN; Management VLAN
83 Follow the steps below to configure Management Access on this page: 1. Check the box to enable MAC Authentication . 2. Specify one or more MAC addresses in the MAC1/MAC2/MAC3/MAC4 fields. Up to four MAC addresses can be added. 3. Click Save . Tips: • You can click to quickly add the MAC address...
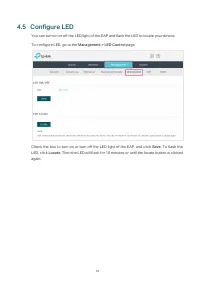
Page 88 - Configure LED; To configure LED, go to the
84 4.5 Configure LED You can turn on or off the LED light of the EAP and flash the LED to locate your device. To configure LED, go to the Management > LED Control page. Check the box to turn on or turn off the LED light of the EAP, and click Save . To flash the LED, click Locate . Then the LED wi...
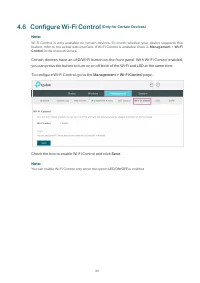
Page 89 - Configure Wi-Fi Control; Check the box to enable Wi-Fi Control and click
85 4.6 Configure Wi-Fi Control (Only for Certain Devices) Note: Wi-Fi Control is only available on certain devices. To check whether your device supports this feature, refer to the actual web interface. If Wi-Fi Control is available, there is Management > Wi-Fi Control in the menu structure. Cert...
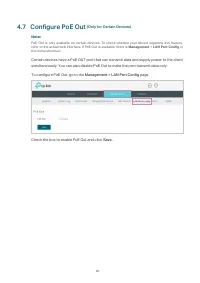
Page 90 - Configure PoE Out; To configure PoE Out, go to the
86 4.7 Configure PoE Out (Only for Certain Devices) Note: PoE Out is only available on certain devices. To check whether your device supports this feature, refer to the actual web interface. If PoE Out is available, there is Management > LAN Port Config in the menu structure. Certain devices have...
Page 91 - Configure SSH; To configure SSH, go to the
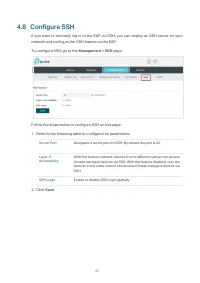
87 4.8 Configure SSH If you want to remotely log in to the EAP via SSH, you can deploy an SSH server on your network and configure the SSH feature on the EAP. To configure SSH, go to the Management > SSH page. Follow the steps below to configure SSH on this page: 1. Refer to the following table t...
Page 92 - Configure SNMP; To configure the EAP as an SNMP agent, go to the
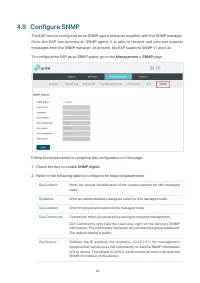
88 4.9 Configure SNMP The EAP can be configured as an SNMP agent and work together with the SNMP manager. Once the EAP has become an SNMP agent, it is able to receive and process request messages from the SNMP manager. At present, the EAP supports SNMP v1 and v2c. To configure the EAP as an SNMP age...
Page 94 - Configure the System
90 5 Configure the System This chapter introduces how to configure the system of the EAP, including: • 5.1 Configure the User Account • 5.2 Controller Settings • 5.3 Configure the System Time • 5.4 Reboot and Reset the EAP • 5.5 Backup and Restore the Configuration • 5.6 Update the F...
Page 95 - Configure the User Account; To configure the user account, go to
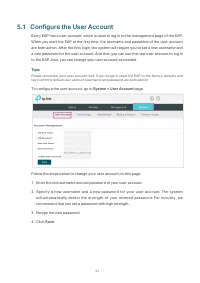
91 5.1 Configure the User Account Every EAP has a user account, which is used to log in to the management page of the EAP. When you start the EAP at the first time, the username and password of the user account are both admin. After the first login, the system will require you to set a new username ...
Page 96 - Controller Settings; If you are using Omada Cloud-Based Controller,; Enable Cloud-Based Controller Management; Go to the; System; page. In the Cloud- Based Controller Management; . After you add the
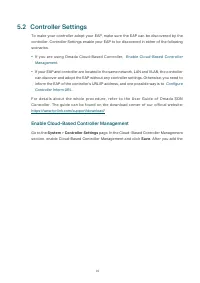
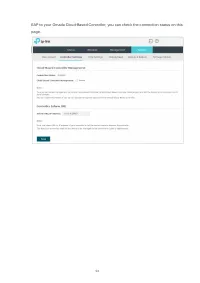
92 5.2 Controller Settings To make your controller adopt your EAP, make sure the EAP can be discovered by the controller. Controller Settings enable your EAP to be discovered in either of the following scenarios. • If you are using Omada Cloud-Based Controller, Enable Cloud-Based Controller Manageme...
Page 98 - Configure Controller Inform URL; page. In the Controller Inform URL section, inform; . Then the EAP make contact
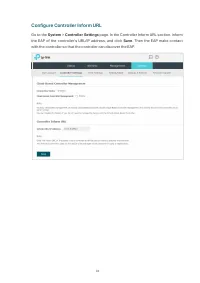
94 Configure Controller Inform URL Go to the System > Controller Settings page. In the Controller Inform URL section, inform the EAP of the controller’s URL/IP address, and click Save . Then the EAP make contact with the controller so that the controller can discover the EAP.
Page 99 - To configure the system time, go to the
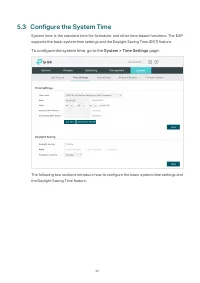
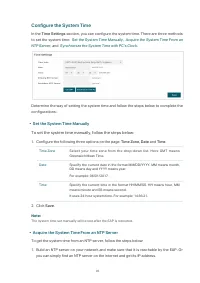
95 5.3 Configure the System Time System time is the standard time for Scheduler and other time-based functions. The EAP supports the basic system time settings and the Daylight Saving Time (DST) feature. To configure the system time, go to the System > Time Settings page. The following two sectio...
Page 100 - Set the System Time Manually; Configure the following three options on the page:; Acquire the System Time From an NTP Server; To get the system time from an NTP server, follow the steps below:
96 Configure the System Time In the Time Settings section, you can configure the system time. There are three methods to set the system time: Set the System Time Manually , Acquire the System Time From an NTP Server , and Synchronize the System Time with PC’s Clock . Determine the way of setting the...
Page 101 - Click the button; Time; Synchronize the System Time with PC’s Clock; and the synchronized system time will be displayed
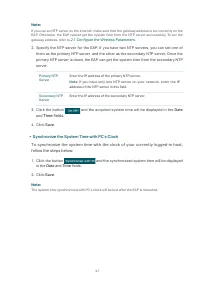
97 Note: If you use an NTP server on the internet, make sure that the gateway address is set correctly on the EAP. Otherwise, the EAP cannot get the system time from the NTP server successfully. To set the gateway address, refer to 2.1 Configure the Wireless Parameters . 2. Specify the NTP server fo...
Page 102 - Configure Daylight Saving Time; Follow the steps below to configure daylight saving time:; Check the box to enable
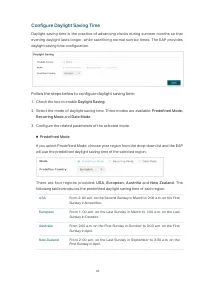
98 Configure Daylight Saving Time Daylight saving time is the practice of advancing clocks during summer months so that evening daylight lasts longer, while sacrificing normal sunrise times. The EAP provides daylight saving time configuration. Follow the steps below to configure daylight saving time...
Page 103 - Recurring Mode; Date Mode
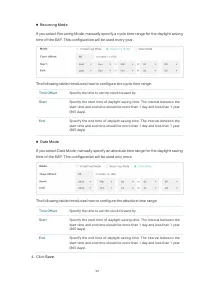
99 ■ Recurring Mode If you select Recurring Mode, manually specify a cycle time range for the daylight saving time of the EAP. This configuration will be used every year. The following table introduces how to configure the cycle time range. Time Offset Specify the time to set the clock forward by....
Page 104 - Reboot and Reset the EAP
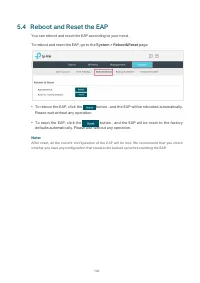
100 5.4 Reboot and Reset the EAP You can reboot and reset the EAP according to your need. To reboot and reset the EAP, go to the System > Reboot&Reset page. • To reboot the EAP, click the button , and the EAP will be rebooted automatically. Please wait without any operation. • To reset the EA...
Page 105 - Backup and Restore the Configuration
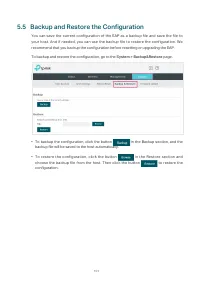
101 5.5 Backup and Restore the Configuration You can save the current configuration of the EAP as a backup file and save the file to your host. And if needed, you can use the backup file to restore the configuration. We recommend that you backup the configuration before resetting or upgrading the EA...
Page 106 - Update the Firmware; System > Firmware Update
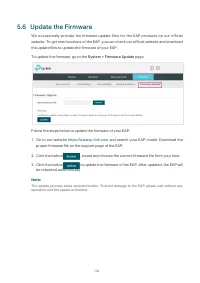
102 5.6 Update the Firmware We occasionally provide the firmware update files for the EAP products on our official website. To get new functions of the EAP, you can check our official website and download the update files to update the firmware of your EAP. To update the firmware, go to the System &...
Page 107 - Application Example; Determine the Network Requirements
103 6 Application Example This chapter provides an application example about how to establish and manage a EAP wireless network: A restaurant wants to provide the wireless internet access for the employees and guests. The restaurant now has a router, a switch, a dual-band EAP and a computer. Fol...
Page 108 - Determine the Network Requirements
104 6.1 Determine the Network Requirements Before starting to build the network, we need to first analyze and determine the network requirements. In this restaurant example, the network requirements are as follows: • On both 2.4GHz and 5GHz bands, there are two SSIDs needed: one for the restaurant e...
Page 109 - Build the Network Topology; Build the network topology as the following figure shows.; Connect the switch to the LAN port of the router.
105 6.2 Build the Network Topology Build the network topology as the following figure shows. EAP Management Host Switch Router (DHCP Server) LAN: 192.168.88.1 Internet • The router is the gateway of the network and acts as a DHCP server to assign dynamic IP addresses to the management host, EAP and ...
Page 110 - Log in to the EAP; LOGIN
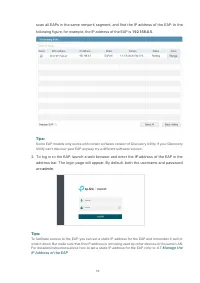
106 6.3 Log in to the EAP After building the network topology, follow the steps below to log in to the web page of the EAP: 1. On the management host, launch the web browser and enter “192.168.88.1” in the address bar. Then log in to the router and find the IP address of the EAP. As the following fi...
Page 111 - Configure the EAP; Configure; configurations of creating SSIDs. Configure the
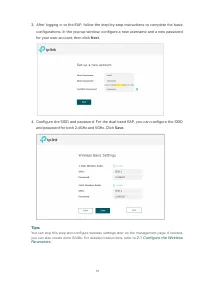
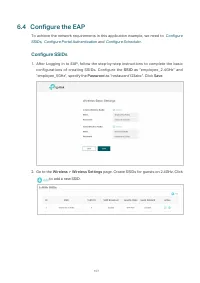
107 6.4 Configure the EAP To achieve the network requirements in this application example, we need to Configure SSIDs , Configure Portal Authentication and Configure Scheduler . Configure SSIDs 1. After Logging in to EAP, follow the step-by-step instructions to complete the basic configurations of c...
Page 112 - Follow the steps below to configure portal authentication:
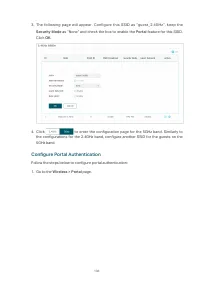
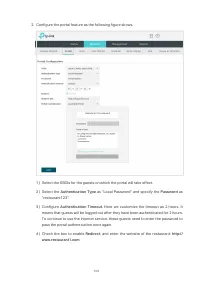
108 3. The following page will appear. Configure this SSID as “guest_2.4GHz“, keep the Security Mode as “None” and check the box to enable the Portal feature for this SSID. Click OK . 4. Click to enter the configuration page for the 5GHz band. Similarly to the configurations for the 2.4GHz band, con...
Page 114 - Term of Use
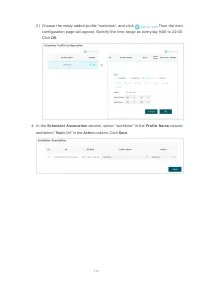
110 5 ) Configure the authentication page. Specify the title and the term of use. To access the internet, guests need to enter the correct password in the Password field, accept the Term of Use , and click the Login button. 3. Click Save . Configure Scheduler Follow the steps below to schedule the r...
Page 116 - Test the Network; To test the SSIDs for the employees, follow the steps below:
112 6.5 Test the Network To ensure that the employees and guests can surf the internet via the wireless network, we can use a client device, such as a telephone, to test whether the SSIDs are working normally. • To test the SSIDs for the employees, follow the steps below: 1 ) Enable the Wi-Fi featur...
Page 118 - COPYRIGHT & TRADEMARKS; Specifications are subject to change without notice.
COPYRIGHT & TRADEMARKS Specifications are subject to change without notice. is a registered trademark of TP-Link Technologies Co., Ltd. Other brands and product names are trademarks or registered trademarks of their respective holders.No part of the specifications may be reproduced in any form o...