Page 3 - Contents
Contents Using your SmartBake Custom Safely 2-3 Features of your Sunbeam SmartBake Custom 4-6The Control Panel 7 Baking Process Monitor 9 Menu Settings 10-11 Using Your SmartBake Custom 12-13 Ingredients 14-15Important Measuring Tips 16 Fruit and Nut Dispenser 17 The Baking Process 18 Programming yo...
Page 4 - Australia; Congratulations
You are just a few easy steps away from experiencing the aroma of fresh bread baking in your new Sunbeam SmartBake Custom.We at Sunbeam understand the busy lifestyles that we live today and that’s why when developing the SmartBake Custom we made baking a loaf of bread as easy as 1, 2, 3. Or for thos...
Page 5 - Sunbeam’s Safety Precautions
Sunbeam’s Safety Precautions SAFETY PRECAUTIONS FOR YOUR SUNBEAM BREAD MAKER • Do not use attachments not recommended by Sunbeam. This may cause fire, electric shock or injury • Do not use outdoors or for commercial use, or for any other purpose other than its intended use • This unit is intended fo...
Page 7 - Using your SmartBake Custom Safely continued
5. Use of extension cords: A short power supply cord has been provided to reduce the risk of injury resulting from becoming entangled in or tripping over a long cord. Extension cords should be used with care. The cord should be arranged so that it will not drape over the benchtop where it can be pul...
Page 8 - Custom
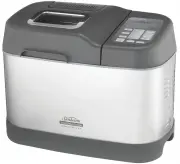
4 Features of your Sunbeam SmartBake ® Custom Automatic Fruit & Nut Dispenser Automatically releases ingredients into the dough during the kneading cycle. Takes the guess-work out of recipes. Large viewing window Non-stick baking pan
Page 10 - Features of your Sunbeam SmartBake Custom continued
6 Your Sunbeam SmartBake Custom is a fully programmable dough and bread making machine that allows you to easily make fresh bread in only a few hours. There are a host of other features: Automatic Fruit & Nut dispenser Automatically releases ingredients into the dough during the kneading cycle. ...
Page 11 - The Control Panel
7 The control panel on the SmartBake Custom is designed to ensure easy use and make baking a loaf of bread a pleasure.The simple to use control panel enables you to select your desired baking program and features a large LCD window making it easy to see your selected menu and the completion time for...
Page 12 - The Control Panel continued
8 5. Custom Allows you to create your own favourite recipes, or customise your program during the cycle. This button must be held for 2 seconds to activate any modifications. 6. Save Allows you to save your favourite menus that you have customised to suit your own personal tastes. When a menu is sav...
Page 13 - Baking Progress Monitor
9 The baking progress monitor is located on the right of the LCD screen. The monitor displays each of the stages of the breadmaking cycle. During the breadmaking cycle one of these boxes is blacked out to indicate which stage of the cycle you are in. Preheat The preheat feature is part of the Wheat ...
Page 14 - Menu Settings
10 Menu Settings 1. Basic Press the MENU button once and the LCD window will show ‘1’. Use this menu to make traditional white bread. You have a choice of 3 crust colours - Light, Medium or Dark.The SmartBake Custom will default to a 1.0kg loaf with a Medium crust colour setting. To select a crust s...
Page 15 - Menu Settings - continued
11 Menu Settings - continued 6. French This cycle is for breads that are lighter in texture and have crispier crusts, such as French and Italian breads. The default setting is 1.0Kg loaf with a Medium Crust. Tip: This style loaf best suits loaves which are low in fat and sugar. 7. Cake Make a variet...
Page 16 - Using your SmartBake
12 Before using your SmartBake Custom for the first time We recommend that you remove the baking pan and wipe over the bread pan and kneading blade with a damp cloth and dry thoroughly.Do not immerse the bread pan in water unless necessary. Do not use harsh abrasive cleaners as they may damage the n...
Page 18 - Ingredients
14 Yeast Yeast is actually a microscopic plant. Simply stated, without yeast, your bread will not rise. When moistened by a liquid, fed by sugar and carefully warmed, yeast produces gases that power the dough to rise. If the temperature is too cold, the yeast will not be activated; if it’s too warm,...
Page 19 - Ingredients continued
15 Eggs Eggs are used in some bread recipes. They provide liquid, assist with the rising and increase the nutritional value of the bread. They add extra flavour and are usually used in the sweeter types of bread. Recipes in this booklet use extra large 59g eggs. Fats Many breads use fats to enhance ...
Page 20 - Important measuring tips
16 Each ingredient in a loaf of bread plays a specific role, so it is extremely important to measure the ingredients correctly to get the best results.We recommend using Australian standard measuring jugs, cups and spoons. Weight measurements are provided if you wish to use a kitchen scale. Australi...
Page 22 - The Baking Process
18 Mixing, Kneading, Rising, Baking.... Here’s a glimpse of how your Sunbeam SmartBake Custom automatically does all the steps for you. Mixing and kneading In standard bread baking, the baker mixes the ingredients first by stirring, then by kneading the dough by hand. The SmartBake Custom mixes and ...
Page 23 - Programming your SmartBake
19 The Baking Process Preheat Your SmartBake Custom features a Preheat function which helps to bring the ingredients to the optimum temperature for the yeast to activate when the kneading cycle begins. This is mainly used on Wheat breads and when making Jam, but is also handy to use on cold days. Th...
Page 24 - Programming your SmartBake Custom - continued
20 Rising The temperature of your SmartBake Custom increases causing the dough to expand and rise. The adjustable time for Rise 1 is: 0 - 99 minutes. Temperature: Warm The adjustable time for Rise 2 is: 0 - 99 minutes. Temperature: Warm The adjustable time for Rise 3 is: 0 - 99 minutes. Temperature:...
Page 27 - How to use the Time Delay
23 The SmartBake Custom allows you to delay the completion of your bread by up to 15 hours, so you can wake up to the smell of freshly baked bread, or go out for the day while your SmartBake Custom does all the work. Note: Do not use the Time Delay when the recipe has perishable ingredients such as ...
Page 29 - Handy hints
25 Order of ingredients Place liquid in first, the dry ingredients in next and the yeast in last. Freshness Ensure all ingredients are fresh and used before the specified use-by date. Avoid using perishable ingredients such as milk, yoghurt, eggs or cheese, with the Time Delay function. Store dry in...
Page 30 - Care and Cleaning
26 Care and Cleaning Before cleaning the SmartBake Custom, unplug it from the power outlet and allow it to cool completely. To clean the exterior Wipe exterior with a slightly dampened cloth and polish with a soft dry cloth. Do not use metal scourers or abrasives as this may scratch the exterior sur...
Page 31 - Recipes: Basic Breads; Menu 1
27 All the recipes have been specifically created and tested by our Sunbeam Test Kitchen for the SmartBake Custom. We hope you enjoy. To use the Basic Bread setting: 1. Ensure the kneading blade is in the bread pan. 2. Place the ingredients into the bread pan in the order listed. 3. Wipe any spills ...
Page 32 - Basic Breads continued
28 Milk Bread 750g 1kg 1.25kg Milk 280mls 350mls 440mls Butter 20g 20g 30g Salt ¾ teaspoon 1 teaspoon 1 ¼ teaspoons Sugar 1 ½ tablespoons 2 tablespoons 2 tablespoons Bread Improver 1 teaspoon 1 teaspoon 1 teaspoon Plain Flour 465g 580g 725g Dried Yeast 1 teaspoon 1 ½ teaspoons 2 teaspoons Cornbread ...
Page 39 - Basic Turbo Breads; Menu 2
35 Basic Turbo Breads Menu 2 Using this Turbo menu, basic breads will be ready in about 2 hours. If you need your bread more quickly, use the Extra Turbo menu (8) which takes about 80 minutes. To use the Turbo Bread setting: 1. Ensure the kneading blade is in the bread pan. 2. Place the ingredients ...
Page 40 - Gluten/Yeast Free Breads; Menu 3
36 Gluten/Yeast Free Breads Menu 3 To use the Gluten/Yeast Free Bread setting: 1. Ensure kneading blade is in the bread pan.2. Place the ingredients into the bread pan in the order listed. 3. Wipe any spills from the outside of the pan. Place the pan into the bread maker and close the lid. Add the s...
Page 41 - Gluten/Yeast Free Breads continued
37 Gluten Free Grain Bread 750g 1kg 1.25kg Luke-warm Water 210g 280mls 375mls Eggs, lightly whisked 2 2 3 Vegetable Oil 80mls 100mls 125mls White Vinegar ½ teaspoon 1 teaspoon 1 teaspoon Arrowroot, sieved 140g 185g 250g Xanthan Gum 2 teaspoons 3 teaspoons 1 tablespoon White Sugar 1 tablespoon 1 ½ ta...
Page 44 - Wheat Breads; Menu 4
40 Wheat Breads Menu 4 To use the Wheat Bread setting: 1. Ensure the kneading blade is in the bread pan. 2. Place the ingredients into the bread pan in the order listed. 3. Wipe any spills from the outside of the pan. Place the pan into the bread maker and close the lid. Add the specified ingredient...
Page 45 - Wheat Breads continued
41 Wheat Breads continued Multigrain 750g 1kg 1.25kg Luke-warm Water 260mls 350mls 440mls Butter 20g 30g 40g Salt ¾ teaspoon 1 teaspoon 1 ½ teaspoons Brown Sugar 1 tablespoon 1 ½ tablespoons 2 tablespoons Skim Milk Powder 2 tablespoons 2 ½ tablespoons 3 tablespoons Grain MixPlain Flour ¹⁄³ cup 180g ...
Page 49 - Sweet Breads; Menu 5
45 Sweet Breads Menu 5 To use the Sweet Bread setting: 1. Ensure the kneading blade is in the bread pan. 2. Place the ingredients into the bread pan in the order listed. 3. Wipe any spills from the outside of the pan. Place the pan into the bread maker and close the lid. Add the specified ingredient...
Page 50 - Sweet Breads continued
46 Sweet Breads continued Chocolate Bread 750g 1kg 1.25kg Luke-warm Water 250mls 300mls 360mls Butter 20g 40g 60g Cocoa Powder, sifted 2 tablespoons 3 tablespoons 4 tablespoons Salt 1 ½ teaspoons 2 teaspoons 2 ½ teaspoons Sugar 2 tablespoons 3 tablespoons 4 tablespoons Skim Milk Powder 1 tablespoon ...
Page 54 - French Breads; Menu 6
50 French Breads Menu 6 To use the French Bread setting: 1. Ensure the kneading blade is in the bread pan. 2. Place the ingredients into the bread pan in the order listed. 3. Wipe any spills from the outside of the pan. Place the pan into the bread maker and close the lid. Add the specified ingredie...
Page 55 - Cake; Menu 7
51 Cake Menu 7 To use the Cake setting: 1. Ensure the kneading blade is in the bread pan. 2. Place the ingredients into the bread pan in the order listed. Note: We recommend using packet cake mixes on this setting. If using a packet cake mix, add the wet ingredients first and the packet pre-mix last...
Page 56 - Extra Turbo Breads; Menu 8
52 Extra Turbo Breads Menu 8 Using this Extra Turbo menu, basic breads will be ready in about 80 minutes. To use the Extra Turbo Bread setting: 1. Ensure the kneading blade is in the bread pan. 2. Place the ingredients into the bread pan in the order listed. Note: We only recommend using the Basic b...
Page 57 - Jam; Menu 9
53 Jam Menu 9 To use the Jam setting: 1. Ensure the kneading blade is in the bread pan. 2. Prepare the fruit as instructed. Place the ingredients into the bread pan in the order listed. 3. Wipe any spills from the outside of the pan. Place the pan into the bread maker and close the lid. 4. Turn the ...
Page 59 - Pasta Dough
55 Pasta Dough Menu 11 To use the Pasta Dough setting: 1. Ensure the kneading blade is in the bread pan. 2. Place the ingredients into the bread pan in the order listed. 3. Wipe any spills from the outside of the pan. Place the pan into the bread maker and close the lid. 4. Turn the power on from th...
Page 60 - Pasta Dough - continued
56 Pasta Dough - continued Fettuccine with Tomato Sauce 1 quantity basic pasta dough Sauce 3 tablespoons olive oil1 onion, chopped,2 x 400g cans crushed tomatoes2 tablespoons tomato pasteSalt and pepper, to taste½ cup parmesan cheese 1. To make the sauce, heat the oil in a frypan. Add onion and cook...
Page 62 - Pizza Dough / Dough continued
58 Pizza Dough / Dough continued Shaping Techniques:Rustic loaf – Working on a lightly floured surface, use the palms of your hands (dusted with flour) to gently tuck dough under itself until you get a smooth rounded top surface. Place on prepared baking tray. Using a sharp knife, make 1cm deep slas...
Page 71 - Troubleshooting: The Machine
Page 72 - Troubleshooting: The Recipes
Page 73 - Notes
Page 74 - Instruction/Recipe Supplement for New Zealand; NEW ZEALAND SUPPLEMENT; PLEASE READ THIS BOOKLET FIRST
Instruction/Recipe Supplement for New Zealand NEW ZEALAND SUPPLEMENT PLEASE READ THIS BOOKLET FIRST This booklet covers the use and care of the following Sunbeam Bread makers: BM7850 SMARTBAKE CUSTOM which can produce loaf sizes 750g; 1.0kg and 1.25kg
Page 76 - Ingredients to use
1 Flour Use fresh, good quality flour. Do not use self-raising flour. White Flour Most large New Zealand milling companies produce two lines of white flour for the domestic market. One is finely milled 'weak' flour which is ideal for sponges, biscuits, shortbread and short pastry. This type of flour...
Page 77 - Measuring Ingredients
2 Measuring Ingredients New Zealand standard metric kitchen measures have been used for all the recipes. All measurements should be level. Accuracy with measuring is important when making bread in a breadmaker. To measure flour For optimum results we recommend weighing flour. If scales are not avail...
Page 78 - Troubleshooting
3 Special Concerns For important information on troubleshooting, please read the main Instruction/Recipe booklet.For further assistance, please phone Sunbeam Customer Services 0800 SUNBEAM (0800 786 232) For Service in New Zealand If your Sunbeam Breadmaker is within the 12 month warranty period, en...
Page 79 - 2 Month Replacement Guarantee
Should you experience any difficulties with your appliance, please phone our customer service line for advice on 1300 881 861 in Australia, or 0800 786 232 in New Zealand. Alternatively, you can send a written claim to Sunbeam at the address listed below. On receipt of your claim, Sunbeam will seek ...
Page 80 - Need help with your appliance?
Need help with your appliance? Contact our customer service team or visit our website for information and tips on getting the most from your appliance. In Australia Visit www.sunbeam.com.au Or call 1300 881 861 In New Zealand Visit www.sunbeam.co.nz Or call 0800 786 232 ‘SmartBake’ is a registered t...