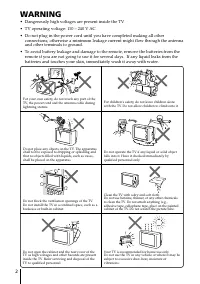
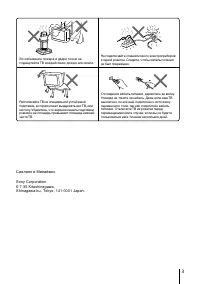
Page 2 - WARNING; • Dangerously high voltages are present inside the TV.
2 Do not place any objects on the TV. The apparatusshall not be exposed to dripping or splashing andthat no objects filled with liquids, such as vases,shall be placed on the apparatus. WARNING • Dangerously high voltages are present inside the TV. • TV operating voltage: 110 – 240 V AC. • Do not plu...
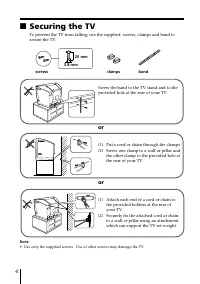
Page 4 - Securing the TV; screws; Note; or
4 x Securing the TV To prevent the TV from falling, use the supplied screws, clamps and band tosecure the TV. 20 mm 3.8 mm screws clamps band Screw the band to the TV stand and to theprovided hole at the rear of your TV. (1) Put a cord or chain through the clamps.(2) Screw one clamp to a wall or pil...
Page 5 - Table of Contents; Installation
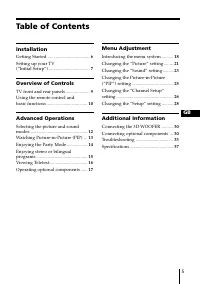
5 Table of Contents Installation Getting Started ..................................... 6 Setting up your TV(“Initial Setup”) .................................... 7 Overview of Controls TV front and rear panels ..................... 9 Using the remote control andbasic functions .........................
Page 6 - Getting Started; Начальная настройкa; Connect the antenna cable (not supplied) to; Tip
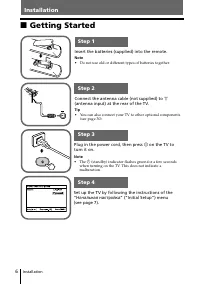
6 Installation Installation x Getting Started b b 1 Step 1 Insert the batteries (supplied) into the remote. Note • Do not use old or different types of batteries together. Step 2 Step 3 Step 4 Set up the TV by following the instructions of the“ Начальная настройкa ” (“Initial Setup”) menu (see page ...
Page 7 - Setting up your TV; When you turn on your TV for the first time, the “; Press; continue
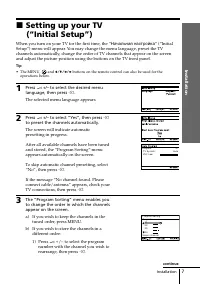
7 Installation Installation x Setting up your TV (“Initial Setup”) When you turn on your TV for the first time, the “ Начальная настройкa ” (“Initial Setup”) menu will appear. You may change the menu language, preset the TVchannels automatically, change the order of TV channels that appear on the sc...
Page 8 - Tips; continued
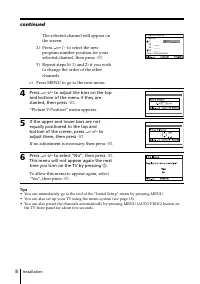
8 Installation The selected channel will appear onthe screen. 2) Press 2 +/– to select the new program number position for yourselected channel, then press t . 3) Repeat steps b) 1) and 2) if you wish to change the order of the otherchannels. c) Press MENU to go to the next menu. 4 Press 2 +/– to ad...
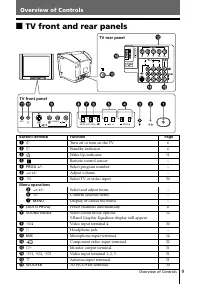
Page 9 - Overview of Controls; TV front panel; TV front and rear panels; Function
9 Overview of Contr ols Overview of Controls Overview of Controls 0 qa 9 4 L(MONO) R qs qg qh qf qd 3 2 1 PROG MENU (AUTO PROG) SOUND MODE 4 5 8 7 6 AUTO PROG:Press [MENU] for 5sec MIC 1 2 3 R L Y C B C R TV front panel TV rear panel x TV front and rear panels Button/Terminal Function Page 1 ! Turn ...
Page 11 - symbol are trademarks of SRS Labs, Inc. WOW; Button; Optional components operations
11 Overview of Contr ols Overview of Controls WOW, TruSurround, SRS and symbol are trademarks of SRS Labs, Inc. WOW and TruSurround technologies are incorporated under license from SRS Labs, Inc.Licensed by BBE Sound, Inc. under USP4638258, 4482866.“BBE” and BBE symbol are trademarks of BBE Sound, I...
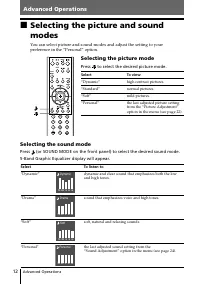
Page 12 - Advanced Operations; Selecting the sound mode; -Band Graphic Equalizer display will appear.; Select; Select
12 Advanced Operations Advanced Operations Selecting the sound mode Press (or SOUND MODE on the front panel) to select the desired sound mode. 5-Band Graphic Equalizer display will appear. Select To listen to “Dynamic” dynamic and clear sound that emphasizes both the lowand high tones. “Drama” sound...
Page 13 - To; Selecting TV program using PIP; Notes
13 Advanced Operations x Watching Picture-in-Picture (PIP) With the PIP feature, you can display two different TVprograms or video input at the same time by using the button. To Display a sub screen Change a program numberin the sub screen Adjust position of sub screen Swap pictures betweenthe main ...
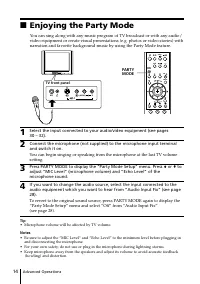
Page 14 - Enjoying the Party Mode; Press PARTY MODE to display the “Party Mode Setup” menu. Press
14 Advanced Operations x Enjoying the Party Mode You can sing along with any music program of TV broadcast or with any audio/video equipment or create visual presentations (e.g. photos or video stories) withnarration and favorite background music by using the Party Mode feature. 1 Select the input c...
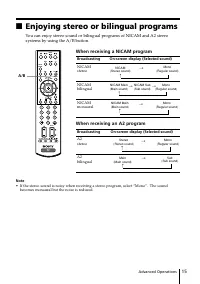
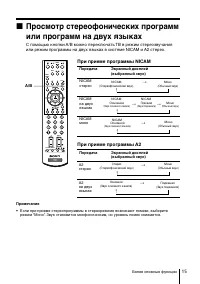
Page 15 - When receiving a NICAM program; When receiving an A2 program; Broadcasting; Enjoying stereo or bilingual programs
15 Advanced Operations When receiving a NICAM program Broadcasting On-screen display (Selected sound) NICAMstereo NICAMbilingual NICAMmonaural When receiving an A2 program Broadcasting On-screen display (Selected sound) A2stereo A2bilingual NICAM (Stereo sound) Mono (Regular sound) t t NICAM Main (M...
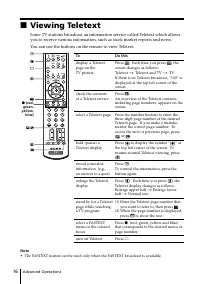
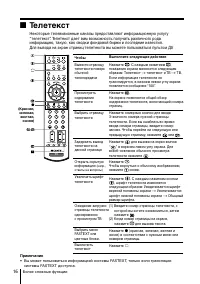
Page 16 - Viewing Teletext; You can use the buttons on the remote to view Teletext.
16 Advanced Operations x Viewing Teletext Some TV stations broadcast an information service called Teletext which allowsyou to receive various information, such as stock market reports and news. You can use the buttons on the remote to view Teletext. To Do this display a Teletext Press . Each time y...
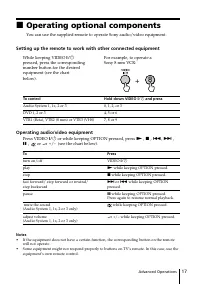
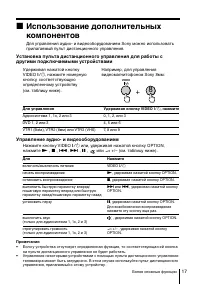
Page 17 - Operating optional components; Setting up the remote to work with other connected equipment
17 Advanced Operations x Operating optional components You can use the supplied remote to operate Sony audio/video equipment. Setting up the remote to work with other connected equipment While keeping VIDEO ?/1 For example, to operate a pressed, press the corresponding Sony 8 mm VCR: number button f...
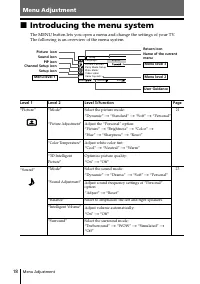
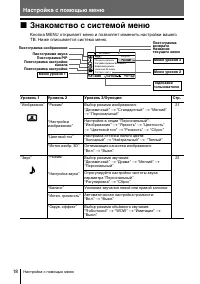
Page 18 - Menu Adjustment; Introducing the menu system; Level 1
18 Menu Adjustment Menu Adjustment x Introducing the menu system The MENU button lets you open a menu and change the settings of your TV.The following is an overview of the menu system. Return icon Setup icon Channel Setup icon PIP icon Name of the currentmenu Picture icon Menu level 3 Menu level 2 ...
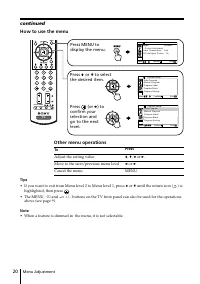
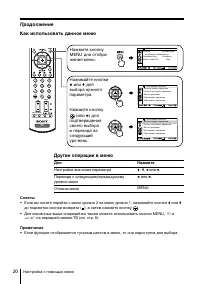
Page 20 - How to use the menu
20 Menu Adjustment 1 2 3 4 6 7 8 9 0 5 MENU T V PROG OPTION RESET How to use the menu Other menu operations Tips • If you want to exit from Menu level 2 to Menu level 1, press V or v until the return icon ( ) is highlighted, then press . • The MENU, t and 2 +/– buttons on the TV front panel can also...
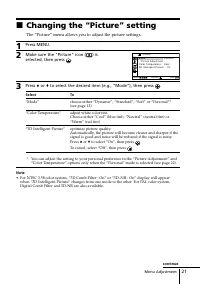
Page 21 - Changing the “Picture” setting; The “Picture” menu allows you to adjust the picture settings.
21 Menu Adjustment x Changing the “Picture” setting The “Picture” menu allows you to adjust the picture settings. 1 Press MENU. 2 Make sure the “Picture” icon ( ) is selected, then press . 3 Press V or v to select the desired item (e.g., “Mode”), then press . Select To “Mode” choose either “Dynamic”...
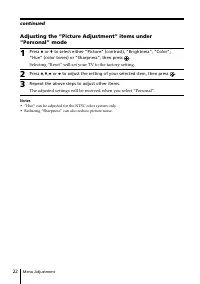
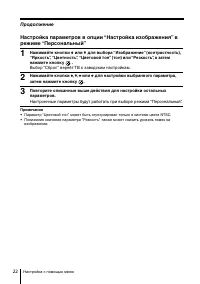
Page 22 - Selecting “Reset” will set your TV to the factory setting.
22 Menu Adjustment Adjusting the “Picture Adjustment” items under“Personal” mode 1 Press V or v to select either “Picture” (contrast), “Brightness”, “Color”, “Hue” (color tones) or “Sharpness”, then press . Selecting “Reset” will set your TV to the factory setting. 2 Press V , v , B or b to adjust t...
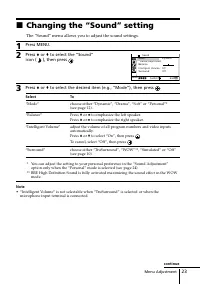
Page 23 - Changing the “Sound” setting; The “Sound” menu allows you to adjust the sound settings.
23 Menu Adjustment x Changing the “Sound” setting The “Sound” menu allows you to adjust the sound settings. 1 Press MENU. 2 Press V or v to select the “Sound” icon ( ), then press . 3 Press V or v to select the desired item (e.g., “Mode”), then press . Select To “Mode” choose either “Dynamic”, “Dram...
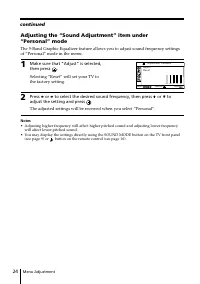
Page 24 - The adjusted settings will be received when you select “Personal”.
24 Menu Adjustment R e s e t 1 0 0 3 0 0 1 k 3 k 8 k A d j u s t Adjustment: Personal Confirm End Select Adjusting the “Sound Adjustment” item under“Personal” mode The 5-Band Graphic Equalizer feature allows you to adjust sound frequency settingsof “Personal” mode in the menu. 1 Make sure that “Adju...
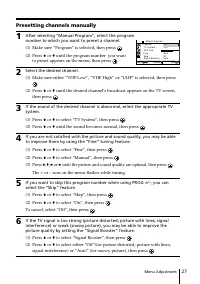
Page 27 - Select the desired channel.
27 Menu Adjustment Presetting channels manually 1 After selecting “Manual Program”, select the programnumber to which you want to preset a channel. (1) Make sure “Program” is selected, then press . (2) Press V or v until the program number you want to preset appears on the menu, then press . 2 Selec...
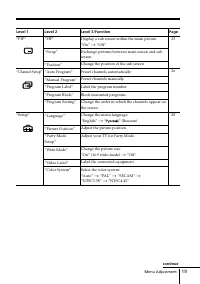
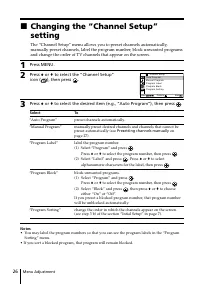
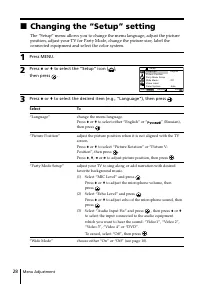
Page 28 - Changing the “Setup” setting
28 Menu Adjustment x Changing the “Setup” setting The “Setup” menu allows you to change the menu language, adjust the pictureposition, adjust your TV for Party Mode, change the picture size, label theconnected equipment and select the color system. 1 Press MENU. 2 Press V or v to select the “Setup” ...
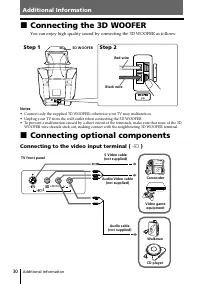
Page 30 - Additional Information; Connecting the 3D WOOFER; Connecting optional components; Connecting to the video input terminal (
30 Additional Information Additional Information x Connecting the 3D WOOFER You can enjoy high quality sound by connecting the 3D WOOFER as follows: Notes • Connect only the supplied 3D WOOFER; otherwise your TV may malfunction.• Unplug your TV from the wall outlet when connecting the 3D WOOFER.• To...
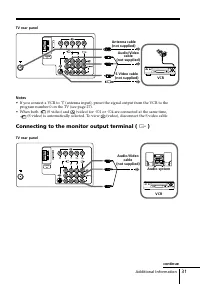
Page 31 - Connecting to the monitor output terminal (
31 Additional Information 1 2 3 R L Y C B C R 1 2 3 R L Y C B C R Audio system VCR Audio/Video cable (not supplied) Connecting to the monitor output terminal ( T ) TV rear panel Notes • If you connect a VCR to 8 (antenna input), preset the signal output from the VCR to the program number 0 on the TV...
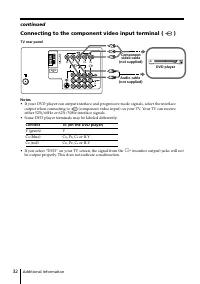
Page 32 - Connect; Connecting to the component video input terminal (
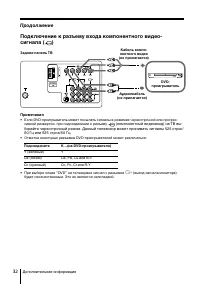
32 Additional Information Connect To (on the DVD player) Y (green) Y C B (blue) C B , P B , C b or B-Y C R (red) C R , P R , C r or R-Y Connecting to the component video input terminal ( ) Notes • If your DVD player can output interlace and progressive mode signals, select the interlace output when ...
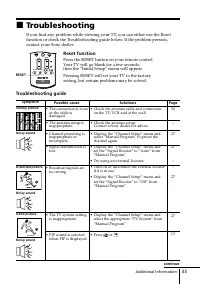
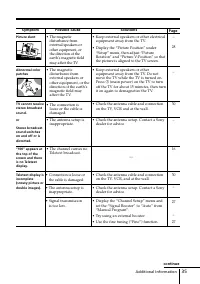
Page 33 - Troubleshooting; Reset function; Possible cause
33 Additional Information x Troubleshooting If you find any problem while viewing your TV, you can either use the Resetfunction or check the Troubleshooting guide below. If the problem persists,contact your Sony dealer. Reset function Press the RESET button on your remote control.Your TV will go bla...
Page 35 - Page
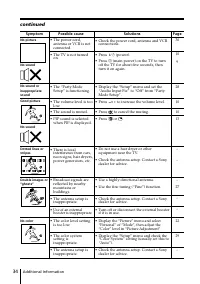
35 Additional Information Possible cause Symptom Solutions Picture slant Abnormal colorpatches TV cannot receivestereo broadcastsound. or Stereo broadcastsound switcheson and off or isdistorted. “100” appears atthe top of thescreen and thereis no Teletextdisplay. Teletext display isincomplete(snowy ...
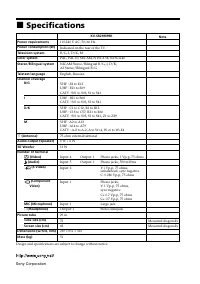
Page 37 - Specifications
37 Additional Information Power requirements Power consumption (W) Television system Color system Stereo/Bilingual system Teletext language Channel coverage B/G I D/K M 8 (Antenna) Audio output (Speaker) 3D Woofer Number of terminal (Video) (Audio) (S Video) (Component Video) MIC (Microphone) i (Hea...
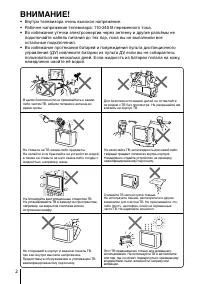
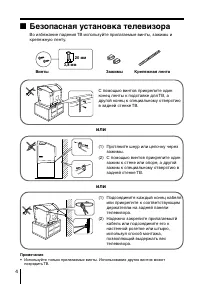
Page 40 - Безопасная установка телевизора; Винты; Примечание; или
4 x Безопасная установка телевизора Во избежание падения ТВ используйте прилагаемые винты, зажимы икрепежную ленту. 20 мм 3,8 мм Винты Зажимы Крепежная лента С помощью винтов прикрепите одинконец ленты к подставке для ТВ, адругой конец к специальному отверстиюв задней стенке ТВ. (1) Протяните шнур и...
Page 41 - Содержание; Установка
5 Содержание Установка Перед эксплуатацией ...................... 6 Настройка ТВ(“Начальная настройкa”) ................ 7 Элементы управления Передняя и задняя панелиуправления ТВ ................................. 9 Использование пульта ДУи базовые функции ....................... 10 Более сложные ф...
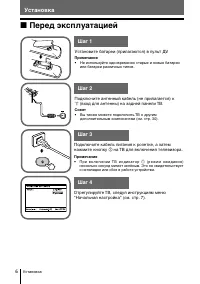
Page 42 - Перед эксплуатацией; на ТВ для включения телевизора.; Подключите антенный кабель (не прилагается) к; Совет
Установка 6 Установка x Перед эксплуатацией b 1 Шаг 1 Установите батареи (прилагаются) в пульт ДУ. Примечание • Не используйте одновременно старые и новые батареи или батареи различных типов. Шаг 2 Шаг 3 Шаг 4 Отрегулируйте ТВ, следуя инструкциям меню“Начальная настройкa” (см. стр. 7). Подключите ка...
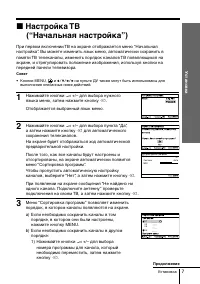
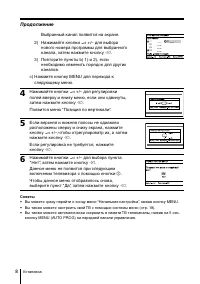
Page 43 - Настройка ТВ; Продолжение
Установка Установка 7 x Настройка ТВ (“Начальная настройкa”) При первом включении ТВ на экране отображается меню “Начальнаянастройкa”. Вы можете изменить язык меню, автоматически сохранить впамяти ТВ телеканалы, изменить порядок каналов ТВ появляющихся наэкране, и отрегулировать положение изображени...
Page 44 - Советы
Установка 8 Выбранный канал появится на экране. 2) Нажимайте кнопки 2 +/– для выбора нового номера программы для выбранногоканала, затем нажмите кнопку t . 3) Повторите пункты b) 1) и 2), если необходимо изменить порядок для другихканалов. c) Нажмите кнопку MENU для перехода к следующему меню. 4 Наж...
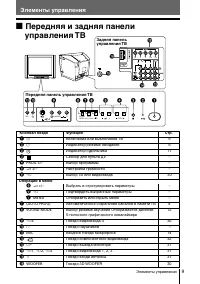
Page 45 - Элементы управления; Передняя панель управления ТВ; Передняя и задняя панели; Функция
Элементы управления Элементы управления 9 0 qa 9 4 L(MONO) R qs qg qh qf qd 3 2 1 PROG MENU (AUTO PROG) SOUND MODE 4 5 8 7 6 AUTO PROG:Press [MENU] for 5sec MIC 1 2 3 R L Y C B C R Элементы управления Передняя панель управления ТВ x Передняя и задняя панели управления ТВ Задняя панельуправления ТВ К...
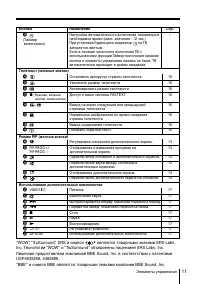
Page 46 - Кнопка; Операции в меню; Стерео/двуязычные операции
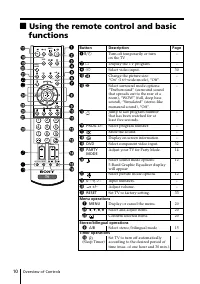
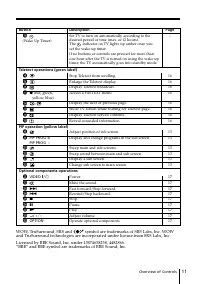
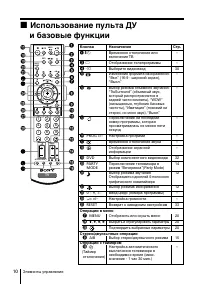
Элементы управления 10 x Использование пульта ДУ и базовые функции 1 2 3 4 6 7 8 9 0 5 DVD MENU T V PROG VIDEO wf wj wh 8 1 2 4 qg qf 0 7 6 5 qk qa 3 ql 9 qh A/B wk OPTION RESET PARTY MODE qj qd qs w;wa wg Кнопка Назначение Стр. 1 ? / 1 Временное отключение или – включение ТВ 3 a Отображение телепро...
Page 47 - Использование дополнительных компонентов; являются товарными знаками SRS Labs,
Элементы управления 11 Кнопка Назначение Стр. qh Настройка автоматического включения телевизора в – необходимое время (макс. значение - 12 час.)При установке будильника индикатор на ТВ загорается жёлтым.Если в течение часа после включения ТВ сиспользованием функции Таймер включения никакиекнопки и э...
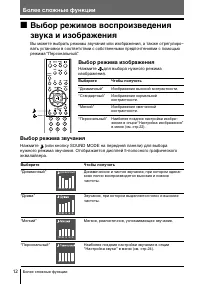
Page 48 - Более сложные функции; Bыбор режима звучания; Bыбор режима изображения; Hажмите; Bыберите
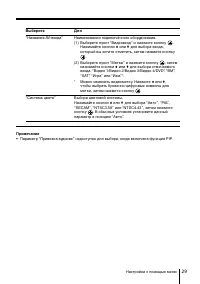
12 Более сложные функции Более сложные функции Bыбор режима звучания Нажмите (или кнопку SOUND MODE на передней панели) для выборанужного режима звучания. Отображается дисплей 5-полосного графическогоэквалайзера. Bыберите Чтобы получить “Динамичный” Динамическое и чистое звучание, при котором одина–...
Page 50 - Примечания
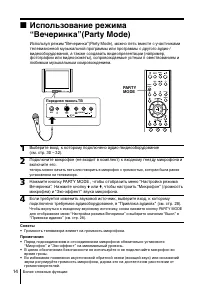
14 Более сложные функции x Использование режима“Вечеринка”(Party Mode) Используя рeжим “Вечеринка”(Party Mode), можно петь вместе с участникамителевизионной музыкальной программы или программы с другого аудио-/видеооборудования, а также создавать видеопрезентации (например,фотографии или видеосюжеты...
Page 51 - При приеме программы NICAM; При приеме программы A2; Передача
15 Более сложные функции x Просмотр стереофонических программили программ на двух языках С помощью кнопки А/В можно переключать ТВ в режим стереозвучанияили режим программы на двух языках в системе NICAM и A2 стерео. При приеме программы NICAM Передача Экранный дисплей(выбранный звук) NICAMстерео NI...
Page 52 - Teлeтeкст; Чтобы
16 Более сложные функции x Teлeтeкст Некоторые телевизионные каналы предоставляют информационную услугу“телетекст”. Teлeтeкст дает вам возможность получать различного родаинформацию, такую, как сводки фондовой биржи и лоследние известия.Для вывода на экран страниц телетекста вы можете пользоваться п...
Page 53 - Управление аудио- и видеооборудованием; Нажмите кнопку VIDEO
17 Более сложные функции x Использование дополнительныхкомпонентов Для управления аудио- и видеооборудованием Sony можно использоватьприлагаемый пульт дистанционного управления. Установка пульта дистанционного управления для работы сдругими подключаемыми устройствами Удерживая нажатой кнопкуVIDEO ?/...
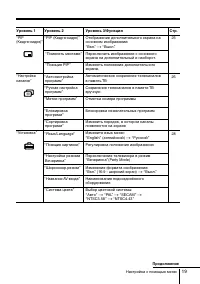
Page 54 - Настройка с помощью меню; Знакомство с системой меню; Уровень 1
18 Настройка с помощью меню Настройка режима Вечеринка E n g l i s h Установка Широкоэкр.режим: Нaзвание AV-входa Система цвета: Позиция картинки Настройка с помощью меню x Знакомство с системой меню Кнопка MENU открывает меню и позволяет изменить настройки вашегоТВ. Ниже описывается система меню. П...
Page 56 - Нажимайте кнопки
20 Настройка с помощью меню Н а с т р о й к а к а н а л о в А в т о н a с т р о й к a п р о г р а м м Р у ч н а я н а с т р о й к а п р о г р а м мМ е т к и п р о г р а м м Б л о к и р о в к а п р о г р а м м С о р т и р о в к a п р о г р а м м Н а с т р о й к а к а н а л о в А в т о н a с т р о й к...
Page 57 - Изменение параметров “Изображение”; кнопку; Выберите
21 Настройка с помощью меню x Изменение параметров “Изображение” Меню “Изображение” позволяет вам настроить параметры изображения. 1 Нажмите кнопку MENU. 2 Убедитесь, что выбрана пиктограмма“Изображение” ( ), затем нажмите кнопку . 3 Нажимайте кнопки V или v для выбора нужного параметра (например, “...
Page 58 - Выбор “Сброс” вернёт ТВ к заводским настройкам.
22 Настройка с помощью меню Настройка параметров в опции “Нaстройка изображения” врежиме “Персональный” 1 Нажимайте кнопки V или v для выбора “Изображение” (контpaстность), “Яркость”, “Цветность”, “Цветовой тон” (тон) или “Pезкость”, а затем нажмите кнопку . Выбор “Сброс” вернёт ТВ к заводским настр...
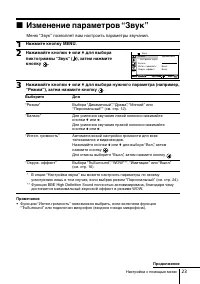
Page 59 - Изменение параметров “Звук”; Меню “Звук” позволяет вам настроить параметры звучания.
23 Настройка с помощью меню x Изменение параметров “Звук” Меню “Звук” позволяет вам настроить параметры звучания. 1 Нажмите кнопку MENU. 2 Нажимайте кнопки V или v для выбора пиктограммы “Звук” ( ), затем нажмитекнопку . 3 Нажимайте кнопки V или v для выбора нужного параметра (например, “Режим”), за...
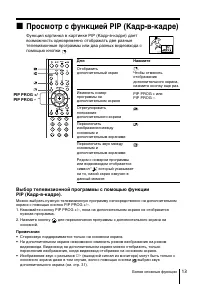
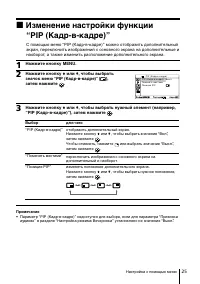
Page 61 - Изменение настройки функции; Нажмите кнопку
25 Настройка с помощью меню x Изменение настройки функции “PIP (Кадр-в-кадре)” С помощью меню “PIP (Кадр-в-кадре)” можно отобразить дополнительныйэкран, переключить изображения с основного экрана на дополнительные инаоборот, а также изменить расположение дополнительного экрана. 1 Нажмите кнопку MENU...
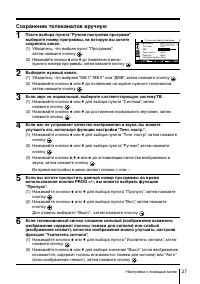
Page 63 - Сохранение телеканалов вручную; Выберите нужный канал.
27 Настройка с помощью меню Сохранение телеканалов вручную 1 После выбора пункта “Ручная настройка программ”выберите номер программы, на которую вы хотитесохранить канал. (1) Убедитесь, что выбран пункт “Программa”, затем нажмите кнопку . (2) Нажимайте кнопки V или v до появления в меню нужного номе...
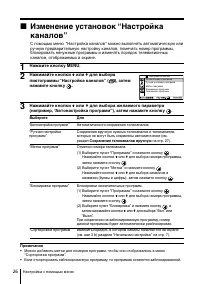
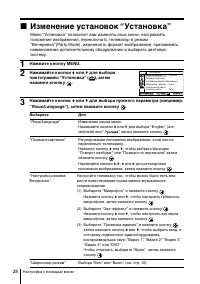
Page 64 - Изменение установок “Установка”
Настройка с помощью меню 28 x Изменение установок “Установка” Меню “Установка” позволяет вам изменять язык меню, настраиватьположение изображения, переключaть телевизор в режим“Вечеринка”(Party Mode), измененять формат изображения, присваиватьнаименования дополнительному оборудованию и выбирать цвет...
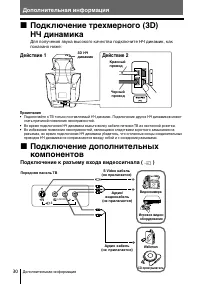
Page 66 - Подключение к разъему входа видеосигнала (; Дополнительная информация; Действие 1
30 Дополнительная информация x Подключение дополнительныхкомпонентов Подключение к разъему входа видеосигнала ( t ) Дополнительная информация Передняя панель ТВ Игровое видео- оборудование Аудио/ видеокабель (не прилагается) Видеокамера x Подключение трехмерного (3D)НЧ динамика Для получения звука в...
Page 67 - Подключение к разъему выхода сигнала монитора (
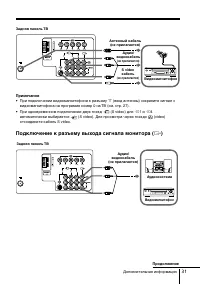
Дополнительная информация 31 Продолжение Задняя панель ТВ Подключение к разъему выхода сигнала монитора ( T ) 1 2 3 R L Y C B C R Видеомагнитофон Аудио/ видеокабель (не прилагается) Антенный кабель (не прилагается) S videoкабель (не прилагается) Примечания •При подключении видеомагнитофона к разъему...
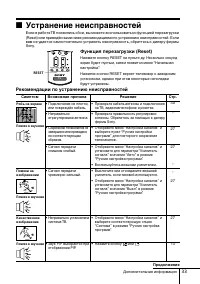
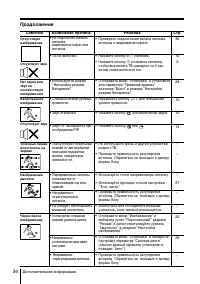
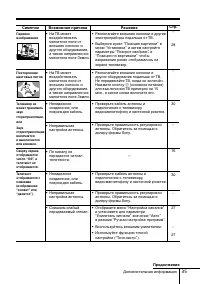
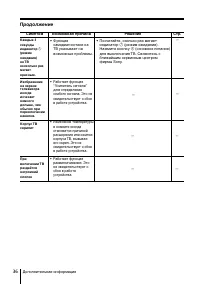
Page 69 - Возможная причина; Устранение неисправностей; Рекомендации по устранению неисправностей
Дополнительная информация 33 Рябь на экране Помехи в звучании Помехи наизображении Помехи в звучании Качественноеизображение Помехи в звучании Возможная причина Симптом Решение x Устранение неисправностей Если в работеТB появились сбои, вы можете воспользоваться функцией перезагрузки(Reset) или прив...
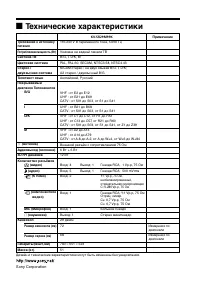
Page 73 - Технические характеристики
Дополнительная информация 37 Требования к источникупитания Потребляемая мощность (Вт) Система ТВ Цветовая система Стерео /двуязычная система Teлeтeкст язык Покрываемыйдиапазон Телеканалов B/G I D/K M 8 (Антенна) Аудиовыход (колонки) 3D НЧ динамик Количество разъёмов (видео) (аудио) (S Video) (компон...