Page 2 - WARNING; • Dangerously high voltages are present inside the TV.
2 WARNING • Dangerously high voltages are present inside the TV. • TV operating voltage: 220 – 240 V AC. • Do not plug in the power cord until you have completed making all other connections; otherwise a minimum leakage current might flow through the antennaand other terminals to ground. • To avoid ...
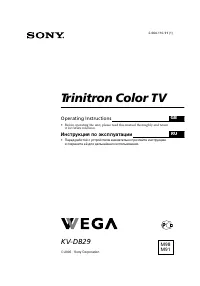
Page 3 - Table of Contents; Installation
3 Table of Contents Installation Securing the TV .................................... 4 Getting Started ..................................... 5 Setting up your TV(“Initial Setup”) .................................... 6 Overview of Controls TV front and rear panels ..................... 8 Using the r...
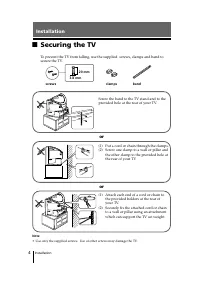
Page 4 - Securing the TV; screws; or
4 Installation Installation x Securing the TV To prevent the TV from falling, use the supplied screws, clamps and band tosecure the TV. 20 mm 3.8 mm screws clamps band Screw the band to the TV stand and to theprovided hole at the rear of your TV. (1) Put a cord or chain through the clamps.(2) Screw ...
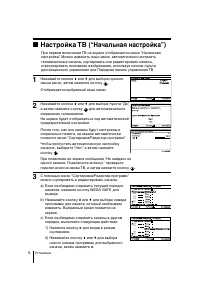
Page 5 - Начальная настройкa; Connect the antenna cable (not supplied) to; Getting Started
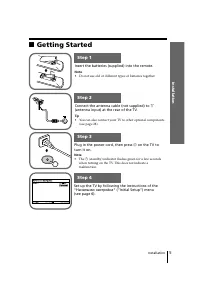
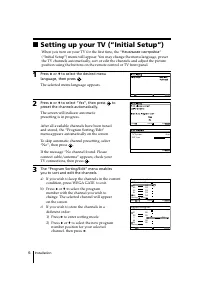
5 Installation Installation b b 1 Step 1 Insert the batteries (supplied) into the remote. Note • Do not use old or different types of batteries together. Step 2 Step 3 Step 4 Set up the TV by following the instructions of the“ Начальная настройкa “ (“Initial Setup”) menu (see page 6). Plug in the po...
Page 8 - qf; Overview of Controls; TV front panel; TV front and rear panels; qa
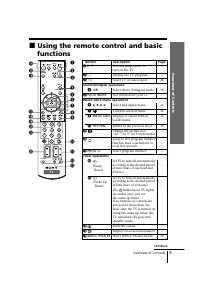
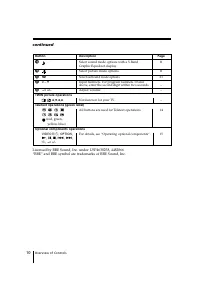
8 Overview of Controls 3 2 1 4 5 PROG 6 7 8 SOUND MODE WEGA GATE 0 9 L(MONO) 2 R 1 Y R L C R 2 P R / C B P B / 3 1 qf qd qs qa qg 4 L(MONO) R PROG MENU (AUTO PROG) SOUND MODE AUTO PROG:Press [MENU] for 5sec Overview of Controls TV front panel TV rear panel x TV front and rear panels Button/Terminal ...
Page 9 - Using the remote control and basic
9 Overview of Contr ols Overview of Controls x Using the remote control and basic functions continue 1 2 3 4 6 7 8 9 0 5 WEGA THEATRE VIDEO RETURN A/B PROG INDEX GATE OPTION T V PROG WEGA 1 3 2 9 7 8 6 4 5 qf qg qh w; ws wa ql qd qs qa 0 qjqk (Sleep Timer) (Wake Up Timer) Button Description Page 1 ?...
Page 10 - qk; continued
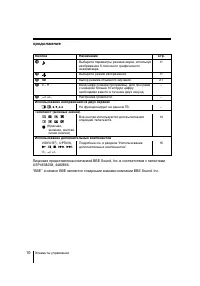
10 Overview of Controls Licensed by BBE Sound, Inc. under USP4638258, 4482866.“BBE” and BBE symbol are trademarks of BBE Sound, Inc. Button Description Page qk Select sound mode options with a 5-Band 11 Graphic Equalizer display. ql Select picture mode options. 11 w; Select surround mode options. 21...
Page 11 - Advanced Operations; Selecting the picture mode; Press; -Band Graphic Equalizer display will appear.
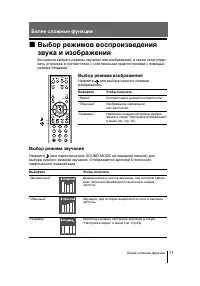
11 Advanced Operations Advanced Operations x Selecting the picture and soundmodes You can select picture and sound modes and adjust the setting to yourpreference in the “Custom” option. Selecting the picture mode Press to select the desired picture mode. Select To view “Vivid” contrast and sharp pic...
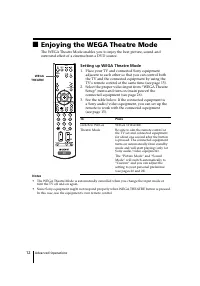
Page 12 - Enjoying the WEGA Theatre Mode; Setting up WEGA Theatre Mode; Place your TV and connected Sony equipment
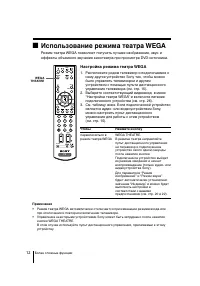
12 Advanced Operations x Enjoying the WEGA Theatre Mode The WEGA Theatre Mode enables you to enjoy the best picture, sound andsurround effect of a cinema from a DVD source. Setting up WEGA Theatre Mode 1. Place your TV and connected Sony equipment adjacent to each other so that you can control botht...
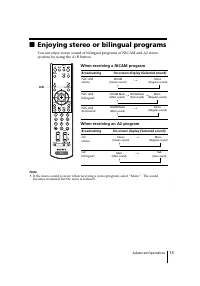
Page 13 - Enjoying stereo or bilingual programs; When receiving a NICAM program; When receiving an A2 program
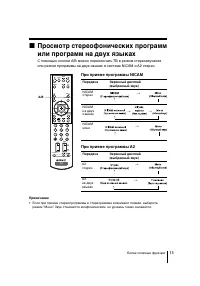
13 Advanced Operations x Enjoying stereo or bilingual programs You can enjoy stereo sound or bilingual programs of NICAM and A2 stereosystems by using the A/B button. NICAM (Stereo sound) Mono (Regular sound) t t NICAM Main (Main sound) NICAM Sub (Sub sound) Mono (Regular sound) t t t Mono (Regular ...
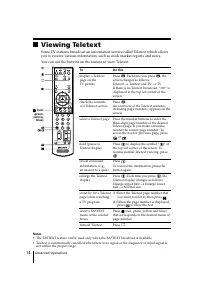
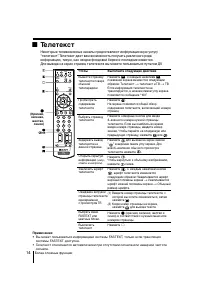
Page 14 - Viewing Teletext; You can use the buttons on the remote to view Teletext.
14 Advanced Operations x Viewing Teletext Some TV stations broadcast an information service called Teletext which allowsyou to receive various information, such as stock market reports and news. You can use the buttons on the remote to view Teletext. To Do this display a Teletext Press . Each time y...
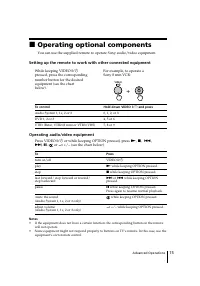
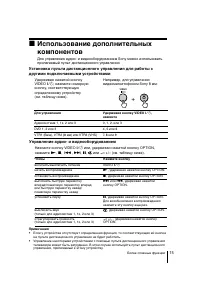
Page 15 - Operating optional components; Setting up the remote to work with other connected equipment; Operating audio/video equipment
15 Advanced Operations x Operating optional components You can use the supplied remote to operate Sony audio/video equipment. Setting up the remote to work with other connected equipment While keeping VIDEO ?/1 For example, to operate a pressed, press the corresponding Sony 8 mm VCR: number button f...
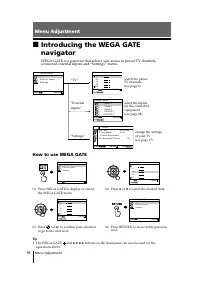
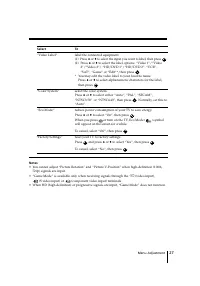
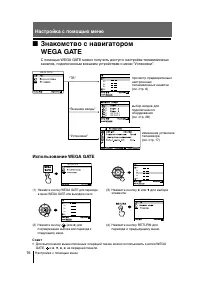
Page 16 - Menu Adjustment; How to use WEGA GATE
16 Menu Adjustment x Introducing the WEGA GATEnavigator WEGA GATE is a gateway that allows you access to preset TV channels,connected external inputs and “Settings” menu. Menu Adjustment Confirm Select WEGA GATE E x t e r n a l I n p u t s T V S e t t i n g s 0 1 0 2 0 3 0 4 0 5 T V Confirm Select E...
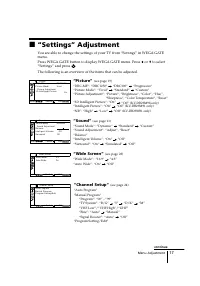
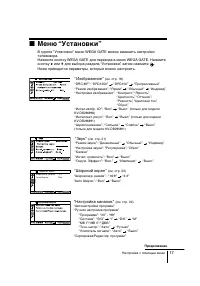
Page 17 - “Settings” Adjustment; “Picture”; “Channel Setup”
17 Menu Adjustment x “Settings” Adjustment You are able to change the settings of your TV from “Settings” in WEGA GATEmenu.Press WEGA GATE button to display WEGA GATE menu. Press V or v to select “Settings” and press . The following is an overview of the items that can be adjusted. Select Picture P ...
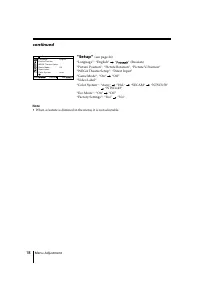
Page 18 - ”Setup”
18 Menu Adjustment Note • When a feature is dimmed in the menu, it is not selectable. ”Setup” (see page 26) “Language”: “English” “ ” (Russian) “Picture Position”: “Picture Rotation”, “Picture V-Position”“WEGA Theatre Setup”: “Direct Input”“Game Mode”: “On” “Off” “Video Label”“Color System”: “Auto” ...
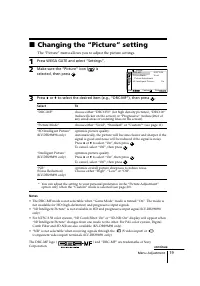
Page 19 - Changing the “Picture” setting; The “Picture” menu allows you to adjust the picture settings.
19 Menu Adjustment x Changing the “Picture” setting The “Picture” menu allows you to adjust the picture settings. 1 Press WEGA GATE and select “Settings”. 2 Make sure the “Picture” icon ( ) is selected, then press . 3 Press V or v to select the desired item (e.g., “DRC-MF”), then press . Select To “...
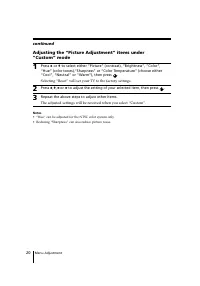
Page 20 - Selecting “Reset” will set your TV to the factory settings.
20 Menu Adjustment Adjusting the “Picture Adjustment” items under“Custom” mode 1 Press V or v to select either “Picture” (contrast), “Brightness”, “Color”, “Hue” (color tones),“Sharpness” or “Color Temperature” (choose either“Cool”, “Neutral” or “Warm”), then press . Selecting “Reset” will set your ...
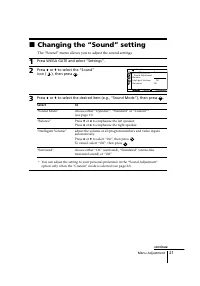
Page 21 - Changing the “Sound” setting; The “Sound” menu allows you to adjust the sound settings.
21 Menu Adjustment x Changing the “Sound” setting The “Sound” menu allows you to adjust the sound settings. 1 Press WEGA GATE and select “Settings”. 2 Press V or v to select the “Sound” icon ( ), then press . 3 Press V or v to select the desired item (e.g., “Sound Mode”), then press . Select To “Sou...
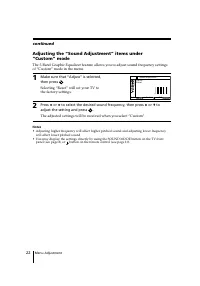
Page 22 - The adjusted settings will be received when you select “Custom”.
22 Menu Adjustment Adjusting the “Sound Adjustment” items under“Custom” mode The 5-Band Graphic Equalizer feature allows you to adjust sound frequency settingsof “Custom” mode in the menu. 1 Make sure that “Adjust” is selected,then press . Selecting “Reset” will set your TV tothe factory settings. 2...
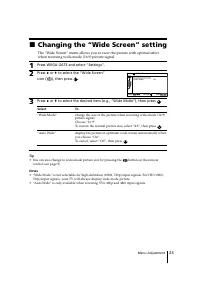
Page 23 - Changing the “Wide Screen” setting
23 Menu Adjustment x Changing the “Wide Screen” setting The “Wide Screen” menu allows you to view the picture with optimal effectwhen receiving wide-mode (16:9) picture signal. 1 Press WEGA GATE and select “Settings”. 2 Press V or v to select the “Wide Screen” icon ( ), then press . 3 Press V or v t...
Page 25 - Select the desired channel.
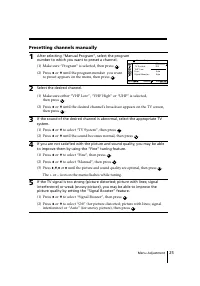
25 Menu Adjustment Presetting channels manually 1 After selecting “Manual Program”, select the programnumber to which you want to preset a channel. (1) Make sure “Program” is selected, then press . (2) Press V or v until the program number you want to preset appears on the menu, then press . 2 Selec...
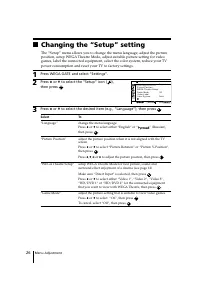
Page 26 - Changing the “Setup” setting
26 Menu Adjustment x Changing the “Setup” setting The “Setup” menu allows you to change the menu language, adjust the pictureposition, setup WEGA Theatre Mode, adjust suitable picture setting for videogames, label the connected equipment, select the color system, reduce your TVpower consumption and ...
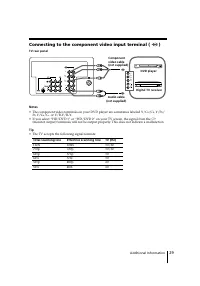
Page 28 - Additional Information; Connecting optional components; Connecting to the video input terminal (; Connecting to the monitor output terminal (
28 Additional Information Additional Information x Connecting optional components Connecting to the video input terminal ( t ) TV front panel 1 Y R L C R 2 P R / C B P B / 3 1 L(MONO) 2 R R L R L Audio/Video cable (not supplied) Antenna cable (not supplied) VCR TV rear panel Audio/Video cable (not s...
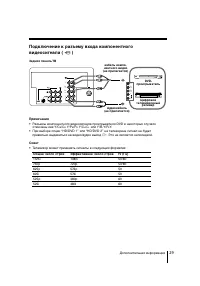
Page 29 - Connecting to the component video input terminal (
29 Additional Information Connecting to the component video input terminal ( ) Digital TV receiver Notes • The component video terminals on your DVD player are sometimes labeled Y/C B /C R, Y/P B / P R, Y/C b /C r or Y/B-Y/R-Y. • If you select “HD/DVD 1” or “HD/DVD 2” on your TV screen, the signal f...
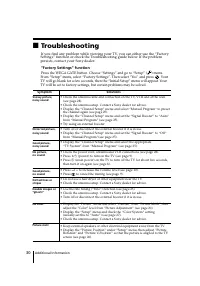
Page 30 - Troubleshooting; “Factory Settings” function; Press the WEGA GATE button. Choose “Settings” and go to “Setup” (
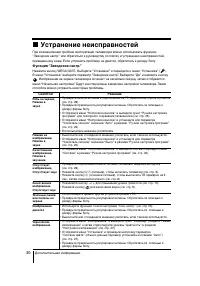
30 Additional Information x Troubleshooting If you find any problem while viewing your TV, you can either use the “Factory Settings” function or check the Troubleshooting guide below. If the problempersists, contact your Sony dealer. “Factory Settings” function Press the WEGA GATE button. Choose “Se...
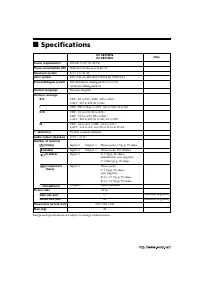
Page 32 - Specifications
Power requirements Power consumption (W) Television system Color system Stereo/Bilingual system Teletext language Channel coverage B/G I D/K M 8 (Antenna) Audio output (Speaker) Number of terminal (Video) (Audio) (S Video) (Component Video) i (Headphone) Picture tube Tube size (cm) Screen size (cm) ...
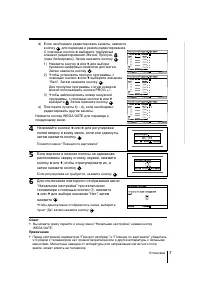
Page 34 - Настройка с помощью меню; Знакомство с навигатором; Содержание; Установка; Настройка ТВ; Элементы управления
3 Сделано в Малайзии. Sony Corporation6-7-35 Kitashinagawa,Shinagawa-ku, Tokyo, 141-0001 Japan. Настройка с помощью меню Знакомство с навигатором WEGA GATE ................................... 16 Меню “Установки” ......................... 17 Изменение параметров“Изображение” ............................
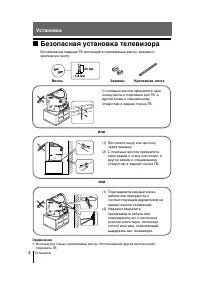
Page 35 - Безопасная установка телевизора; или; Винты
Установка 4 x Безопасная установка телевизора Во избежание падения ТВ используйте прилагаемые винты, зажимы икрепежную ленту. или Примечание • Используйте только прилагаемые винты. Использование других винтов может повредить ТВ. или С помощью винтов прикрепите одинконец ленты к подставке для ТВ, адр...
Page 36 - Перед эксплуатацией; Подключите антенный кабель (не прилагается) к; на ТВ для включения телевизора.
Установка 5 Установка b b x Перед эксплуатацией Шаг 1 Шаг 2 Шаг 3 Шаг 4 Установите батареи (прилагаются) в пульт ДУ. Примечание • Не используйте одновременно старые и новые батареи или батареи различных типов. Подключите антенный кабель (не прилагается) к 8 (вход для антенны) на задней панели ТВ. Со...
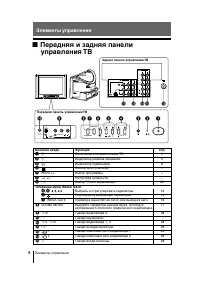
Page 39 - Передняя и задняя панели
8 Элементы управления 3 2 1 4 5 PROG 6 7 8 SOUND MODE WEGA GATE 0 9 L(MONO) 2 R 1 Y R L C R 2 P R / C B P B / 3 1 qf qd qs qa qg 4 L(MONO) R PROG MENU (AUTO PROG) SOUND MODE AUTO PROG:Press [MENU] for 5sec Кнопка/Гнездо Функция 1 ! Включение или выключение ТВ. 5 2 1 Индикатор режима ожидания. 5 2 Ин...
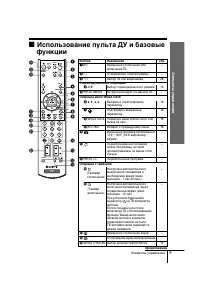
Page 40 - Использование пульта ДУ и базовые
Элементы управления 9 Элементы управления x Использование пульта ДУ и базовые функции Продолжение 1 2 3 4 6 7 8 9 0 5 WEGA THEATRE VIDEO RETURN A/B PROG INDEX GATE OPTION T V PROG WEGA 1 3 2 9 7 8 6 4 5 qf qg qh w; ws wa ql qd qs qa 0 qjqk Кнопка Назначение Cтр. 1 ? / 1 Временное отключение или – вк...
Page 41 - продолжение
10 Элементы управления продолжение Кнопка Назначение Cтр. qk Выберите параметры режима звука, используя 11 изображение 5-полосного графическогоэквалайзера. ql Выберите режим изображения. 11 w; Выбор режима объёмного звучания. 21 wa 0 – 9 Ввод цифр (номера программы). Для программ – с номером больше ...
Page 42 - Более сложные функции; Bыбор режима звучания; Bыбор режима изображения; Hажмите
11 Более сложные функции Более сложные функции Bыбор режима звучания Нажмите (или переключатель SOUND MODE на передней панели) длявыбора нужного режима звучания. Отображается дисплей 5-полосногографического эквалайзера. Bыберите Чтобы получить “Динамичный” Динамическое и чистое звучание, при котором...
Page 43 - Использование режима театра WEGA; Настройка режима театра WEGA; Расположите рядом телевизор и подключаемое к
12 Более сложные функции Более сложные функции x Использование режима театра WEGA Режим театра WEGA позволяет получить лучшее изображение, звук иэффекты объемного звучания кинотеатра при просмотре DVD-источника. Настройка режима театра WEGA 1. Расположите рядом телевизор и подключаемое к нему другое...
Page 44 - При приеме программы NICAM; При приеме программы A2
13 Более сложные функции A/B x Просмотр стереофонических программили программ на двух языках С помощью кнопки А/В можно переключать ТВ в режим стереозвучанияили режим программы на двух языках в системе NICAM и A2 стерео. При приеме программы NICAM Передача Экранный дисплей(выбранный звук) NICAMстере...
Page 45 - Teлeтeкст
14 Более сложные функции (Красная, зеленая, желтая, синяя) Чтобы Bывести страницутелетекста поверхобычнойтелепередачи Просмотретьсодержаниетелетекста Bыбрать страницутелетекста 3адержать выводтелетекста наданной странице Oткрыть скрытуюинформацию (напр., ответы на вопросы) Увеличить шрифттелетекста ...
Page 46 - Управление аудио- и видеооборудованием
15 Более сложные функции x Использование дополнительныхкомпонентов Для управления аудио- и видеооборудованием Sony можно использоватьприлагаемый пульт дистанционного управления. Установка пульта дистанционного управления для работы сдругими подключаемыми устройствами Удерживая нажатой кнопку Наприме...
Page 47 - Использование WEGA GATE
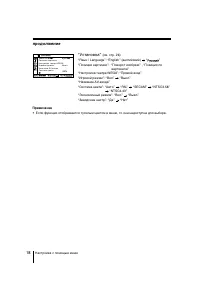
16 Настройка с помощью меню Настройка с помощью меню x Знакомство с навигаторомWEGA GATE С помощью WEGA GATE можно получить доступ к настройке телевизионныхканалов, подключенным внешним устройствам и меню “Установки”. просмотр предварительнонастроенныхтелевизионных каналов(см. стр. 6) выбор входов д...
Page 48 - Меню “Установки”; “Изображение”
17 Настройка с помощью меню x Меню “Установки” В группе “Установки” меню WEGA GATE можно изменить настройкителевизора.Нажмите кнопку WEGA GATE для перехода в меню WEGA GATE. Нажмитекнопку V или v для выбора раздела “Установки”, затем нажмите . Ниже приводятся параметры, которые можно настроить. “Изо...
Page 49 - “Установка”
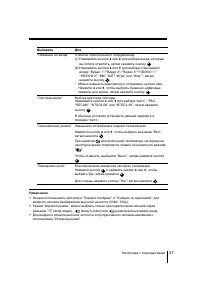
18 Настройка с помощью меню “Установка” (см. стр. 26) “Язык / Lаnguаgе”: “English” (английский) “ ” “Позиция картинки”: “Поворот изображ.” , “Позиция по вертикали” “Настройка театра WEGA”: “Прямой вход”“Игровой pежим”: “Вкл.” “Выкл.” “Название АV-входа”“Система цвета”: “Авто” “PAL” “SECAM” “NTSC3.58...
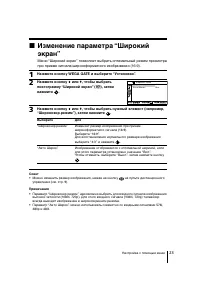
Page 50 - Изменение параметров “Изображение”; Нажмите кнопку WEGA GATE и выберите “Установки”.
19 Настройка с помощью меню x Изменение параметров “Изображение” Меню “Изображение” позволяет вам настроить параметры изображения. 1 Нажмите кнопку WEGA GATE и выберите “Установки”. 2 Убедитесь, что выбрана пиктограмма“Изображение” ( ), затем нажмите кнопку . 3 Нажимайте кнопки V или v для выбора ну...
Page 51 - Выбор “Сброс” вернёт ТВ к заводским настройкам.
20 Настройка с помощью меню продолжение Настройка параметров “Нaстройка изображения” в режиме“Индивид.” 1 Нажимайте кнопки V или v для выбора “Контрaст” (контpaстность), “Яркость”, “Цветность”, “Оттенок” (тон), “Pезкость” или “Цветовой тон”(выберите значение “Холодный”, “Нейтральный” или “Теплый”), ...
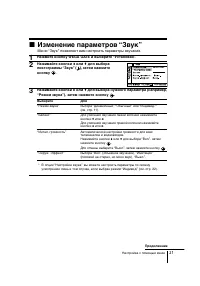
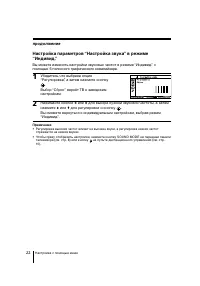
Page 52 - Изменение параметров “Звук”; Меню “Звук” позволяет вам настроить параметры звучания.
21 Настройка с помощью меню x Изменение параметров “Звук” Меню “Звук” позволяет вам настроить параметры звучания. 1 Нажмите кнопку WEGA GATE и выберите “Установки”. 2 Нажимайте кнопки V или v для выбора пиктограммы “Звук” ( ), затем нажмитекнопку . 3 Нажимайте кнопки V или v для выбора нужного парам...
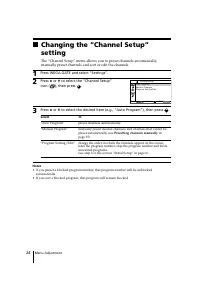
Page 55 - Изменение установок “Настройка каналов”
24 Настройка с помощью меню С помощью меню “Настройка каналов” можно выполнять автоматическую илиручную предварительную настройку каналов, сортировать и редактироватьканалы, а также выполнять предварительную. 1 Нажмите кнопку WEGA GATE и выберите “Установки”. 2 Нажимайте кнопки V или v для выбора пи...
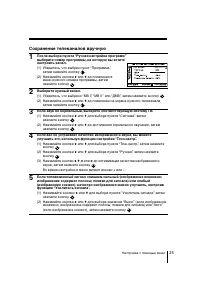
Page 56 - Со; Выберите нужный канал.
25 Настройка с помощью меню Со хранение телеканалов вручную 1 После выбора пункта “Ручная настройка программ”выберите номер программы, на которую вы хотитенастроить канал. (1) Убедитесь, что выбран пункт “Программa”, затем нажмите кнопку . (2) Нажимайте кнопки V или v до появления в меню нужного ном...
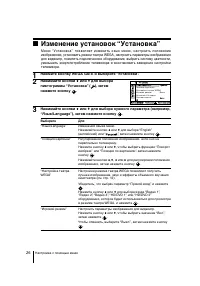
Page 57 - Изменение установок “Установка”
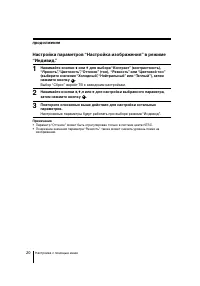
26 Настройка с помощью меню x Изменение установок “Установка” М е н ю “ У с та н о в к а ” п о з в ол я е т и з м е н и т ь я з ы к м е н ю , н а с т р о и т ь п ол оже н и еизображения, установить режим театра WEGA, настроить параметры изображениядля видеоигр, пометить подключенное оборудование, вы...
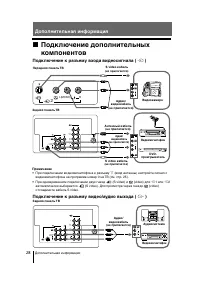
Page 59 - Дополнительная информация
28 Дополнительная информация Аудиосистема Задняя панель ТВ Подключение к разъему видео/aудио выхода ( T ) Аудио/ видеокабель (не прилагается) x Подключение дополнительныхкомпонентов Подключение к разъему входа видеосигнала ( t ) Примечаниe • При подключении видеомагнитофона к разъему 8 (вход антенны...
Page 61 - Устранение неисправностей; Функция “Заводские настр.”
30 Дополнительная информация x Устранение неисправностей При возникновении проблем эксплуатации телевизора можно использовать функцию“Заводские настр.” или обратиться к руководству по поиску и устранению неисправностей,приведенному ниже. Если устранить проблему не удастся, обратитесь к дилеру Sony. ...
Page 63 - ехнические характеристики
x Т ехнические характеристики Требования к источникупитания Потребляемая мощность (Вт) Система ТВ Цветовая система Стерео /двуязычная система Teлeтeкст Покрываемыйдиапазон Телеканалов B/G I D/K M 8 (Антенна) Аудиовыход (колонки) Количество разъёмов (видео) (аудио) (S Video) (компонентное видео) i (н...