Page 2 - Specifications
110-240 V AC, 50/60 Hz Indicated on the rear of the TV B/G, I, D/K, M PAL, PAL 60, SECAM, NTSC3.58, NTSC4.43 NICAM Stereo/Bilingual B/G, I, D/K;A2 Stereo/ Bilingual B/G English, Russian VHF : E2 to E12 /UHF : E21 to E69 /CATV : S01 to S03, S1 to S41 UHF : B21 to B68 /CATV : S01 to S03, S1 to S41 VHF...
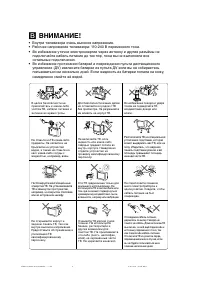
Page 3 - WARNING
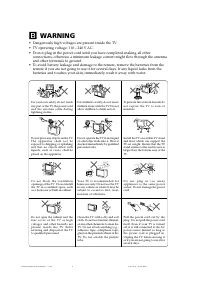
Clean the TV with a dry and softcloth. Do not use benzine, thinner,or any other chemicals to clean theTV. Do not attach anything (e.g.,adhesive tape, cellophane tape,glue) on the painted cabinet of theTV. Do not scratch the picturetube. B WARNING • Dangerously high voltages are present inside the TV...
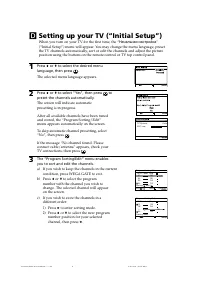
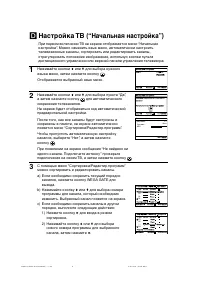
Page 4 - Connect the antenna cable (not supplied) to; Plug in the power cord, then press; Начальная настройкa; Getting Started
b b Insert the batteries (supplied) into the remote. Note • Do not use old or different types of batteries together. Connect the antenna cable (not supplied) to 8 (antenna input) at the rear of the TV. Tips • Your TV can receive both TV and FM radio signals from the appropriate connections through t...
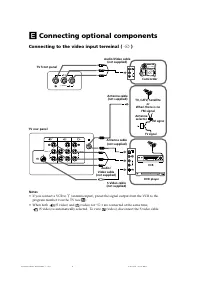
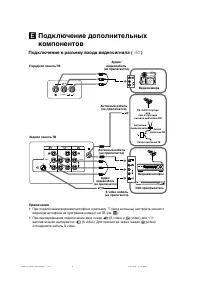
Page 7 - Connecting optional components; Connecting to the video input terminal (
E Connecting optional components Connecting to the video input terminal ( t ) Notes • If you connect a VCR to 8 (antenna input), preset the signal output from the VCR to the program number 0 on the TV (see M ). • When both (S video) and (video) for t 1 are connected at the same time, (S video) is au...
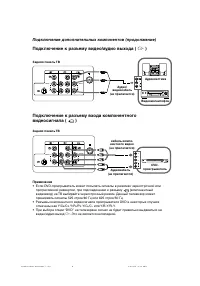
Page 8 - Connecting to the component video input terminal (; Connecting to the monitor output terminal (; Connecting optional components (continued)
DVD player TV rear panel Component video cable (not supplied) Audio cable (not supplied) L R R 1 L Y C B C R (MONO) (MONO) Y R L C R C B Connecting to the component video input terminal ( ) Notes • If your DVD player can output interlace and progressive mode signals, select the interlace output when...
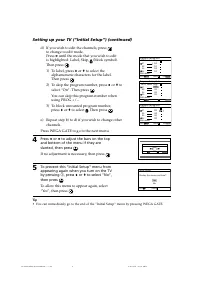
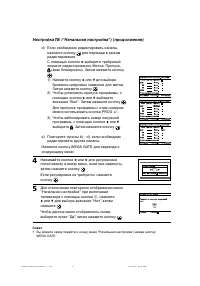
Page 9 - Troubleshooting; “Factory Settings” function; Press the WEGA GATE button. Choose “Settings” and go to “Setup” (
F Troubleshooting If you find any problem while viewing your TV, you can either use the “FactorySettings” function or check the Troubleshooting guide below. If the problempersists, contact your Sony dealer. “Factory Settings” function Press the WEGA GATE button. Choose “Settings” and go to “Setup” (...
Page 11 - qa
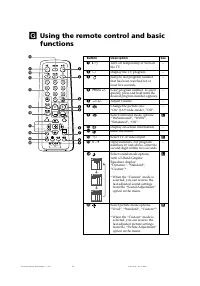
G Using the remote control and basicfunctions TV 1 2 3 4 6 7 8 9 0 5 PROG A / B 1 2 3 7 45 qj qa qd qf qh WEGA GATE 6 89 0 w; ql qg qs RETURN qk Button Description See 1 ? / 1 Turn off temporarily or turn on – the TV. 2 a Display the TV program. – 3 Jump to last program number – that has been watche...
Page 12 - qj; qg; Using the remote control and basic functions (continued)
Button Description See WEGA GATE menu operations 6 Confirm selected items. I 7 WEGA GATE Display or cancel WEGA GATE menu. qj V , v , B , b Select and adjust items. qk RETURN Return to the previous level. Timer operations qg Set TV to turn on automatically according to the – desired period of time (...
Page 13 - TV front panel
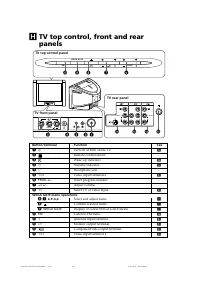
WEGA GATE PROG FM 0 9 8 6 7 L R 2 (MONO) 4 ( R L Y C B C R MONO) qa ( L R 1 MONO) 1 3 L R 2 5 (MONO) qf qs qd 2 TV front panel TV rear panel H TV top control, front and rearpanels TV top control panel Button/Terminal Function See 1 ! Turn off or turn on the TV. C 2 Remote control sensor. - 3 Wake Up...
Page 14 - How to use WEGA GATE
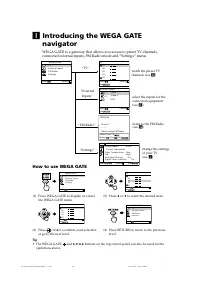
I Introducing the WEGA GATE navigator WEGA GATE is a gateway that allows you access to preset TV channels,connected external inputs, FM Radio mode and “Settings” menu. watch the preset TVchannels (see D ) select the inputs for theconnected equipment(see E ) change the settingsof your TV(see J ) How ...
Page 15 - “Settings” Adjustment; or; “Picture”
J “Settings” Adjustment You are able to change the settings of your TV from “Settings” in WEGA GATEmenu.Press WEGA GATE button to display WEGA GATE menu. Press V or v to select “Settings” and press . The following is an overview of the items that can be adjusted. Confirm End Picture C o l o r T e m ...
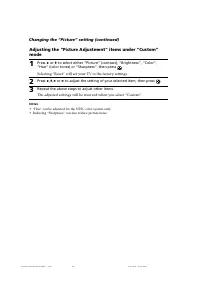
Page 16 - Changing the “Picture” setting; The “Picture” menu allows you to adjust settings below.
K Changing the “Picture” setting The “Picture” menu allows you to adjust settings below. 1 Press WEGA GATE and select “Settings”. 2 Make sure the “Picture” icon ( ) is selected, then press . 3 Press V or v to select the desired item (e.g., “Picture Mode”), then press . Select To “Picture Mode” choos...
Page 17 - Changing the “Picture” setting (continued)
Adjusting the “Picture Adjustment” items under “Custom”mode 1 Press V or v to select either “Picture” (contrast), “Brightness”, “Color”, “Hue” (color tones) or “Sharpness”, then press . Selecting “Reset” will set your TV to the factory settings. 2 Press V , v , B or b to adjust the setting of your s...
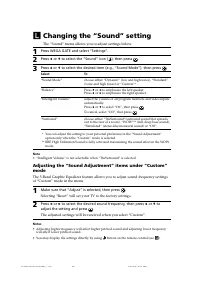
Page 18 - Changing the “Sound” setting; The “Sound” menu allows you to adjust settings below.; Selecting “Reset” will set your TV to the factory settings.
L Changing the “Sound” setting The “Sound” menu allows you to adjust settings below. 1 Press WEGA GATE and select “Settings”. 2 Press V or v to select the “Sound” icon ( ), then press . 3 Press V or v to select the desired item (e.g., “Sound Mode”), then press . Select To “Sound Mode” choose either ...
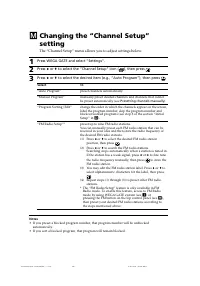
Page 19 - The “Channel Setup” menu allows you to adjust settings below.
M Changing the “Channel Setup”setting The “Channel Setup” menu allows you to adjust settings below. 1 Press WEGA GATE and select “Settings”. 2 Press V or v to select the “Channel Setup” icon ( ), then press . 3 Press V or v to select the desired item (e.g., “Auto Program”), then press . Select To “A...
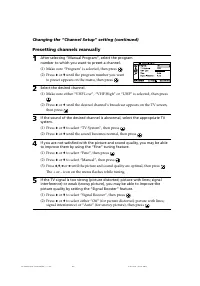
Page 20 - Select the desired channel.; Changing the “Channel Setup” setting (continued)
Presetting channels manually 1 After selecting “Manual Program”, select the programnumber to which you want to preset a channel. (1) Make sure “Program” is selected, then press . (2) Press V or v until the program number you want to preset appears on the menu, then press . 2 Select the desired chann...
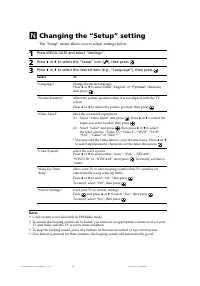
Page 21 - Changing the “Setup” setting; The “Setup” menu allows you to adjust settings below.
N Changing the “Setup” setting The “Setup” menu allows you to adjust settings below. 1 Press WEGA GATE and select “Settings”. 2 Press V or v to select the “Setup” icon ( ), then press . 3 Press V or v to select the desired item (e.g., “Language”), then press . Select To “Language” change the menu la...
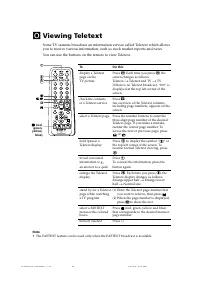
Page 22 - Viewing Teletext; You can use the buttons on the remote to view Teletext.
O Viewing Teletext Some TV stations broadcast an information service called Teletext which allowsyou to receive various information, such as stock market reports and news. You can use the buttons on the remote to view Teletext. To Do this display a Teletext Press . Each time you press , the page on ...
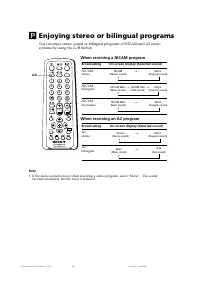
Page 23 - Enjoying stereo or bilingual programs; When receiving a NICAM program; When receiving an A2 program
P Enjoying stereo or bilingual programs You can enjoy stereo sound or bilingual programs of NICAM and A2 stereosystems by using the A/B button. When receiving a NICAM program Broadcasting On-screen display (Selected sound) NICAMstereo NICAMbilingual NICAMmonaural When receiving an A2 program Broadca...
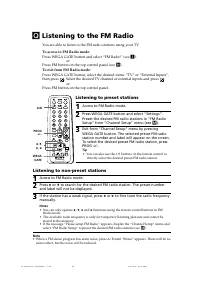
Page 24 - Listening to the FM Radio; To access to FM Radio mode:; Listening to non-preset stations; Listening to preset stations
Q Listening to the FM Radio You are able to listen to the FM radio stations using your TV. To access to FM Radio mode: Press WEGA GATE button and select “FM Radio” (see I ). or Press FM button on the top control panel (see H ). To exit from FM Radio mode: Press WEGA GATE button, select the desired i...
Page 25 - Trinitron Color TV; Инструкция по эксплуатации
Trinitron Color TV © 2006 Sony Corporation KV-AZ212 2-687-422- 12 (1) M91 Инструкция по эксплуатации • Перед работой с устройством внимательно прочтайте инструкциюи сохраните её для дальнейшего использования. RU 01RU01COV-SOEMRus.p65 5/15/07, 2:08 PM 1
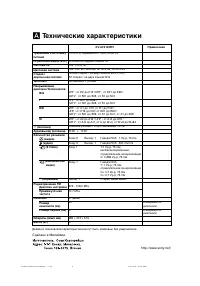
Page 26 - Технические характеристики
A Технические характеристики Требования к источникупитания Потребляемая мощность (Вт) Система ТВ Цветовая система Стерео /двуязычная система Teлeтeкст Покрываемыйдиапазон Телеканалов B/G I D/K M 8 (Антенна) Аудиовыход (колонки) Количество разъёмов (видео) (аудио) (S Video) (компонентное видео) i (на...
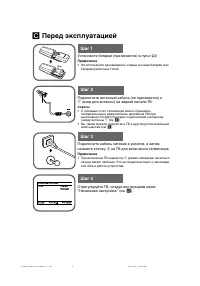
Page 28 - Перед эксплуатацией; Подключите антенный кабель (не прилагается) к; на ТВ для включения телевизора.
b b C Перед эксплуатацией Шаг 1 Шаг 2 Шаг 3 Шаг 4 Установите батареи (прилагаются) в пульт ДУ. Примечание • Не используйте одновременно старые и новые батареи или батареи различных типов. Подключите антенный кабель (не прилагается) к 8 (вход для антенны) на задней панели ТВ. Советы • С помощью этого...
Page 31 - Подключение к разъему входа видеосигнала (
E Подключение дополнительныхкомпонентов Подключение к разъему входа видеосигнала ( t ) Передняя панель ТВ Антенный кабель (не прилагается) Видеомагнитофон Задняя панель ТВ Аудио/ видеокабель (не прилагается) Видеокамера Аудио/ видеокабель (не прилагается) Антенный кабель (не прилагается) ТВ, CATV, С...
Page 32 - Подключение дополнительных компонентов (продолжение); Подключение к разъему видео/aудио выхода (
DVD- проигрыватель Задняя панель ТВ кабель компо- нентного видео (не прилагается) Аудиокабель (не прилагается) Подключение к разъему входа компонентноговидеосигнала ( ) Примечания • Если DVD-проигрыватель может посылать сигналы в режимах чересстрочной или прогрессивной развертки, при подсоединении к...
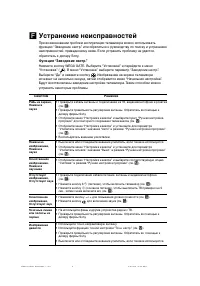
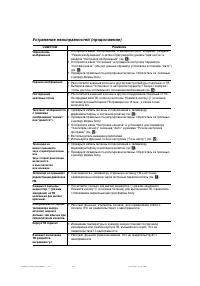
Page 33 - Устранение неисправностей; Функция “Заводские настр.”
F Устранение неисправностей При возникновении проблем эксплуатации телевизора можно использоватьфункцию “Заводские настр.” или обратиться к руководству по поиску и устранениюнеисправностей, приведенному ниже. Если устранить проблему не удастся,обратитесь к дилеру Sony. Функция “Заводские настр.” Наж...
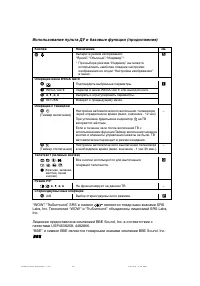
Page 36 - Использование пульта ДУ и базовые функции (продолжение); являются товарными знаками SRS
Кнопка Назначение см. w; Выберите режим изображения: K “Яркий”, “Обычный”, “Индивид.”*. * При выборе режима “Индивид.” вы можете использовать наиболее поздние настройкиизображения из опџии “Нaстройка изображения”в меню. Операции меню WEGA GATE 6 Подтвердить выбранные параметры. I 7 WEGA GATE Переход...
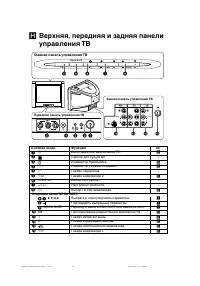
Page 37 - Главная панель управления ТВ
WEGA GATE PROG FM 0 9 8 6 7 L R 2 (MONO) 4 ( R L Y C B C R MONO) qa ( L R 1 MONO) 1 3 L R 2 5 (MONO) qf qs qd 2 H Верхняя, передняя и задняя панелиуправления ТВ Кнопка/Гнездо Функция 1 ! Включение или выключение ТВ. C 2 Сенсор для пульта ДУ. – 3 Индикатор будильника. G 3 1 Индикатор режима ожидания....
Page 38 - Использование WEGA GATE
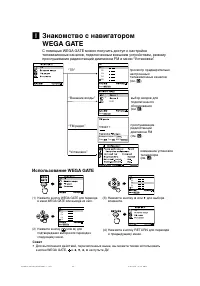
I Знакомство с навигаторомWEGA GATE С помощью WEGA GATE можно получить доступ к настройкетелевизионных каналов, подключенным внешним устройствам, режимупрослушивания радиостанций диапазона FM и меню “Установки”. просмотр предварительнонастроенныхтелевизионных каналов(см. D ) выбор входов дляподключе...
Page 39 - Меню “Установки”; или; “Изображение”
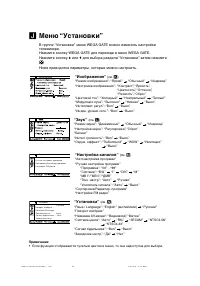
J Меню “Установки” В группе “Установки” меню WEGA GATE можно изменить настройкителевизора.Нажмите кнопку WEGA GATE для перехода в меню WEGA GATE.Нажмите кнопку V или v для выбора раздела “Установки”, затем нажмите . Ниже приводятся параметры, которые можно настроить. “Изображение” (см. K ) “Режим из...
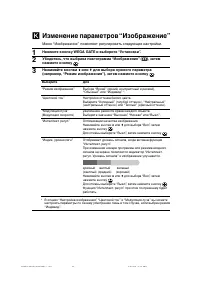
Page 40 - Изменение параметров “Изображение”; Меню “Изображение” позволяет регулировать следующие настройки.
K Изменение параметров “Изображение” Меню “Изображение” позволяет регулировать следующие настройки. 1 Нажмите кнопку WEGA GATE и выберите “Установки”. 2 Убедитесь, что выбрана пиктограмма “Изображение” ( ), затем нажмите кнопку . 3 Нажимайте кнопки V или v для выбора нужного параметра (например, “Ре...
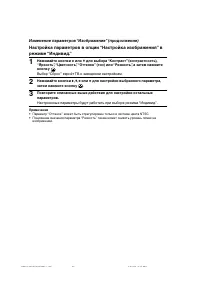
Page 41 - Изменение параметров “Изображение” (продолжение); Выбор “Сброс” вернёт ТВ к заводским настройкам.
Изменение параметров “Изображение” (продолжение) Настройка параметров в опции “Нaстройка изображения” врежиме “Индивид.” 1 Нажимайте кнопки V или v для выбора “Контраст” (контpaстность), “Яркость”, “Цветность”, “Оттенок” (тон) или “Pезкость”, а затем нажмитекнопку . Выбор “Сброс” вернёт ТВ к заводск...
Page 42 - Изменение параметров “Звук”
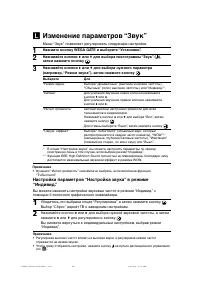
L Изменение параметров “Звук” Меню “Звук” позволяет регулировать следующие настройки. 1 Нажмите кнопку WEGA GATE и выберите “Установки”. 2 Нажимайте кнопки V или v для выбора пиктограммы “Звук” ( ), затем нажмите кнопку . 3 Нажимайте кнопки V или v для выбора нужного параметра (например, “Режим звук...
Page 43 - Изменение установок “Настройка каналов”
Меню “Настройка каналов” позволяет регулировать следующие настройки. 1 Нажмите кнопку WEGA GATE и выберите “Установки”. 2 Нажимайте кнопки V или v для выбора пиктограммы “Настройка каналов” ( ), затем нажмите кнопку . 3 Нажимайте кнопки V или v для выбора желаемого параметра (например, “Aвтонaстройк...
Page 44 - Изменение установок “Настройка каналов” (продолжение); Сохранение телеканалов вручную; Выберите нужный канал.
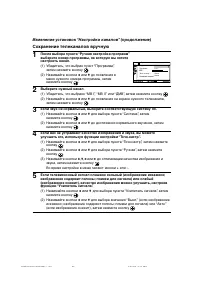
D / K 0 1 Программа: Система:MB IТочн. настр.: Авто Авто Усилитель сигнaлa: Оконч Ручная настройка программ Изменение установок “Настройка каналов” (продолжение) Сохранение телеканалов вручную 1 После выбора пункта “Ручная настройка программ”выберите номер программы, на которую вы хотитенастроить ка...
Page 45 - Изменение установок “Установка”; Меню “Установка” позволяет регулировать следующие настройки.
N Изменение установок “Установка” Меню “Установка” позволяет регулировать следующие настройки. 1 Нажмите кнопку WEGA GATE и выберите “Установки”. 2 Нажимайте кнопки V или v для выбора пиктограммы “Установка” ( ), затем нажмите кнопку . 3 Нажимайте кнопки V или v для выбора нужного параметра (наприме...
Page 46 - Teлeтeкст
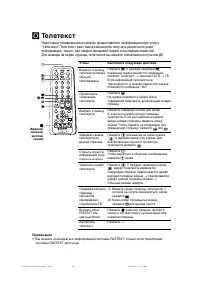
O Teлeтeкст Некоторые телевизионные каналы предоставляют информационную услугу“телетекст”. Teлeтeкст дает вам возможность получать различного родаинформацию, такую, как сводки фондовой биржи и последние известия.Для вывода на экран страниц телетекста вы можете пользоваться пультом ДУ. Чтобы Bывести ...
Page 47 - При приеме программы NICAM
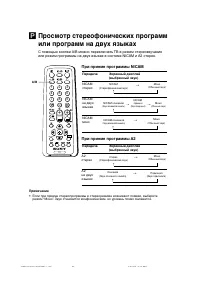
NICAM (Стереофонический звук) Моно (Обычный звук) t t При приеме программы NICAM Передача Экранный дисплей(выбранный звук) NICAMстерео NICAMна двухязыках NICAMмоно При приеме программы A2 Передача Экранный дисплей(выбранный звук) A2стерео A2на двухязыках NICAM oсновной (Звук основного канала) NICAM ...