Page 2 - Safety instructions; Safety and operating instructions
Safety instructions 2 1. Safety and operating instructions THIS MANUAL FORMS AN INTEGRAL PART OF THE APPLIANCE: IT MUST ALW AYS BE KEPT INTACT TOGETHER W ITH THE DISHW ASHER. BEFORE USING THE APPLIANCE, CAREFULLY READ ALL THE INSTRUCTIONS CONTAINED IN THIS MANUAL. INSTALLATION MUST BE PERFORMED BY A...
Page 3 - Contents; EUROPEAN
Contents 3 WARNING: SOME DISHW ASHER DETERGENTS ARE STRONGLY ALKALINE. THEY CAN BE EXTREMELY DANGEROUS IF SW ALLOW ED. AVOID CONTACT W ITH THE SKIN AND EYES AND KEEP CHILDREN AW AY FROM THE DISHW ASHER W HEN THE DOOR IS OPEN. CHECK THAT THE DETERGENT RECEPTACLE IS EMPT Y AFTER COMPLETION OF THE W AS...
Page 5 - User instructions; TECHNIC AL D ATA; 4 Standard place settings; Water supply pressure; See rating plate
User instructions 5 TECHNIC AL D ATA Width 597 599 mm Depth measured flush w ith the outer edge of the control panel Fully integrated: 550 mm Free standing: 584 mm Height (depending on models) from 818 mm to 888 mm from 850 mm to 888 mm Capacity 14 Standard place settings Water supply pressure min...
Page 6 - door hinge area must be covered for safety; special kit; must be purchased from authorised
User instructions 6 2. Installation and hook-up Remove the polystyrene basket retainers. Position the appliance in the desired place of installation. The back or sides of the dishwasher may be placed up against walls or other furniture units. If the dishwasher is installed near a heat source, fit th...
Page 7 - Water supply connection; CONNECTING TO THE WATER SUPPLY; supplied with the dishwasher.; not exceeding; . Supplying the appliance with hot water cuts down the washing time; DRAIN CONNECTION; The free end should be positioned at a height of between
User instructions 7 2.1 Water supply connection Preventing the risk of clogging or damage: if the water pipe is new or has not been used for a long time, before connecting to the water supply check that the water is clear and free of impurities, to prevent damage to the appliance. The dishwasher mus...
Page 8 - Electrical connection and precautions; BRACKET; IF THE APPLIANCE IS PROVIDED WITH A PLUGLESS SUPPLY CORD:; III
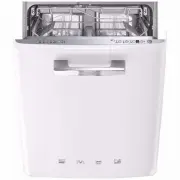
User instructions 8 2.2 Electrical connection and precautions CHECK THAT THE VOLTAGE AND THE FREQUENCY OF THE MAINS MATCH THE RATINGS ON THE NAME PLATE OF THE APPLIANCE POSITIONED ON THE INNER EDGE OF THE DOOR. THE PLUG ON THE SUPPLY CORD AND THE CORRESPONDING SOCKET OUTLET MUST BE OF THE SAME T YPE...
Page 9 - Description of the controls; Upper panel
User instructions 9 3. Description of the controls 3.1 Upper panel All the dishwasher controls are grouped on the upper panel. Switch-on, programming, switch-off, etc. procedures are only possible when the door is open. 1 ON/OFF BUTTON Pressing this button energises the appliance. 2 SELECTED PROGRAM...
Page 11 - SETTING THE WASHING PROGRAM AND SWITCHING ON
User instructions 11 SETTING THE WASHING PROGRAM AND SWITCHING ON To select the most suitable program for the dishes to be washed refer to the table below, which indicates the most appropriate program according to dish type and degree of soiling. After using the table to identify the most appropriat...
Page 12 - PROGRAMS TABLE
User instructions 12 PROGRAMS TABLE PROGRAMM E, NUMBER & SYMBOL LOAD CROCKERY AND CUTLERY PROGRAM PROGRESS DURATION CONSUMPTION MINUT ES (1) WAT ER LITRES POWER KWh (1) 1 SOAK Pans and dishes awaiting completion of the load. Cold prew ash 15 3,5 0,02 2 NORMAL ECO (*) Croc kery and cutlery norm a...
Page 13 - Washing programs; Before starting a washing program make sure that:
User instructions 13 3.2 Washing programs Before starting a washing program make sure that: The water supply tap is open. The softener container contains regenerating salt. The correct amount of detergent has been added to the dispenser. The baskets have been correctly loaded. The spray ar...
Page 14 - Enersave
User instructions 14 ENERSAVE This option can be selected with the wash programme of choice to further reduce energy consumption . This ensures perfect drying and greater control of rinsing temperatures, which can be kept at lower levels for significant energy saving . Enersave is activated automati...
Page 16 - CHANGING THE PROGRAM; TO SAVE ON ENERGY! ... AND PROTECT THE ENVIRONMENT; minute; , because it might cause
User instructions 16 CHANGING THE PROGRAM To change the program in progress, simply open the door and select a new program. When the door is closed the dishwasher will automatically select the new program. TO SAVE ON ENERGY! … AND PROTECT THE ENVIRONMENT Always use the dishwasher with a full load....
Page 18 - Operating instructions; Adjust the water softening system; Using the water softening system; 0 washing cycles; container can hold approximately
User instructions 18 4. Operating instructions Once the dishwasher has been correctly installed, prepare for use as follows: Adjust the water softening system; Add the regenerating salt; Add the rinse aid and detergent. 4.1 Using the water softening system The amount of scale contained in the ...
Page 19 - ADJUSTING THE WATER SOFTENER; The setting can be adjusted using the; PROGRAM SELECTION; . Keep the button pressed until the; WATER HARDNESS; indicate the current setting. Each
User instructions 19 Do not use table salt as it contains insoluble substances which, over time, may damage the water softening system. When necessary, refill the regenerating salt container before starting the washing program. In this way, the excess saline solution will be immediately removed ...
Page 20 - Using the rinse aid and detergent dispensers; detergent
User instructions 20 WATER HARDNESS TABLE WATER HARDNESS SETTINGS German degrees (°dH) French degrees (°dH) 0 – 6 0 – 11 H0 All lights off (no salt) 7 – 10 12 – 18 H1 One light on 11 – 15 19 – 27 H2 Two lights on 16 – 21 28 – 37 H3 Three lights on 22 – 28 38 – 50 H4 Four lights on 29 - 50 51 – 90 H5...
Page 21 - ADDING THE RINSE AID; Open the dispenser by pressing and lifting the tab on the cover.
User instructions 21 ADDING THE RINSE AID The rinse aid helps the dishes dry faster and prevents the formation of scale deposits and staining; it is automatically added to the water during the final rinse cycle, from the container situated on the inner side of the door. To add rinse aid: Open the ...
Page 22 - ADJUSTING THE RINSE AID DISPENSER MODE; Press and hold the; RINSE AID; flashes and the; SELECTED; indicate the current setting.; RINSE AID ADJUSTMENT TABLE
User instructions 22 ADJUSTING THE RINSE AID DISPENSER MODE Press and hold the PROGRAM SELECTION button (3), after about 15" the salt indicator flashes; keep still pressed until the RINSE AID DISPENSER MODE INDICATOR LIGHT (5) flashes and the SELECTED PROGRAM LIGHTS (2) indicate the current sett...
Page 23 - ADDING THE DETERGENT; To open the detergent dispenser cover, lightly press button
User instructions 23 ADDING THE DETERGENT To open the detergent dispenser cover, lightly press button P . Add the detergent or tablet and close the cover by sliding it until it stops, indicated by a click. The dispenser will open automatically during the wash cycle. Only add the detergent (also in t...
Page 24 - General warnings and recommendations
User instructions 24 The introduction of detergent into the rinse aid dispenser, even in liquid form, will damage the dishwasher. 4.3 General warnings and recommendations Before using the dishwasher for the first time, it is advisable to read the following recommendations concerning dish types to be...
Page 26 - Using the baskets; The dishwasher has a capacity of; LOWER BASKET; With fixed supports; BOTTOM BASKET INSERTS
User instructions 26 4.4 Using the baskets The dishwasher has a capacity of 14 place-settings , including serving dishes. LOWER BASKET The lower basket receives the full force of the lower spray arm, and should therefore be used for the “toughest” items with a heavier degree of soiling. All types an...
Page 27 - LOADING THE LOWER BASKET
User instructions 27 LOADING THE LOWER BASKET Carefully load flat plates, soup plates, dessert and serving dishes, positioning them vertically. Pots, pans and their covers must be loaded upside down. When loading soup plates and dessert bowls, be sure to leave a gap between them. Loading examples: U...
Page 29 - EXAMPLES OF LOADING FOR INTENSIVE DIRT; 3 Standard place setting; If the bottom basket inserts are of the fold-down type,
User instructions 29 EXAMPLES OF LOADING FOR INTENSIVE DIRT 13 Standard place setting If the bottom basket inserts are of the fold-down type, they should be laid flat for easier loading.
Page 30 - Cutlery tray; at the
User instructions 30 UPPER BASKET EQUIPMENT (depending on the model) Cutlery tray For knives, spoons (tea and dessert) and long objects. The ends are designed to hold long stemmed glasses. - It can be removed by pressing and pushing the release levers (B) at the same time. - It has to be lowered if ...
Page 31 - Shelves with expandable wings
User instructions 31 Fold-down shelves For mugs, cups and long objects. The ends are designed to hold long stemmed glasses When not used they can be moved to a vertical position (until a click is heard). Shelves with expandable wings For small objects, mugs and cups. They can be used either closed o...
Page 34 - Cleaning and maintenance; ORBIT AL
User instructions 34 5. Cleaning and maintenance Before carrying out any work, always unplug the appliance from the electrical supply or switch off the all-pole disconnection device. 5.1 General warnings and recommendations Avoid the use of acidic or abrasive detergents. Clean the outer surfaces and...
Page 35 - CLEANING THE FILTER UNIT; It is advisable to periodically inspect the centre filter
User instructions 35 CLEANING THE FILTER UNIT It is advisable to periodically inspect the centre filter C and, if necessary, to clean it. To remove the filter, grip the tabs, turn them anticlockwise and lift upwards; push the centre filter D from the underside to remove it from the micro- filter...
Page 36 - Plug the power cord back into the socket.
User instructions 36 BEFORE STARTING THE DISHWASHER AFTER PROLONGED DISUSE: Check that there are no deposits of sludge or rust inside the water pipe: if there are, allow the water to run from the water supply tap for a few minutes. Plug the power cord back into the socket. Reconnect the water ...
Page 37 - there is rinse aid inside the special container
User instructions 37 If the dishes fail to dry or remain dull, check that: there is rinse aid inside the special container; the rinse aid dispenser setting is correct; the detergent used is of good quality and has not lost its effectiveness (for example, through incorrect storage, with the box...
Page 38 - If the door does not close:; - Check the position of the door lock catch; If necessary; , raise it by adjusting the plastic screw; If it has triggered; close the door with force until it resets open and close the door.
User instructions 38 If the door does not close: 1 - Check the position of the door lock catch (D) 2 - If necessary , raise it by adjusting the plastic screw (V) next to the catch. 3 - Check the condition of the lock hook; if it has not triggered (reference N ), the door opens and closes normally. I...
Page 41 - FAULT; Wash motor pump does not work; Light off
User instructions 41 FAULT DESCRIPTION E7 Turbine flow -regulator malfunction (for the relevant models only) The appliance is not able to "measure" the amount of water loaded accurately. Interrupt the program and switch off the dishwasher. Switch the dishwasher back on, program it again and ...