Page 2 - “Conforms with the WEEE Regulations.”
2 Dear User, Our objective is to make this product provide you with the best output which is manufactured in our modern facilities in a careful working environment, in compliance with total quality concept. Therefore, we suggest you to read the user manual carefully before using the product and, kee...
Page 3 - CONTENTS; Maintenance And Cleaning
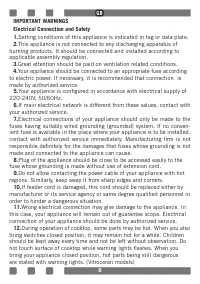
3 CONTENTS Important Warnings 4 Introduction Of The Appliance 6 Control Panel 7 Electrical Connection Scheme 7 Important Warnings 8 If Built-In Oven Is Placed Under Cooktop 10 Installation Of Cookstop 10 Counter Cutting Sizes And Installation Of Your Cooktop 12 Correct Place For Installation 13 Vent...
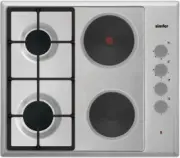
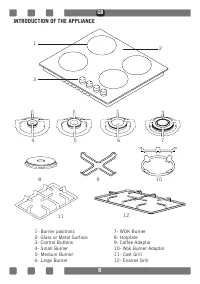
Page 6 - INTRODUCTION OF THE APPLIANCE; - Glass or Metal Surface
6 INTRODUCTION OF THE APPLIANCE 1 2 3 8 4 5 6 7 12 11 9 10 GB 1- Burner positions 2- Glass or Metal Surface 3- Control Buttons4- Small Burner 5- Medium Burner 6- Large Burner 7- WOK Burner8- Hotplate9- Coffee Adaptor10- Wok Burner Adaptor11- Cast Grill12- Enamel Grill
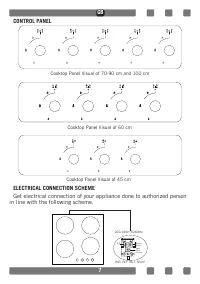
Page 7 - in line with the following scheme.; Cooktop Panel Visual of 60 cm
7 CONTROL PANEL ELECTRICAL CONNECTION SCHEME Get electrical connection of your appliance done to authorized person in line with the following scheme. Cooktop Panel Visual of 70-90 cm and 100 cm Cooktop Panel Visual of 60 cm Cooktop Panel Visual of 45 cm L1 220-240V ~ 50/60Hz H05 VV-F 3G 1.5mm² Earth...
Page 9 - Gas Connection and Safety; cylinder. Affix an edge of the hose on hose; True
9 Gas Connection and Safety 1. For LPG (cylinder) connection, affix metal clamp on the hose coming from LPG cylinder. Affix an edge of the hose on hose inlet connector behind the appliance by pushing to end through heating the hose in boiled water. Afterward, bring the clamp towards end section of t...
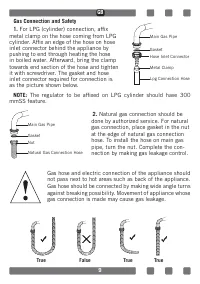
Page 10 - cigarette or similar inflammable matter.; IF BUILT-IN OVEN IS PLACED UNDER COOKTOP; Gas pipe should be affixed in a way not to touch the oven below, sharp; Figure 1
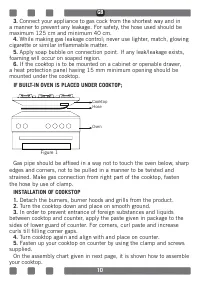
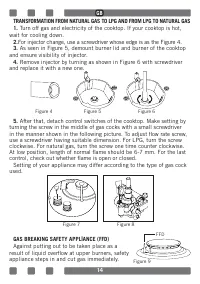
10 3. Connect your appliance to gas cock from the shortest way and in a manner to prevent any leakage. For safety, the hose used should be maximum 125 cm and minimum 40 cm. 4. While making gas leakage control; never use lighter, match, glowing cigarette or similar inflammable matter. 5. Apply soap b...
Page 11 - Figure 2
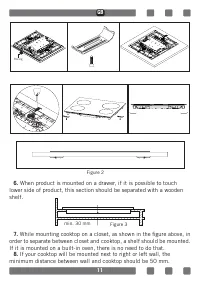
11 6. When product is mounted on a drawer, if it is possible to touch lower side of product, this section should be separated with a wooden shelf. 7. While mounting cooktop on a closet, as shown in the figure above, in order to separate between closet and cooktop, a shelf should be mounted. If it is...
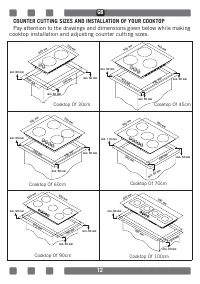
Page 12 - COUNTER CUTTING SIZES AND INSTALLATION OF YOUR COOKTOP; cooktop installation and adjusting counter cutting sizes.; Cooktop Of 30cm
12 COUNTER CUTTING SIZES AND INSTALLATION OF YOUR COOKTOP Pay attention to the drawings and dimensions given below while making cooktop installation and adjusting counter cutting sizes. Cooktop Of 30cm 300 mm 520 mm 490 mm 270 mm min. 60 mm min. 60 mm min. 60 mm Cooktop Of 45cm 520 mm 490 mm 440 mm ...
Page 13 - Room Size; Smaller than 5m3
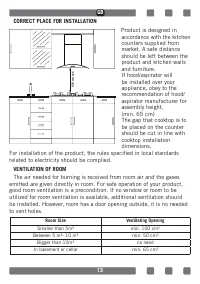
13 CORRECT PLACE FOR INSTALLATION Product is designed in accordance with the kitchen counters supplied from market. A safe distance should be left between the product and kitchen walls and furniture. If hood/aspirator will be installed over your appliance, obey to the recommendation of hood/ aspirat...
Page 15 - ignition at flame
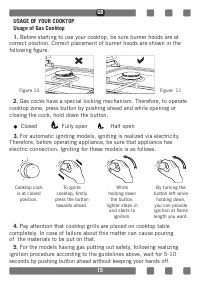
15 USAGE OF YOUR COOKTOPUsage of Gas Cooktop 1. Before starting to use your cooktop, be sure burner hoods are at correct position. Correct placement of burner hoods are shown in the following figure. 2. Gas cocks have a special locking mechanism. Therefore, to operate cooktop zone, press button by p...
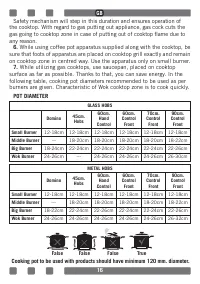
Page 16 - POT DIAMETER; False
16 Safety mechanism will step in this duration and ensures operation of the cooktop. With regard to gas putting out appliance, gas cock cuts the gas going to cooktop zone in case of putting out of cooktop flame due to any reason. 6. While using coffee pot apparatus supplied along with the cooktop, b...
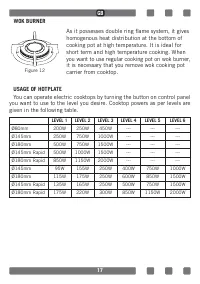
Page 17 - WOK BURNER; As it possesses double ring flame system, it gives; USAGE OF HOTPLATE; given in the following table.
17 WOK BURNER As it possesses double ring flame system, it gives homogenous heat distribution at the bottom of cooking pot at high temperature. It is ideal for short term and high temperature cooking. When you want to use regular cooking pot on wok burner, it is necessary that you remove wok cooking...
Page 18 - MAINTENANCE AND CLEANING; In the course of cleaning your cooktop, never use flammable
18 MAINTENANCE AND CLEANING Before starting to maintenance or cleaning, firstly unplug the plug supplying electricity to cooktop and turn off gas valve. If cooktop is hot, wait for cooling down. 1. For the purpose that your cooktop has long and economic life, regular cleaning and maintenance should ...
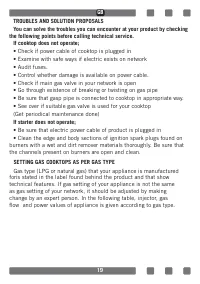
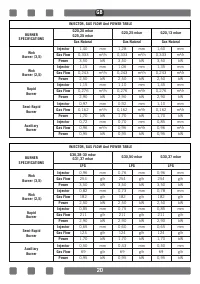
Page 19 - Gas type (LPG or natural gas) that your appliance is manufactured
19 TROUBLES AND SOLUTION PROPOSALSYou can solve the troubles you can encounter at your product by checking the following points before calling technical service. If cooktop does not operate; • Check if power cable of cooktop is plugged in• Examine with safe ways if electric exists on network• Audit ...
Page 21 - ENVIRONMENTALLY-FRIENDLY DISPOSAL; Dispose of packaging in an environmentally-; PACKAGE INFORMATION
21 ENVIRONMENTALLY-FRIENDLY DISPOSAL 1. Dispose of packaging in an environmentally- friendly manner. 2. This appliance is labelled in accordance with European Directive 2012/19/EU concerning used electrical and electronic appliances (waste electrical and electronic equipment - WEEE). The guideline d...
Page 23 - СОДЕРЖАНИЕ
23 СОДЕРЖАНИЕ Важные Предупреждения 24 Описание Прибора 27 Пульты Улраbлehия 28 Схема Электрического Подключения 28 Важные Предупреждения 29 Если Под Плитой Установлена Встроенная Духовка 31 Монтаж Плиты На Место 31 Размеры Места Под Плиту И Установка Плиты 33 Правильное Место Для Монтажа 34 Вентиля...
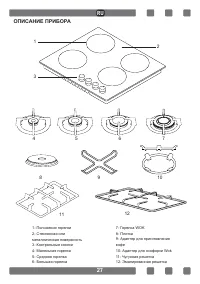
Page 27 - ОПИСАНИЕ ПРИБОРА
27 ОПИСАНИЕ ПРИБОРА 1 2 3 8 4 5 6 7 12 11 9 10 1- Положения горелки2- Стеклянная или металлическая поверхность3- Контрольные кнопки4- Маленькая горелка5- Средняя горелка6- Большая горелка 7- Горелка WOK 8- Плитка9- Адаптер для приготовления кофе10- Адаптер для конфорки Wok11- Чугунная решетка12- Эма...
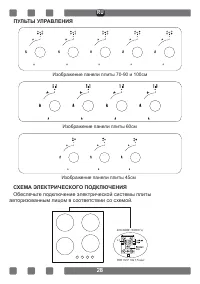
Page 28 - Обеспечьте подключение электрической системы плиты; Изображение панели плиты 60см
28 ПУЛЬТЫ УЛРАBЛEHИЯ СХЕМА ЭЛЕКТРИЧЕСКОГО ПОДКЛЮЧЕНИЯ Обеспечьте подключение электрической системы плиты авторизованным лицом в соответствии со схемой. Изображение панели плиты 70-90 и 100см Изображение панели плиты 60см Изображение панели плиты 45см 220-240B~ 50/60 Гц L1 H05 VV-F 3G 1,5 мм ² RU
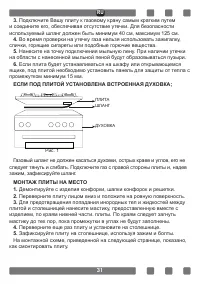
Page 31 - ЕСЛИ ПОД ПЛИТОЙ УСТАНОВЛЕНА ВСТРОЕННАЯ ДУХОВКА
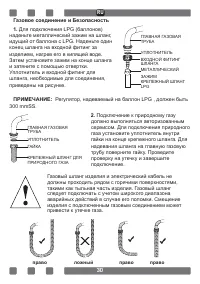
31 3. Подключите Вашу плиту к газовому крану самым кратким путем и соедините его, обеспечивая отсутствие утечки. Для безопасности используемый шланг должен быть минимум 40 см, максимум 125 см. 4. Во время проверки на утечку газа нельзя использовать зажигалку, спички, горящие сигареты или подобные го...
Page 32 - мм
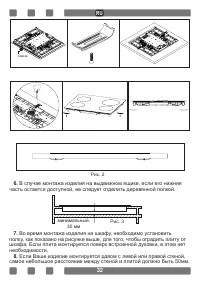
32 6. В случае монтажа изделия на выдвижном ящике, если его нижняя часть остается доступной, ее следует отделить деревянной полкой. 7. Во время монтажа изделия на шкафу, необходимо установить полку, как показано на рисунке выше, для того, чтобы оградить плиту от шкафа. Если плита монтируется поверх ...
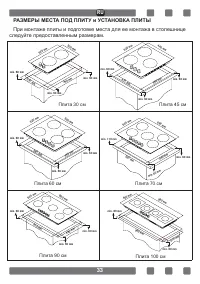
Page 33 - РАЗМЕРЫ МЕСТА ПОД ПЛИТУ и УСТАНОВКА ПЛИТЫ; При монтаже плиты и подготовке места для ее монтажа в столешнице
33 РАЗМЕРЫ МЕСТА ПОД ПЛИТУ и УСТАНОВКА ПЛИТЫ При монтаже плиты и подготовке места для ее монтажа в столешнице следуйте предоставленным размерам. Плита 30 см 300 mm 520 mm 490 mm 270 mm min. 60 mm min. 60 mm min. 60 mm Плита 45 см 520 mm 490 mm 440 mm 410 mm min. 60 mm min. 60 mm min. 60 mm Плита 60 ...
Page 34 - Величина Помещения; не требуется
34 ПРАВИЛЬНОЕ МЕСТО ДЛЯ МОНТАЖА Дизайн изделия разработан в соответствии с доступными на рынке столешницами. Между стенами кухни и мебелью следует оставить безопасное расстояние. Если на верху изделия будет устанавливаться вытяжной колпак/аспиратор, соблюдайте требования изготовителя вытяжного колпа...
Page 35 - FFD
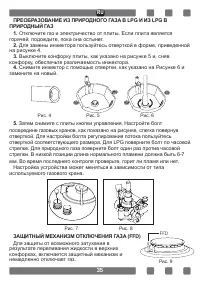
35 ПРЕОБРАЗОВАНИЕ ИЗ ПРИРОДНОГО ГАЗА В LPG И ИЗ LPG В ПРИРОДНЫЙ ГАЗ 1. Отключите газ и электричество от плиты. Если плита является горячей, подождите, пока она остынет. 2. Для замены инжектора пользуйтесь отверткой в форме, приведенной на рисунке 4. 3. Выключите конфорку плиты, как указано на рисунк...
Page 36 - ЭКСПЛУАТАЦИЯ ПЛИТЫ; Закрыто
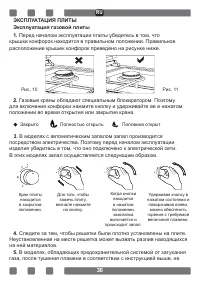
36 ЭКСПЛУАТАЦИЯ ПЛИТЫ Эксплуатация газовой плиты1. Перед началом эксплуатации плиты убедитесь в том, что крышки конфорок находится в правильном положении. Правильное расположение крышек конфорок приведено на рисунке ниже. 2. Газовые краны обладают специальным блокиратором. Поэтому для включения конф...
Page 37 - ДИАМЕТР ГОРШОК
37 отпуская руки от кнопки, удерживайте её в течение 5-10 минут. Защитный механизм вступает в силу в течение этого времени и обеспечит рабочее состояние плиты. Для защиты от затухания газа, в случае затухания пламени плиты по какой-либо причине, газовый кран автоматически отключает газ, поступающий ...
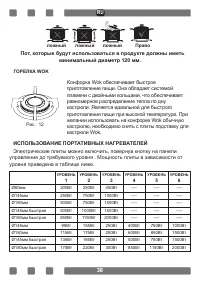
Page 38 - ГОРЕЛКА WOK; ИСПОЛЬЗОВАНИЕ ПОРТАТИВНЫХ НАГРЕВАТЕЛЕЙ; лoжный
38 Пот, которые будут использоваться в продукте должны иметь минимальный диаметр 120 мм. ГОРЕЛКА WOK Конфорка Wok обеспечивает быстрое приготовление пищи. Она обладает системой пламени с двойными кольцами, что обеспечивает равномерное распределение тепла по дну кастрюли. Является идеальной для быстр...
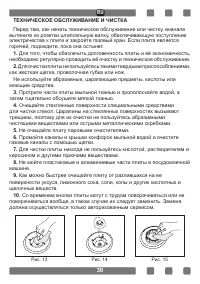
Page 39 - ТЕХНИЧЕСКОЕ ОБСЛУЖИВАНИЕ И ЧИСТКА
39 ТЕХНИЧЕСКОЕ ОБСЛУЖИВАНИЕ И ЧИСТКА Перед тем, как начать техническое обслуживание или чистку, вначале вытяните из розетки штепсельную вилку, обеспечивающую поступление электричества к плите и закройте газовый кран. Если плита является горячей, подождите, пока она остынет. 1. Для того, чтобы обеспе...