Page 2 - Table of contents
3 Table of contents Safety precautions . . . . . . . . . . . . . . . . 5 Your new appliance . . . . . . . . . . . . . . . 7 Burners . . . . . . . . . . . . . . . . . . . . . . . . . 8 Switching on manually . . . . . . . . . . . . . . . . . 8 Switching on automatically . . . . . . . . . . . . . . 8 S...
Page 4 - Safety precautions
5 Safety precautions Read these instructions carefully. Reading these instructions will enable you to use your appliance safely and effectively.All operations relating to installation, regulation and conversion to other types of gas must be carried out by an authorised installation engineer, respect...
Page 6 - Your new appliance
7 Your new appliance 1 Pan supports 2 Control knobs 3 Auxiliary burner (up to 1 kW) 4 Semi-rapid burner (up to 1,75 kW) 5 Rapid burner (up to 3 kW) 6 Double-flame burner (up to 3,3 kW) 7 Triple-flame burner (up to 4 kW) 8 Dual double-flame burner (up to 5 kW) 9 Electric hob 1500 W 1 2 2 9 5 3 3 6 5 ...
Page 9 - Warnings
10 Warnings It is normal to hear a slight whistling noise while the burner is operating.When it is first used, it is normal for the burner to give off odours; this does not pose any risk and does not indicate a malfunction; they will disappear in time.A few seconds after the burner is switched off, ...
Page 11 - Cooking
12 Additional coffee maker support Only for use on the auxiliary burner with pans which are no more than 12 cm in diameter. Cast iron pan support: Code HZ298114. Enamelled iron pan support: Code HZ298114. Simmer Plate This accessory has been designed to reduce the level of heat at the lowest power s...
Page 12 - Electric hobs; Electric hobs with
13 Electric hobs Before using the hob for the first time, heat it up for 5 minutes, set to full power, with no pans placed on it. At this point it is normal to notice smoke and odours, but these will disappear over time. Do not operate the hobs without placing pans on top, except during this initial...
Page 13 - Suggestions
14 Suggestions These suggested settings are intended as a guide only. The power must be increased for:- large quantities of liquid- large quantities of food- cooking using pans without lids Hob with 9 settings Melting: chocolate, butter, gelatine 1-2 Cooking: rice, white sauce and ragout 2-3 Cooking...
Page 14 - Precautions for use
15 Precautions for use The following advice is intended to help you save energy and prevent pan damage: Use pans which are the right size for each burner.Do not use small pans on large burners. The flame should not touch the sides of the pan. Do not use damaged pans, which do not sit evenly on the h...
Page 15 - Cleaning and maintenance; Cleaning
16 Cleaning and maintenance Cleaning Once the appliance is cool, use a sponge to clean it with soap and water.After each use, clean the surface of the respective burner parts once they have cooled down. If any residue is left (baked-on food, drops of grease etc.), however little, it will become stuc...
Page 16 - Faults
17 Faults Sometimes certain faults detected can be easily resolved. Before calling the Technical Assistance Service, bear in mind the following advice: Fault Possible cause Solution The general electrical system is malfunctioning. Defective fuse. The automatic safety switch or circuit breaker has tr...
Page 17 - Technical Assistance Service; Warranty conditions; Used appliances and packaging
18 Technical Assistance Service When contacting our Technical Assistance Service, please provide the product number (E-No.) and production number (FD) of the appliance. This information is given on the specifications plate located on the lower section of the hob and on the label in the user manual. ...
Page 18 - Indice
19 Indice Indicazioni di sicurezza . . . . . . . . . . . . . 21 Il suo nuovo apparecchio . . . . . . . . . . . 23 Bruciatori . . . . . . . . . . . . . . . . . . . . . . . . . 24 Accensione manuale . . . . . . . . . . . . . . . . . 24 Accensione automatica . . . . . . . . . . . . . . . 24 Sistema di ...
Page 20 - Indicazioni di sicurezza
21 Indicazioni di sicurezza Leggere attentamente le presenti istruzioni. Ciò le consentirà di manipolare e usare l'apparecchio in modo sicuro ed efficace.Tutte le operazioni di installazione, regolazione e adattamento a un diverso tipo di gas devono essere effettuate da un tecnico autorizzato, nel r...
Page 22 - Il suo nuovo apparecchio
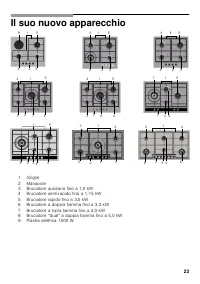
23 Il suo nuovo apparecchio 1 Griglie 2 Manopole 3 Bruciatore ausiliario fino a 1,0 kW 4 Bruciatore semi-rapido fino a 1,75 kW 5 Bruciatore rapido fino a 3,0 kW 6 Bruciatore a doppia fiamma fino a 3,3 kW 7 Bruciatore a tripla fiamma fino a 4,0 kW 8 Bruciatore “dual ″ a doppia fiamma fino a 5,0 kW 9 ...
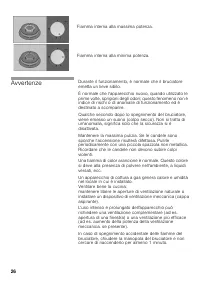
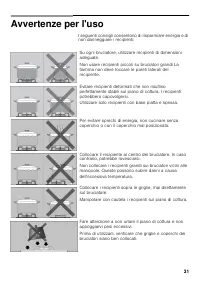
Page 25 - Avvertenze
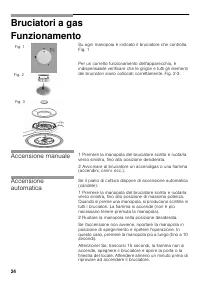
26 Avvertenze Durante il funzionamento, è normale che il bruciatore emetta un lieve sibilo.È normale che l'apparecchio nuovo, quando utilizzato le prime volte, sprigioni degli odori; questo fenomeno non è indice di rischi o di anomalie di funzionamento ed è destinato a scomparire.Qualche secondo dop...
Page 27 - Consigli per la cottura
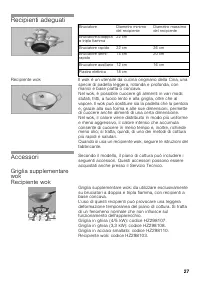
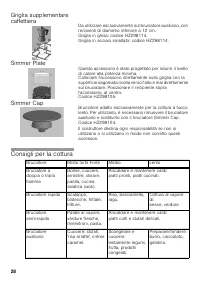
28 Griglia supplementare caffettiera Da utilizzare esclusivamente sul bruciatore ausiliario, con recipienti di diametro inferiore a 12 cm. Griglia in ghisa: codice HZ298114. Griglia in acciaio smaltato: codice HZ298114. Simmer Plate Questo accessorio è stato progettato per ridurre il livello di calo...
Page 28 - Piastre elettriche; Piastre elettriche con
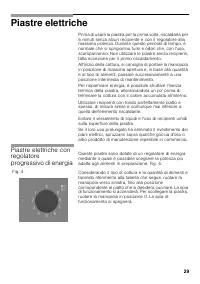
29 Piastre elettriche Prima di usare la piastra per la prima volta, riscaldarla per 5 minuti senza alcun recipiente e con il regolatore alla massima potenza. Durante questo periodo di tempo, è normale che si sprigionino fumi e odori che, con l'uso, scompariranno. Non utilizzare le piastre senza reci...
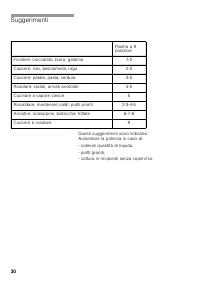
Page 29 - Suggerimenti
30 Suggerimenti Questi suggerimenti sono indicativi. Aumentare la potenza in caso di:- notevoli quantità di liquido,- piatti grandi,- cottura in recipienti senza coperchio. Piastra a 9 posizioni Fondere: cioccolato, burro, gelatina 1-2 Cuocere: riso, besciamella, ragù 2-3 Cuocere: patate, pasta, ver...
Page 31 - Pulizia e manutenzione; Pulizia
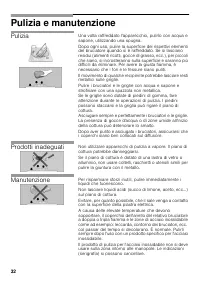
32 Pulizia e manutenzione Pulizia Una volta raffreddato l'apparecchio, pulirlo con acqua e sapone, utilizzando una spugna.Dopo ogni uso, pulire la superficie dei rispettivi elementi del bruciatore quando si è raffreddato. Se si lasciano residui (alimenti ricotti, gocce di grasso, ecc.), per piccoli ...
Page 32 - Anomalie
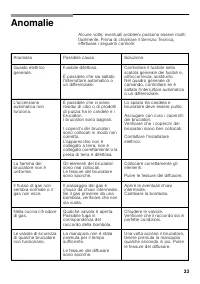
33 Anomalie Alcune volte, eventuali problemi possono essere risolti facilmente. Prima di chiamare il Servizio Tecnico, effettuare i seguenti controlli: Anomalia Possibile causa Soluzione Guasto elettrico generale. Fusibile difettoso. È possibile che sia saltato l'interruttore automatico o un differe...
Page 33 - Servizio di assistenza tecnica; Condizioni di garanzia; Imballaggio e apparecchi usati
34 Servizio di assistenza tecnica In caso di richiesta di intervento del nostro Servizio Tecnico, fornire il codice del prodotto (E-Nr.) e il codice di fabbricazione (FD) dell'apparecchio. Queste informazioni sono riportate sulla targa identificativa, situata nella parte inferiore del piano di cottu...
Page 34 - Contenido
35 Contenido Indicaciones de seguridad . . . . . . . . . . . 37 Su nuevo aparato . . . . . . . . . . . . . . . . . . 39 Quemadores . . . . . . . . . . . . . . . . . . . . . . . . 40 Encendido manual . . . . . . . . . . . . . . . . . . . . . . 40 Encendido automático . . . . . . . . . . . . . . . . ....
Page 36 - Indicaciones de seguridad
37 Indicaciones de seguridad Lea atentamente estas instrucciones. Sólo entonces podrá manejar su aparato de manera efectiva y segura.Todos los trabajos de instalación, regulación y adaptación a otro tipo de gas deben ser realizados por un técnico autorizado, respetando la normativa y legislación apl...
Page 38 - Su nuevo aparato
39 Su nuevo aparato 1 Parrillas 2 Mandos 3 Quemador auxiliar de hasta 1 kW 4 Quemador semi-rápido de hasta 1,75 kW 5 Quemador rápido de hasta 3 kW 6 Quemador de doble llama de hasta 3,3 kW 7 Quemador de triple llama de hasta 4 kW 8 Quemador de doble llama dual de hasta 5 kW 9 Placa eléctrica 1500 W ...
Page 41 - Advertencias
42 Advertencias Durante el funcionamiento del quemador, es normal que se escuche un leve silbido.En los primeros usos es normal que se desprendan olores, esto no supone ningún riesgo, ni mal funcionamiento, irán desapareciendo.Unos segundos después del apagado del quemador se producirá un sonido (go...
Page 43 - Consejos de
44 Parrilla supletoria cafetera Para utilizar exclusivamente en el quemador auxiliar con recipientes de diámetro inferior a 12 cm. Parrilla hierro fundido: código HZ298114. Parrilla acero esmaltada: código HZ298114. Simmer Plate Este accesorio ha sido diseñado para reducir el nivel de calor en la po...
Page 44 - Placas eléctricas; Placas eléctricas con
45 Placas eléctricas Antes de usar la placa por primera vez, caliéntela durante 5 minutos sin ningún recipiente sobre ella y con el regulador a la máxima potencia. Durante este periodo de tiempo es normal el desprendimiento de humo y de olores, que con el uso irá desapareciendo. Excepto durante este...
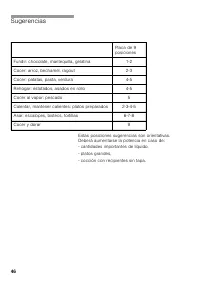
Page 45 - Sugerencias
46 Sugerencias Estas posiciones sugerencias son orientativas. Deberá aumentarse la potencia en caso de:- cantidades importantes de líquido,- platos grandes,- cocción con recipientes sin tapa. Placa de 9 posiciones Fundir: chocolate, mantequilla, gelatina 1-2 Cocer: arroz, bechamel, ragout 2-3 Cocer:...
Page 46 - Advertencias de uso
47 Advertencias de uso Los siguientes consejos le ayudarán a ahorrar energía y a evitar daños en los recipientes: Utilice recipientes de tamaño apropiado a cada quemador.No utilice recipientes pequeños en quemadores grandes. La llama no debe tocar los laterales del recipiente. No utilice recipientes...
Page 47 - Limpieza
48 Limpieza y mantenimiento Limpieza Una vez frío el aparato, límpielo con una esponja, agua y jabón.Después de cada uso, limpie la superficie de los respectivos elementos del quemador una vez que se haya enfriado. Si se dejan restos (alimentos recocidos, gotas de grasa, etc.), por poco que sea, se ...
Page 48 - Anomalías
49 Anomalías En ocasiones, las anomalías detectadas se pueden solucionar fácilmente. Antes de llamar al Servicio Técnico tenga en cuenta los siguientes consejos: Anomalía Posible causa Solución El funcionamiento eléctrico general está averiado. Fusible defectuoso. El automático o un diferencial ha s...
Page 49 - Servicio de asistencia técnica; Condiciones de
50 Servicio de asistencia técnica Si se solicita nuestro Servicio Técnico, se debe facilitar el número de producto (E-Nr.) y el número de fabricación (FD) del aparato. Esta información figura en la placa de características, situada en la parte inferior de la placa de cocción, y en la etiqueta del ma...
Page 50 - çindekiler
51 İ çindekiler Güvenlik önerileri . . . . . . . . . . . . . . . . . . 53 Yeni cihaz ı n ı z . . . . . . . . . . . . . . . . . . . . . 55 Brülörler . . . . . . . . . . . . . . . . . . . . . . . . . 56 Manuel çakmak . . . . . . . . . . . . . . . . . . . . . 56 Otomatik çakmak . . . . . . . . . . . . ...
Page 52 - Güvenlik önerileri
53 Güvenlik önerileri Talimatlar ı dikkatle okuyunuz. Ancak bu ş ekilde cihaz ı n etkin ve güvenli kullan ı m ı mümkün olacakt ı r. Bütün kurulum, ayarlama ve gaz tipine göre uyarlama i ş lemleri yetkili bir teknisyen taraf ı ndan, ülkedeki standartlara ve yürürlükteki kanuni yönergelere ve yerel el...
Page 54 - Yeni cihaz
55 Yeni cihaz ı n ı z 1 Izgaralar 2 Kumanda dü ğ meleri 3 1,0 kW'a kadar yard ı mc ı brülör 4 1,75 kW'a kadar orta-h ı zl ı brülör 5 3,0 kW'a kadar h ı zl ı brülör brülör 6 3,3 kW'a kadar çift alevli brülör 7 4,0 kW'a kadar üç alevli brülör 8 5,0 kW'a kadar çift alevli brülörlerin ikili olmas ı 9 15...
Page 55 - r konumu; Manuel çakmak
56 Gaz brülörleri Haz ı r konumu Hangi brülörün hangi kumanda dü ğ mesi taraf ı ndan çal ı ş t ı r ı ld ı ğ ı n ı belirten göstergeler vard ı r. Ş ekil 1 Cihaz ı n do ğ ru çal ı ş t ı r ı labilmesi için ı zgaralar ı n ve tüm brülör parçalar ı n ı n do ğ ru yerle ş tirildi ğ inden emin olunmal ı d ı ...
Page 59 - Pi
60 Simmer Plate Bu aksesuar en dü ş ük güçle s ı cakl ı k seviyesini azaltmak amac ı yla tasarland ı . Aksesuar ı do ğ rudan tepelik k ı s ı mlar ı yukar ı bakacak ş ekilde ı zgaran ı n üzerine yerle ş tiriniz, asla do ğ rudan brülör üzerine yerle ş tirmeyiniz. Kab ı aksesuar ı ortalayacak ş ekilde ...
Page 60 - Elektrikli Plakalar; Kesintisiz enerji
61 Elektrikli Plakalar Plakay ı ilk kullan ı mdan önce kumanda dü ğ mesini en yüksek ı s ı seviyesine getirip 5 dakika boyunca üzerinde herhangi bir kap koymadan bekletiniz. Bu süre boyunca duman ve kokular ı n yay ı lmas ı normaldir. Kullan ı ld ı kça bu durum ortadan kalkacakt ı r. Bu ilk ı s ı tm...
Page 61 - Öneriler
62 Öneriler Önerilen pozisyonlar yol göstericidir. A ş a ğ ı daki durumlarda ate ş i yükseltmek gerekebilir: - bol miktarlarda s ı v ı kullan ı larak pi ş irme yap ı ld ı ğ ı nda, - büyük porsiyonlarda, -kapaks ı z kaplarla pi ş irme yap ı ld ı ğ ı nda. 9 konumlu plaka Eritme: Çikolata, tereya ğ ı ,...
Page 63 - Temizlik ve bak; Temizlik
64 Temizlik ve bak ı m Temizlik Cihaz so ğ uduktan sonra sünger, sabun ve su ile temizleyiniz.Her kullan ı mdan sonra, so ğ umalar ı n ı n ard ı ndan ilgili brülör elemanlar ı n ı n yüzeyini temizleyiniz. Ne kadar az da olsa yüzey üzerinde art ı k (ta ş m ı ş yemek, ya ğ damlalar ı vb.) b ı rak ı lm...
Page 64 - Beklenmeyen durumlar
65 Beklenmeyen durumlar Beklenmeyen durumlar bazen kolayl ı kla çözülebilir. Teknik Servis'i aramadan önce a ş a ğ ı daki önerileri dikkate al ı n ı z: Beklenmeyen durum Olas ı neden Çözüm Genel elektrik fonksiyonu çal ı ş m ı yor. Sigorta ar ı zas ı . Otomatik sigorta att ı veya ş alter indi. Genel...
Page 65 - Garanti ko; Ambalaj ve kullan
66 Teknik Bak ı m Servisi Teknik Servisimize ihtiyac ı n ı z varsa cihaz ı n ürün numaras ı n ı (E-Nr.) ve üretim numaras ı n ı (FD) vermeniz gerekecektir. Bu bilgiyi pi ş irme tezgah ı n ı n iç k ı sm ı nda yer alan özellikler plakas ı n ı n üzerinde ve kullan ı m k ı lavuzunun etiketinde bulabilir...